Connecting DJI Drones with Azure IoT Hub
1. Introduction
In this tutorial, we will show how to connect DJI drones with Azure IoTHub by Azure IoTHub Device Client SDK. The full project information can be found here: https://www.hackster.io/JiongShi/azure-cloud-services-for-dji-drones-d8d3a3. You can download the sample project from my Github page: https://github.com/shijiong/AzureCloudService4DJI. We use DJI Mavic Air as an example to demonstrate this demo.
2. Register as a DJI Developer
Register for a DJI Developer account here: Link.
During the registration process, email information and a credit card or phone number will need to be supplied to verify registration. Any credit card information given will only be used for verification and will not be charged. In this tutorial, we use Visual Studio 2019 Community with Windows 10 SDK (Version 1903).
3. Generate an App Key
Every application needs a unique App Key to initialize the SDK. To create an App Key for an application, go to the DJI developer User Center.
• Select the "Apps" tab on the left.
• Select the "Create App" button on the right.
• Enter the name, platform, package identifier, category and description of the application.
• An application activation email will be sent to complete App Key generation.
• The App Key will appear in the user center, and can be copied and pasted into the application.
4. Create a Basic Camera Application
Firstly, we can create a basic camera application according to the DJI’s official document: https://developer.dji.com/document/868bd800-1fc0-4f9e-a420-b7524a088909. We will learn how to use DJI Windows SDK to show the FPV (First Person View) from the aircraft's camera and control the camera to shoot photo and record video. The App Key will be used in this step.
5. Install Device SDK for Azure IoT Hub
Right click the project, choose “Manage NuGet Packages”. Type “Microsoft.Azure.Devices.Client” in the search bar, you will see the available packages in the list. Choose the package and install it.
6. Get Sensor Data of the Drone
By leveraging the Windows SDK, we can get the sensor data of the drone. In this demo, we will fetch the 3-axis velocities of the aircraft. First of all, we can create a class named DroneEntity to facilitate the development of the data.
01.public class  DroneEntity : TableEntity
02.{
03.        public DroneEntity()
04.        {
05.            this.PartitionKey = "DJIMavicAir";
06.            this.RowKey = Guid.NewGuid().ToString();
07.
08.            MeasurementTime = System.DateTime.Now;
09.            VelocityX = 0;
10.            VelocityY = 0;
11.            VelocityZ = 0;
12.
13.        }
14.        public System.DateTime MeasurementTime { get; set; }
15.        public double  VelocityX { get; set; }
16.        public double  VelocityY { get; set; }
17.        public double  VelocityZ { get; set; }
18.}
Then, we add VelocityChanged listener after the code of registering app successfully as follows.
1.//set the VelocityChanged event
2.DJISDKManager.Instance.ComponentManager.GetFlightControllerHandler(0, 0).VelocityChanged += OnVelocityChanged;
3.                    var typeVelocity = await DJISDKManager.Instance.ComponentManager.GetFlightControllerHandler(0, 0).GetVelocityAsync();
4.                    OnVelocityChanged(this, typeVelocity.value);
Afterwards, we can add the following code in MainPage.xaml.cs. Here we intend to update the global variable velocityX, velocityY and velocityZ by the latest sensor data, as well as to refresh the sensor data that displayed on the MainPage.
01.private async void OnVelocityChanged(object sender, Velocity3D? value)
02.{
03.    if (value != null)
04.    {
05.
06.        aircraftVelocity3D = value.Value;
07.        velocityX = aircraftVelocity3D.x;
08.        velocityY = aircraftVelocity3D.y;
09.        velocityZ = aircraftVelocity3D.z;
10.        //Must in UI Thread
11.        await Dispatcher.RunAsync(Windows.UI.Core.CoreDispatcherPriority.Normal, async () =>
12.        {
13.            VelocityXTB.Text = velocityX.ToString() + "m/s";
14.            VelocityYTB.Text = velocityY.ToString() + "m/s";
15.            VelocityZTB.Text = velocityZ.ToString() + "m/s";
16.        });
17.    }
18.}
7. Upload the data to the Azure IoT Hub
Since we now get the real-time 3-axis velocities of the aircraft, we can upload the data to Azure IoT Hub. If you haven’t created Azure IoT Hub and the corresponding device, you can refer to Step 3 and Step 4 of this tutorial: https://www.hackster.io/JiongShi/azure-cloud-services-for-dji-drones-d8d3a3. In order to upload the data, we shall import the connection string and declare it in MainPage.xaml.cs as follows.
1.private const string connectionstring = "HostName=*****.azure-devices.net;DeviceId=DJIMavicAir;SharedAccessKey=***=";
Then, we will add a Button, by which the user can start the uploading process. In the Click event of the button, we will implement a ThreadPoolTimer to upload the data every 5 seconds as follows.
1.private void  IoTButton_Click(object sender, RoutedEventArgs e)
2.{
3.            timerIotHubTransfer = ThreadPoolTimer.CreatePeriodicTimer(dataIoTHubTick, TimeSpan.FromMilliseconds(Convert.ToInt32(5000)));
4.}
And furthermore, the timer elapsed handler, dataIoTHubTick, is defined as
01.private async void dataIoTHubTick(ThreadPoolTimer timer)
02.{
03.            try
04.            {
05.                // Create a new customer entity.
06.                DroneEntity ent = new  DroneEntity();
07.
08.                ent.MeasurementTime = System.DateTime.Now;
09.                ent.VelocityX = velocityX;
10.                ent.VelocityY = velocityY;
11.                ent.VelocityZ = velocityZ;
12.
13.                String JsonData = Serialize(ent);
14.                await SendDataToAzureIoTHub(JsonData);
15.            }
16.            catch (Exception ex)
17.            {
18.                MessageDialog dialog = new  MessageDialog("Error sending to IoTHub: "  + ex.Message);
19.                await dialog.ShowAsync();
20.            }
21.}
The SendDataToAzureIoTHub is defined as
01.private async Task SendDataToAzureIoTHub(string text)
02.{
03.            try
04.            {
05.                var msg = new  Message(Encoding.UTF8.GetBytes(text));
06.
07.                await deviceClient.SendEventAsync(msg);
08.            }
09.            catch (Exception e)
10.            {
11.                Debug.WriteLine(e.ToString());
12.            }
13.}
Now, once the app runs, you will see the 3-axes velocities on the screen, as shown in Fig. 1.
Fig. 1 Real time 3-axes Velocities
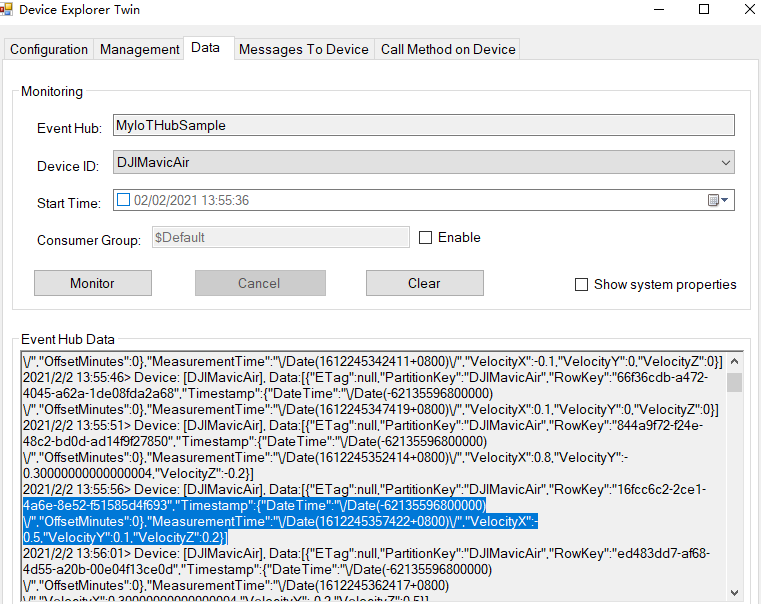
After clicking the “Upload to Azure IoTHub” button, the data will be transmitted to Azure IoTHub every 5 seconds. The data can be captured by Device Explorer as follows.
Fig. 2 Azure IoT Data Captured by Device Explorer
Summary
In this tutorial, we showed the steps to connect your drones with Azure IoT Hub. You can obtain the on-board sensor data and upload to Azure IoT Hub periodically.
Resources
- Azure Cloud Services for DJI Drones: https://www.hackster.io/JiongShi/azure-cloud-services-for-dji-drones-d8d3a3
- Source Code: https://github.com/shijiong/AzureCloudService4DJI
- DJI Windows SDK: https://developer.dji.com/windows-sdk/
See Also
1. Connecting DJI Drones with Azure Table Storage: https://social.technet.microsoft.com/wiki/contents/articles/54263.connecting-dji-drones-with-azure-table-storage.aspx
2. Connecting DJI Drones with Azure Cognitive Services: https://social.technet.microsoft.com/wiki/contents/articles/54265.connecting-dji-drones-with-azure-cognitive-services.aspx

