BizTalk Server 2020: Set up and Install Prerequisites
Introduction
This article provides prerequisites details, how to setup, install and configure softwares for BizTalk Server 2020. Setup, installation and configuration part is similar like old version of BizTalk server, but her we'll provide you the steps in details with screen-shots. We have divided steps in 2 categories, in first category we'll see the mandatory steps that need to follow to setup BizTalk Server 2020 and in second category, we'll see optional steps that need to follow.
Mandatory Steps
Step 1. Join the Administrators Group
BizTalk Server installation and configuration requires user to part of administration group. To make this happen we have to add user in local Administrators group that are administering the BizTalk Server. Below are the steps that need follow,
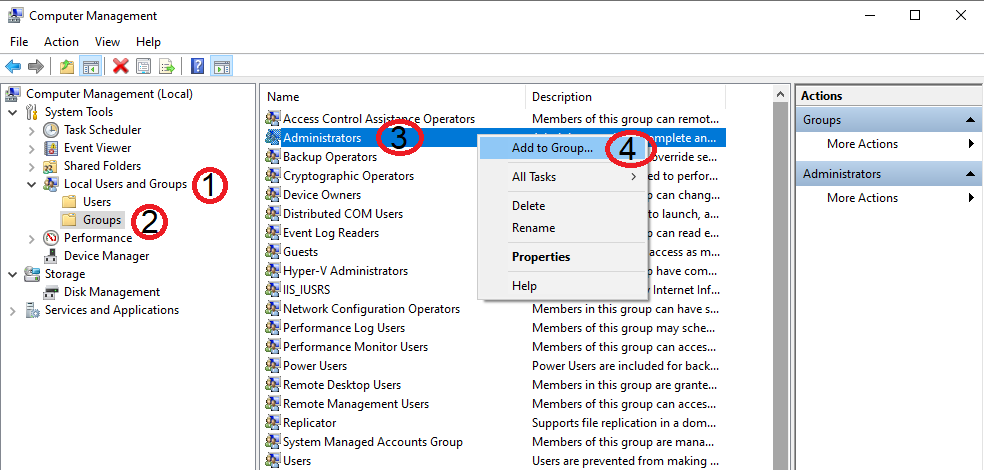
- Open Run command and type 'compmgmt.msc', it will open Computer Management.
- Expand Local Users and Groups, and select Groups.
- Right-click the Administrators group, and select Add to Group. Add user account, and select OK to save changes.
Step 2. Enable Network DTC Access
If have a separate server for BizTalk and SQL then we have to enable Network DTC Access on BizTalk Server and SQL Server. Below are steps that need to follow to enable it,
Open Run command and type 'dcomcnfg', it will open Component Services.
Expand Computers, expand My Computer, and expand Distributed Transaction Coordinator
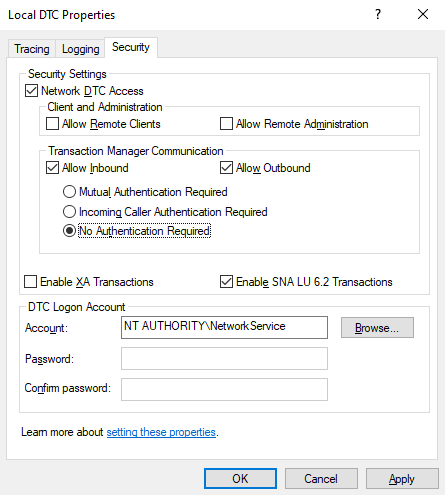
Go to the Security tab and configure following,
- Network DTC Access should be checked
- Allow Inbound and Allow Outbound should be checked
- No Authentication Required should be checked
It will prompted to restart MS DTC, please select Yes.
Step 3. Install Windows Updates
This is a mandatory steps to install all the critical windows updates before you install BizTalk Server. Click on Start menu and go to Windows Update, and check for updates. After installing all updates you need to restart the computer. Your system should look like below if you are using Windows10.
Step 4. Install Visual C++ 2015-2019 redistributable package
Download and install below package from Microsoft support page, or, you can check all latest supported versions, The latest supported Visual C++ downloads
- Visual C++ 2015-2019 redistributable package - x86
- Visual C++ 2015-2019 redistributable package - x64
Step 5. Install Microsoft OLE DB Driver for SQL Server
Download and install the Microsoft OLE DB Driver for SQL Server from below link.
Microsoft OLE DB Driver for SQL Server
Step 6. Enable IIS
To enable IIS on BizTalk server requires below steps, please follow it,
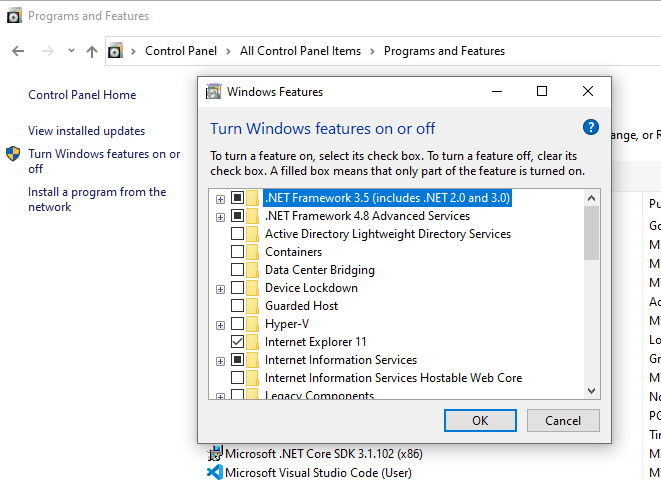
- Open Run command and type 'Control Panel', it will open Control Panel.
- Now select Programs and Features and open it.
- In left panel, we'll see Turn Windows Features on or off, and open, it will open new window.
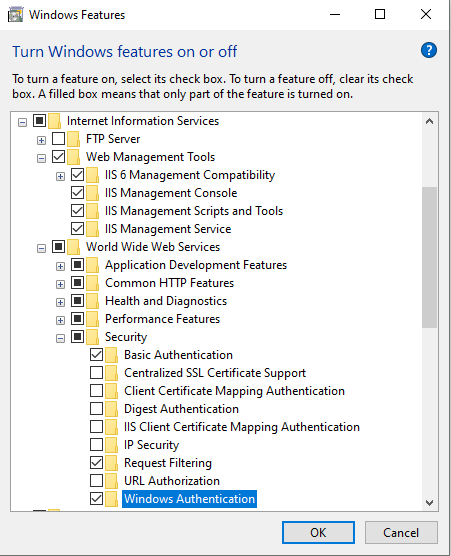
Select Internet Information Services and checked below options,
- IIS 6 Management Compatibility
- IIS 6 Management Console
- IIS 6 Scripting Tools (Installs adsutil.vbs)
- IIS Metabase and IIS 6 configuration compatibility
- IIS Management Console
Now select World Wide Web Services and expand Security, checked below options,
- Basic Authentication
- Windows Authentication
Complete the installation, and restart the computer if it ask.
Step 7. Install SQL Server 2016 Analysis Services ADOMD.NET
We can download and install x86 and x64 SQL_AS_ADOMD from below link,
Microsoft SQL Server 2016 Feature Pack download
Step 8. Install SQL Server
SQL Server is very important to install and configure BizTalk server, based on the requirement we can install this on same server or separate server.
After installation, please restart the computer if prompted.
Important Note:
- Microsoft doesn't recommend to use SQL Server Express Edition because this edition does not include certain features needed by BizTalk Server.
- It supports SQL Standard Edition but to use BAM real-time aggregation install SQL Server Enterprise Edition. BAM real-time aggregation (RTA) is not supported in the Standard Edition.
- BizTalk Server supports all case-sensitive and case-insensitive SQL Server collations except for binary collations. Binary collations are not supported.
Step 9. Disable Shared Memory
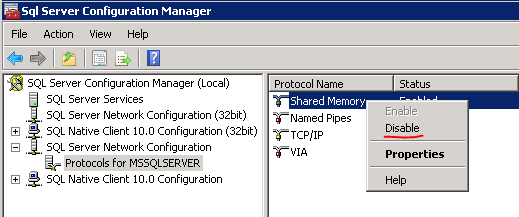
This is mandatory step if we have BizTalk and SQL installed on same machine, because shared memory protocol may slower BizTalk's performance, so if we'll disable shared memory then this this performance issue got resolved. Below are the steps that we need to follow to disable shared memory;
- Open Start and search SQL Server Configuration Manager.
- Click on SQL Server Network Configuration and expend it, then choose Protocols for MSSQLSERVER.
- Right-click Shared Memory, and then select Disable.
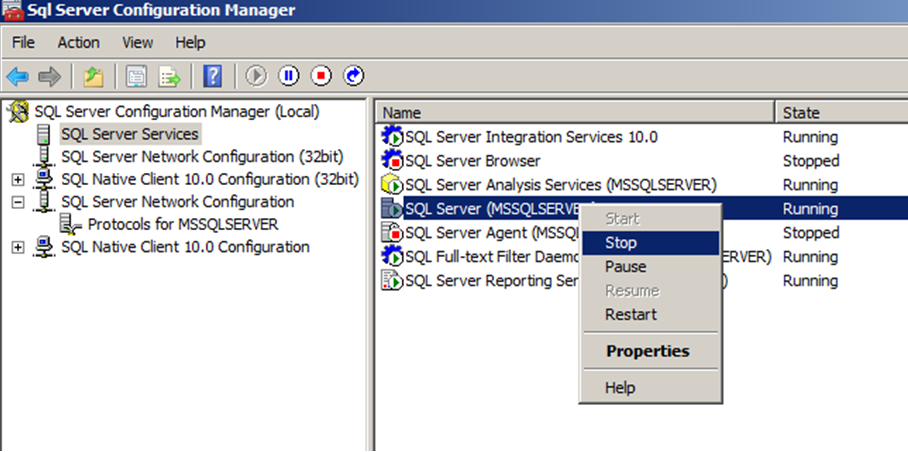
- Now we have to restart SQL Server (MSSQLSERVER), and after that close SQL Server Configuration Manager.
Optional Steps
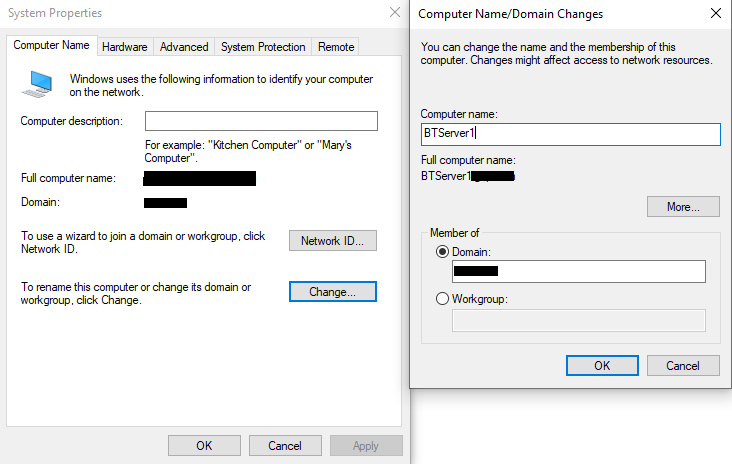
Step 1. Change the computer name
BizTalk server configuration fails if computer name is more than 15 characters, if have computer name more than 15 char then it require to change the name.
- Right click on Start menu, it'll open new window.
- Select the Computer name property to change it.
- Restart system to reflect the changes properly.
Step 2. Configure Application Event Log
BizTalk server configuration keeps all the event details in event log based on number of feature we install. During installation if we have low space in event log then installation will fail. So to rid of this issue, we have to configure application event log properly and give them the proper log size.
To change the log settings, we have to follow below steps,
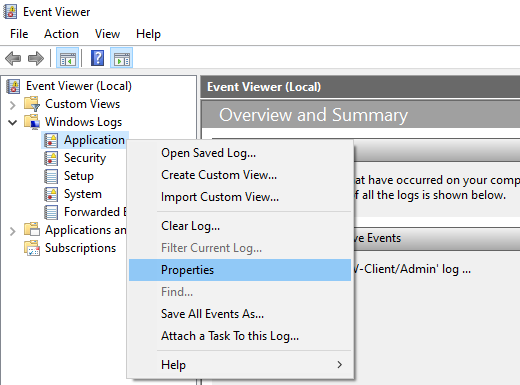
Open Run command and type 'eventvwr', it'll open Event Viewer window.
Expend Windows Logs and select Application.
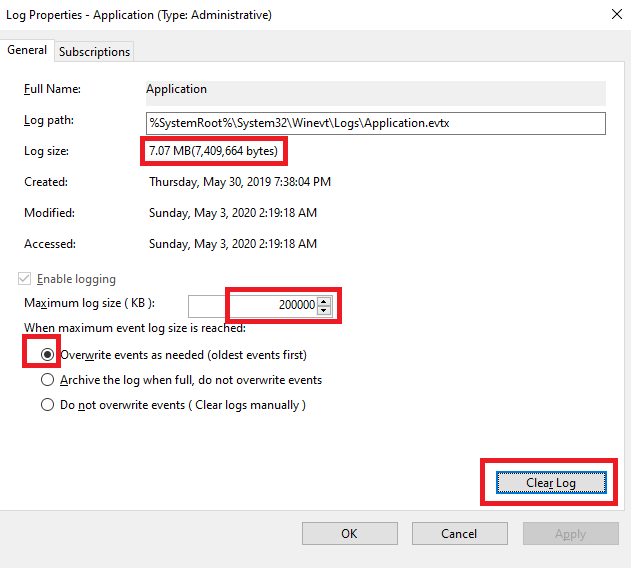
Log properties window will open and here we have to change the log size.
Try to enter the higher number in maximum log size field.
Next, we'll have 3 options, Overwrite, Archive log when full or Do not overwrite. Based on our need we can choose.
And now last option to Clear Log. and click OK.
Step 3. Run 64-bit BAM portal
This step will be mandatory if we have to use BAM portal, if don't then we can skip this step.
For those who are using BAM portal please follow below steps;
- Open Run command and type 'inetmgr', it'll open Internet Information Services (IIS).
- Now go to Application Pools, right click on DefaultAppPool and select Advanced Settings.
- Change the value of Enable 32-bit Application to true, because BAM Portal runs in 32-bit mode only and if have a 64-bit application then we have to set this.
- Click OK.
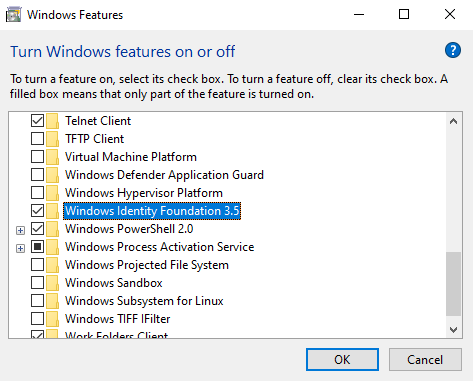
Step 4. Install Windows Identity Foundation (WIF)
This step will be mandatory if we have to use SharePoint Services adapter, otherwise we can skip it.
Step 5. Install & configure SMTP Server
This steps is mandatory if we use BAM, otherwise we can ignore this step.
To enable it on BizTalk server requires below steps, please follow it,
- Open Run command and type 'Control Panel', it will open Control Panel.
- Now select Programs and Features and open it.
- In left panel, we'll see Turn Windows Features on or off, and open, it will open new window.
- Select SMTP Server and finish installation.
- Restart the computer if prompted.
Note: SMTP Server is not available on client operating systems, such as Windows 8.1 or Windows 10.
Step 6. Install Excel 2019 or 2016
If we use BAM, BizTalk Server requires Excel. If we don't use BAM, we can skip this step.
The BAM Office Excel Workbook defines the business processes we want to monitor. We also use the BAM Excel Workbook to define the way business users see the data collected by BAM.
Step 7. Install Visual Studio 2019
This step is optional if we are installing BizTalk server on non-development machine like staging or production server. But if we are installing this on development machine then BizTalk Server requires Visual Studio to create BizTalk projects using the development tools.
Step 8. Configure SQL Database Mail
If we use BAM Alerts, BizTalk Server requires SQL Server Database Mail. If we don't use BAM Alerts, then can skip this step.
Please check this article to understand how to Configure, SQL Server Database Mail.
Step 9. Install WinSCP
This is required by the SFTP adapter. If don't use the SFTP adapter, then skip this step.
Download and install WinSCP.
References
Set up and install prerequisites for BizTalk Server 2020
See Also
Another important place to find an extensive amount of BizTalk related articles is the TechNet Wiki itself. The best entry point is BizTalk Server Resources on the TechNet Wiki.
