SQL Server: Understanding and Fixing Boot Page Corruption
1. Introduction
Database corruption in any form is unpleasant and arduous. One of the key maintenance activities a Database Administrator routinely performs is, check databases for potential corruption. If the check returns positive, a DBA either restores the database using a good backup or attempts to repair corruption, the former being the ideal choice. However, if there are no recent backups, the repair is generally the last resort. Depending on the nature of corruption, a repair may or may not incur data loss. That said, there are some edge cases where repair doesn’t work either - unfortunately, boot page corruption is one of them.
In this article, we will see what happens when the database boot page gets corrupted and how it affects the overall database availability. We will start off by corrupting the boot page using a Hex editor and trying to fix it using the traditional methods. You will see that none of the traditional fixes work against the boot page. We will try the advanced method thereafter.
2. Gotchas...
- This article assumes that the database has no recent backups. In the real world, the best way to go about fixing corruption is to restore from a last known good backup.
- The article uses a very simple example to get the message across. Fixing boot page corruption in a real production database environment could be very challenging and is not guaranteed to work at all times.
- Proceed with caution. The database may become useless. If your database hit boot page corruption, chances are that it is already non-functional. The method discussed in this article is the last resort when nothing works to resurrect it, and you can afford to lose the entire database (which you will have lost anyway given that there is no direct fix for boot page corruption).
- Always perform the repair against a copy of the database and not the main database. Incase repair doesn’t work, you can always fall back to the original database. If backup/restore doesn’t work, you can take the database offline and copy the database files to create a copy.
3. Importance of the Boot Page
Boot page is page number 9 (1:9) in the first data file. There is only one boot page per database, unlike file header pages which are one per data file (page 0). The fact that there is only one boot page in an entire database makes it critical. There is no direct fix for boot page corruption, which makes it even more critical. Neither can you perform page restore against the boot page nor can you repair it using DBCC CHECKDB.
The boot page provides metadata information for the entire database. It contains the current version of the database, the create date, the database name, database ID, the compatibility level, the last checkpoint LSN, database purity status, etc. It also captures the attribute dbi_dbccLastKnownGood, which provides the date the DBCC CHECKDB last completed successfully. When a SQL Server instance starts up, it reads the boot page for every database on the instance and logs an entry about the last CHECKDB run in the error logs. Contrary to a common belief, SQL Server doesn’t actually run CHECKDB at startup. It simply reads the boot page and records in the error log the last successful CHECKDB run date. Transparent Data Encryption (TDE) encrypts the data pages and log file and stores the Database Encryption Key in the boot record of the database.
Boot page’s availability is very important during the recovery of the database. As part of the “redo” phase of recovery, SQL Server reads the boot page and analyzes the transaction log from the minLSN of the oldest uncommitted (active) transaction at the point of the crash, and hardens the changes to the data files. If the boot page is corrupt, SQL Server cannot perform the crash recovery and thus does not bring the database back online.
While page restore provides a more granular level of recovery, unfortunately, it cannot be used to restore the boot page. Also, DBCC CHECKDB cannot fix the boot page corruption. The automatic page repair feature of Availability Groups, too, doesn’t fix the corrupt boot page. A corrupt boot page potentially prevents the backup from being taken even in the presence of WITH CONTINUE_AFTER_ERROR option.
4. Setting up the Environment
Let us set the stage for the boot page corruption demo. We will start off by creating a simple database called “BootCorruptDB” and change its recovery model to full. We will create a table called “Furniture” and insert six records into it. The sequence of actions is:
- Initial database creation with one table and 6 records in it.
- Run a full backup of the database. This backup covers the six records in the table.
- Insert 4 more records into the table Furniture.
- Change the TARGET_RECOVERY_TIME for the database to a higher number - 7200 seconds (2 hours). To delay the CHECKPOINT process by 2 hours.
- Perform A) Insert two records in the Furniture table B) Update an existing record in the Furniture table. C) Create a new table Mattress and insert one record into it.
- Run SHUTDOWN WITH NOWAIT.
The unorderly shutdown in step 6 is done so that the CHECKPOINT doesn’t run across the databases on the instance before the instance shuts down. This means the changes made in step 5 above have not yet hardened on the data files and were only captured in the transaction log. This doesn’t mean those changes will be lost. When the database comes online, recovery is run and SQL Server rolls forward the changes and all changes are reflected in the data files with no loss.
However, in our case, we're intentionally delaying the checkpoint so that the dirty data remains inside the memory and doesn’t get flushed out to the data files on disk. Our goal is to corrupt the boot page while the instance is down. We do that in the next section. Post inducing corruption, we will try to bring the database online and as you can guess, the database cannot come online or run recovery, thus ending up in a damaged state.
The full script that covers the above six steps is given below.
--1. CREATE THE DATABASE
CREATE DATABASE  [BOOTCORRUPTDB]
 ON  PRIMARY
( NAME  = N'BOOTCORRUPTDB', FILENAME = N'D:\SQL_DATA\BOOTCORRUPTDB.MDF' , SIZE = 65536KB , FILEGROWTH = 65536KB )
 LOG ON
( NAME  = N'BOOTCORRUPTDB_LOG', FILENAME = N'D:\SQL_LOGS\BOOTCORRUPTDB_LOG.LDF' , SIZE = 32768KB , FILEGROWTH = 65536KB )
GO
ALTER DATABASE  [BOOTCORRUPTDB] SET  RECOVERY FULL
GO

USE BOOTCORRUPTDB
GO

IF EXISTS(SELECT * FROM SYS.TABLES T JOIN SYS.SCHEMAS S ON T.SCHEMA_ID = S.SCHEMA_ID WHERE S.NAME = 'DBO'  AND T.NAME = 'FURNITURE')
DROP TABLE  DBO.FURNITURE;
GO
--CREATE THE TABLE FURNITURE
CREATE TABLE  DBO.FURNITURE
(
    ID INT  NOT NULL,
    NAME VARCHAR(20) NOT NULL
);

CREATE UNIQUE  CLUSTERED INDEX  IDX_FURNITURE_ID
ON DBO.FURNITURE(ID);

--INSERT 6 RECORDS
INSERT INTO  FURNITURE (ID, NAME) VALUES  (
1, 'CHAIR'),
(2, 'TABLE'),
(3, 'DINING TABLE'),
(4, 'SOFA'),
(5, 'STUDY DESK'),
(6, 'BED')

--2. AT THIS POINT, RUN THE FIRST FULL BACKUP
BACKUP DATABASE  [BootCorruptDB] TO   DISK = N'D:\SQL_BACKUPS\BootCorruptDB_FULL.bak'
 WITH NOFORMAT, NOINIT,  NAME = N'BootCorruptDB-Full Database Backup', SKIP, NOREWIND, NOUNLOAD,  STATS = 10
GO

--3. INSERT 4 MORE RECORDS AFTER THE FIRST FULL BACKUP
INSERT INTO  FURNITURE (ID, NAME) VALUES  (
7, 'DESK LAMP'),
(8, 'COUCH'),
(9, 'LOVESEAT'),
(10, 'LEATHER COUCH')

--OPTIONALLY RUN A MANUAL CHECKPOINT SO THE DIRTY PAGES ARE FLUSHED OUT TO THE DISK

--4. BUMP UP THE TARGET RECOVERY TIME TO 7200 SECONDS (2 HOURS)
USE [master]
GO
ALTER DATABASE  [BootCorruptDB] SET  TARGET_RECOVERY_TIME = 7200 SECONDS WITH NO_WAIT
GO

--5A. INSERT 2 RECORDS POST RECOVERY INTERVAL CHANGE
INSERT INTO  FURNITURE (ID, NAME) VALUES  (
11, 'ROUND TABLE'),
(12, 'CENTER TABLE')

--5B. UPDATE 1 RECORD
UPDATE FURNITURE SET NAME  = 'HATESEAT'  WHERE NAME  = 'LOVESEAT' AND ID = 9

--5C. CREATE A NEW TABLE CALLED MATTRESS
CREATE TABLE  DBO.MATTRESS
(
NAME VARCHAR(20)
)
INSERT INTO  MATTRESS VALUES  ('QUEEN SIZE')
GO

--6.RUN SHUTDOWN WITH NOWAIT SO THE CHECKPOINT DOESN'T RUN
SHUTDOWN WITH  NOWAIT
To know what happens to the changes (made in step 5 above) that have not yet flushed to the data files and only live in the log, read on.
5. Corrupting the Boot Page Using HxD Editor
At this point, the SQL instance is down. The locks against the MDF and LDF files have been relinquished. Let’s corrupt the boot page. As mentioned above, the boot page is page 9 in the first data file. We will use the freeware Hex editor called HxD to open the data file and corrupt it.
To know the location (offset) of the boot page in the data file, multiply 9 * 8192 = 73728 bytes in decimal which equals 12000 in hexadecimal.
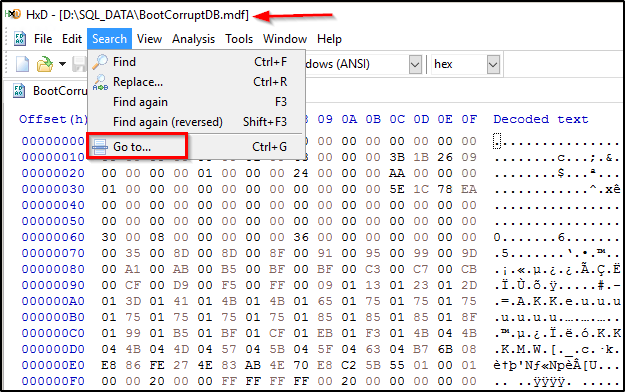
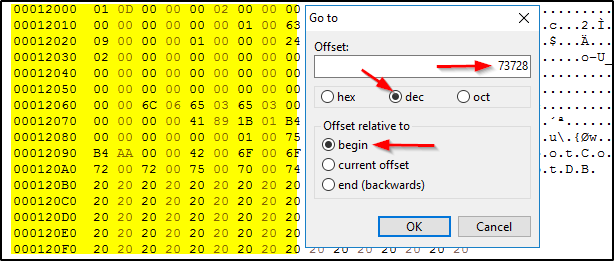
Launch the HxD editor and open the data file. Once the data file is opened, under Search menu option, select GoTo and type 73728 with decimal checked. The cursor will automatically go to the start of the offset 12000. The next 8192 bytes (2000 in hexadecimal) is the boot page. In other words, the area from 12000 to 14000 is the boot page.
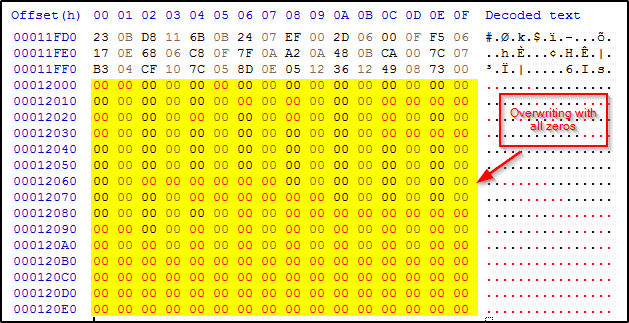
Make sure "dec" is checked and that the 'Offset relative to' is set to "begin". The partial yellow highlighted area starting with 00012000 offsets is the boot page.
Let's corrupt the boot page by overwriting the contents with all zeroes. The zeroes in red color overwrote the previous data.
[
](resources/7167736.3.png)Hit Save. This completes corrupting the boot page. In the next section, we will bring the SQL instance online and attempt the emergency-mode repair.
6. Trying the Emergency-Mode Repair
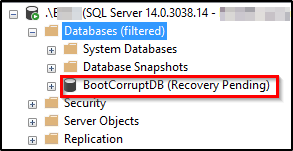
Let's bring the instance online from the SQL Server configuration manager. Notice that the database changed the status to "Recovery Pending". This is understandable since we corrupted its boot page and SQL Server has no idea where to begin the recovery from.
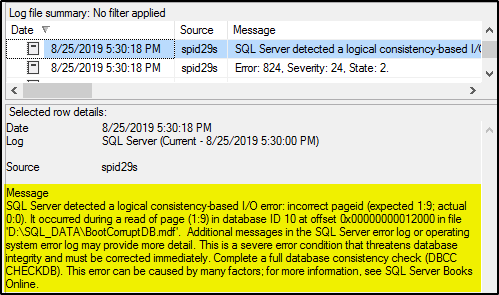
If we check the error logs, there will be the following entry. Basically, it indicates that SQL Server detected an error on page 9 during the read operation.
Let's run DBCC CHECKDB (without repair) against the corrupt database and see what it returns.

As you can see, it ran into an error and didn't complete.
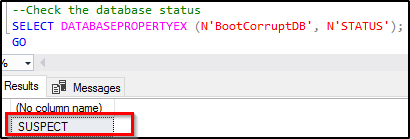
Let's check the database state. As you can see, it is in the SUSPECT state.
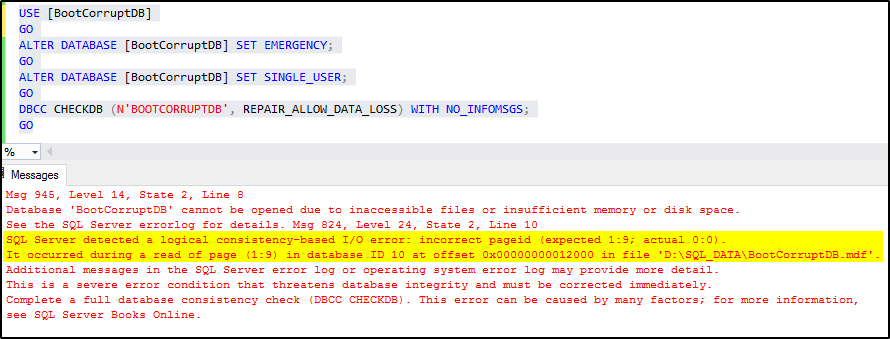
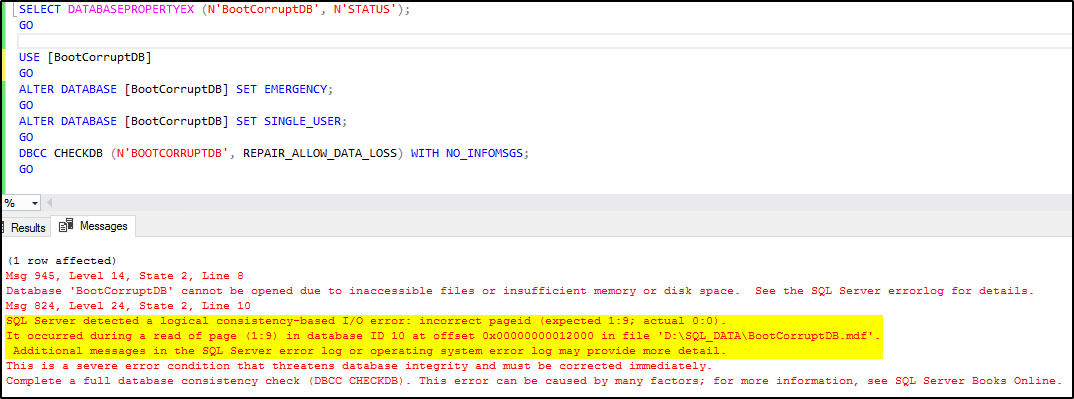
Let's try to run the emergency repair. At this point, we are OK losing data so I am running with REPAIR_ALLOW_DATA_LOSS repair option.
USE [BOOTCORRUPTDB];
GO

ALTER DATABASE  [BOOTCORRUPTDB] SET  EMERGENCY;
GO
ALTER DATABASE  [BOOTCORRUPTDB] SET  SINGLE_USER;
GO
DBCC CHECKDB (N'BOOTCORRUPTDB', REPAIR_ALLOW_DATA_LOSS) WITH  NO_INFOMSGS;
GO
No success. The emergency repair failed on the corrupt boot page.
7. Trying the Hack-Attach Method
In this method, we create a new database with the same name as the corrupt database and give the same names for MDF and LDF files as the corrupt database's MDF and LDF files. We then take the newly created database offline and replace its database files with the original corrupt database files. As you can guess, we first have to copy the original corrupt file elsewhere and drop the database to allow the new database creation since two databases cannot share the same name. We are basically tricking SQL Server into attaching the corrupt files to the database to run the repair (with data loss) later.
Tip: Paul Randal of SQLskills wrote a blog on this topic. Also, see his blog post on the boot page here.
Unfortunately, the trick doesn't work in the case of boot page corruption. After replacing the newly created database's files with the ones of the corrupt database, when we try to bring the database online, it runs into the boot page error.
As you can guess, an attempt to run repair against the database fails with the same boot page error that we saw earlier.
8. Recovering the Corrupt Boot Page with Data Loss
Now that the previous two attempts to bring the database online failed, let's swap the boot page of the corrupt database with the one from the full backup. It is to be noted that the full backup contains only Furniture table with 6 records. It knows nothing about the other 6 records and the new table Mattress.
The steps we will follow to swap the boot page are as follows:
- Take the corrupt database offline followed by copying the MDF and LDF to another location.
- Drop the corrupt database and delete the database files.
- Restore the database BootCorruptDB using the full backup taken when we set up the demo.
- Take the restored database offline so we can open the file in HxD.
- Launch HxD and open both MDF files - the one of the restored database and the corrupt one.
- On the clean restored MDF tab, go to offset 12000 (in hex, 73728 in decimal) and highlight the contents up to 14000, hit copy. 1 page = 8192 bytes (2000 in hex).
- Go to the corrupt MDF file tab in HxD and browse to the offset 12000. Leave the cursor at the start of the offset.
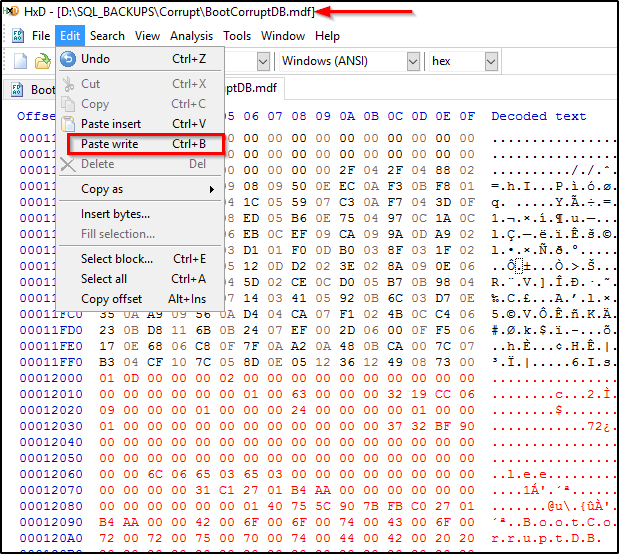
- Select Edit in the menu and hit "Paste Write" to overwrite the corrupted boot page content with the one copied from the clean file. Hit Save.
- Delete the MDF and LDF of the restored database (Since the DB is offline).
- Drop in the MDF (which we fixed above) and LDF files of the corrupt database in the same location.
- Bring the database online
- Run CHECKDB with repair_allow_data_loss.
- Switch the database into multi-user mode.
- Run select against the Furniture table and see how many records are returned.
Alright, let's start by copying the boot page content from the restored database to the original corrupt database.
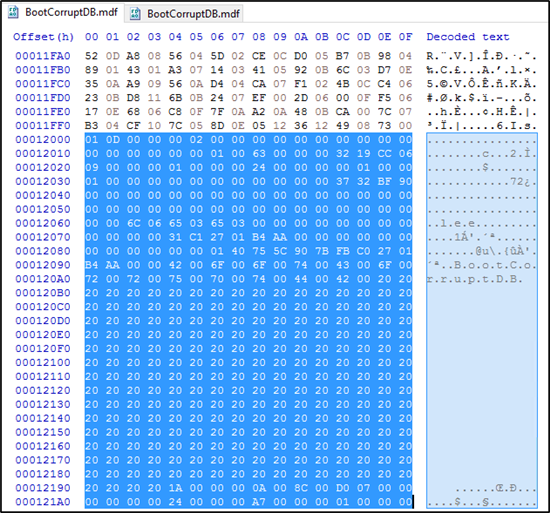
select Paste write to overwrite the existing corrupt content and hit Save.
Overwrite/replace the restored database's MDF and LDF with the original ones. Note that this time, the MDF has the boot page restored from the backup.
Bring the database online. Notice that the database has the boot page from the backup which is outdated. Thus, the data file and log file does not match. However, let's run a repair with data loss anyway and see what happens. Note that the database is in suspect mode.

Alright, this time it rebuilt the log file. It also warns that the transactional consistency has been lost.
As you may recall, we had delayed the checkpoint process by 2 hours so the changes we made in step 5 in section 4 (adding two records, creating the new table mattress, etc) existed only in the transaction log file which has now been rebuilt. Thus, all those changes that did not make it to the data file have been lost.
[
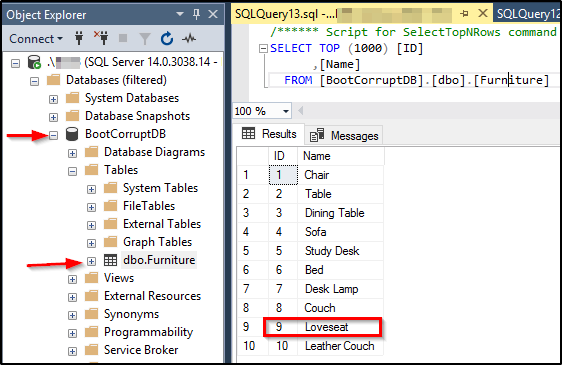
](resources/4162.14.png)Switch the database into Multi-User and as you can see, the table Furniture has only 10 records. All changes that were yet to be flushed out to the disk have been lost. There is no mattress table, no update of Loveseat to Hateseat, etc.
Although we incurred data loss here, the good thing is not all data has been lost. We were still able to bring the database online and it contains the 10 records.
Note: In a real production environment, the data loss and transactional consistency may vary. And as mentioned in the Gotchas section, it's possible that the above method may not work.
9. Recovering the Corrupt Boot Page without Data Loss
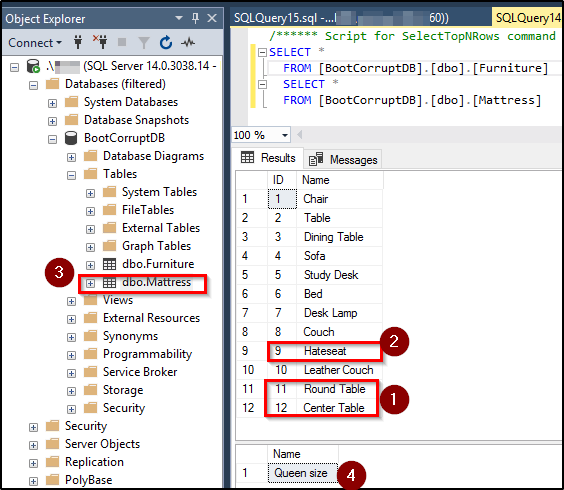
In this case, the same steps from the preceding demo can be repeated with a small change. If we don't change the target recovery interval and leave it to the default value (60 seconds), the checkpoint process hardens the changes to the data file about every minute. When this is followed by all steps we executed as part of our demo including the boot page corruption, swapping of the boot page from the backup, repair with data loss, rebuilt of the log, as you can see below, no data was lost since the changes were hardened to the data file on disk prior to the boot page corruption, thus rebuilding transaction log didn't lose the data since it was flushed to disk.
However, the fact that the repair was run with allow data loss, there's always a chance of data getting lost and the transactional consistency to be broken, so proceed with caution.
As you can see, all changes from step 5 were restored successfully.
[
](resources/32887.16.png)
10. Conclusion
A boot page is a very critical page in the database, without which, recovery cannot be run. It is page 9 of the first data file. As you have seen in the sections above, it is very complex to fix boot page corruption and it is not guaranteed to work at all times. The best way to get out of corruption is by restoring the last known good backup(s). However, if there are none available, a repair can be tried. Unfortunately, repair doesn't work for boot page corruption. The boot page can be swapped from a prior backup. Always perform the repair against a copy of the main database so you can easily go back to the previous state when nothing works.
REPAIR_ALLOW_DATA_LOSS rebuilds the transaction log and the database loses transactional consistency. If there are any transactions in the log that do not have their corresponding entries in the data files, which normally happens when the database crashes prior to the checkpoint process flushes the dirty data pages to disk, then those transactions can potentially be lost when repair with data loss is run. Page-level restores do not work against boot page.
11. See Also
- SQL Server: Understanding and Dealing with Page Restores. Though page restores don't work for Boot pages, the article gives some insight into page-level restores.
- Pages and Extents architecture guide

