SharePoint Framework: Introduction to Test driven development (TDD) using Jest & Enzyme
Introduction
Testing is an important fundamental of building a quality product and choosing an approach for testing is equally important. In this article, significance of Test driven development (TDD) & process to be followed to implement TDD in SharePoint Framework (SPFx) is explained.
TDD is software development process, where tests are written based on the requirement with assumption of mock object(s) or visual representation. Once necessary tests are written, development starts with an eye on passing each tests that were written.
Test driven development - The theory
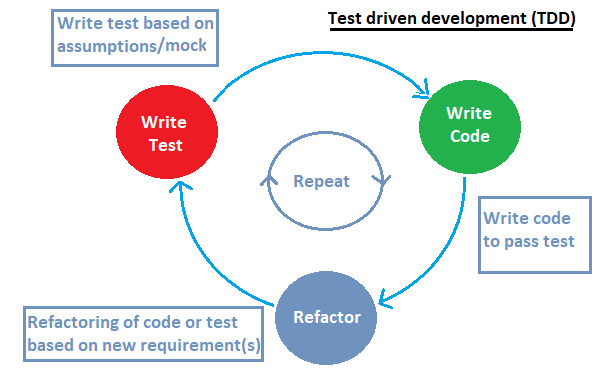
Test driven development can be spitted into three major phases
- Write test and Run it - This is an initial phase, a starting point, where test are written based on the requirement. Usually these test are written based on a mock-up object or visual representation.
- Develop code and Pass test - Developer write code and pass each test.
- Refactor the code - Make changes to include new functionality and improve existing code based on the warning or suggestion
- Repeat.- Repeat the exercise until the product is complete.
Topics covered in this article
- How to include Jest & Enzyme in SPFx solution using PnP Generator
- How to Write tests for SPFx react component
- Running test for component without debugging
Getting Started
This article is divided into three major sections
- Create SPFx solution using PnP Generator to include JEST
- Write Test using JEST & Enzyme & Write code to pass it
- Testing SPFx using Node JS
Write Test
Considering that the requirement is to show certain list items in client side web part, we will write the test based on it.
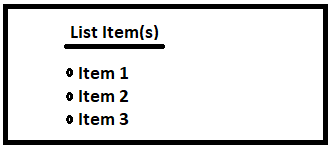
We can visualize the webpart by drawing/ making rough sketch of it or use mock object to meet the requirement before development.
We have drawn a rough sketch of the requirement(screen shot above). From the screen shot, we can assume that we need a service to pull the information from SharePoint list & use unordered list Html tag (<ul></ul>) to display the fetched item.
For this, we will create SPFx webpart and write test assuming a service is required to get list item.
Create SPFx solution using PnP Generator to include JEST
To install the PnP Generator using NPM, Run the below command in powershell.
npm install -g @pnp/generator-spfx
Why PnP Generator ?
PnP Generator not only helps in including JEST, but also has lot of option that can be included upfront during project scaffolding. Jquery, Angular, Azure Dev Ops, PnP React\ Property controls to name a few.
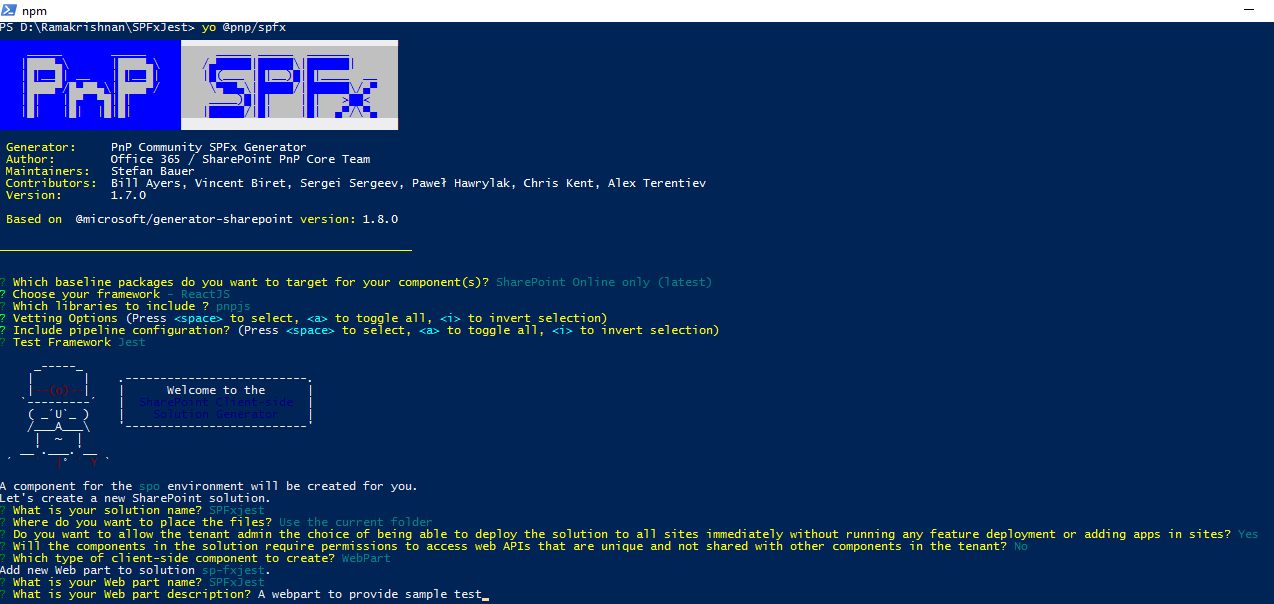
Run the below command under the suitable destination folder and press space bar to select required modules for the project. In this article, we will take React as the framework and include Jest as a testing framework for unit testing.
yo @pnp/spfx
Here, we have selected PnP JS library to be included for getting list item and Included JEST as the test framework.
Solution & webpart name is SPFxJest.
Code
To write test, we need to create a Test Suite and this can be done by naming a file with "spec.tsx" or "spec.ts". In this case, since we need to test the component SPFxJest.tsx, we are creating a file name SPFxJest.spec.tsx. It is important to name it with "spec" for the Testing framework to identify the files.
Include the below set of code.
import * as React from 'react';
import 'jest';
import { shallow } from 'enzyme';
import { Services } from './Service';
import SpFxJest from './SpFxJest';

let wrapper: any;

test('getItems() returns correct result', (done) => {
    let _Services = new Services();
    _Services.getItems().then(data => {
        wrapper = shallow(<SpFxJest ListItems={data} />);
        expect(wrapper.find('span').first().text()).toBe('List Item(s)');
        (data.length > 0) ? expect(wrapper.find('li').length).toBeGreaterThan(2) : expect(wrapper.find('li').length).toBeFalsy();
        expect(wrapper).toMatchSnapshot();
        done();
    });
});
Explanation
In the above code, we have assumed that there will be a services Object which have a getItems method that will return the fetched items from SharePoint list. Once the items are fetched successfully, it will passed as props to the SPFxJest component to render the UI as per the requirement.
This process is called Shallow rendering & we are using enzyme for testing the component behavior after passing props.
Here, we start each test using a test function. We also expect the component to match snapshot & write set of code inside expect function, for e.g. we expect the first span element to have value as 'List Item(s)'.
Let us perform the test by running the below command
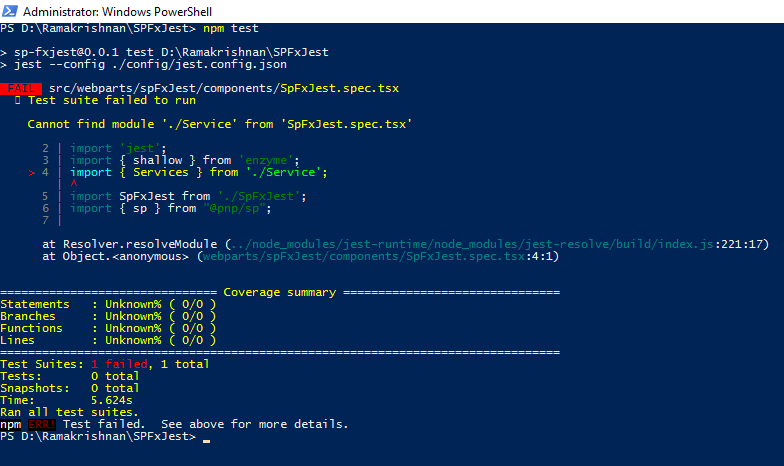
npm test
On running the command, we will receive the error stating that "Cannot find module". This is obvious, since we have not developed anything as of now and services does not exist in our project.
Write Code
To pass the test we just created, we will now develop the project by creating the required service and User Interface (UI)
Code
Lets create a service by including a new file name "Service.ts" under src > webpart >component & Include below set of code
import { IListItem } from './Interface';
import { sp, Items, spODataEntityArray } from "@pnp/sp";


export class Services {
    public getItems(): Promise<IListItem[]> {
        return new Promise<IListItem[]>((resolve, reject) => {

            sp.web.lists.getByTitle("Jest").items.select("Id", "Title").get(spODataEntityArray<Items, IListItem>(Items)).then(items => {
                resolve(items);
            }).catch(error => reject(error));
        });
    }
}
Add below code to change rendering of Component UI "SPFxJest.tsx".
import * as React from 'react';
import styles from './SpFxJest.module.scss';
import { ISpFxJestProps } from './ISpFxJestProps';


export default class SpFxJest extends React.Component<ISpFxJestProps, {}> {
  public render(): React.ReactElement<ISpFxJestProps> {
    return (
      <div className={styles.spFxTest}>
      <div className={styles.container}>
        <div className={styles.row}><span><u><b>List Item(s)</b></u></span></div>
        <div className={styles.row}>
          <div className={styles.column}>
            <ul>
              {this.props.ListItem.map((item, i) => { return <li key={item.Title}>{item.Title}</li>; })}
            </ul>
          </div>
        </div>
      </div>
    </div>
    );
  }
}
Explanation
Here, we are using a PnP JS to get items from a list name "JEST" under a function name getItems & exported it with a class named Services. We have also defined interface and used Entity Merging to get items in the required fashion. This can be referred by downloading the solution (link in the last section of this article)
Run the Test
Now, if run "npm test" once again, we get a message stating that the Headers are not specified and the issue lies with spHttpClient. Even if we specify the headers, the test will fail & this is due to the fact that we are not fetching the items in any of the user context. To fetch the item we need to debug the solution in browser to fetch the list item in actual user context or we can run test under the context of node using SPFetchClient.
Testing SPFx component using JEST without debugging
For this, we will install PnP Node Js Module by running the below command in powershell under the solution directory.
npm install @pnp/logging @pnp/common @pnp/nodejs --save
logging & common modules are dependencies of node js & we need to install them as well.
Now we will register the add-in in the site collection where the Jest list exist and grant required access to list for the add-in.
Below are the steps to Registed & Grant access to the add-in
Register Add-in
- Navigation to {site url}/_layouts/appregnew.aspx
- Click "Generate" for both the Client Id and Secret values
- Provide add-in a title, here we are naming it as" SPFxJest"
- Provide a fake value for app domain and redirect uri
- Click "Create"
- Copy the returned the client id and secret as well as app name for the records which will be used later in this article.
Grant Access to Add-in
Navigate to {site url}/_layouts/appinv.aspx
Paste client id from the above section into the Add Id box and click "Lookup"
All information should be populated into the form from the last section
Paste the below XML into the permissions request xml box and hit "Create"
<AppPermissionRequests AllowAppOnlyPolicy="true">
  <AppPermissionRequest Scope="http://sharepoint/content/sitecollection/web/list" Right="Read" />
</AppPermissionRequests>
5. Select the list to grant access to & click "Trust it"
Here, we are granting read permission to the list we need provide give access to.
Now, we will use this Client ID & Client Secret to fetch the item using PNP Node JS via SPFetchClient.
Again we will make necessary changes in the test suite to fetch the item without debugging.
For this, include the below set of code
import * as React from 'react';
import 'jest';
import { shallow } from 'enzyme';
import { Services } from './Service';
import SpFxJest from './SpFxJest';
import { sp } from "@pnp/sp";
import { SPFetchClient } from "@pnp/nodejs";
let wrapper: any;
beforeEach(() => {
    sp.setup({
        sp: {
            fetchClientFactory: () => {
                return new SPFetchClient("<<>Site collection URL here>", "<<Client ID here>>", "<<Client Secret here>>");
            },
        }
    });
});
test('getItems() returns correct result', (done) => {
    let _Services = new Services();
    _Services.getItems().then(data => {
        wrapper = shallow(<SpFxJest ListItem={data} />);
        expect(wrapper.find('span').first().text()).toBe('List Item(s)');
        (data.length > 0) ? expect(wrapper.find('li').length).toBeGreaterThan(2) : expect(wrapper.find('li').length).toBeFalsy();
        expect(wrapper).toMatchSnapshot();
        done();
    });
}, 10000);
Here, if we check the new set of codes that is included & compare it with the previous code, one can notice that SPFetchClient is utilized from @pnp/nodejs which is being imported. Also, a beforeEach section is included where fetchClientFactory headers for sp modules of@pnp/sp is setup . Note: this setup does not necessarily needs to be included inside beforeEach section & can be included else where before swallow rendering of component.
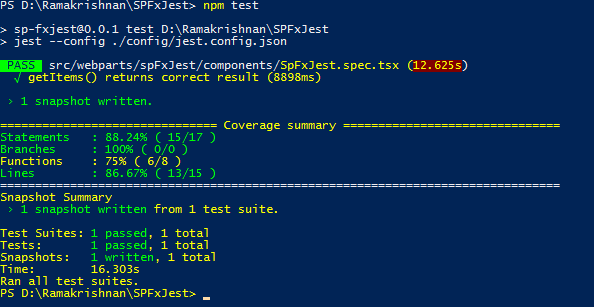
Lets run npm test again.
We can see that getItems method successfully fetched list items and passed it to the component via props for rendering.
Jest also created a snap file containing snapshot(HTML Structure) of the component.
Conclusion
Thus, we saw how TDD can be included in SharePoint Framework solutions and improve the developer code & experience.
Download this solution
This solution can be downloaded from Technet Gallery
