SharePoint Framework(SPFx) webpart with elevated privileges using MS Flow
Introduction
While building a custom SharePoint List form Using SPFx web part, one usually encounter a situation, where an elevation of current user context is required. Especially, where the user does not have permission over the list and we would like to collect information from them. For example, a feedback form or a site collection request form, where a user should not have direct access to view or edit other items but he/she should be able to make an entry(create item) into the list.
Architecture flow diagram & logic
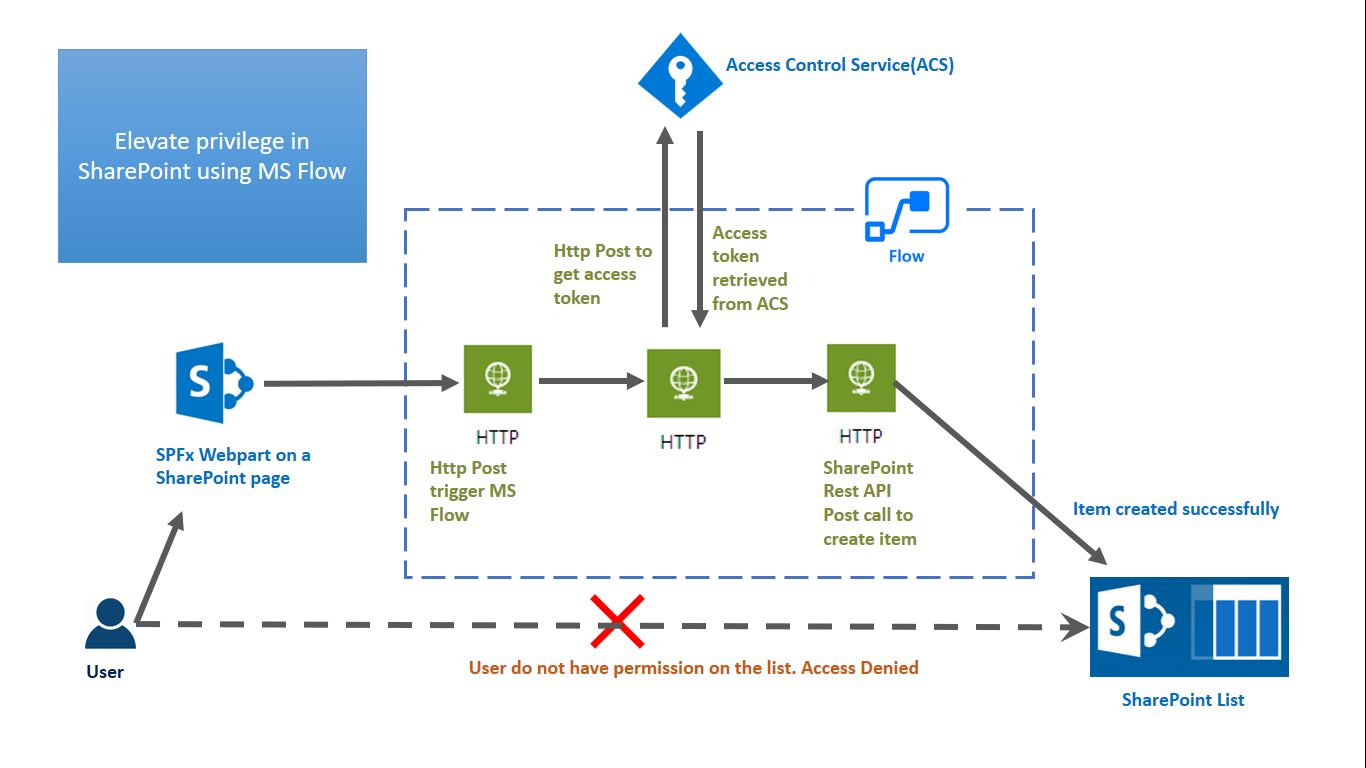
Below is a schematic representation of overall architectural flow that has been described in this article.
Process flow described in this article are mentioned in bullet points below :
- A user does not have access to SharePoint list has been provided an Interface which is build using SPFx web part.
- A user makes an HTTP post request via SPFx web part which triggers MS flow.
- Next consecutive action present in the flow makes a request to ACS to retrieve Access Token.
- Once Action Token is received as a response another SharePoint REST API call has been performed using this action token.
- Item is created successfully
Implementation
The concept has been split into two major division.
- Make SharePoint REST API Call from MS flow
2) Call MS Flow from SPFx Web part
Call SharePoint REST API from MS flow
I) Create & Register an app in SharePoint Online
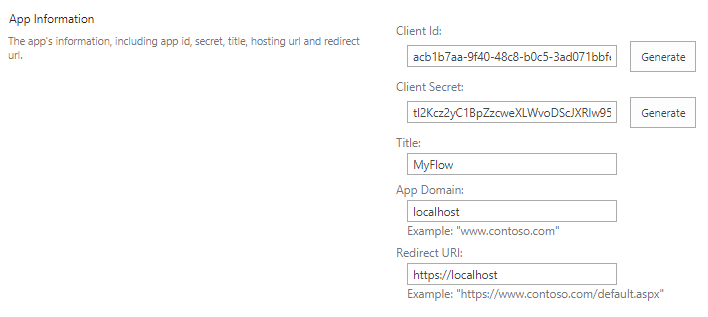
Step 1) Login to SharePoint Online Site collection and navigate to _layouts/15/appregnew.aspx (https://<<domainname>>.sharepoint.com/sites/dev/_layouts/appregnew.aspx) to generate Client ID & Secret.
Step 2) Generate Client ID & Secret. Provide a Name of the app(which is "MyFlow" here). Enter AppDomain as "localhost" and redirect URI as "https://localhost" and click on Create. Important: Make note of the Client ID & Secret that has been generated.
Step 3) Go to _layouts/15/appinv.aspx (https://<<domainname>>.sharepoint.com/sites/dev/_layouts/appinv.aspx) & register the app by entering Client ID generated in previous step. Click on "Lookup" button.
Add the below XML in Permission Request XML and click on Create.
<AppPermissionRequests AllowAppOnlyPolicy="true">
<AppPermissionRequest Scope="http://sharepoint/content/sitecollection/web/list" Right="FullControl" />
</AppPermissionRequests>
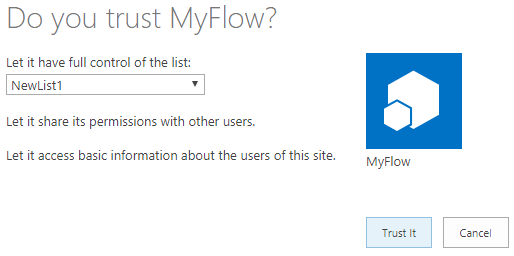
Step 4) Select a list from dropdown where elevated privilege is required.(here the list name is NewList1) and click on "Trust It".
Step 5) To verify the registration, navigate to _layouts/15/appprincipals.aspx, Here note Tenant ID as well.
II) Create MS Flow
Step 1) Login to https://flow.microsoft.com and click on "Create from Blank" as the flow need to be created from scratch.
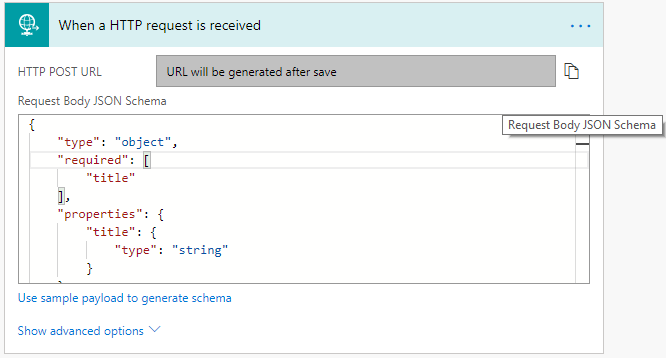
Step 2) Add Action "When an Http request is received" and include the below JSON in the Request body. This accepts a title as body parameter along with its value.
{
    "type": "object",
    "required": [
        "title"
    ],
    "properties": {
        "title": {
            "type": "string"
        }
    },
    "$schema": "http://json-schema.org/draft-04/schema#"
}
III) Retrieve Access token from Azure Access Control Services(ACS)
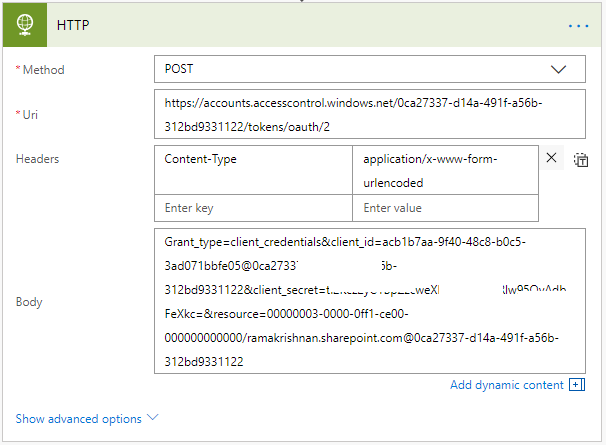
Step 3) Add New step and include new action in flow "HTTP" post since access token is required to make REST API call and include the below value as displayed in the screenshot below. Replace the Client ID & Secret along with the Tenant ID which was noted in the previous section.
Method |
POST |
Uri |
https://accounts.accesscontrol.windows.net/<<TENANTID>>/tokens/oauth/2 The TenantID should be replaced with our actual tenant ID |
Headers |
Content-Type : application/x-www-form-urlencoded |
Body |
Grant_type=client_credentials&client_id=<<ClientID>>@<<TenantID>>&client_secret=<<ClientSecretID>>&resource=00000003-0000-0ff1-ce00-000000000000/<<TenantName>>.sharepoint.com@<<TenantID>> |
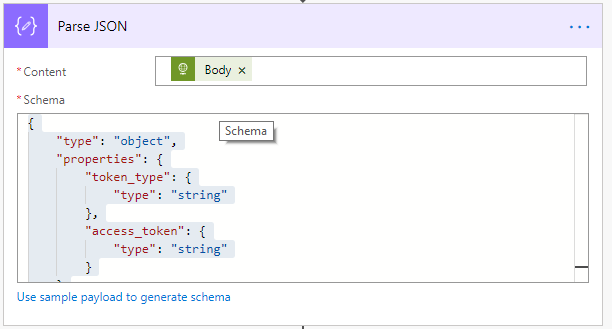
Step 4) Add another new step and add/include Parse JSON action as we need to read the access token. Include the content as the body of previous action & below JSON schema format.
{
    "type": "object",
    "properties": {
        "token_type": {
            "type": "string"
        },
        "access_token": {
            "type": "string"
        }
    }
}
IV) Make SharePoint REST API call using FLOW
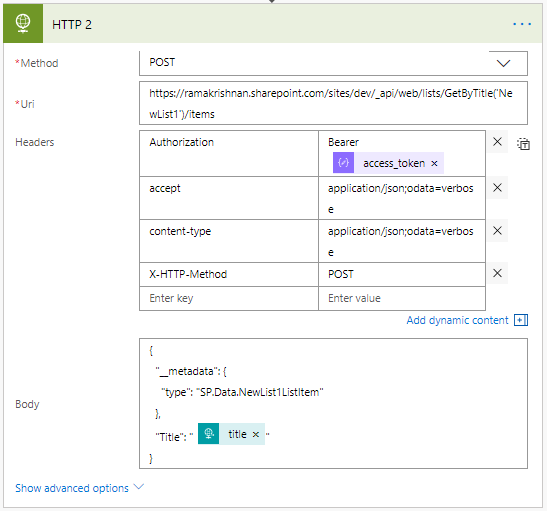
Step 5) Add New step and include new action in flow "HTTP" post as we will make REST API post call. Include the below value as displayed in the screenshot below. Replace URL of the site & list title.
Method |
POST |
Uri |
https://<<yourdomain>>.sharepoint.com/sites/<sitename>/_api/web/lists/GetByTitle('<ListTitle>')/items |
Headers |
Authorization : Bearer : ACCESSTOKEN |
Body |
{ |
Step 6) Add New step and include new action in flow "HTTP" post as we will make REST API post call. Include the below value as displayed in the screenshot below. Replace url of the site & list title.
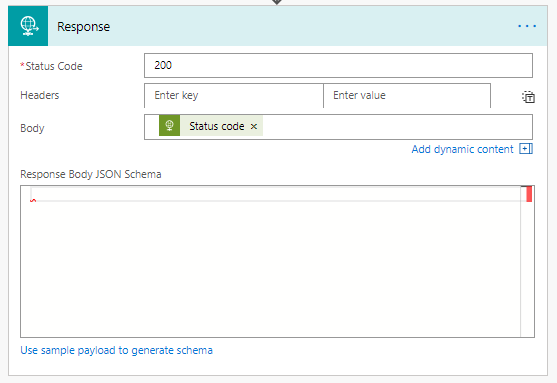
Step 7) Add New step and include new action in flow "Request - response" to send a response back based on the out received from the previous step. Include Status code in the body parameter as displayed in the screenshot below.
Step 8) Provide a Name to the Flow and Save. Make a note of the URL from the first action(When an HTTP request is received) which is used to trigger the flow.
Call MS Flow from SPFx web part
Follow the below steps to create SPFx web part that will be used to trigger Flow which in turn create an item in SharePoint list.
I) Create SPFx web part
Kindly refer this article to know the pre-requisite for creating SPFx web part.
Step 1) Open Windows Powershell.
Note: If SPFx solution already exists and only web part needs to be added to an existing solution, then directly jump to Step 5.
Step 2) Create a folder inside a directory by entering the below command, here for example
**md SPFxFlow **
Step 3) Go Inside the folder by entering the command
cd SPFxFlow
Step 4) Create a web part by entering below command
**yo @microsoft/sharepoint
**
Specify the following :
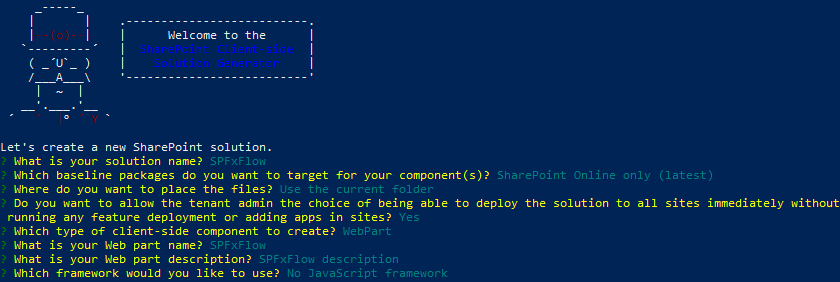
- Solution Name - SPFxFlow
- Target - SharePoint Online only
- File Location - Use the current folder
- Allow tenant admin to deploy the solution to all Site Immediately without running any feature deployment or adding apps in sites - Yes
- Which client -side component- Web part
- WebpartName - SPFxFlow
- A description - SPFxFlow Description
- Framework- No Javascript framework
Authorization
Bearer access_token
accept
application/json;odata=verbose
content-type
application/json;odata=verbose
X-HTTP-Method
POST
Enter key
Enter value
Authorization : Bearer : ACCESSTOKEN Accept : application/json;odata=verbose |
Authorization : Bearer : ACCESSTOKEN Accept : application/json;odata=verbose |
Step 5) Once the project is created open it in Visual Studio Code using the below command.
code .
II) Modify SPFx web part to Call Flow
Step 6) Modify the SPFxFlowWebPart.ts and replace the below code.
The below code provide a text box as input along with the property field which accepts FLOW URL as input.
import { Version } from '@microsoft/sp-core-library';
import {
  BaseClientSideWebPart,
  IPropertyPaneConfiguration,
  PropertyPaneTextField
} from '@microsoft/sp-webpart-base';
import { escape } from '@microsoft/sp-lodash-subset';
import styles from './SpFxFlowWebPart.module.scss';
import * as strings from 'SpFxFlowWebPartStrings';
import { HttpClient, IHttpClientOptions, HttpClientResponse } from '@microsoft/sp-http';
export interface ISpFxFlowWebPartProps {
  flowURL: string;
  FlowURLLabel: string;
}
import { SPComponentLoader } from '@microsoft/sp-loader';
interface IResult {
  status: string;
}
export default class SpFxFlowWebPart extends BaseClientSideWebPart<ISpFxFlowWebPartProps> {

  public render(): void {
    this.domElement.innerHTML = `
      <div class="${ styles.spFxFlow }">
        <div class="${ styles.container }">
          <div class="${ styles.row }">
            <div class="${ styles.column }">
                 <span class="${styles.title} ms-Grid-col ms-u-sm12 block">
                   Item creation using SPFx & Flow
                </span>
                <div class="ms-Grid-col ms-u-sm12 block"><br/></div>
                <div class="ms-TextField ms-Grid-col ms-u-sm12 block">
                  <label class="ms-Label ms-Grid-col ms-u-sm4 block">Title</label>
                  <input id="spfxflowIm" class="ms-TextField-field ms-Grid-col ms-u-sm8 block" value="" type="text" placeholder="">
                </div>
                <div class="ms-TextField ms-Grid-col ms-u-sm12 block"><br/></div>
                <div class="ms-TextField ms-Grid-col ms-u-sm6 block"></div>
                <div class="ms-TextField ms-Grid-col ms-u-sm6 block">
                <button class="${styles.button} create-Button">
                <span class="${styles.label}">Create Item</span>
                </button></div>
                <div id="status"></div>
              </div>
            </div>
          </div>
        </div>
      </div>`;
      this.setButtonsEventHandlers();
  }


  private setButtonsEventHandlers(): void {
    const webPart: SpFxFlowWebPart = this;
    this.domElement.querySelector('button.create-Button').addEventListener('click', () => { webPart.createItem(); });
  }

  private createItem(): void {
        let result: HTMLElement = document.getElementById("status");
        let responseText: string = "";
        //result.style.color = "white";
        result.innerText = "Updating item...";
        var itemTitle : string = (<HTMLInputElement>document.getElementById("spfxflowIm")).value;
        const postURL = this.properties.flowURL;
        const body: string = JSON.stringify({
          'title': itemTitle,
        });
        const requestHeaders: Headers = new Headers();
        requestHeaders.append('Content-type', 'application/json');
        requestHeaders.append('Cache-Control', 'no-cache');
        const httpClientOptions: IHttpClientOptions = {
          body: body,
          headers: requestHeaders
        };
        this.context.httpClient.post(
          postURL,
          HttpClient.configurations.v1,
          httpClientOptions).then((response: HttpClientResponse) => {
            response.json().then((responseJSON: JSON) => {
              responseText = JSON.stringify(responseJSON);
            result.innerText = (responseText=="201")?"Item updated successfully":"Error received while updating item";
          });
        }).catch ((response: any) => {
          let errMsg: string = `Error = ${response.message}`;
          result.style.color = "red";
          console.log(errMsg);
          result.innerText = errMsg;
        });
  }

  protected get dataVersion(): Version {
    return Version.parse('1.0');
  }

  protected getPropertyPaneConfiguration(): IPropertyPaneConfiguration {
    return {
      pages: [
        {
          header: {
            description: strings.PropertyPaneDescription
          },
          groups: [
            {
              groupName: strings.BasicGroupName,
              groupFields: [
                PropertyPaneTextField('flowURL', {
                  label: strings.FlowURLLabel
                })
              ]
            }
          ]
        }
      ]
    };
  }
}
Step 7) Replace the code present in en-us.js location at (solutionpath > src > webparts > spFxFlow > loc >) with below code.
define([], function() {
  return {
    "PropertyPaneDescription": "SPFx FLow",
    "BasicGroupName": "Flow Properties",
    "FlowURLLabel": "Flow URL"
  }
});
Step 8) Replace the code present in mystrings.d.ts location at (solutionpath > src > webparts** >** spFxFlow **> **loc >) with below code.
declare interface ISpFxFlowWebPartStrings {
  PropertyPaneDescription: string;
  BasicGroupName: string;
  FlowURLLabel: string;
}

declare module 'SpFxFlowWebPartStrings' {
  const strings: ISpFxFlowWebPartStrings;
  export = strings;
}
Step 9) Run the below command in windows PowerShell to test.
gulp serve
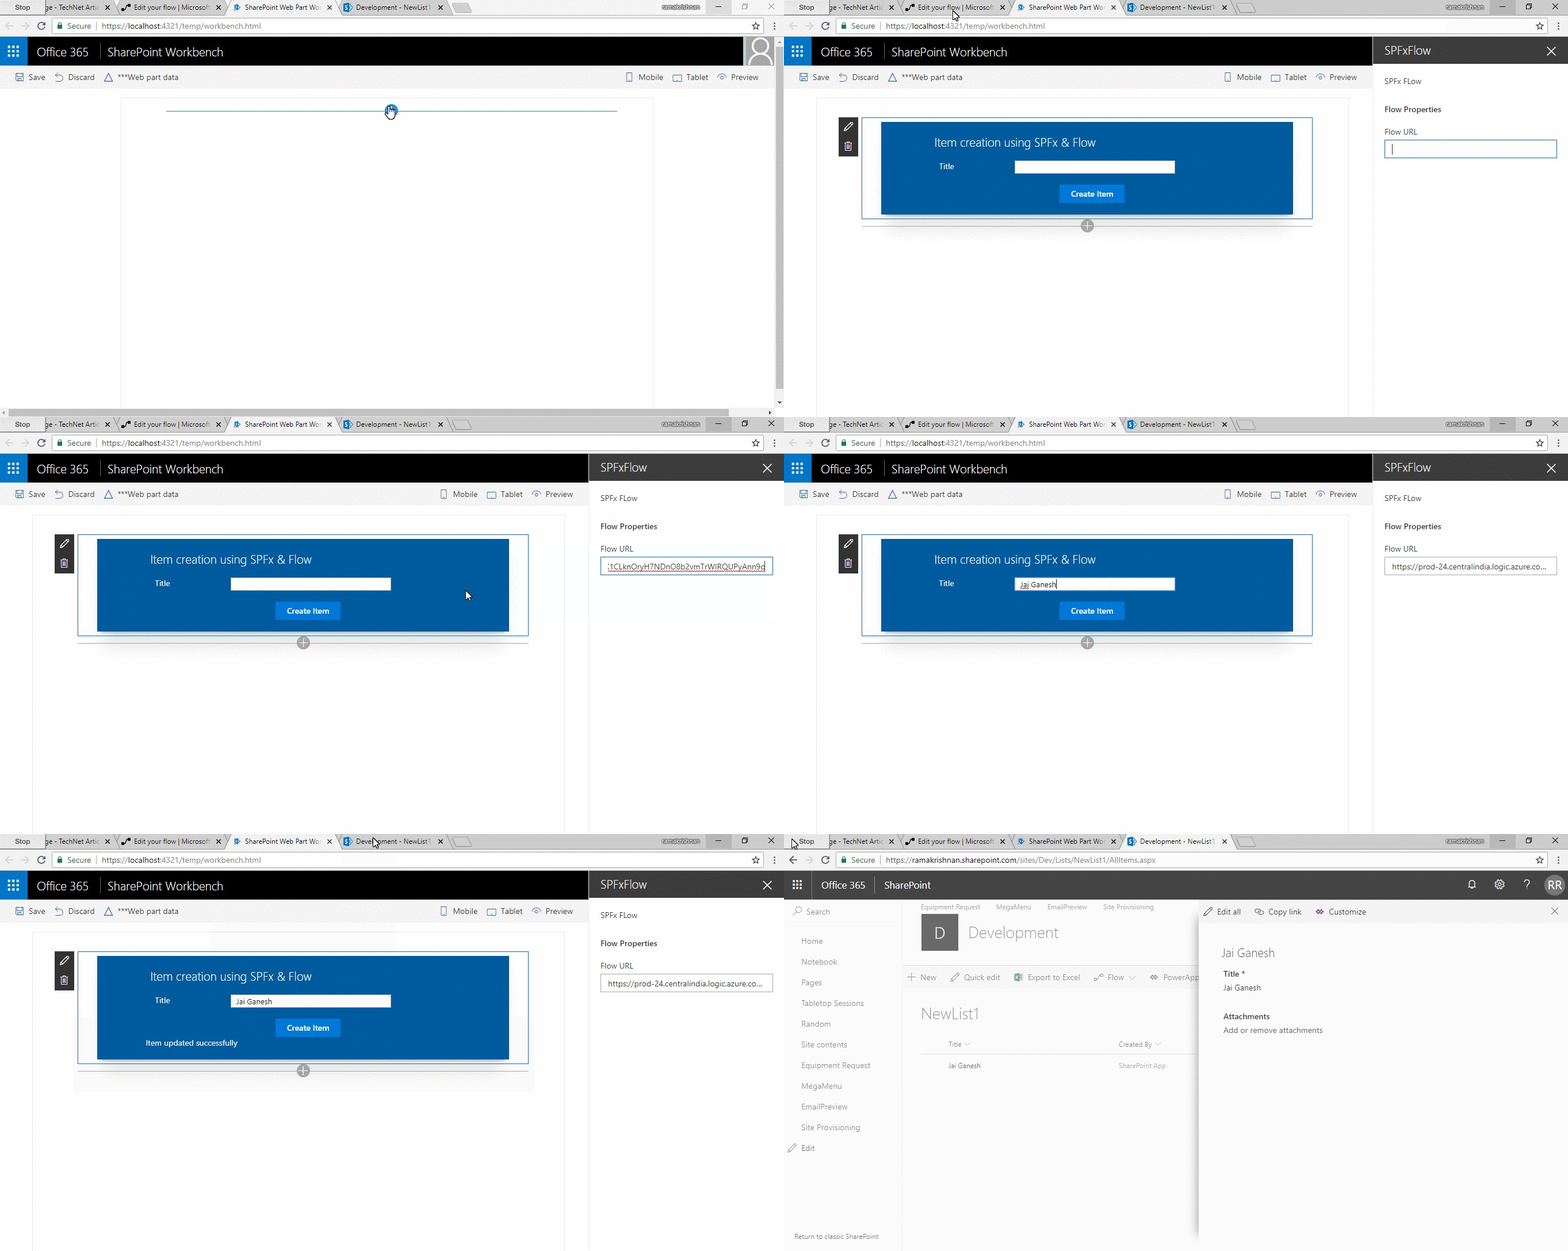
Step 10) Provide URL of the Flow noted in step 8 of the previous section and provide Item Title and click on Create Item. Refer the below screenshot.
A new item will be created in the specified list (NewList1).
A glimpse of over all process flow
Below is a glimpse of overall flow where the SPFx web part is added in a local workbench and item title is provided. Behind the scene, flow makes multiple HTTP calls and finally add an item in SharePoint on behalf of the user.
