Logic Apps 101: Inserting Data Into Multiple Tables Using SQL Connector and Trigger(SQL)
Introduction
In modern-day integration, there are many cases where the front end(web app/API) is hosted in cloud and some or whole part of the data store is on cloud or on premises and the integration code has to populate the data /fetch and perform the CRUD operations on the tables based upon the request. In such scenarios, Logic Apps is best suited to integrate the web app/API and the data store as Logic App provides an easy and visual way of integrating the systems( in form of a workflow).
What are Logic Apps?
Logic Apps are a piece of integration workflow hosted on Azure which is used to create scale-able integrations between various systems.These are very easy to design and provide connectivity between various disparate systems using many out of the box connectors as well as with the facility to design custom connectors for specific purposes. This makes integration easier than ever as the design aspect of the earlier complex integrations is made easy with minimum steps required to get a workflow in place and get it running.
Scope
This article deals with how to insert similar data into multiple tables in a data store using a logic app. The logic app exposes an HTTPS endpoint which can be consumed by the front end web API/app and it can send the data to the Logic App. The endpoints accept JSON payload and insert the data received over the HTTPS call into multiple tables hosted on an on-premise SQL server. This article aims to discuss how to insert the data to SQL tables using a single call from the logic app ( by making use of SQL After Insert triggers) as opposed to the conventional way of calling two different stored procedures/ insert row actions. The approach discussed in this article reduces the number of action that an Logic App needs to perform and thus saves user from getting billed for multiple actions ( as number of actions are billed during an logic app run). This article assumes that the reader is a beginner with a basic knowledge about Microsoft Azure and Logic Apps and guides the user to try a hands on approach to learn the concept.
What are SQL Triggers?
As per the MSDN Documentation at CREATE TRIGGER (Transact-SQL)
"A trigger is a special kind of stored procedure that automatically executes when an event occurs in the database server. DML triggers execute when a user tries to modify data through a data manipulation language (DML) event. DML events are INSERT, UPDATE, or DELETE statements on a table or view. These triggers fire when any valid event is fired, regardless of whether or not any table rows are affected"
Implementation
The Implementation can be divided into two parts.
- Creating SQL Tables, Stored Procedures and Triggers
- Creating Logic App and Connecting Logic App to the SQL Store
Creating SQL Tables, Stored Procedures and Triggers
SQL Tables
A simple Employee Master Table is created which stores the information about the employee like the Employee ID, Employee Name, Salary, Reporting Manager Employee ID etc. The query for creating the simple employee table is as below.
CREATE TABLE  [dbo].[Employee_Master]
(
    [Emp_ID] int  Unique NOT  NULL,
    [Emp_name] varchar(100) NULL,
    [Emp_Sal] decimal(10, 2) NULL,
    [Supervisor_ID] int  Unique NOT  NULL
)
Another table which stores the Employee and Reporting Manager can be created using the sample query as mentioned below.
CREATE TABLE  [dbo].[Employee_Manager_Mapping]
(
    [Emp_ID] int  Unique NOT  NULL,
    [Supervisor_ID] int   NOT NULL
)
Stored Procedure and SQL Trigger
The stored procedure to insert the data into the the Employee_Master table is as follows.
CREATE PROCEDURE  usp_OnboardEmployee
@employeeId int,
@employeeName varchar(100),
@salary decimal(10,2),
@managerid int

AS
BEGIN

INSERT INTO  [EMPLOYEE_MASTER]
VALUES
(@employeeId, @employeeName, @salary, @managerid)

END
The SQL trigger which is an After Insert Trigger which is created on the Employee_Master table and inserts the Employee Id and the Supervisor Id in the Employee_Manager_Mapping Table. The trigger is as follows.
CREATE TRIGGER  trgAfterEmployeeOnBoardSP ON [dbo].[Employee_MASTER]
FOR INSERT
AS
    declare @empid int;
    declare @SupervisorId int;

    select @empid=i.Emp_ID from inserted i;
    select @SupervisorId = i.Supervisor_ID from inserted i;

    INSERT INTO  Employee_Manager_Mapping

    VALUES(@empid, @SupervisorId);

GO
Creating Logic App
Before the Logic App can be created, it is necessary to set up an on premises data gateway to enable the communication between the Logic App on the cloud and the SQL data store on the premises. Refer Connecting to on-premises data sources with Azure On-premises Data Gateway . Once done following steps can be done to create the logic app.
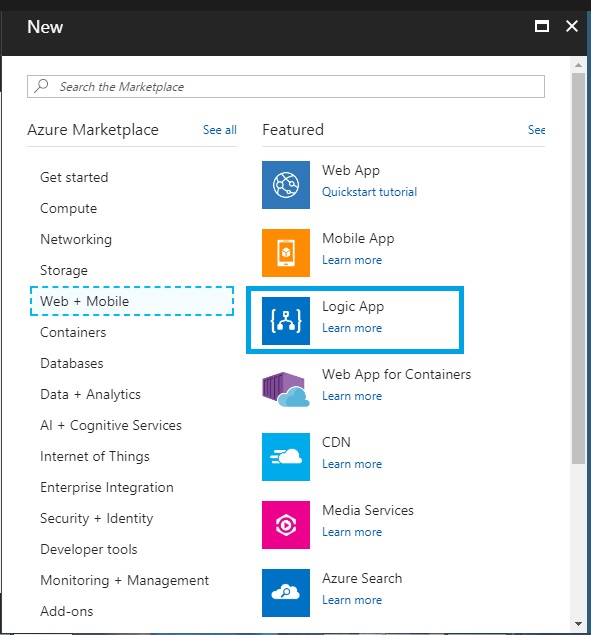
Select the Logic App from the Azure Market Place
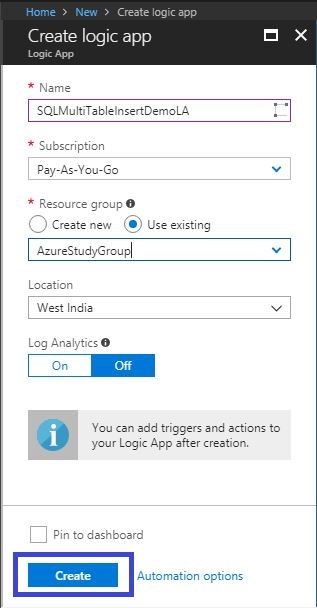
Select the Details like subscription, Resource Group, Location and then ht the create blade on the blade. Refer below screenshot.
Select the HTTP Trigger template from the list of available templates as shown below.
In order to define the input message, use the Upload Sample Payload To Generate Schema (highlighted in yellow), Paste following sample message which can be used to generate the input schema. After that Click on Advanced Options and select the method as POST.
{
    "EmployeeId" : 123,
    "EmployeeName" : "Mandar Dharmadhikari",
    "Salary" : 10000.20,
    "SupervisorId" : 345
}
Refer following sample screenshot for the configuration of the HTTP Trigger
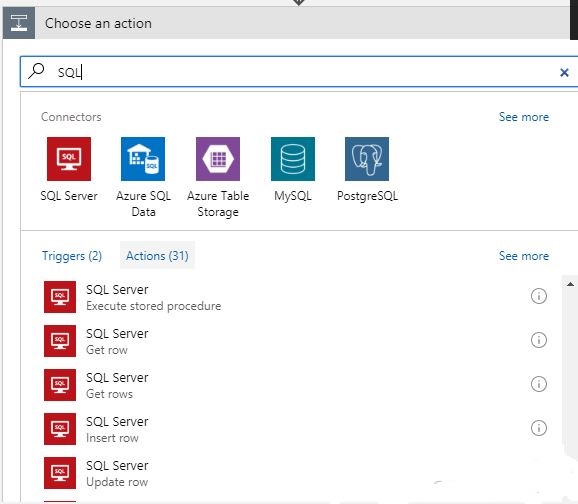
Once the HTTP POST request is received , the On Premises SQL datastore can be updated with the employee details. The Action to execute the stored procedure from the list of SQL action is to be selected. Refer sample screen shot.
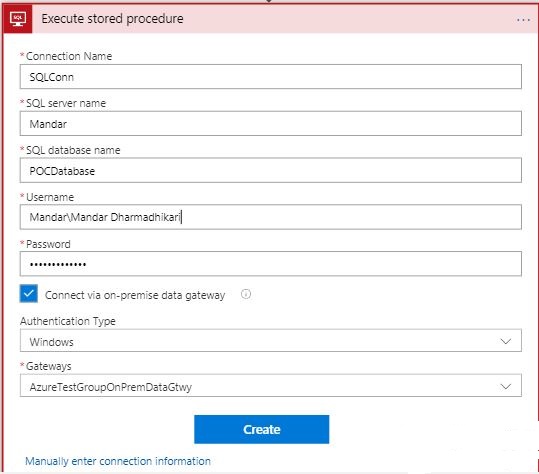
Create the connection to the On Premise SQL server data store using the on premise data gateway. Refer following sample screen shot
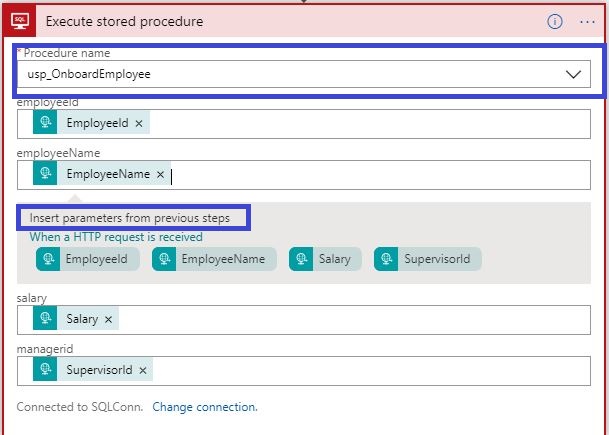
Select the SQL stored procedure usp_onboardEmployee which was created earlier and use the fields that are recieved from the HTTP Post call. Refer a sample screen shot below.
Save the Logic App. This will create the end point that can be copied from the HTTP trigger and used to test the solution developed.
Testing
A utility like POSTMAN or SOAP UI can be used to test the Logic App created above. The sample message used while creating the json payload for the HTTP trigger is used for testing. The payload is as follows.
{
    "EmployeeId" : 123,
    "EmployeeName" : "Mandar Dharmadhikari",
    "Salary" : 10000.20,
    "SupervisorId" : 345
}
The url copied from the HTTP Trigger is the one which should be consumed in the POSTMAN. The content-type header for the request should be set to application/json. Following is the screen shot of the request that is sent to the Logic App.
Following screenshot confirms the successful execution of the Flow.
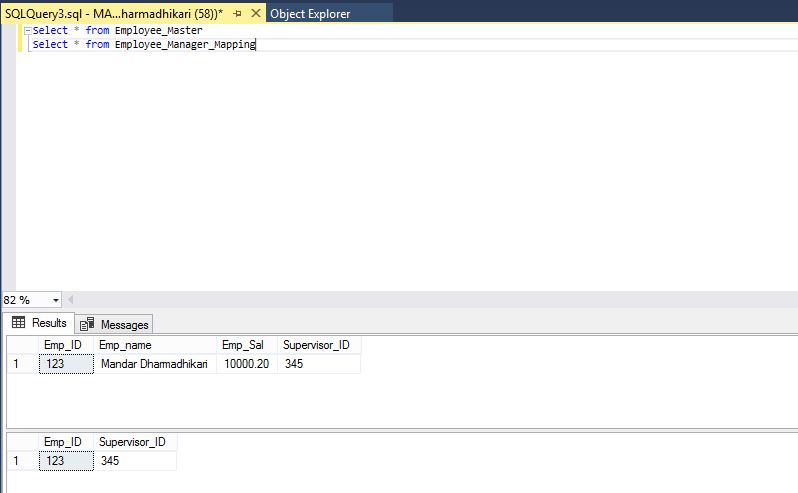
When Following query is run on the on premises data store, the results returned as shown in the screen shot following the query.
Select * from Employee_Master
Select * from Employee_Manager_Mapping
Conclusion
As evident from the testing results, a single action from logic app can be used in conjunction with the SQL trigger when similar data is to be updated across multiple sql tables in the data store.
See Also
Following articles can be visited for extra reading related to the topic discussed above.
- Create Azure Logic App
- Microsoft Azure: Building a Logic App
- Logic Apps: Face Verification Using Microsoft Cognitive Services Face Api and Logic Apps
- Updating Users With Daily Weather Forecasts Using Logic Apps
- Logic App Resources Wiki Portal
References
Content from following articles was referred while writing the article.
- Connecting to on-premises data sources with Azure On-premises Data Gateway
- CREATE TRIGGER (Transact-SQL)
