BizTalk Server: Implementing Continuous Integration and Deployment For BizTalk Using BTDF and Jenkins
Introduction
With the advent of agile methodology for the project delivery, a scenario where the code changes from multiple developers need to be built and tested on the build server presents itself very frequently even for multiple times even in a single day. And testing the build includes a lot of manual work right from building the code to verifying the deployment of the code on the build server. Continuous Integration and Deployment provide a way of coping up with this demand of the testing and deployment of the code to the environments like Preproduction, Quality Assurance servers and even to the production environment. Continuous integration and deployment focus on automating following steps using various CI CD tools like Visual Studio Team Services (VSTS), Jenkins etc.
- Fetch the code from the Source Control
- Build the code
- Run Unit Tests
- Generate The Deployment Packages
- Install And Deploy the Packages
- Run the Deployment Verification/Integration Tests
- Push the MSI to the next target Server.
Steps 1 to 6 are done on the build server with a run restriction based upon the success of the predecessor steps. Once the Steps 1 through 6 are executed successfully, the installer package can be released to the immediate higher environment where the CI/CD tool deploys the installer package and then hands over the control for actual testing to the Testing Teams. The successful testing then can prompt the movement of the package to the next higher environment and so on till the code actually reaches the production environment.
BizTalk CI CD
This concept can be applied to the BizTalk solutions. The CI CD approach can be used to automate the building and deployment of the BizTalk code across multiple environments. The CI CD approach for BizTalk applications is a bit different as the deployment of the BizTalk applications is different from normal .NET apps. Various tools aid in setting up BizTalk CI CD right from the Source Control to the deployment. This entire process can be achieved using the Team Foundation Server, Visual Studio Team Services or other open source application like Jenkins. This article deals with setting up the CI CD for BizTalk using Jenkins in combination with PowerShell scripts, MSBuild and Windows batch files. Following tools are used to set up the CI CD cycle for BizTalk
- GIT Repository - Used for Source Control (Build Server Should have the GIT Command Line Tools Installed to Pull The Code from GIT)
- Visual Studio - Used to Build BizTalk Application
- BizUnit and Visual Studio Testing Framework - Used to write and execute the Unit Test Cases for the BizTalk schemas, Maps and Helper class Methods
- BizTalk Deployment Framework - Used to create the mMSIinstaller package for the BizTalk application.
- NUnit - Used to run Post Deployment Integration tests
- Jenkins- Used as the CI CD server. To automate the building and testing of the BizTalk applications.
CICD Flow
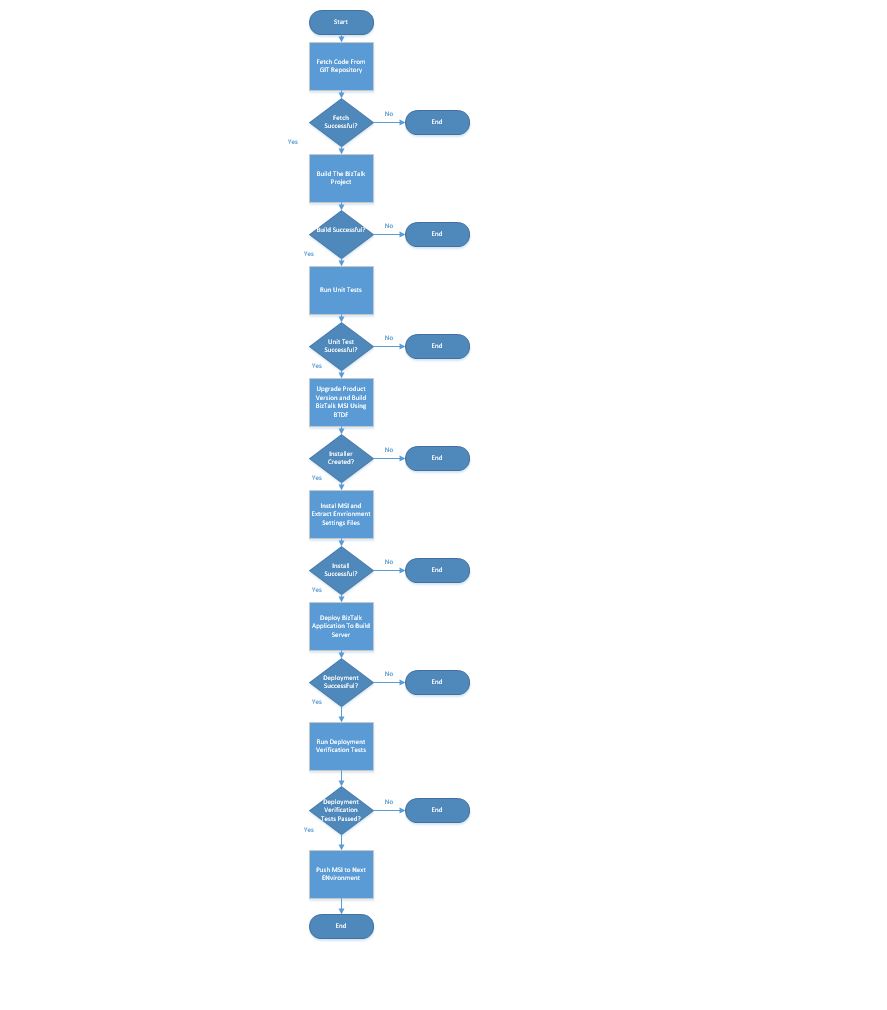
Following flowchart describes the flow for the build server pipeline tasks related to the CICD.
Sample BizTalk Application
The application used in this demonstration is a simple application which takes the first name and the last name of the person and returns the full name by appending the first and the last name. The BizTalk application is invoked through a WCF service. Following are the input and the output schemas used in the app.
Input.xsd
<xs:schema xmlns="http://SampleBTApp.Schemas.Input" xmlns:b="http://schemas.microsoft.com/BizTalk/2003" targetNamespace="http://SampleBTApp.Schemas.Input" xmlns:xs="http://www.w3.org/2001/XMLSchema">
  <xs:element name="Req">
    <xs:complexType>
      <xs:sequence>
        <xs:element name="FirstName" type="xs:string" />
        <xs:element name="LastName" type="xs:string" />
      </xs:sequence>
    </xs:complexType>
  </xs:element>
</xs:schema>
Output.xsd
<xs:schema xmlns="http://SampleBTApp.Schemas.Output" xmlns:b="http://schemas.microsoft.com/BizTalk/2003" targetNamespace="http://SampleBTApp.Schemas.Output" xmlns:xs="http://www.w3.org/2001/XMLSchema">
  <xs:element name="Resp">
    <xs:complexType>
      <xs:sequence>
        <xs:element name="FullName" type="xs:string" />
      </xs:sequence>
    </xs:complexType>
  </xs:element>
</xs:schema>
The BizTalk application project also has a unit test helper and unit tests project which contains the unit tests to test the map which is used to transform the input to output. The Unit Test projects take the help of the BizUnit framework and the Visual Studio Testing framework to run the unit tests. Following piece of code shows the implementation of the classes from the BizUnit framework and how they can be used to create the method to test the Maps in the sample BizTalk application.
01.using System.Collections.Generic;
02.using BizUnit.TestSteps.Common;
03.using BizUnit.TestSteps.ValidationSteps.Xml;
04.using BizUnit.TestSteps.File;
05.using Microsoft.BizTalk.TestTools.Mapper;
06.using BizUnit.Core.TestBuilder;
07.namespace SampleBTApp.TestHelper
08.{
09.    public static  class MapTestHelpers
10.    {
11.        public static  void MapTest(string inputMessageFolderPath, string outputMessageFolderPath, TestableMapBase target,  string sourceFile, SchemaDefinition sourceSchema, string  destinationFile, SchemaDefinition destinationSchema,  List<XPathDefinition> xpathList)
12.        {
13.            ValidateSouceMessage(inputMessageFolderPath, sourceFile, sourceSchema);
14.
15.            string inputMessagePath = inputMessageFolderPath + sourceFile;
16.            string outputMessagePath = outputMessageFolderPath + destinationFile;
17.
18.            target.ValidateInput = false;
19.            target.ValidateOutput = false;
20.            target.TestMap(inputMessagePath, Microsoft.BizTalk.TestTools.Schema.InputInstanceType.Xml, outputMessagePath,  Microsoft.BizTalk.TestTools.Schema.OutputInstanceType.XML);
21.
22.
23.        }
24.
25.        public static  void ValidateSouceMessage(string inputMessageFolderPath, string inputFile, SchemaDefinition sourceSchema)
26.        {
27.            FileReadMultipleStep fileReadStep = new FileReadMultipleStep();
28.
29.            fileReadStep.DeleteFiles = false;
30.            fileReadStep.DirectoryPath = inputMessageFolderPath;
31.            fileReadStep.SearchPattern = inputFile;
32.            fileReadStep.FailOnError = true;
33.            fileReadStep.ExpectedNumberOfFiles = 1;
34.
35.            XmlValidationStep inputValidationStep = new XmlValidationStep();
36.            inputValidationStep.XmlSchemas.Add(sourceSchema);
37.
38.            fileReadStep.SubSteps.Add(inputValidationStep);
39.            TestCase inValTestCase = new TestCase();
40.            inValTestCase.Name = "Validate Input Message";
41.            inValTestCase.ExecutionSteps.Add(fileReadStep);
42.
43.            BizUnit.Core.TestRunner testRunner = new BizUnit.Core.TestRunner(inValTestCase);
44.            testRunner.Run();
45.
46.
47.        }
48.
49.
50.        public static  void ValidateDestinationMessage(string OutoutputMessageFolderPath, string outputFile, SchemaDefinition  destinationSchema, List<XPathDefinition> xpathList)
51.        {
52.            FileReadMultipleStep fileReadStep = new FileReadMultipleStep();
53.            fileReadStep.DeleteFiles = false;
54.            fileReadStep.FailOnError = true;
55.            fileReadStep.DirectoryPath = OutoutputMessageFolderPath;
56.            fileReadStep.SearchPattern = outputFile;
57.            fileReadStep.ExpectedNumberOfFiles = 1;
58.
59.
60.            XmlValidationStep validateOutPutStep = new XmlValidationStep();
61.            validateOutPutStep.XmlSchemas.Add(destinationSchema);
62.
63.            foreach( var xpath in  xpathList)
64.            {
65.                validateOutPutStep.XPathValidations.Add(xpath);
66.            }
67.
68.            fileReadStep.SubSteps.Add(validateOutPutStep);
69.
70.            TestCase outValTestCase = new TestCase();
71.            outValTestCase.Name= "Validate Output Message";
72.            outValTestCase.ExecutionSteps.Add(fileReadStep);
73.
74.            BizUnit.Core.TestRunner testRunner = new BizUnit.Core.TestRunner(outValTestCase);
75.            testRunner.Run();
76.
77.
78.
79.        }
80.    }
81.}
Following class shows how the unit test cases written to test the maps.
01.using System;
02.using Microsoft.VisualStudio.TestTools.UnitTesting;
03.using SampleBTApp.TestHelper;
04.using BizUnit.TestSteps.ValidationSteps.Xml;
05.using Microsoft.BizTalk.TestTools.Mapper;
06.using SampleBTApp.Maps;
07.using System.Collections.Generic;
08.using BizUnit.TestSteps.Common;
09.namespace SampleBTApp.UnitTests
10.{
11.    [TestClass]
12.    public class  MapTests
13.    {
14.        private const  string InputFileDirectory =  @"E:\BizTalkCICDUsingJenkins\BizTalkApp\SampleBTApp\SampleBTApp.UnitTests\SampleMessages\In\";
15.        private const  string OutputFileDirectory =  @"E:\BizTalkCICDUsingJenkins\BizTalkApp\SampleBTApp\SampleBTApp.UnitTests\SampleMessages\Out\";
16.
17.        SchemaDefinition sourceSchema = new SchemaDefinition()
18.        {
19.            XmlSchemaNameSpace = "http://SampleBTApp.Schemas.Input",
20.            XmlSchemaPath = @"E:\BizTalkCICDUsingJenkins\BizTalkApp\SampleBTApp\SampleBTApp.Schemas\Input.xsd"
21.
22.        };
23.
24.        SchemaDefinition destinationSchema = new SchemaDefinition()
25.        {
26.            XmlSchemaNameSpace = "http://SampleBTApp.Schemas.Output",
27.            XmlSchemaPath = @"E:\BizTalkCICDUsingJenkins\BizTalkApp\SampleBTApp\SampleBTApp.Schemas\Output.xsd"
28.        };
29.
30.        [TestMethod]
31.        public void  TestTransform_Input_To_OutputMap()
32.        {
33.            var inputSchema = sourceSchema;
34.            var outputSchema = destinationSchema;
35.            const string  inputFile = "Input.xml";
36.            const string  outputFile = "Output.xml";
37.            const string  fullNameXpath = "/*[local-name()='Resp' and namespace-uri()='http://SampleBTApp.Schemas.Output']/* [local-name()='FullName' and namespace-uri()='']";
38.
39.            List<XPathDefinition> xpathList = new List<XPathDefinition>()
40.            {
41.                new XPathDefinition()
42.                {
43.                    XPath = fullNameXpath,
44.                    Value = "Mandar Dharmadhikari"
45.
46.                }
47.            };
48.
49.            TestableMapBase target = new  Maps.Input_To_Output();
50.            MapTestHelpers.MapTest(InputFileDirectory, OutputFileDirectory, target, inputFile, sourceSchema, outputFile,  destinationSchema, xpathList);
51.
52.        }
53.    }
54.}
These unit tests can be run from the Visual Studio just like other unit test cases.
The BizTalk Sample application also contains the deployment verification tests that use the NUnit framework for the testing.
Following code shows the method which calls the BizTalk exposed WCF service and passes the first and last name and checks if the response returned is as expected.
01.using System;
02.using System.Collections.Generic;
03.using System.Linq;
04.using System.Text;
05.using System.Threading.Tasks;
06.using SampleBTApp.DeploymentTests.SampleAppServiceRef;
07.public static  class NUnitUtility
08.{
09.    public static  bool TestBizTalkAppService(string firstName, string lastName)
10.    {
11.        bool retVal = false;
12.
13.        NameAppenderServiceClient client = new  NameAppenderServiceClient();
14.
15.        Req req = new  Req();
16.        req.FirstName = firstName;
17.        req.LastName = lastName;
18.
19.        Resp resp = client.AppendName(req);
20.
21.        if (resp != null && resp.FullName == firstName + " " + lastName)
22.            retVal=true;
23.        return retVal;
24.    }
25.}
Following is the code used for writing the NUnit test cases.
01.using System;
02.using System.Collections.Generic;
03.using System.Linq;
04.using System.Text;
05.using System.Threading.Tasks;
06.using NUnit.Framework;
07.namespace SampleBTApp.DeploymentTests
08.{
09.    [TestFixture]
10.    public static  class VerifyDeployment
11.    {
12.        [Test]
13.        public static  void TestBizTalkWCFService()
14.        {
15.            var retVal= NUnitUtility.TestBizTalkAppService("Mandar", "Dharmadhikari");
16.            Assert.AreEqual(true, retVal);
17.
18.        }
19.    }
20.}
These Nunit Test cases can be bundled in the BTDF deployment for the application. There are some important settings that need to be done in the BTDF .btdfproj file to allow the auto-termination of the instances, deploying the IIS application, creating the IIS app pools and the IIS reset. The btdf project file for this sample application is as below.
<?xml version="1.0" encoding="utf-8"?>
<!--
  Deployment Framework for BizTalk
  Copyright (C) Thomas F. Abraham, Scott Colestock
-->
<Project xmlns="http://schemas.microsoft.com/developer/msbuild/2003" DefaultTargets="Installer">
  <PropertyGroup>
    <Configuration Condition="'$(Configuration)' == ''">Debug</Configuration>
    <Platform Condition="'$(Platform)' == ''">x86</Platform>
    <SchemaVersion>1.0</SchemaVersion>
    <ProjectName>SampleBTApp</ProjectName>
    <ProjectVersion>1.0</ProjectVersion>
    <IncludeVirtualDirectories>True</IncludeVirtualDirectories>
    <IncludeDeploymentTest>True</IncludeDeploymentTest>
    <UsingMasterBindings>True</UsingMasterBindings>
    <RequireXmlPreprocessDirectives>False</RequireXmlPreprocessDirectives>
    <ApplyXmlEscape>True</ApplyXmlEscape>
    <AutoTerminateInstances>True</AutoTerminateInstances>
    <MsiName>SampleBTApp</MsiName>
    <SkipIISReset>False</SkipIISReset>
    <IncludeDeploymentTest>True</IncludeDeploymentTest>
    <DefaultInstallDir>c:\BTDFInstall\SampleBTApp\1.0</DefaultInstallDir>

  </PropertyGroup>
  <PropertyGroup>
    <!-- Properties related to building an MSI for server deployments -->
    <!-- BizTalk App Version Upgrade -->
    <!--   For each new product release to be deployed to your BizTalk servers: -->
    <!--     1) Increment ProductVersion -->
    <!--     2) Generate a new GUID and update ProductId with the new GUID -->
    <!--   This allows the new MSI to automatically uninstall (not undeploy!) the old MSI and install the new one. -->
    <ProductVersion>1.0.01</ProductVersion>
    <ProductId>408fe762-c721-4963-b47a-7ea6b9068f25</ProductId>
    <!-- BizTalk App Version Upgrade -->
    <ProductName>SampleBTApp</ProductName>
    <Manufacturer>Deployment Framework User</Manufacturer>
    <PackageDescription>SampleBTApp</PackageDescription>
    <!-- NEVER change the ProductUpgradeCode. -->
    <ProductUpgradeCode>ef8b2bb5-e10e-40c1-9f31-b04c730fd36f</ProductUpgradeCode>
  </PropertyGroup>
  <!-- Under TFS Team Build, set CustomizableOutDir property to true in TFS 2005/2008/2010 UpgradeTemplate. -->
  <!-- With a workflow build, copy the default template then modify the MSBuild task for the solution build. Set OutDir to blank and -->
  <!-- CommandLineArguments to String.Format("/p:SkipInvalidConfigurations=true;TeamBuildOutDir=""{0}"" {1}", BinariesDirectory, MSBuildArguments). -->
  <PropertyGroup Condition="'$(Configuration)' == 'Debug'">
    <DeploymentFrameworkTargetsPath>$(MSBuildExtensionsPath)\DeploymentFrameworkForBizTalk\5.0\</DeploymentFrameworkTargetsPath>
    <OutputPath Condition="'$(TeamBuildOutDir)' == ''">bin\Debug\</OutputPath>
    <OutputPath Condition="'$(TeamBuildOutDir)' != ''">$(TeamBuildOutDir)</OutputPath>
  </PropertyGroup>
  <PropertyGroup Condition="'$(Configuration)' == 'Release'">
    <DeploymentFrameworkTargetsPath>$(MSBuildExtensionsPath)\DeploymentFrameworkForBizTalk\5.0\</DeploymentFrameworkTargetsPath>
    <OutputPath Condition="'$(TeamBuildOutDir)' == ''">bin\Release\</OutputPath>
    <OutputPath Condition="'$(TeamBuildOutDir)' != ''">$(TeamBuildOutDir)</OutputPath>
  </PropertyGroup>
  <PropertyGroup Condition="'$(Configuration)' == 'Server'">
    <DeploymentFrameworkTargetsPath>Framework\</DeploymentFrameworkTargetsPath>
    <!-- Get our PDBs into the GAC so we get file/line number information in stack traces. -->
    <DeployPDBsToGac>false</DeployPDBsToGac>
  </PropertyGroup>
  <ItemGroup>
    <PropsFromEnvSettings Include="SsoAppUserGroup;SsoAppAdminGroup" />
  </ItemGroup>
  <!-- !!! TODO !!! -->
  <!-- Add ItemGroup elements that contain one or more Schemas, Orchestrations, Transforms, etc. elements that describe -->
  <!-- the specific artifacts in your solution that need to be deployed. Use IntelliSense as a guide. -->
  <ItemGroup>
    <Schemas Include="SampleBTApp.Schemas.dll">
      <LocationPath>..\$(ProjectName).Schemas\bin\$(Configuration)</LocationPath>
    </Schemas>
  </ItemGroup>
  <ItemGroup>
    <Orchestrations Include="SampleBTApp.Orchestrations.dll">
      <LocationPath>..\$(ProjectName).Orchestrations\bin\$(Configuration)</LocationPath>
    </Orchestrations>
  </ItemGroup>
  <ItemGroup>
    <Transforms Include="SampleBTApp.Maps.dll">
      <LocationPath>..\$(ProjectName).Orchestrations\bin\$(Configuration)</LocationPath>
    </Transforms>
  </ItemGroup>
  <ItemGroup>
    <DeploymentTest Include="SampleBTApp.DeploymentTests.dll">
      <LocationPath>..\SampleBTApp.DeploymentTests\bin\$(Configuration)</LocationPath>
    </DeploymentTest>
  </ItemGroup>
  <ItemGroup>
    <IISAppPool Include="SampleBTApp.Services">
      <DeployAction>Create</DeployAction>
      <UndeployAction>Delete</UndeployAction>
      <DotNetFrameworkVersion>v4.0</DotNetFrameworkVersion>
      <PipelineMode>Integrated</PipelineMode>
      <UserName>mandar\mandar dharmadhikari</UserName>
      <Password>Microsoft@234</Password>
      <IdentityType>SpecificUser</IdentityType>
    </IISAppPool>
  </ItemGroup>
  <ItemGroup>
    <IISApp Include="SampleAppWcfService">
      <AppPoolName>SampleBTApp.Services</AppPoolName>
      <DeployAction>CreateOrUpdate</DeployAction>
      <UndeployAction>Delete</UndeployAction>
      <PhysicalPath>..\SampleBTApp.Services</PhysicalPath>
      <VirtualPath>/SampleAppWcfService</VirtualPath>
      <Exclusions>*.csproj;Web.Debug.config;Web.Release.config;obj;Properties;bin</Exclusions>
    </IISApp>
  </ItemGroup>

  <!-- !!! TODO !!! -->
  <Import Project="$(DeploymentFrameworkTargetsPath)BizTalkDeploymentFramework.targets" />
  <!--
    The Deployment Framework automatically packages most files into the server install MSI.
    However, if there are special folders that you need to include in the MSI, you can
    copy them to the folder $(RedistDir) in the CustomRedist target.
    To include individual files, add an ItemGroup with AdditionalFiles elements.
  -->
  <Target Name="CustomRedist">
  </Target>
</Project>
Configuration Steps
The setup of a Build Pipeline using Jenkins to achieve CI CD for BizTalk requires the use of some batch files and PowerShell scripts to achieve an end top end automated process. This section covers the batch and PowerShell scripts along with the basic setup of Jenkins for connecting to the GIT and Configuration of the Build Pipeline
Supportive Batch Files and PowerShell Scripts
Bach File To Build The BizTalk Code: In order to build the Visual Studio code, the devenv.exe command can be run in the silent mode and the build log can be sent to a log file. In case if there are any build errors in the solution, the batch file will cause generate a fail message which will cause the who;e flow to halt. Following is the sample batch file. It can be configured to point to the location where the code fetched from the GIT is kept.
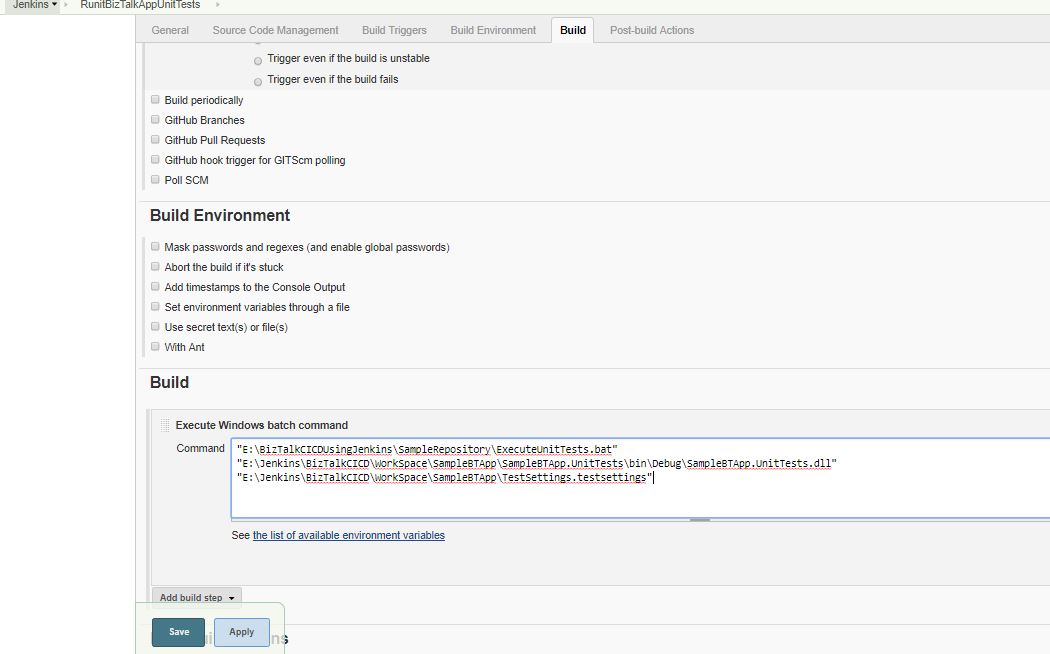
"<Visual Studio Installation Path>\Common7\IDE\devenv.exe" %1 /Build Debug /Out <BizTalkAppName>_VSBuildLog.logBatch File To Execute the Unit Test Cases: In order to run the Unit Test cases, the VSTests.Console.exe command line exe needs to be run by providing parameters like the assembly containing the unit tests and the test settings file. Again it is possible to generate the log file for the run unit test cases. ( See References for more Details).
"<VS Installation Path>\Common7\IDE\CommonExtensions\Microsoft\TestWindow\vstest.console.exe" "<Path To the assembly(dll) containing the Unit Test Cases" /Setting:"Path To the Test Settings File"Power Shell Script to Modify the BTDF Proj file: One important point that needs to be taken care of while generating the BizTalk application MSI using BTDF is that the product version and the product id values need to be updated so that the upgraded version of the MSI is created. This facilitates the installation of MSI as an upgraded version the MSI will ensure that the older version gets uninstalled first and the newer version is installed later. If the version of the MSI is not upgraded then the administrator has to manually first uninstall the MSI from the control panel and then reinstall the new MSI. Following PowerShell script modifies the product version by changing the product id and the product version values in the BTDF proj file. This power shell accepts the path to the BTDF proj file as input and saves the modified btdf proj file at the same location.
01.param
02.(
03.    [Parameter(Mandatory=$true)]
04.    [string]$BTDFProjFilePath
05.
06.)
07.
08.Function UpdateBTDFFile($BTDFProjFilePath)
09.{
10.    if(Test-Path $BTDFProjFilePath)
11.    {
12.        write-host("Found the valid path ofr the btdf Project File")
13.        Write-Host("This script will now try to change the Product version and Product GUID")
14.
15.        $btdfprojxml= new-object xml
16.        [xml]$btdfprojxml = get-content -path $BTDFProjFilePath
17.        $Guid = [guid]::NewGuid()
18.
19.        foreach($projectgroup in $btdfprojxml.Project.PropertyGroup)
20.        {
21.            if( $projectgroup.ProductVersion -ne $null)
22.            {
23.                [string]$productId = $projectgroup.ProductVersion
24.                $version = $productId.Substring(3,2)
25.                [int]$verionint= $version
26.                write-Host($verionint)
27.                Write-Host("Current Version of the product is $productId")
28.                write-Host("Attempting to increament the product version now")
29.                $verionint = $verionint +1
30.                write-Host($verionint)
31.                       $productId=$productId.remove(4,1).Insert(4,"$versionInt")
32.                write-Host("New version of the Product is $productId")
33.                $projectgroup.ProductVersion = $productId
34.                $projectgroup.ProductId = [string]$Guid
35.
36.            }
37.
38.
39.        }
40.
41.        write-Host("Saving the xml File Now")
42.
43.        $btdfprojxml.Save($BTDFProjFilePath);
44.
45.
46.    }
47.}
48.UpdateBTDFFile -BTDFProjFilePath $BTDFProjFilePath
$productId = $productId.Replace(``"$version"``,``"$verionint"``)$pversion=$pversion.remove(4,1).Insert(4,"$versionInt")PowerShell Script To Install the Newly Generated MSI file and Export the Environment Settings File: This PowerShell script is designed to install the MSI generated by the BTDF at a particular location. Once the installation extracts the contents, the next step is to prep the settings file for the deployment of the BizTalk application on the server. This PowerShell Script accepts the location path where the MSI is stored and the path at which it needs to be installed.
param
    (
       [Parameter(Mandatory=$true)]
       $MsiPath,
       [Parameter(Mandatory=$true)]
       $InstallPath

    )


Function InstallBTDFMSI ($MsiPath, $InstallPath)
{


   if(($MsiPath -eq $null) -or ($InstallPath -eq $null))
   {
        write-Host("MSI Path /Install Path is missing")

   }
   else
   {
         cls

        Write-Host("Installation of MSI started")
        [string]$InstallArgument= "/i `"" + $MsiPath + "`""


        [string]$InstalDirArgument = "INSTALLDIR=`"" + $InstallPath +"`""
        write-Host($InstallArgument1)
        write-Host($InstalDirArgument)
        $MSIArguments = @(
            $InstallArgument
            "/qn"
            "/norestart"
            "/log BackEndService-1.0.03.log"
            $InstalDirArgument

                            )
        Write-Host ($MSIArguments)
        try
        {
            Start-Process "msiexec.exe"  -ArgumentList $MSIArguments -Wait -ErrorAction Stop
            ExportEnvironmentSettingsFile -InstallPath $InstallPath
        }
        catch
        {
            write-host $error[0]
            throw $LASTEXITCODE
        }

   }

}
Function ExportEnvironmentSettingsFile ($InstallPath)
{

    $InstallPathTemp = $InstallPath.Substring(1,(($InstallPath.Length)-2))
    Write-Host($InstallPathTemp)

    $SettingsFilePath = $InstallPath +"\Deployment\EnvironmentSettings\SettingsFileGenerator.xml"
    $SettingsFileExtractPath = $InstallPath + "\Deployment\EnvironmentSettings"
    $FilePath = "`"" +  $InstallPath + "\Deployment\Framework\DeployTools\EnvironmentSettingsExporter.exe" + "`""
    $ArgumentList = "`"" + $SettingsFilePath + "`" `"" +  $SettingsFileExtractPath + "`""
    Write-Host($ArgumentList)

    write-Host($FilePath)
    try
        {
            Start-Process -FilePath $FilePath -ArgumentList $ArgumentList -Wait -ErrorAction Stop
            ExportEnvironmentSettingsFile -InstallPath $InstallPath
        }
        catch
        {
            write-host $error[0]
            throw $LASTEXITCODE
        }

}

InstallBTDFMSI -MsiPath $MsiPath -InstallPath $InstallPath
Batch File To Run NUnit Tests: The Batch file uses the NUnit Console exe to run the NUnit Tests silently in the background. Nunit Console application can be downloaded from the Nuget Packages using Visual Studio. Following is the batch file.
"C:\Program Files (x86)\NUnit.org\nunit-console\nunit3-console.exe" "<Path To Nunit Test Assembly>" /out:TestResult.txtBatch File To Copy MSI to Shared Folder: The last task of the Build is to copy the MSI generated by BTDF to a shared folder if the build is successful end to end. This shared folder can be accessed from the next environment.
copy "Path Where Build MSi is Stored" "Path to the shared folder accessible from Next Environment"
Configuring and Setting Up Jenkins
What Is Jenkins?
Jenkins is an open source continuous integration server which uses an assortment of plugins to set up the CI CD process for various projects. It has the support for the execution of Windows Batch File, MSBuild and PowerShell executions and hence can be used to set up Continuous Integration of the .Net applications when the organization using the >NET technology in conjunction with other open source technologies and Source controls like GITHub. Jenkins with its plugins extends the support to fetch the code from the source control systems like GIT based on GIT webhooks /Periodic pull from the GIT server using the scheduler build. Jenkins can be downloaded from Download Jenkins
Setting Up Jenkins
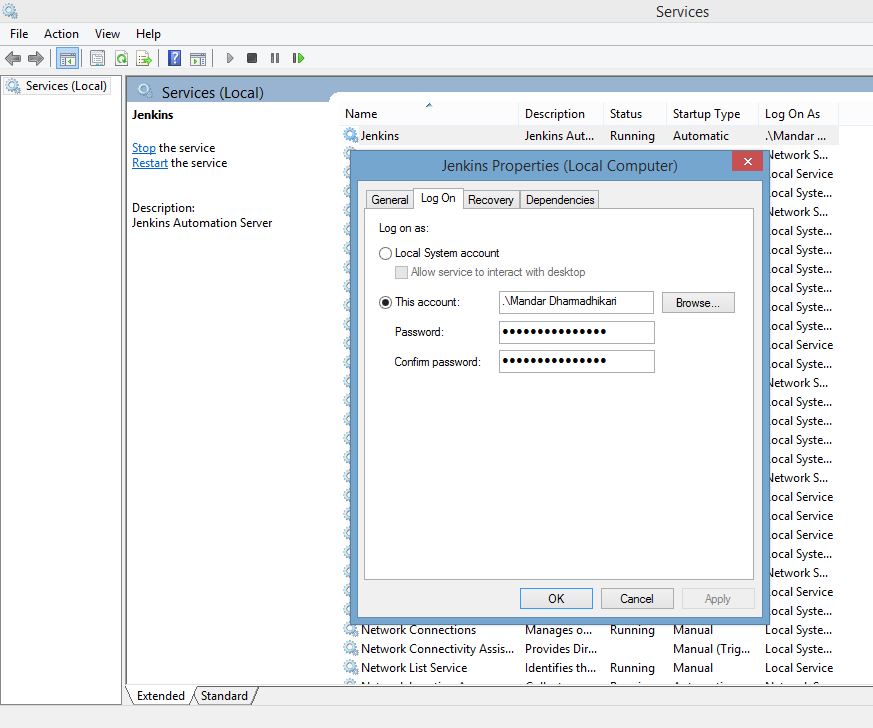
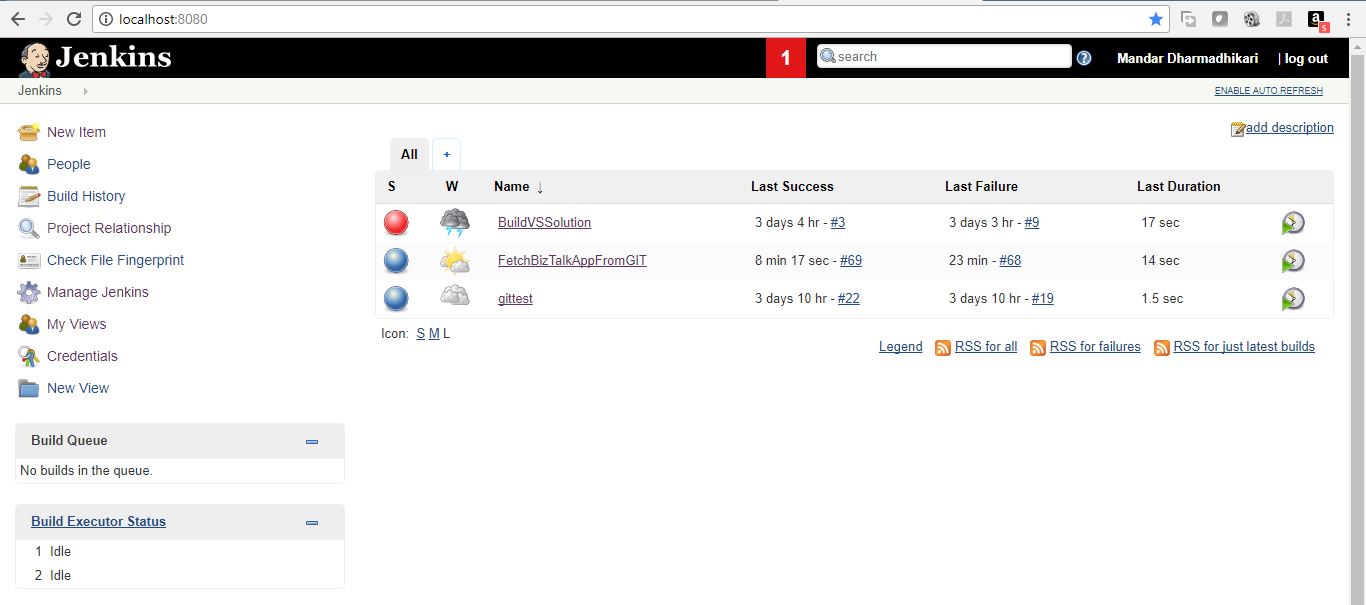
Jenkins is installed as a windows service and is available on http://localhost:8080 . In order to make Jenkins able to do the deployments to the BizTalk environment, it is imperative that the Jenkins Windows service is configured to run using a logon of the user which has the administrative privileges on the Server as well as BizTalk databases. Following screenshots show the service configuration and the sample home page of the Jenkins.
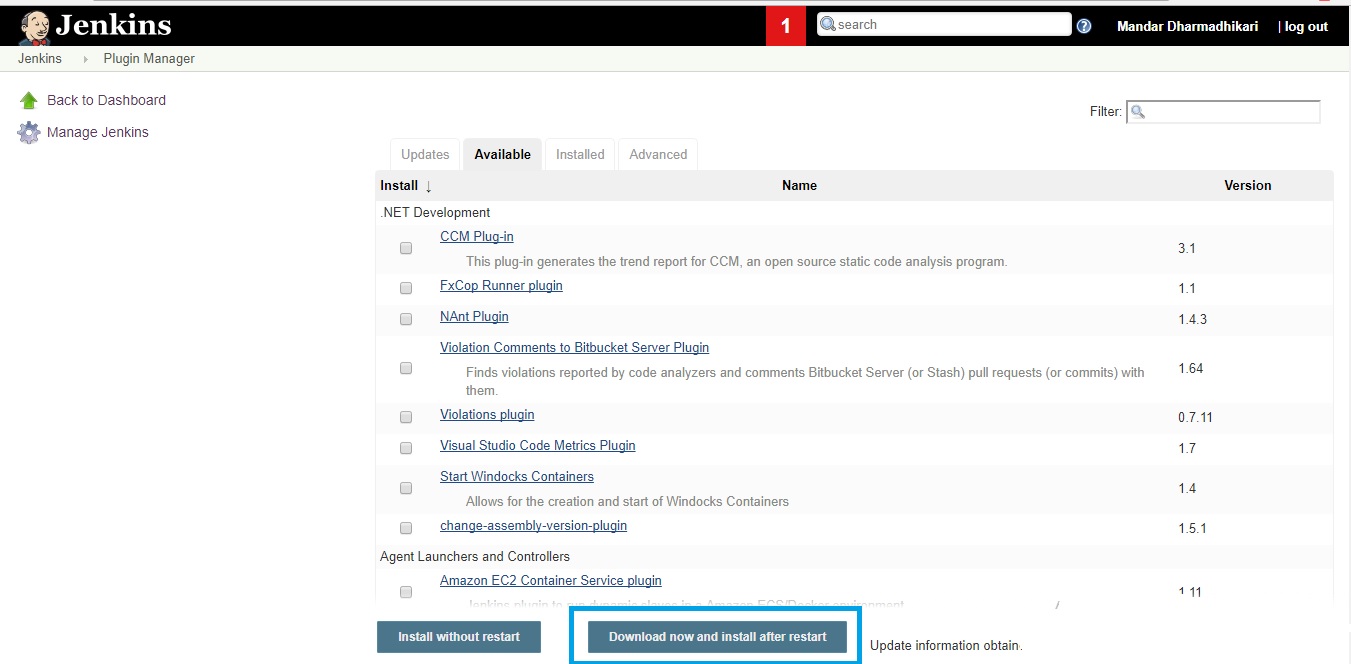
Once Jenkins is installed, following is the list of the plugins that need to be installed on the Jenkins Server.
- GITPlugin
- MSBuildPlugin
- PowerShell Plugin
- NUnit Plugin
- Pipeline Plugin
- Visual Studio Test Plugin /MS Test Plugin
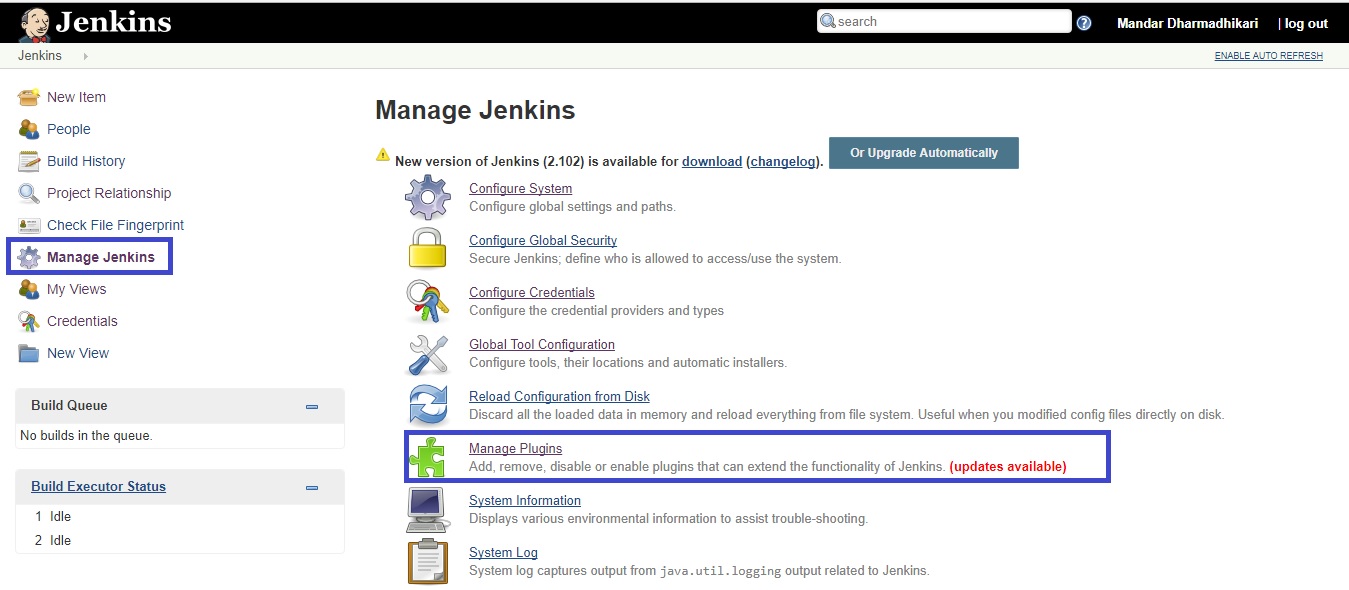
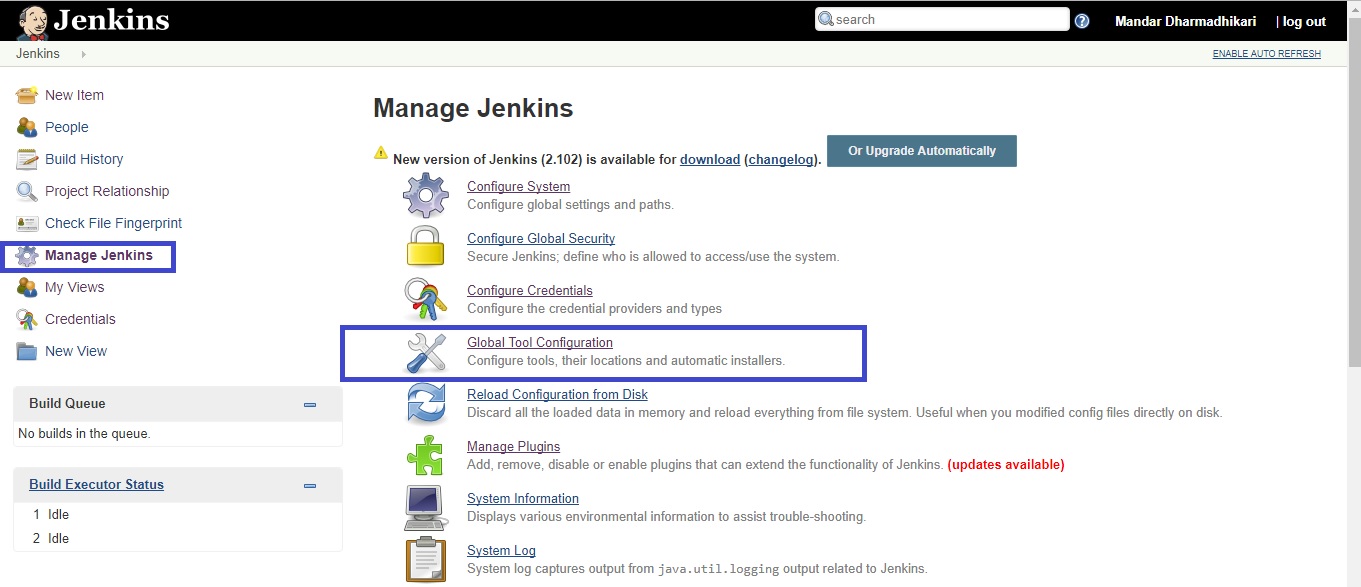
Refer to following set of screenshots to navigate to the page from which the plugins can be installed.
Configuring Plugins
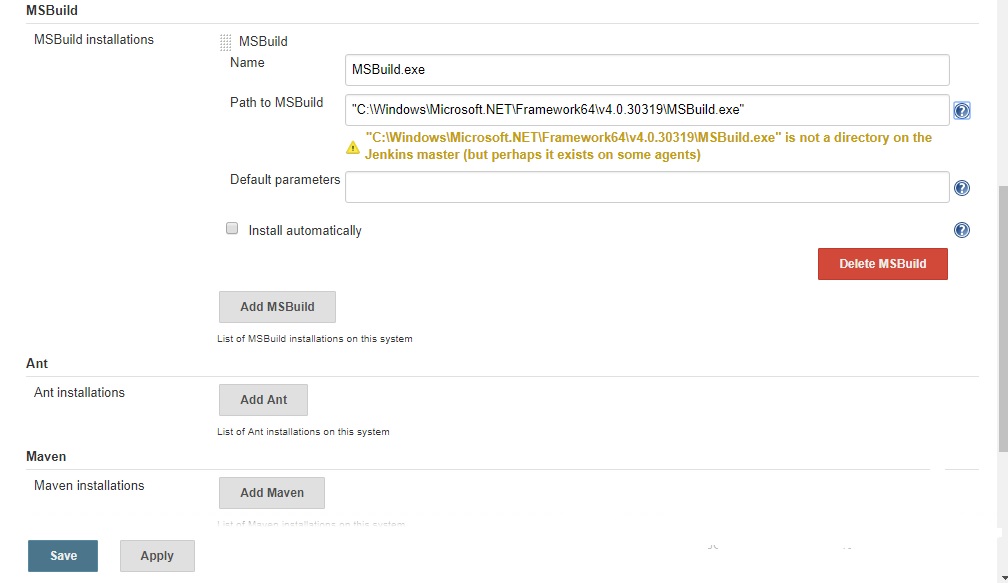
Once the Plugins listed above are downloaded, installed and the Jenkins service is restarted, next task is to configure the plugins like MSBuild and GIT. Refer following to set up the plugins.
MSBuild Plugin
Refer following screenshots to configure the MSBuild plugin.
Git Plugin
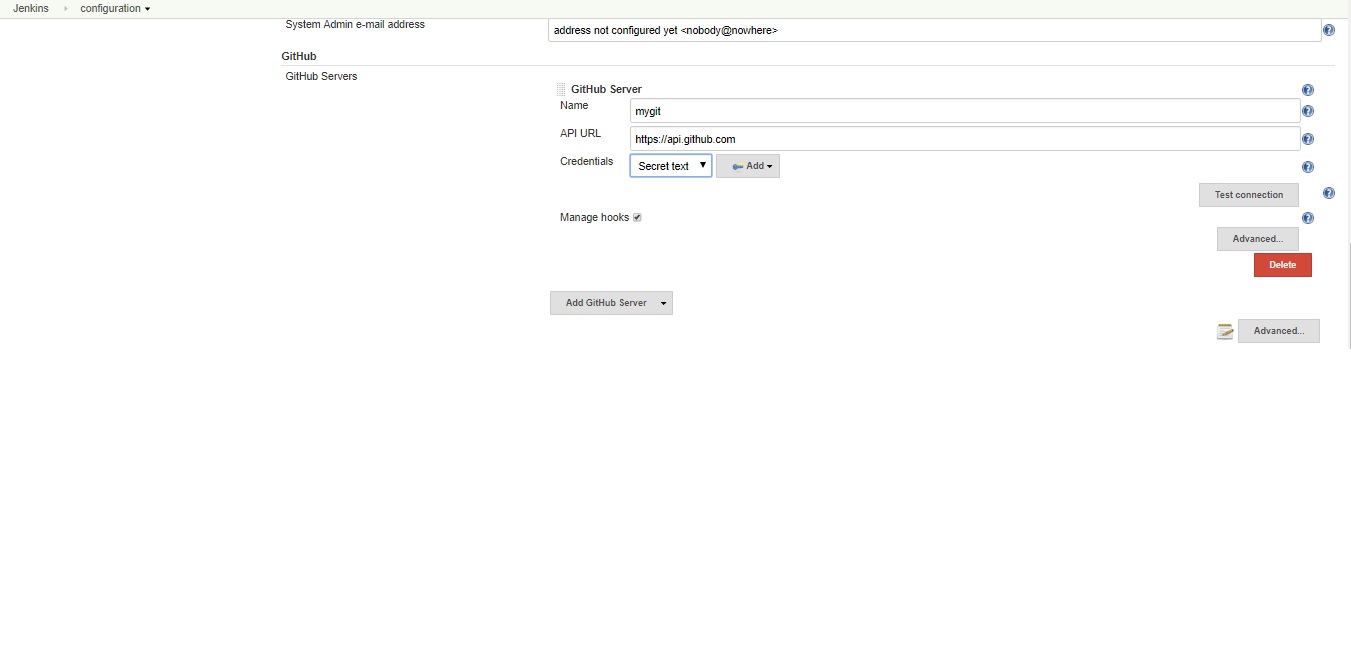
In order to connect to the Git repository, it is necessary to save the user access token for the logged in user in Jenkins. Refer to the following screenshot.
Following screen shot shows how to configure the GIT servers.
Once the GIT command line tools are installed on the Jenkins server, the path to git.exe is configured by default.
This completes the basic configuration set up for the Jenkins Server.
Configuring Build Pipeline
Once the basic configuration steps are done, Next step comes to the creation and configuration of the build jobs for each of the steps mentioned in the Introduction.
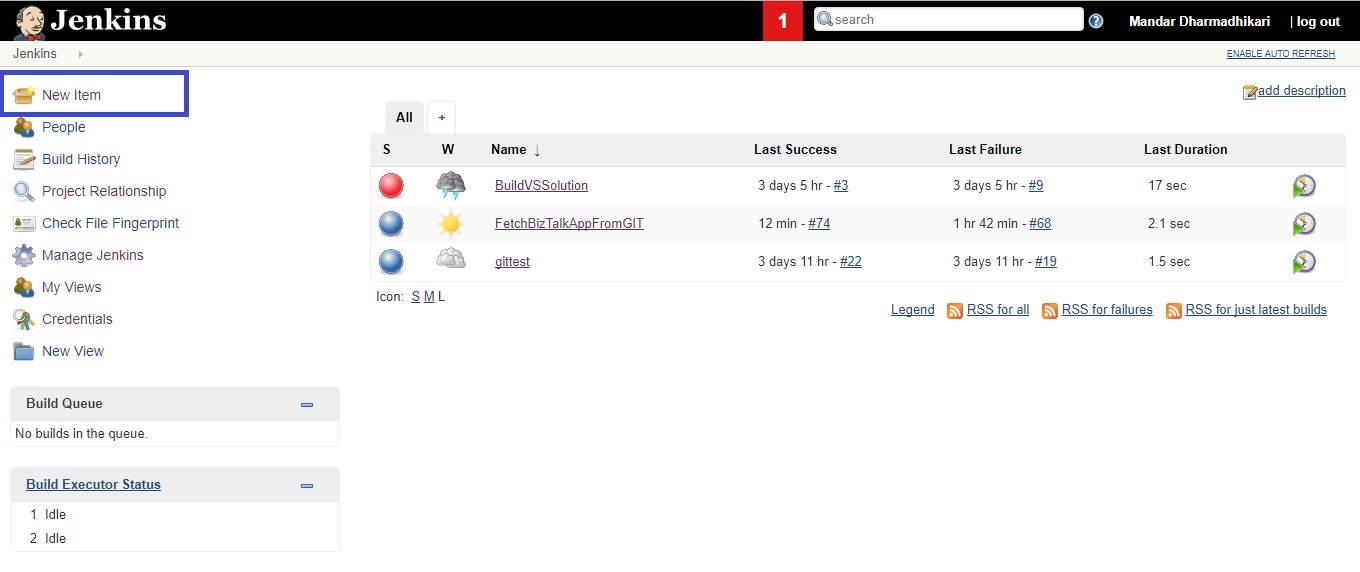
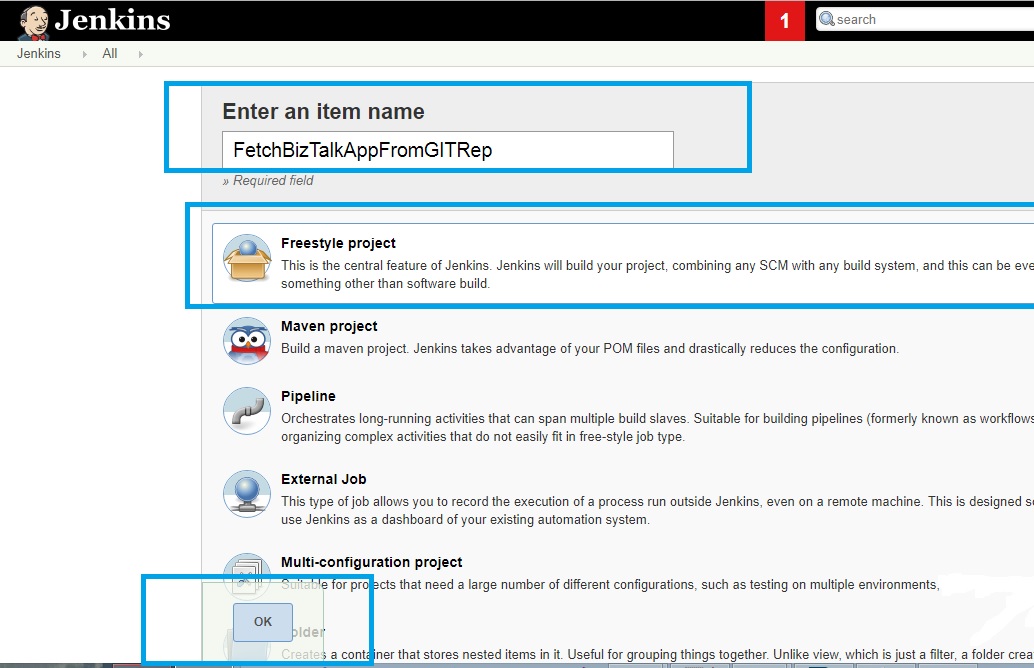
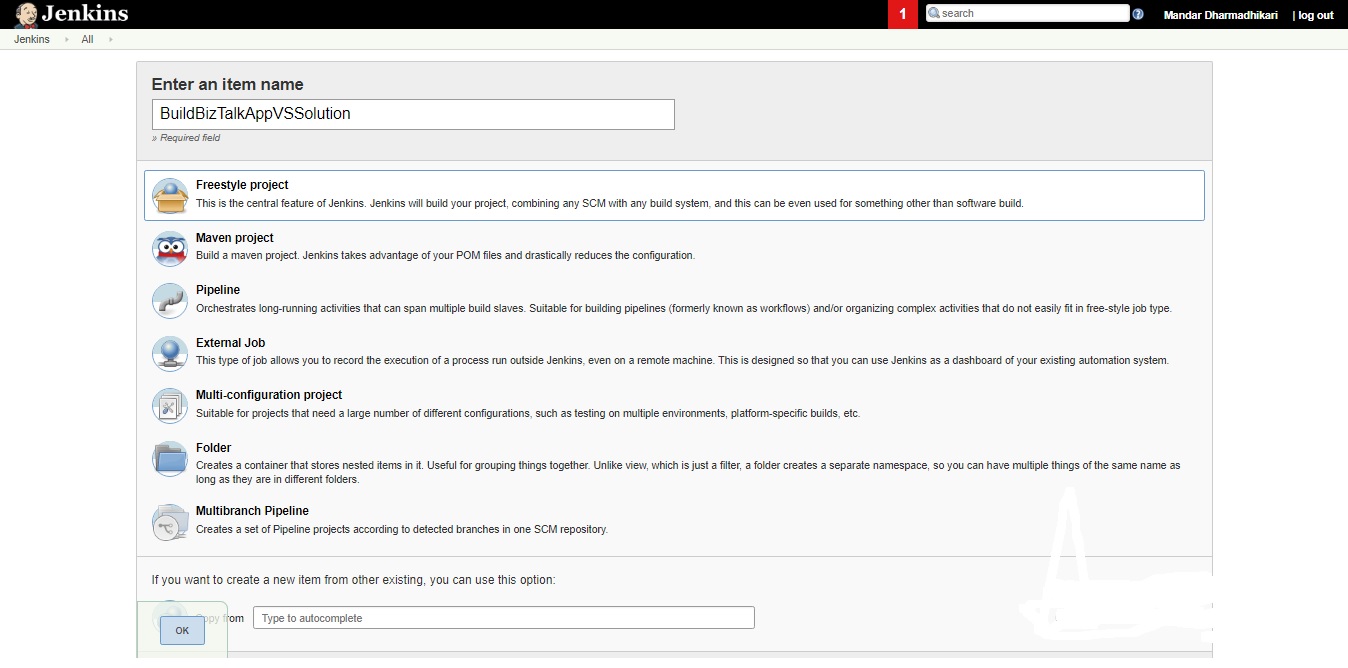
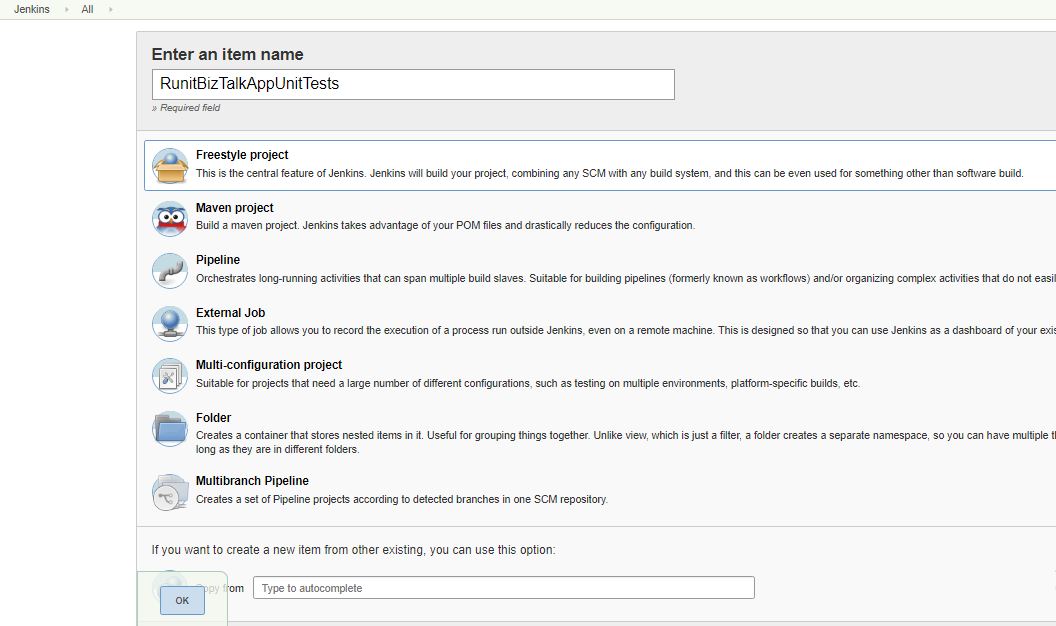
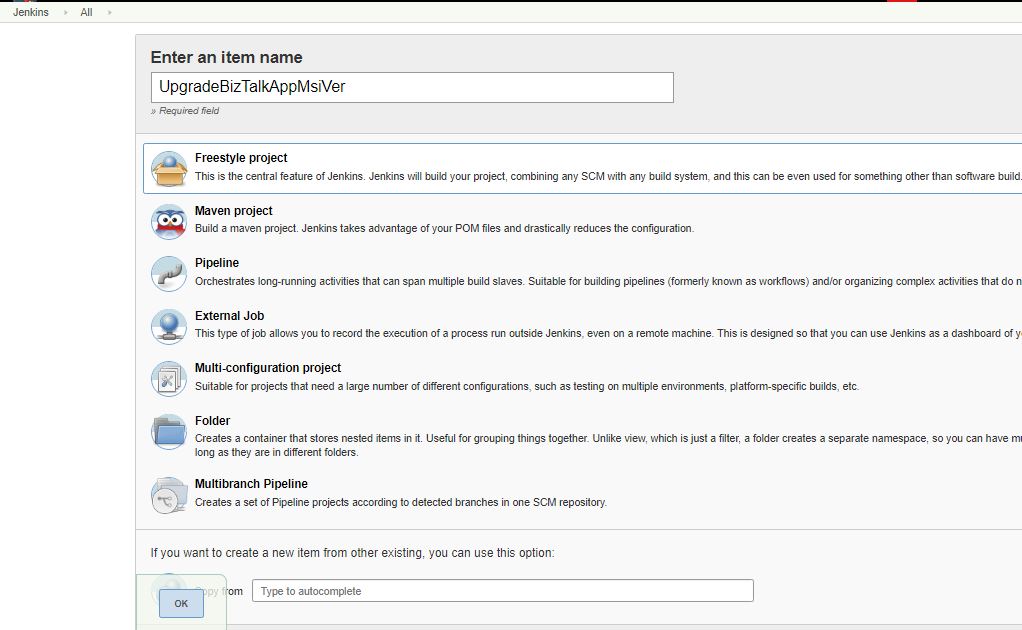
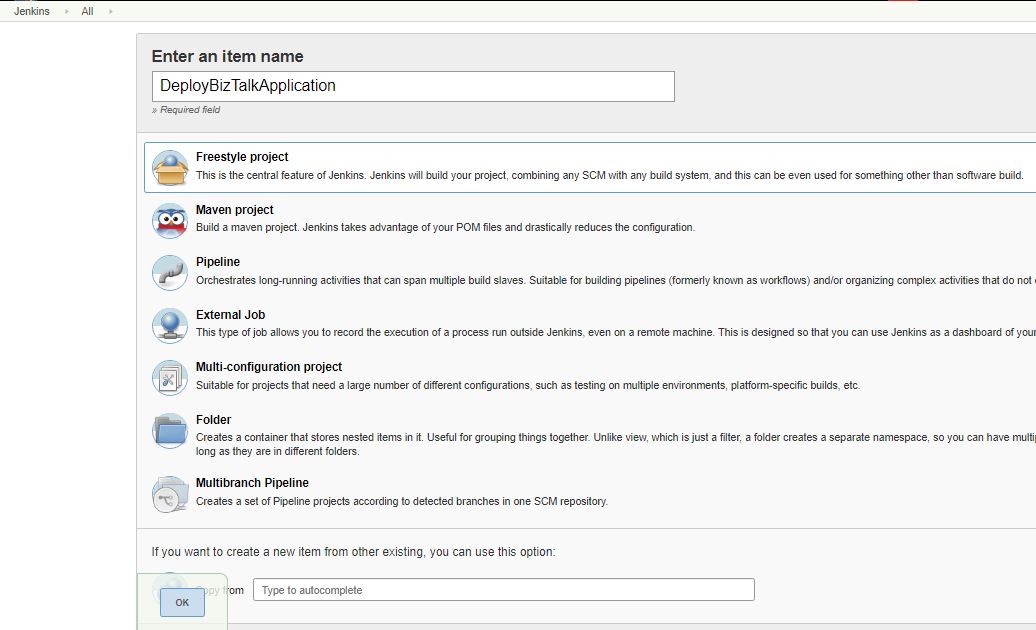
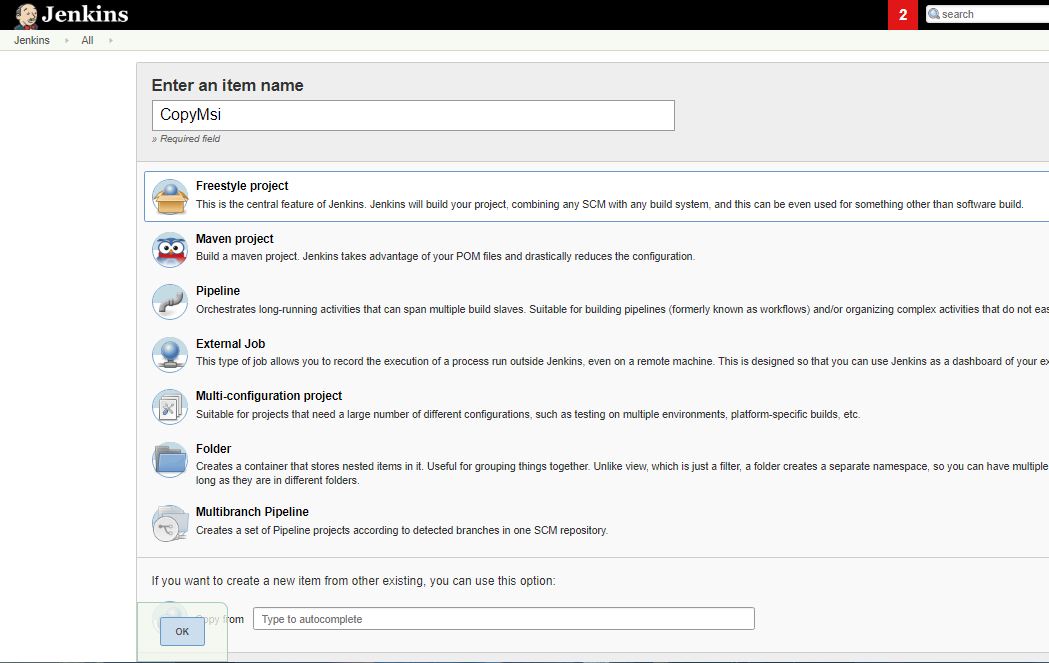
Following screenshot shows how to add a new build job to the Jenkins.
Fetch BizTalk Code from GIT Repository
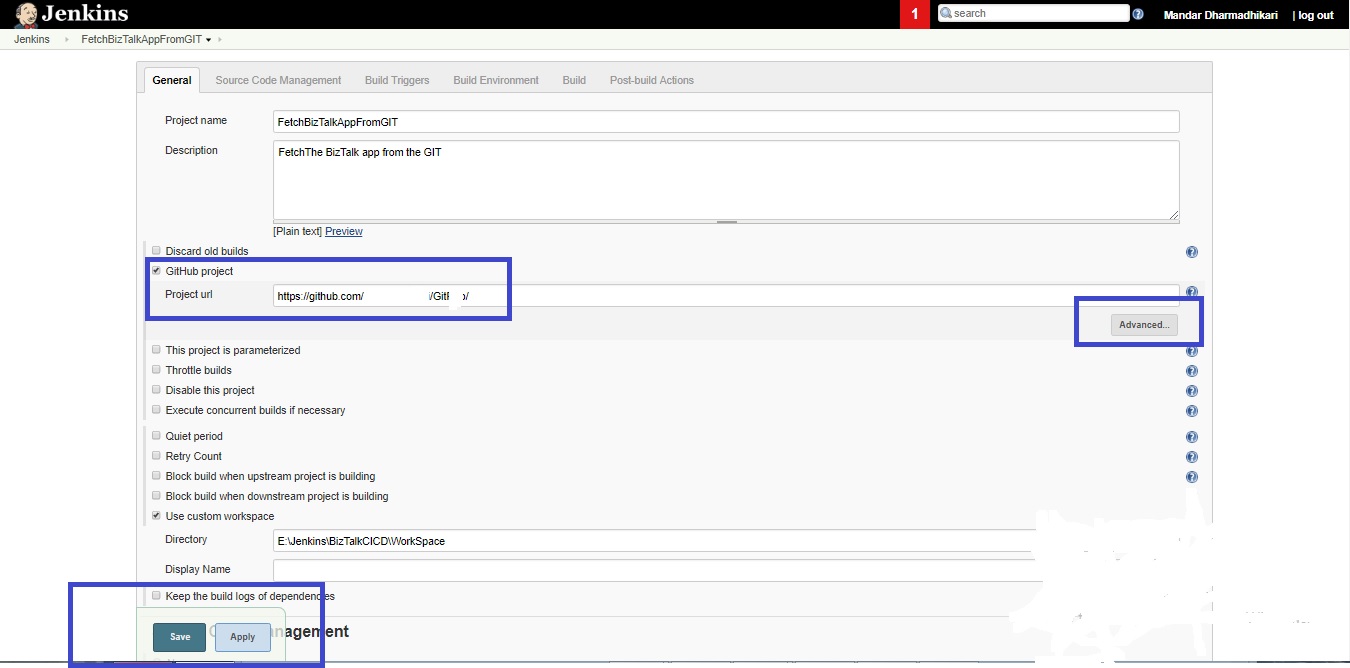
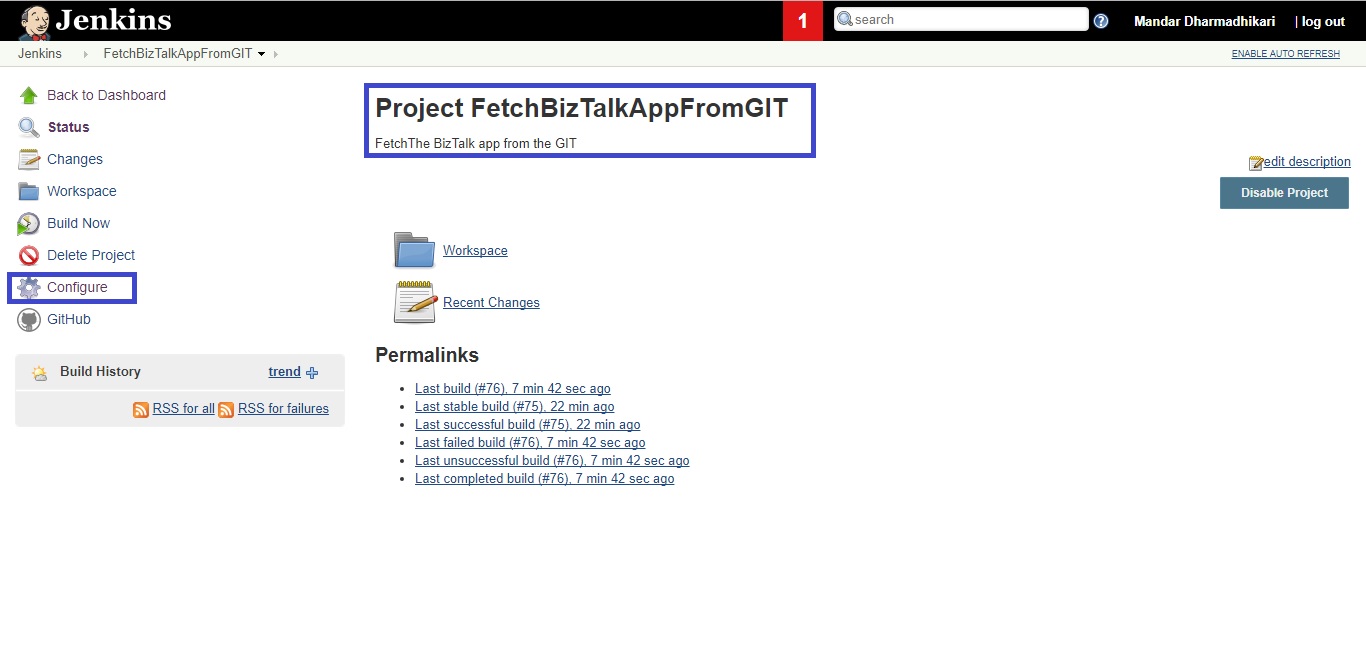
Following screenshots give a step by step approach to create the build project the fetch the code from the GIT Repository. This Build project is scheduled to run after every 15 mins but this can be configured as required.
Build BizTalk Solution
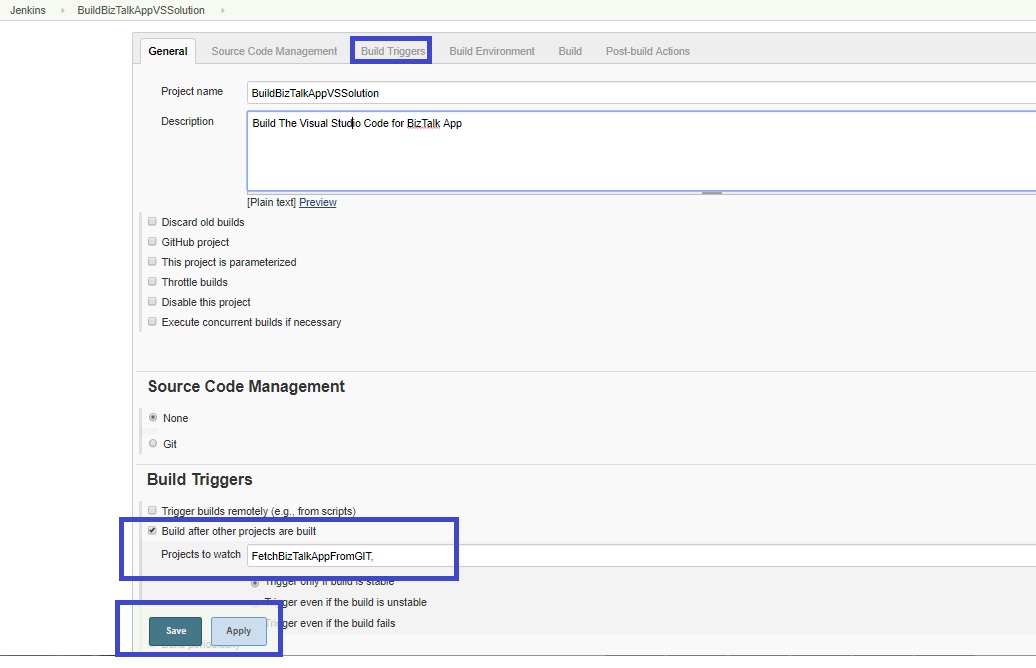
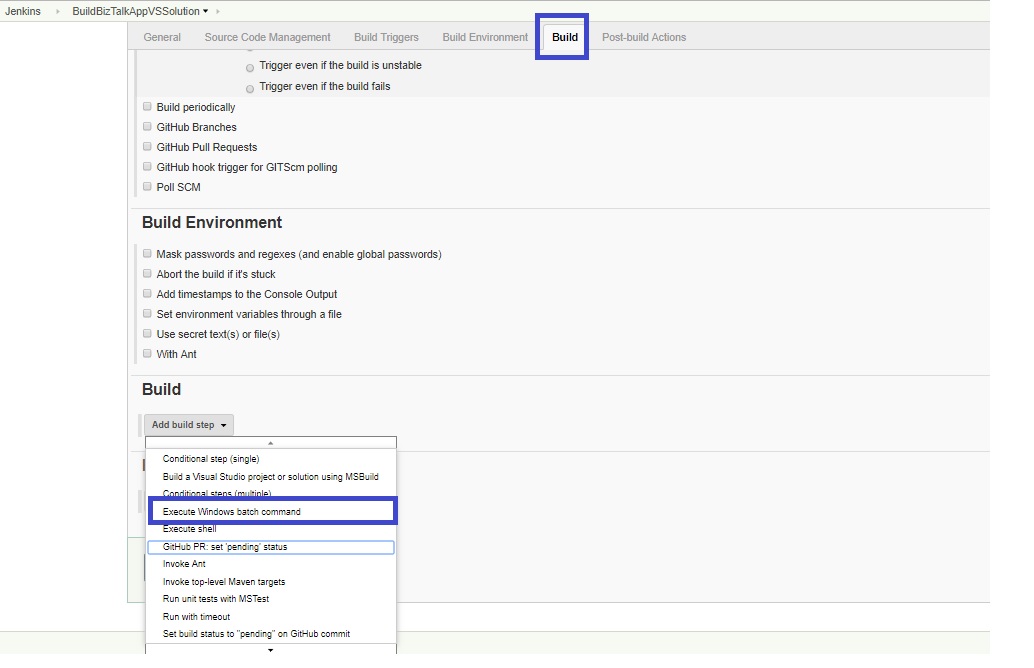
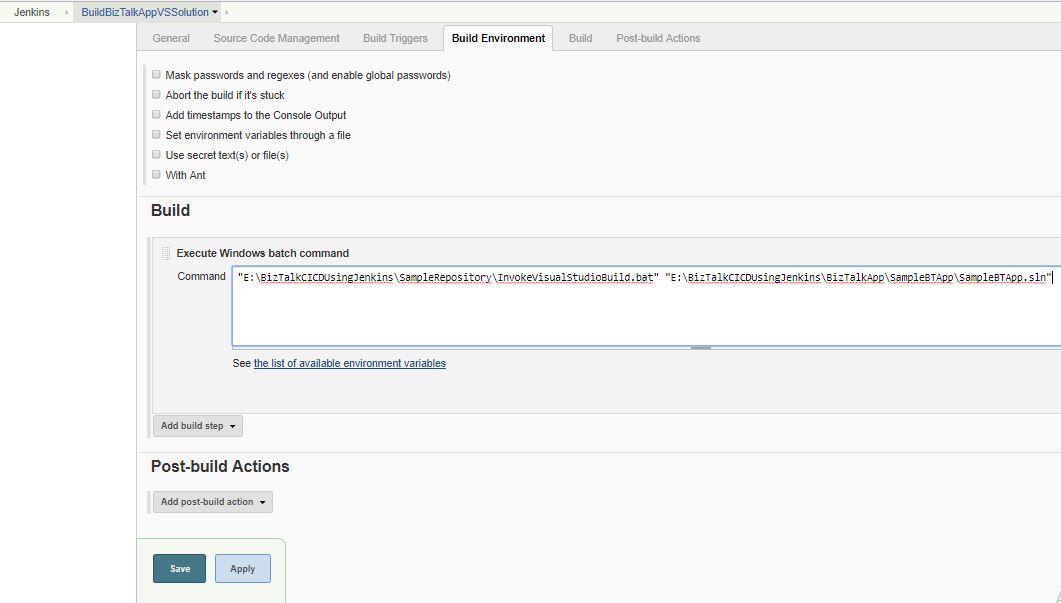
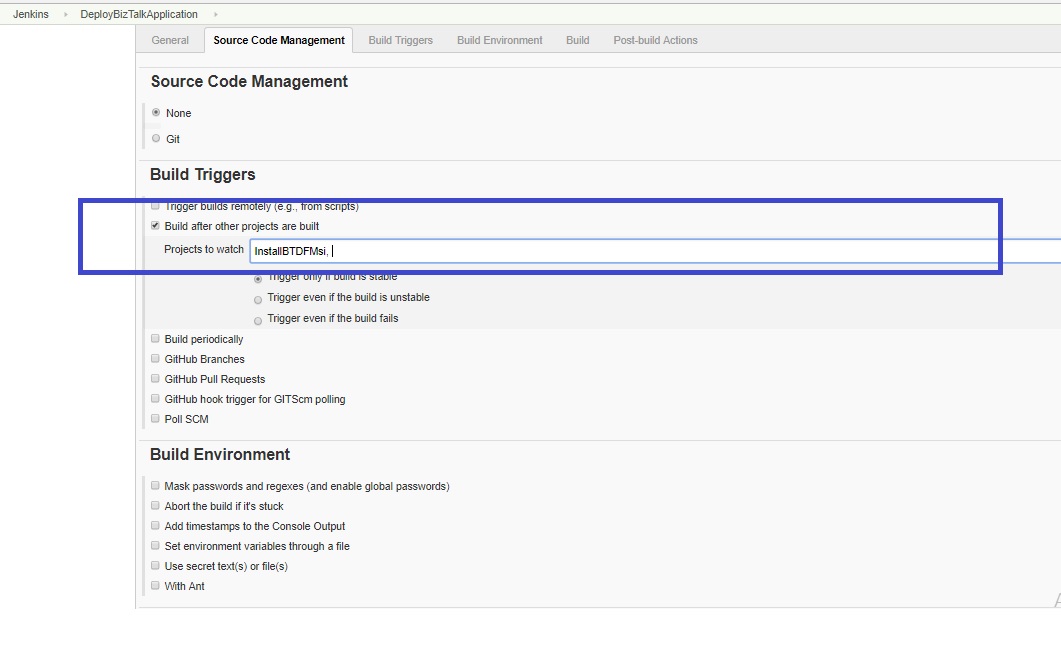
This Build job is created with a link to the previous job with a condition that a successful fetching from the Git Repository will fire the Build BizTalk Application build job.
Refer sample screenshots below.
Paths indicated in above are as a sample. They should be changed as required. Once the job is saved, it is ready to run.
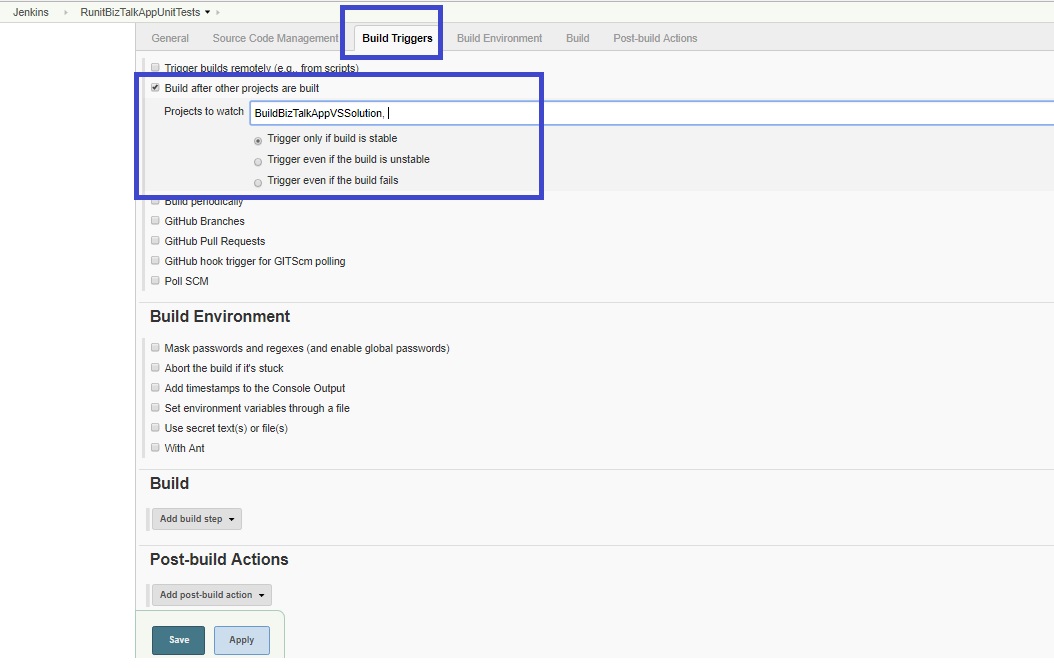
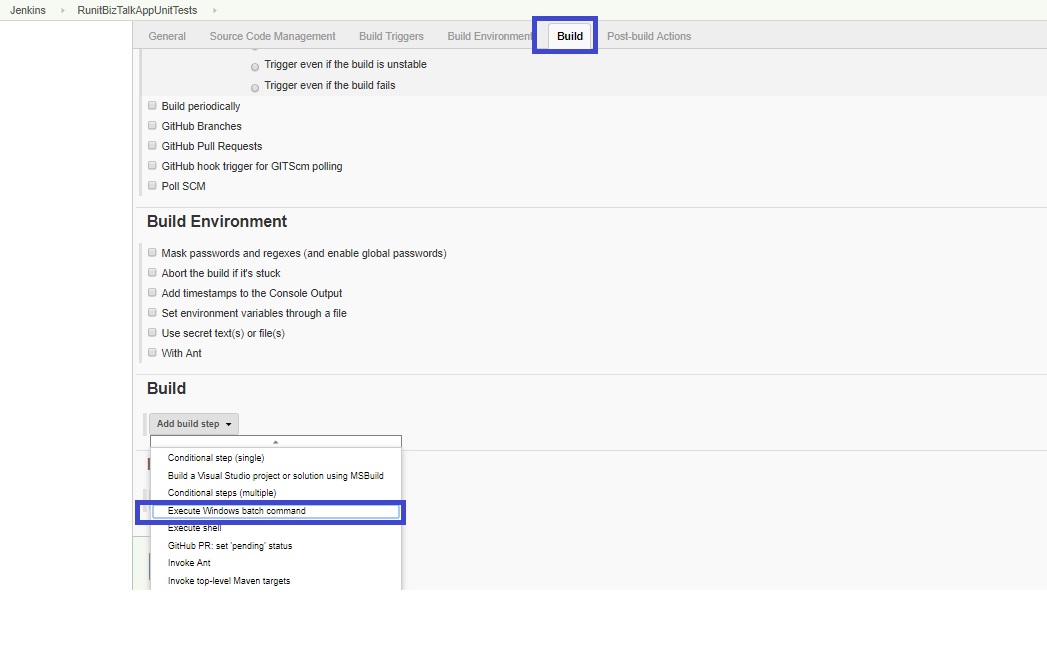
Run Unit Tests
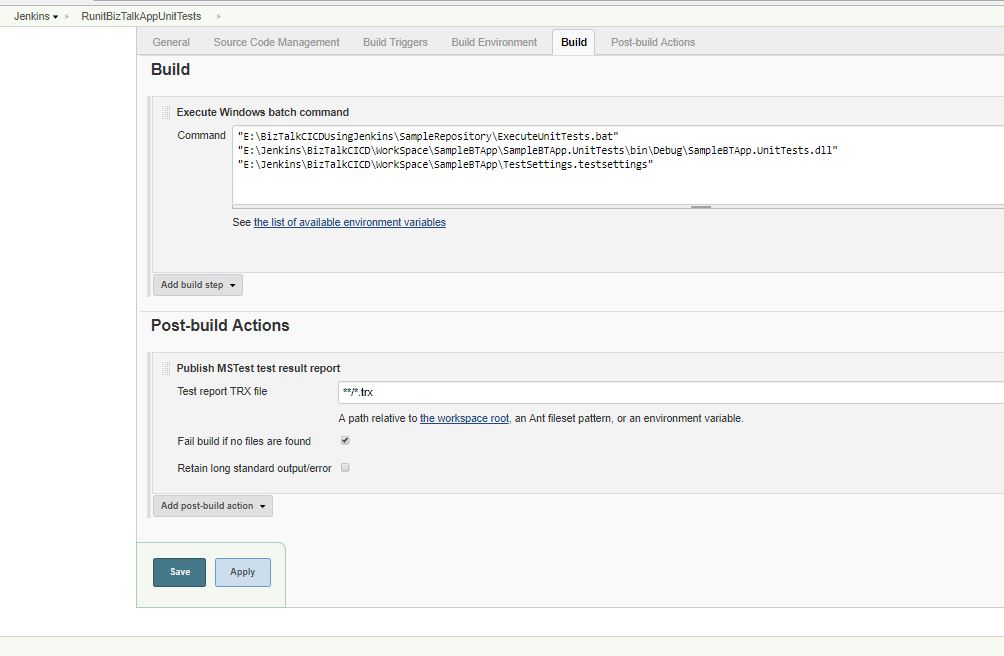
Following Screen Shots give a sample way of configuring the Unit Test Case project. The paths shown are for sample purposes. Actual paths should be configured as required.
The unit tests results can be published using the MSTest plugin that was downloaded earlier. This can be done by adding a post-build action as shown below.
Upgrade BizTalk MSI Version
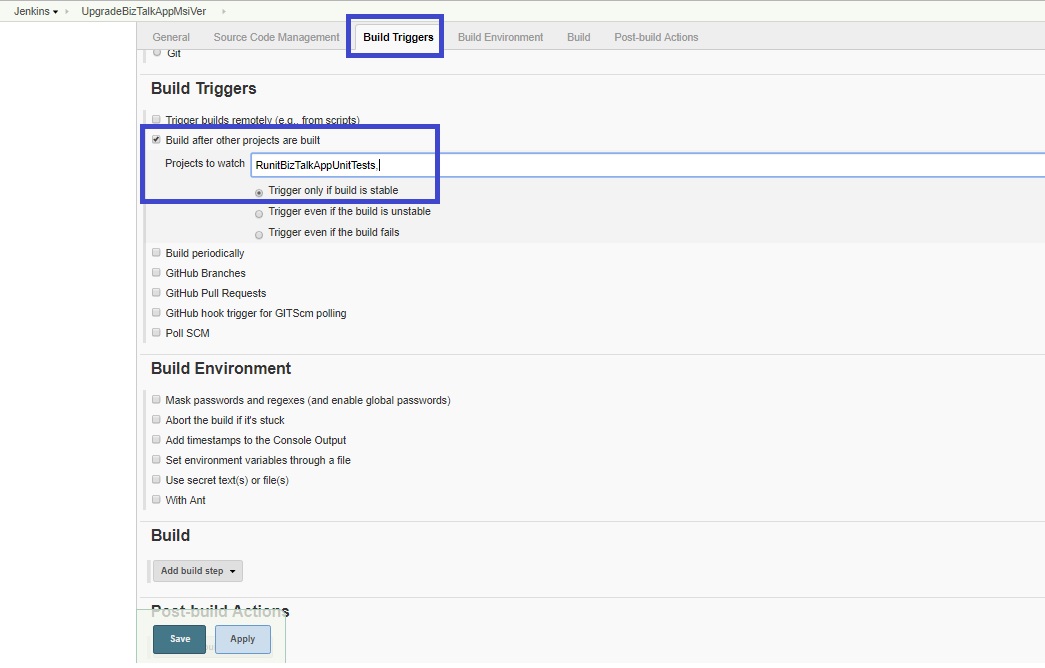
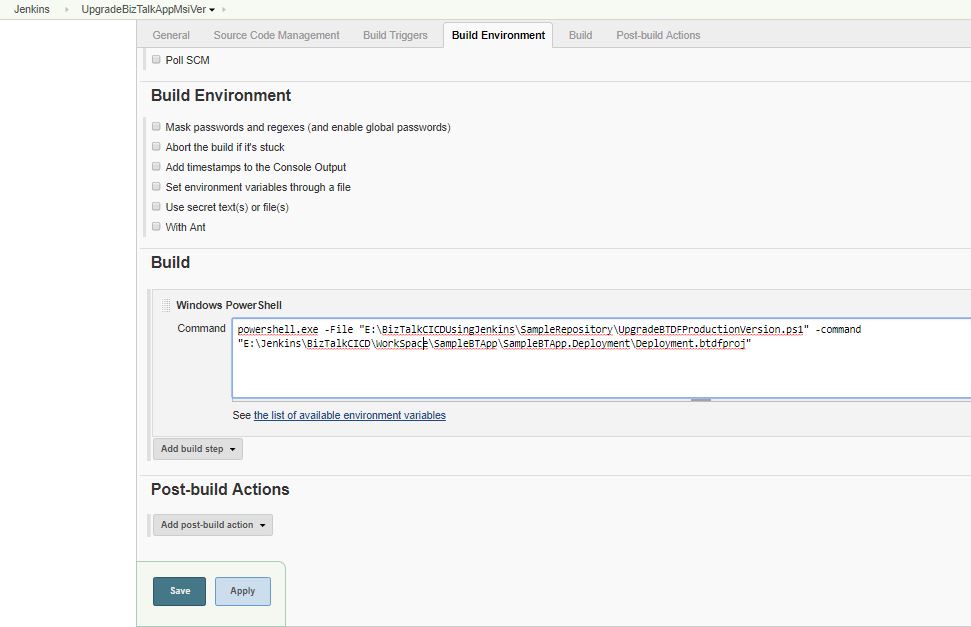
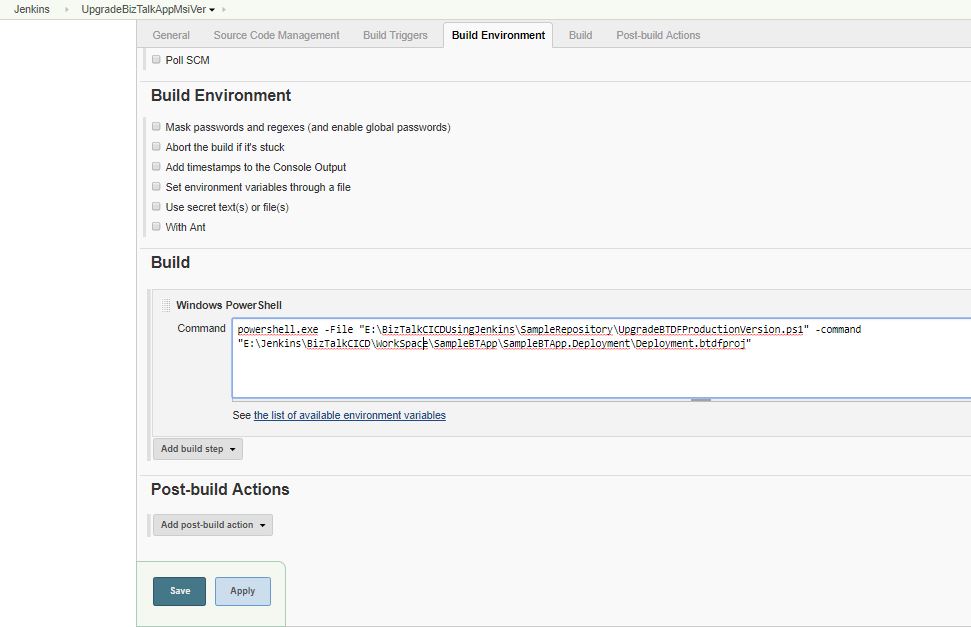
As discussed earlier, it is imperative that the version of the BizTalk MSI should be upgraded to enable a smooth installation of the MSI on the target server. Following screenshots show the steps to invoke the PowerShell script to modify the BTDF project File.
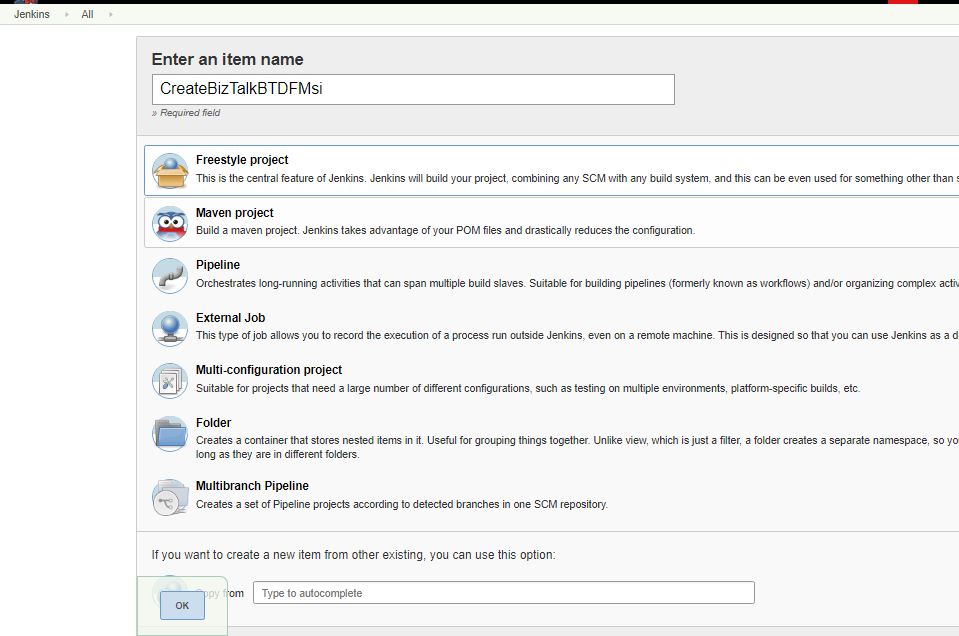
Create BTDF Msi
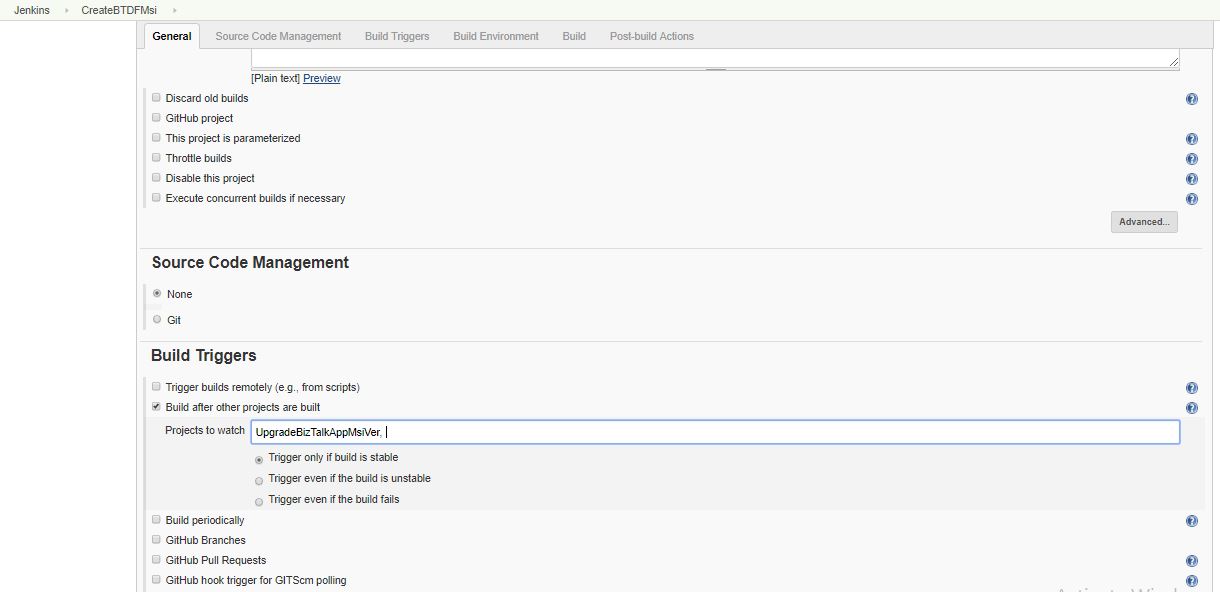
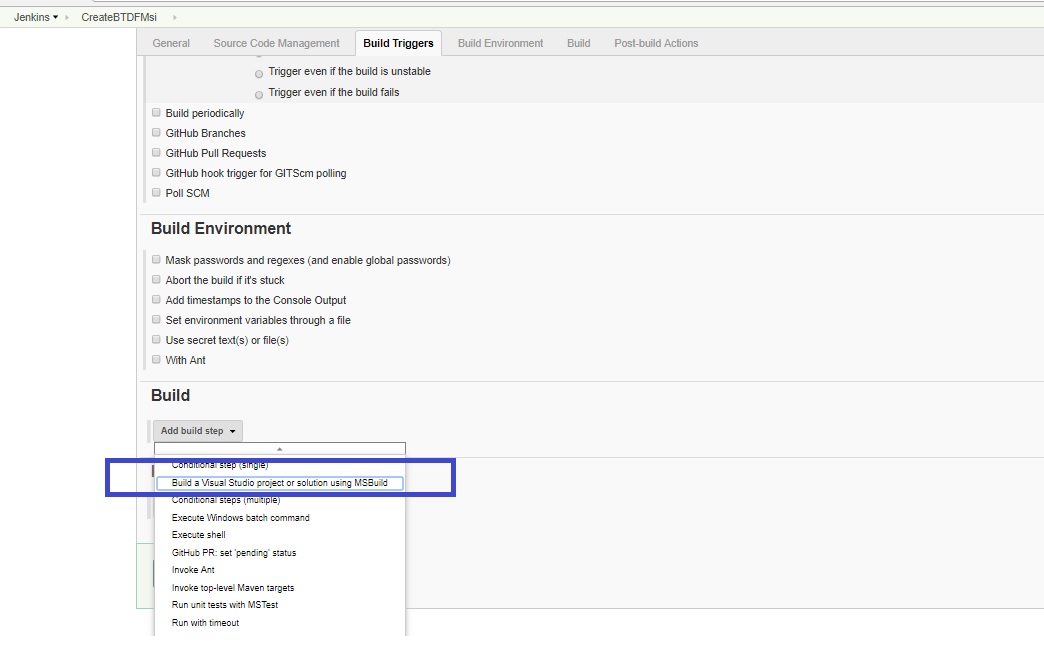
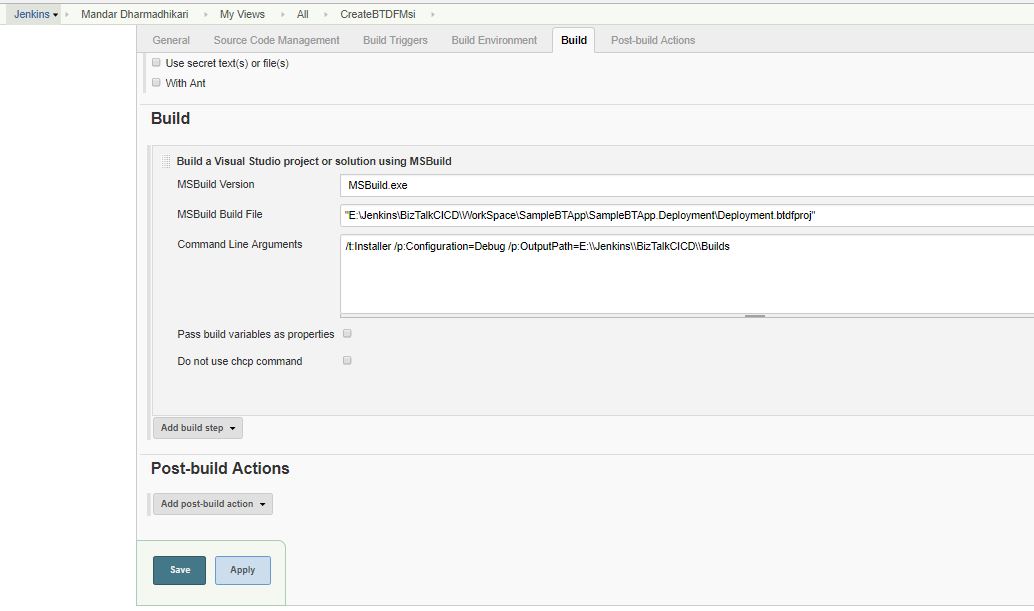
Once the Version of the Product is upgraded in the btdf project file, the next step is to create a BTDF powered MSI for the BizTalk application. The MSBuild plugin of Jenkins is used to create the MSI.
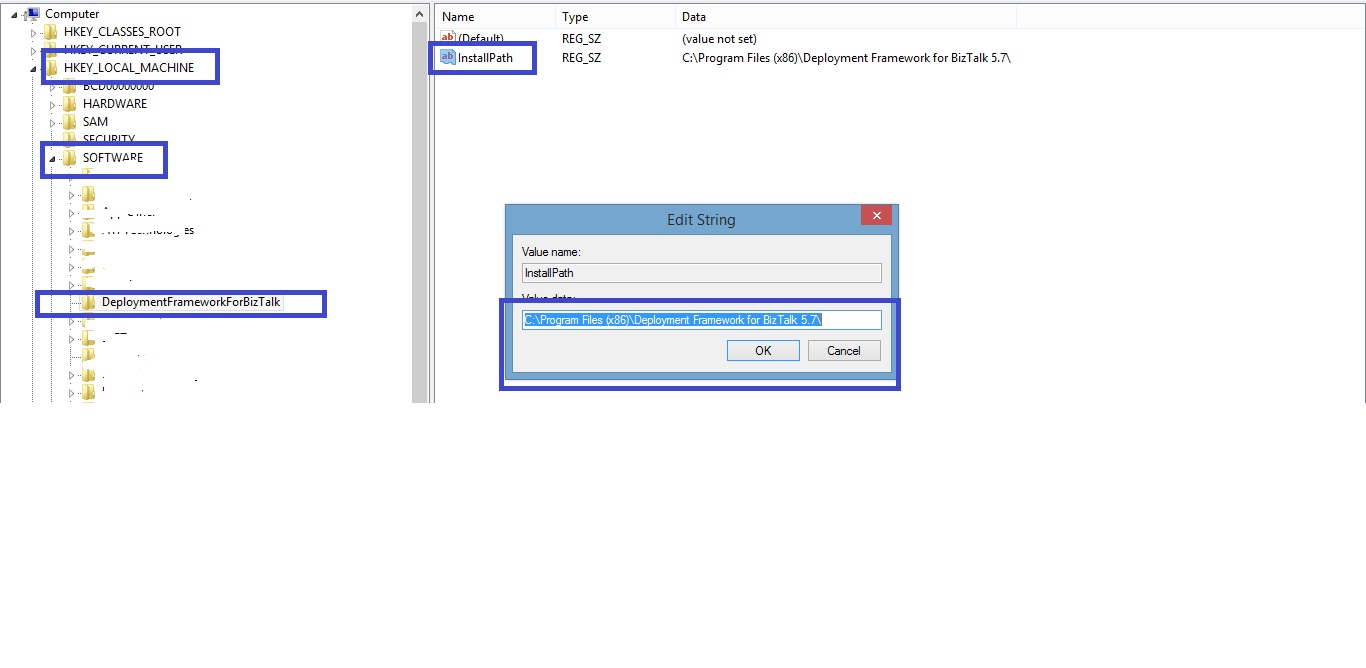
Prerequisite: Before the Build Project can be executed, it is necessary to add the InstallPath string value in the windows registry. Refer following screenshot for example.
Following screenshots give a step by step process to set up the Build project in Jenkins.
Install Msi and Extract Settings Files
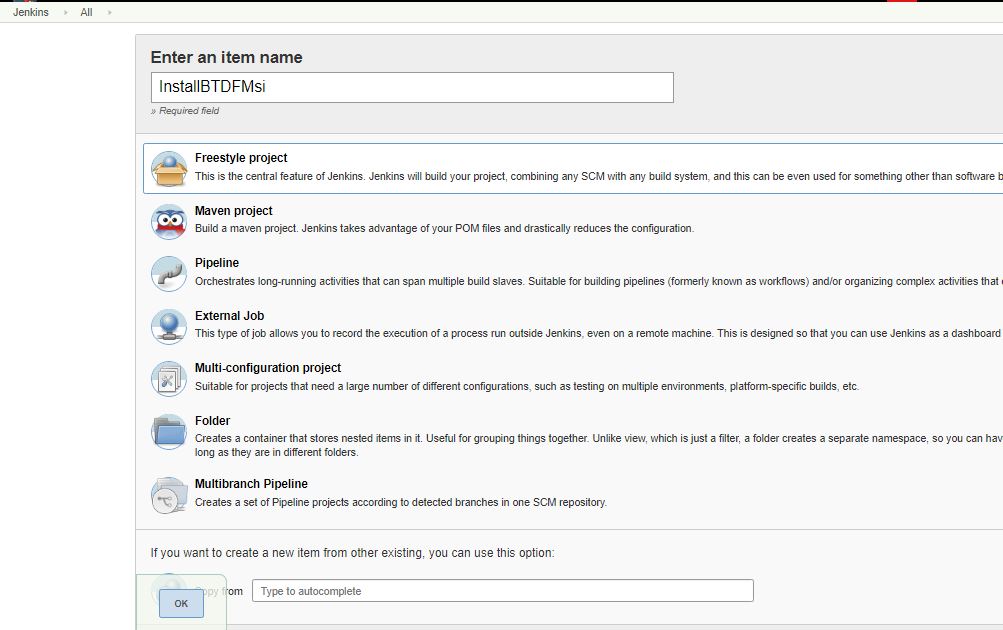
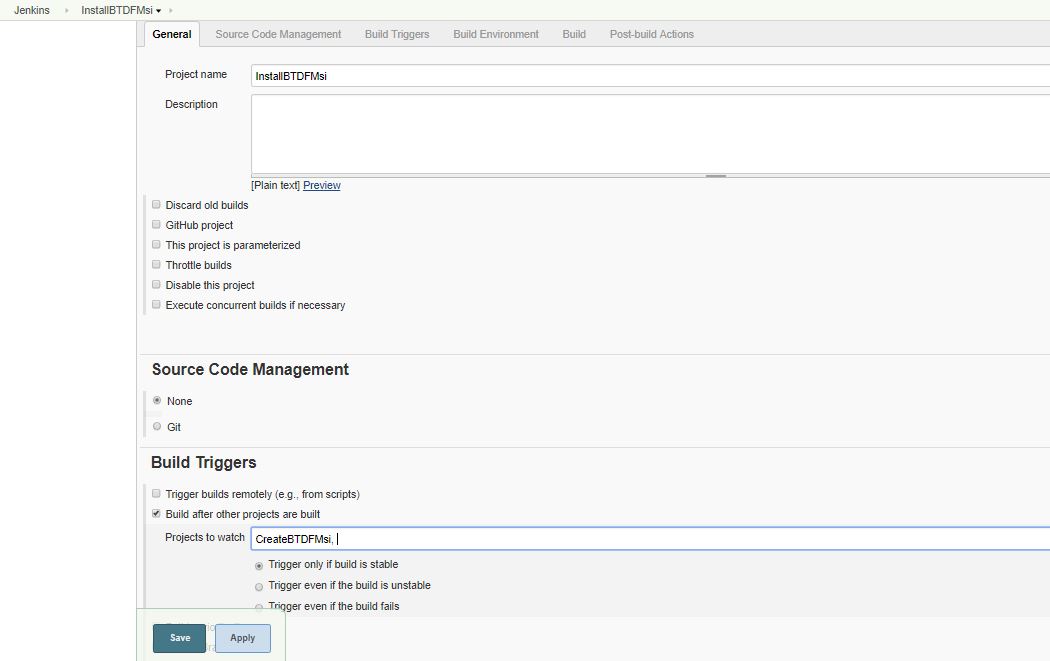
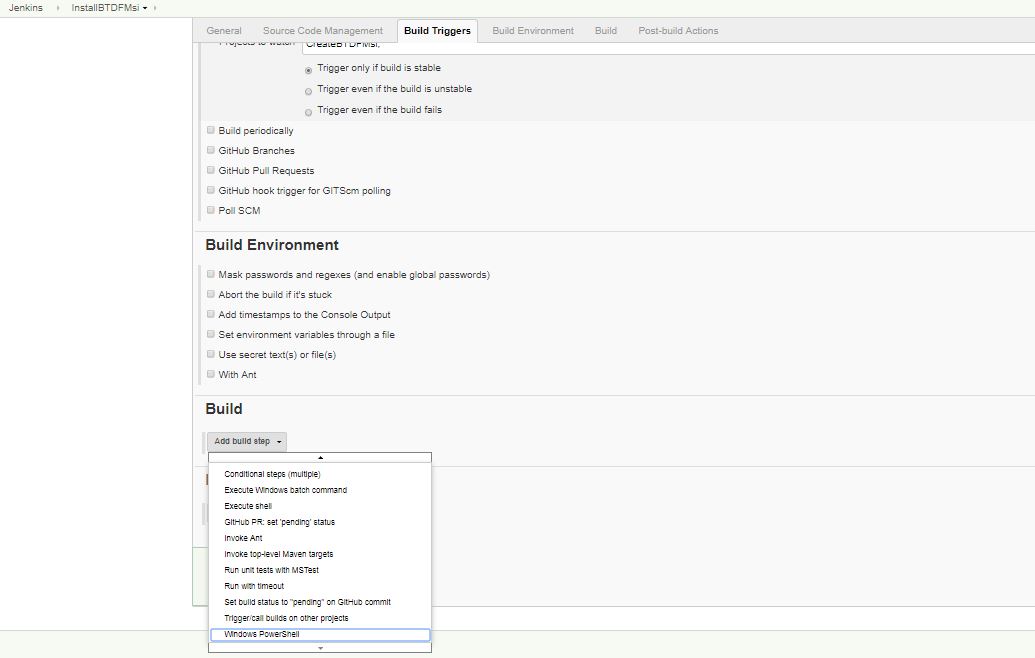
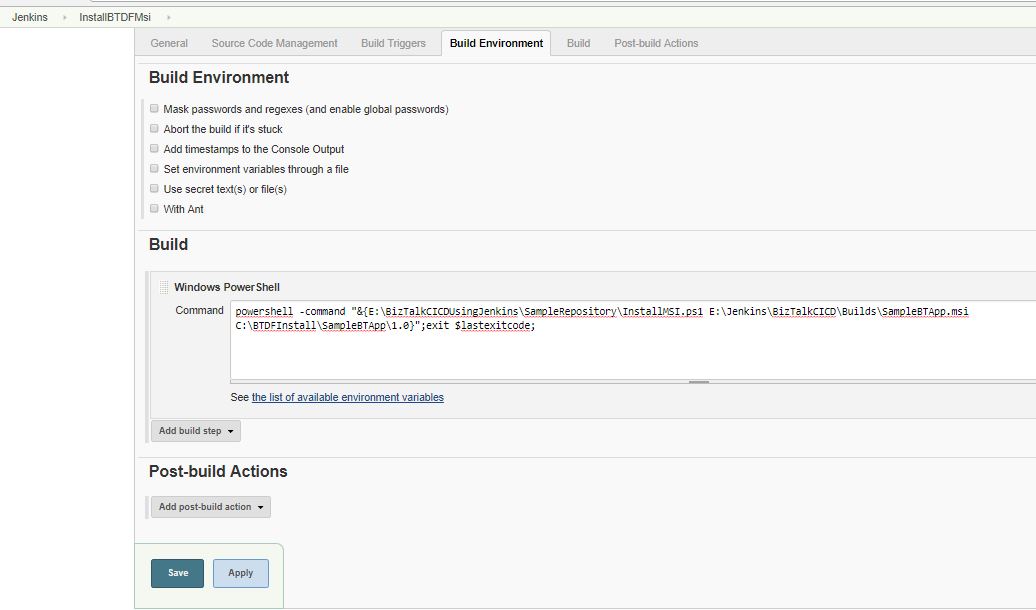
Once the BTDF powered MSI is created for the BizTalk application, next step is to install the MSI at a particular path and then to extract out the settings file for the environment. All this is accomplished using the PowerShell Script for MSI installation mentioned in the Scripts and PowerShell section. Refer the following screenshot to set up the Jenkins Build Project.
Command Invoked in the screenshot is as below.
powershell -command "&{E:\BizTalkCICDUsingJenkins\SampleRepository\InstallMSI.ps1 E:\Jenkins\BizTalkCICD\Builds\SampleBTApp.msi C:\BTDFInstall\SampleBTApp\1.0}";exit $lastexitcode;
Deploy BizTalk Application
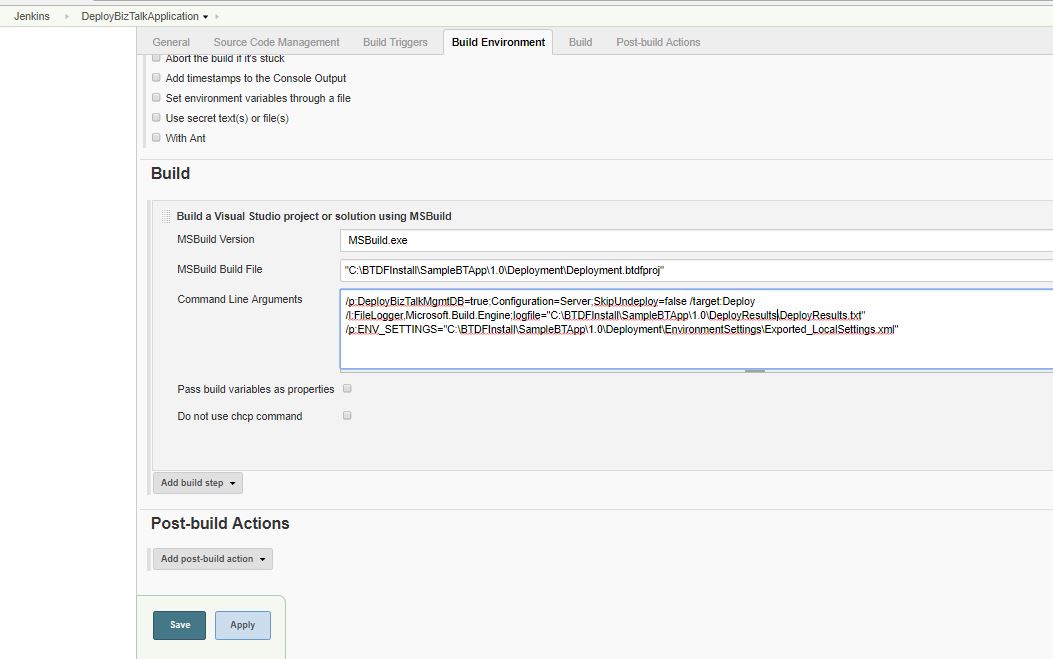
Once the Msi is installed and the settings file extracted, the next task is to deploy the Application to the build server. Here MSBuild.exe is used through the MSBuild plugin. Following Screenshots show the process to set up the Build Job for the Deployment of BizTalk application.
Verify Deployment
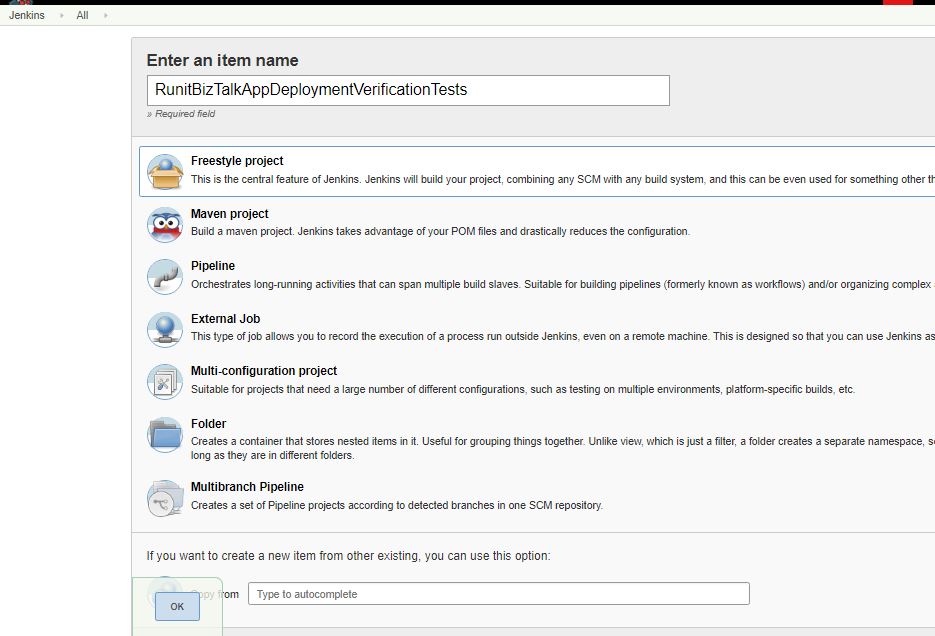
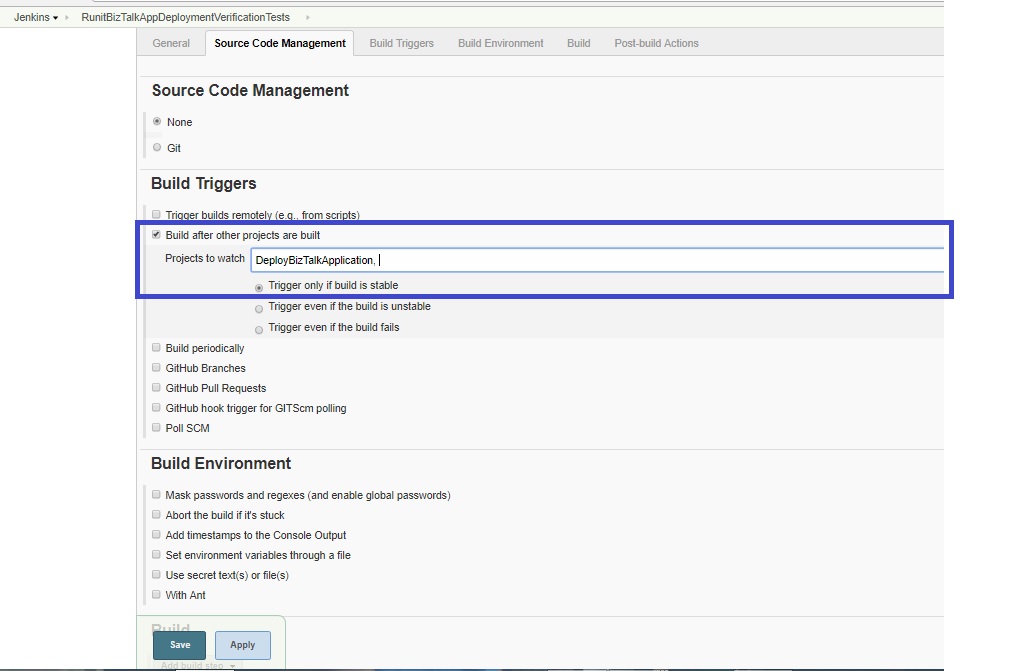
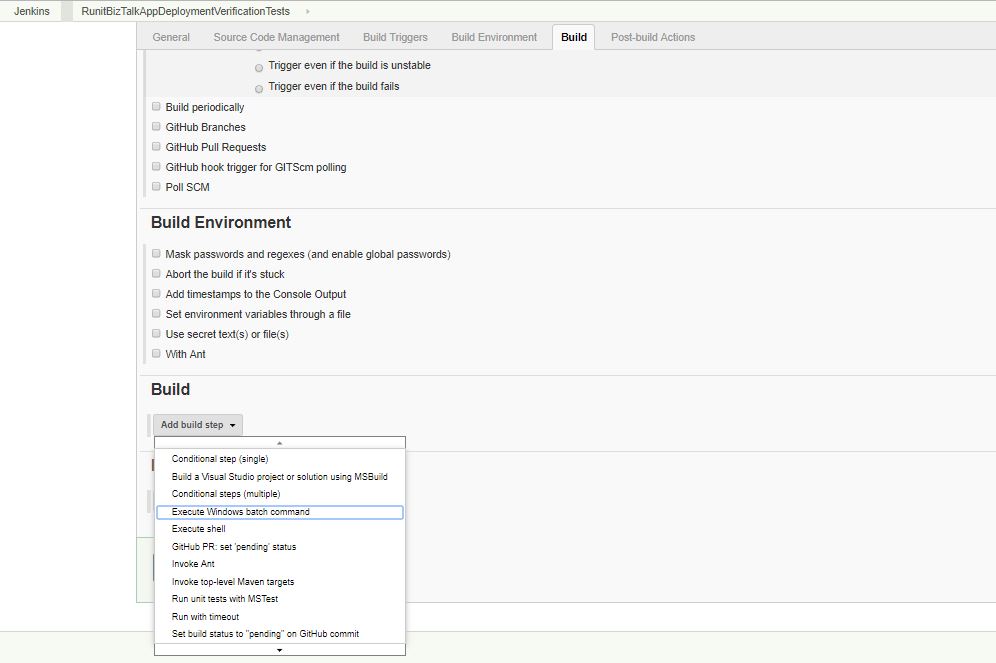
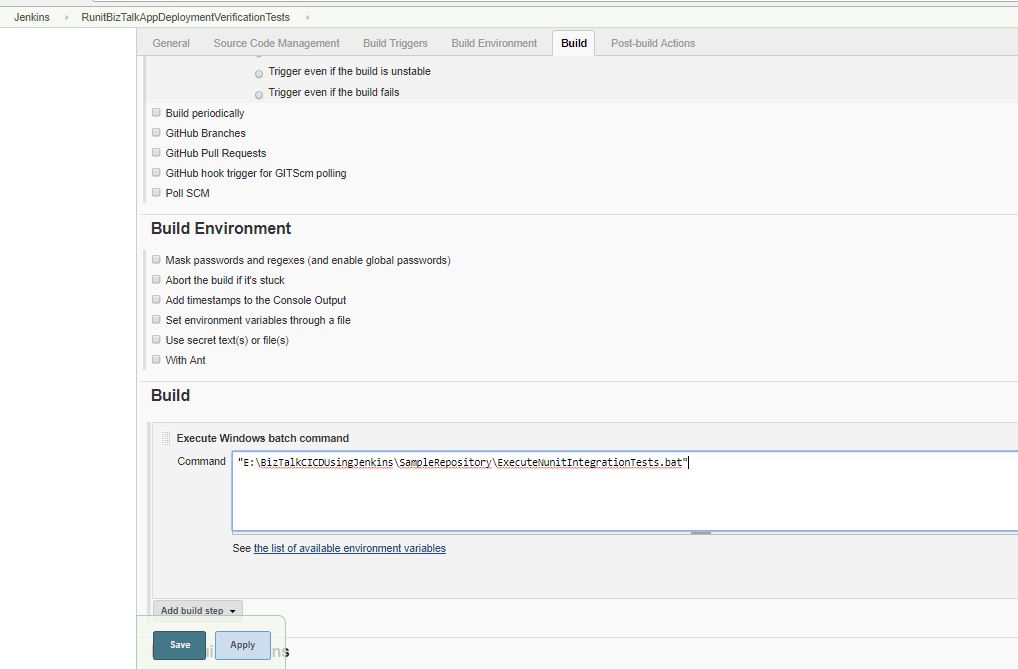
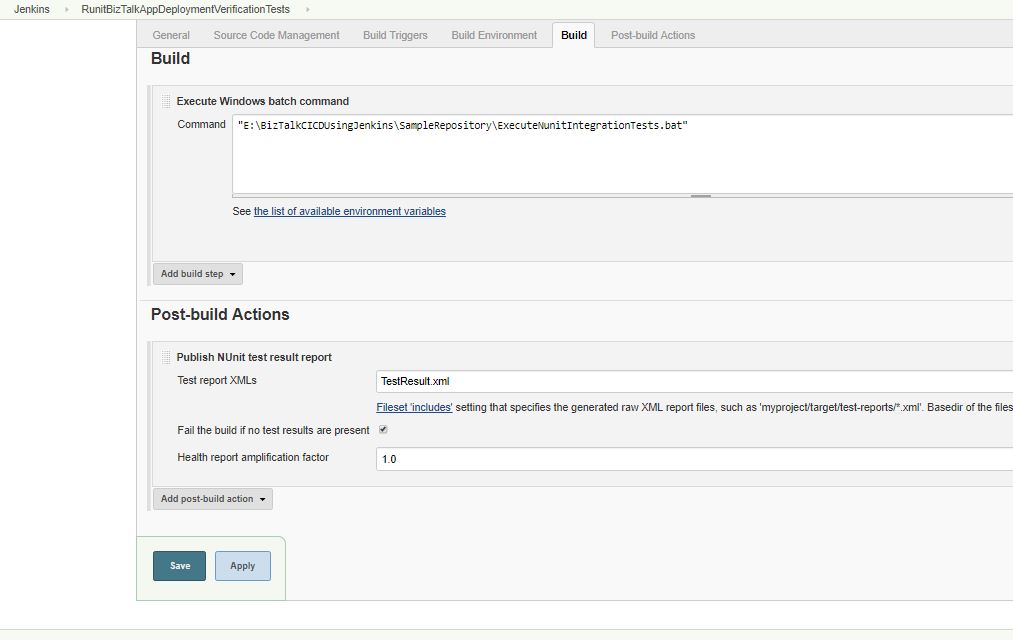
Once the deployment is done, the next task is to check if the deployment is successful and to that, in this particular example the response from BizTalk exposed WCGF service is examined. To perform the actual testing, NUnit framework is used. The NUnit test cases are run using the NUnitConsole.exe from a batch file. BTDF enables the developers to deploy the NUnit Test Assemblies by configuring them in the btdf project. Following screenshots show a sample set up Jenkins Build Job for the Nunit Test Cases.
Once the tests are run the reports for the test can be published using the NUnit Plugin which was downloaded earlier. Post build action needs to be set in the NUnit project. Providing the name of the Test results XML that was generated while running the NUnit tests. Refer sample screenshots below.
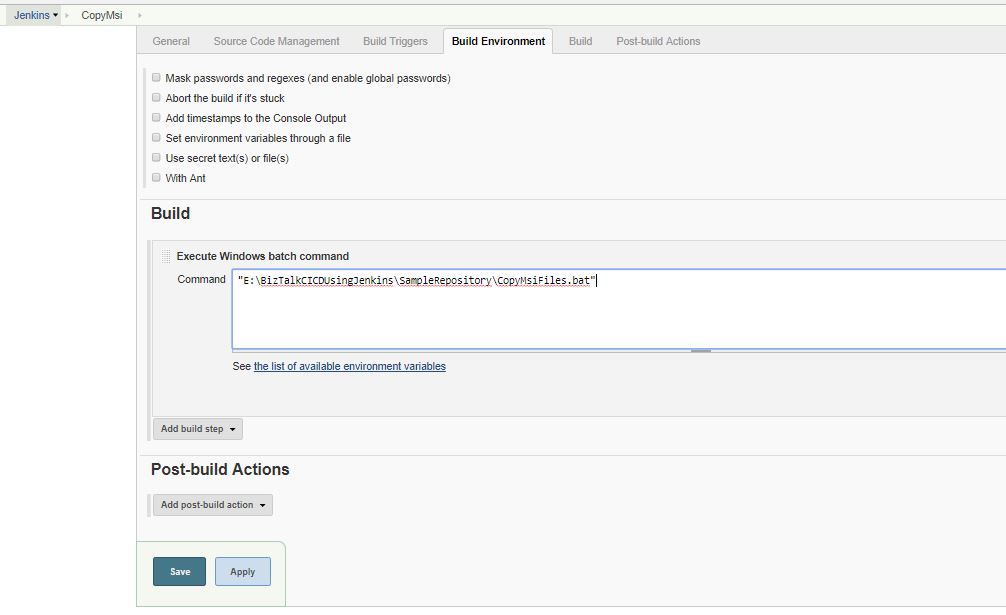
Copy MSI To Next Environment
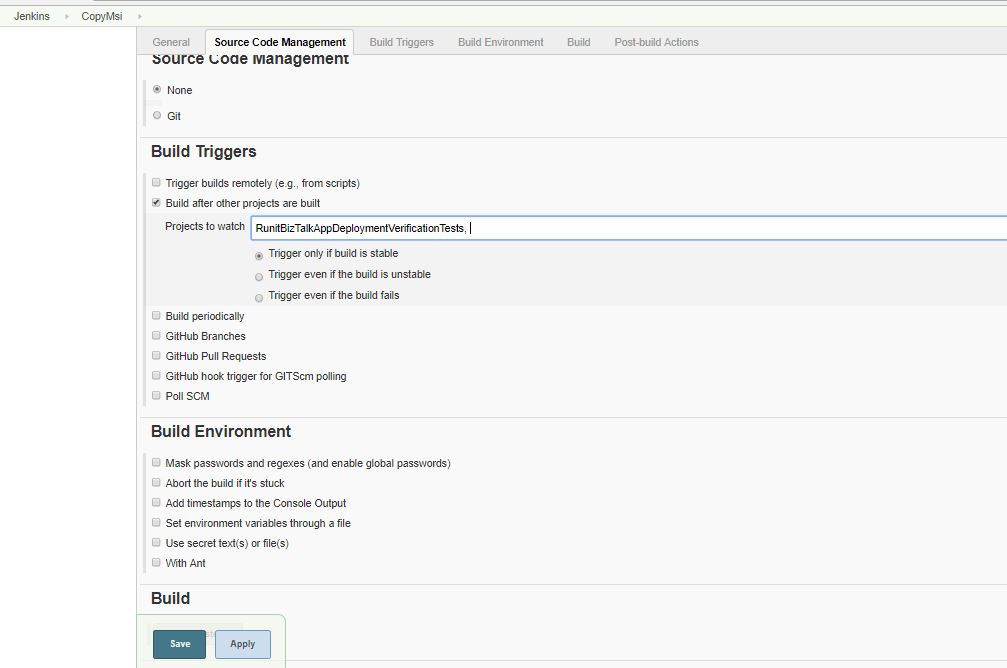
Once all of above tasks are completed successfully, the final task is to push the MSI to a shared folder which can be accessed from the next higher environment. The Jenkins project on the next higher environment can be configured to fire up after checking the existence of the MSI in the shared drive periodically. Refer Sample screenshots below
Build Pipeline View
The jobs that are created in above steps are chained together in such a way that the current job is triggered by its immediate upstream while the current job on successful completion triggers its immediate downstream job. This can be viewed together using the build pipeline view. A sample run of the whole BizTalk CI CD process is shown below.
Scripts
The scripts used in this demonstration can be downloaded from Technet Gallery from following link.
BizTalk Server: Implementing Continuous Integration and Deployment For BizTalk
Conclusion
Based upon the results obtained in the build pipeline view, it can be concluded that Continuous Integration and Deployment for BizTalk application can be set up with ease using Visual Studio, BTDF, BizUnit , NUnit, Windows PowerShell and Jenkins build server.
See Also
Following are some of the links that can be used for extra reading.
- BizTalk Server 2013: Step-by-Step to implement Unit Testing in Schemas and Maps
- Step by Step Guide For Installation and Configuration of BTDF for BizTalk 2016 and Visual Studio 2015
- Windows PowerShell Basics
- Getting Started with Windows PowerShell
- Unit testing C# with NUnit and .NET Core
- Visual Studio Team Services
References
Content from following websites was referred while writing the wiki article
- Nunit Home Page
- Jenkins Home Page
- Deployment Framework for BizTalk Server V5.0
- BizTalk Continuous Integration & Continuous Deployment
- BTS 2016 Feature Pack I - Continuous Deployment Walk-Through
