SharePoint: Basic User Operations using PNP JS and TypeScript
What is PnP JavaScript Core Library ?
The Patterns and Practices (PnP) is an open source initiative driven by widespread community of Microsoft employees and MVP’s around the globe who collaborate to provide guidance, samples, reusable components that we as a community can use it in our day to day life to simplify our work. Anyone can contribute to this initiative.
*“The new Patterns and Practices JavaScript Core Library was created to help developers by simplifying common operations within SharePoint. Currently it contains a fluent API for working with the full SharePoint REST API as well as utility and helper functions. This takes the guess work out of creating REST requests, letting developers focus on the what and less on the how.”
*
Overview
There are different ways in which we can use the PNP library.
- You can include a CDN link in your code pointing to the js file and then use a content editor webpart.
https://cdnjs.cloudflare.com/ajax/libs/sp-pnp-js/3.0.1/pnp.js
https://cdnjs.cloudflare.com/ajax/libs/sp-pnp-js/3.0.1/pnp.min.js
2. You can download the file to your local and then upload it in your SharePoint site and refer it from there inside of a content editor webpart.
3. You can use NPM to include the relevant package to your project.
npm install sp-pnp-js –save
In this article, we will be using the third option of installing the package using NPM. We will use Visual Studio Code as the editor for writing code. Our development environment will be SharePoint 2013 On Premise.
We could have used a content editor webpart and referred to pnp.min.js file to perform our operations using PnP but we are specifically using Visual Studio Code so that we can see how we can make use of the PNP library while writing TypeScript code. This will come handy while developing SPFx applications or while writing Angular code.
Prerequisites
1. Node.Js - It is a cross platform runtime environment for applications written in JavaScript. It helps in transpiling our .ts files to into .js files. You can install Node.js from https://nodejs.org/en
2. Node Package Manager - Node JS package manager, helps us to manage all the libraries that our software relies upon. Node comes with npm installed so, we should have a version of npm.
3. Visual Studio Code - Visual Studio Code is optimized for building and debugging modern web applications. Install Visual Studio Code. Browse https://code.visualstudio.com/ and follow instructions
4. TypeScript - It is a typed superset of JavaScript that compiles to plain JavaScript. You can use NPM to install TypeScript.
npm install –g typescript
- Gulp - Gulp is a JavaScript task runner that helps us in automating tasks. You can use NPM to install Gulp.
npm install –g gulp
Webpack - It is a module bundler. Reference [https://angular.io/guide/webpack
Reference to es6-promise and fetch protocol for IE. These files are required in order for pnp to work in IE.
](https://angular.io/guide/webpack)
https://github.com/stefanpenner/es6-promise
https://github.com/github/fetch
Scenario
We will use the PnP library along with TypeScript to perform some basic user operations like below. There are lot of other operations as well that we can do but for a starter we will implement the below mentioned operations.
Getting Logged In User Information
Check If a given user belongs to a particular group or not
Get Extended Managers for the current user
Get all user profile properties for the current user
Get a particular user profile property for a given user
Now let us get started with the actual implementation.
Implementation
After ensuring that you have the prerequisites set up you can start with the actual project setup.
We can initialize our project using "npm init" command. We simply type this command in the command line and it will ask for some parameters like name, version etc. and will generate package.json file for you. The package.json file is very important. It contains information about metadata for the project, what dependencies the project have like what all packages must be installed. Refer to the reference section for more details.
- Install the following packages using NPM.
npm install --save-dev gulp-serve

npm install sp-pnp-js –save-dev
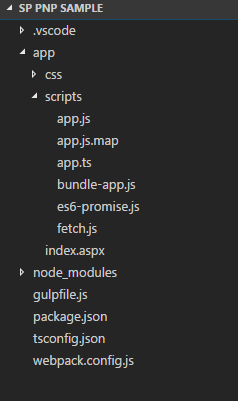
- In Visual Studio Code create the following folder structure. The structure is self explanatory.
5. In Visual Studio Code, add a new file called gulpfile.js and add the following code
var gulp = require('gulp')
var serve = require('gulp-serve');

gulp.task('serve', serve(['app']));
6. Click Ctrl + Shift + P and search for “Configure Task Runner”. Click on it.
7. Select TypeScript – tsconfig.json.
- Add a tsconfig.json file at the root of the project and add the following code. The tsconfig.json is another important file. It is the TypeScript configuration file which guides the compiler to generate JavaScript files. Refer to the references for more details.
{
  "compilerOptions": {
    "target": "es5",
    "module": "commonjs",
    "moduleResolution": "node",
    "sourceMap": true,
    "emitDecoratorMetadata": true,
    "experimentalDecorators": true,
    "noImplicitAny": true,
    "suppressImplicitAnyIndexErrors": true,
    "types": [ "node" ],
    "typeRoots": [ "./node_modules/@types"  ]
  }
}
- Now add the following code inside -app/index.aspx file.
<html>
    <head>
        <title>SharePoint PnP Sample </title>
    </head>
    <body>
        <script type="text/javascript" src="http://127.0.0.1:3000/scripts/bundle-app.js"></script>
        <div class="divSample">
            <div class="userInfo"></div>
        </div>
    </body>
</html>
- Add the following code in -app/scripts/app.ts file.
import pnp from "sp-pnp-js";

function GetUser() {
    pnp.setup({
                sp: {
                    headers: {
                        "Accept": "application/json; odata=verbose"
                    }
                }

            });

    pnp.sp.web.currentUser.get().then(result => {
        console.log(result);
    });

}

function CheckIfUserBelongsToGroup(groupName: string, userEmail: string) {

    pnp.sp.web.siteGroups.getByName(groupName).users.getByEmail(userEmail).get().then(rs => {
        console.log("user belongs to group");
    }).catch(error => {
        console.log("user does not belong");
    })

}

function getExtendedManagers() {

    var managers: any = [];

    pnp.setup({
          sp: {
            headers: {
                "Accept": "application/json; odata=verbose"
            }
          }

        });

    pnp.sp.profiles.myProperties.select("ExtendedManagers").get().then(d => {

        managers = d.ExtendedManagers.results;
        console.log(managers);
    });
}

function getMyProperties() {

    pnp.setup({
          sp: {
            headers: {
                "Accept": "application/json; odata=verbose"
            }
          }

        });

    pnp.sp.profiles.myProperties.get().then(d => {

       var properties = d.UserProfileProperties.results;

       console.log(properties);

    });

}

function getUserProfilePropertyForUser(userLoginName: string, propertyName: string) {

    pnp.setup({
          sp: {
            headers: {
                "Accept": "application/json; odata=verbose"
            }
          }

        });

    pnp.sp.profiles.getUserProfilePropertyFor(userLoginName, propertyName).then((result: any) => {


        console.log(result.GetUserProfilePropertyFor);
    });
}
Let us split the above code into bits and see what every method is doing.
import pnp from "sp-pnp-js";
The above piece of code imports the functionalities from the PnP JavaScript Core library.
Get Logged In User Information -
In the below code we are using PnP to fetch the current logged in user information.
We are first setting the headers and after that we are fetching the current user information.
function GetUser() {
    pnp.setup({
                sp: {
                    headers: {
                        "Accept": "application/json; odata=verbose"
                    }
                }

            });

    pnp.sp.web.currentUser.get().then(result => {
        console.log(result);
    });

}
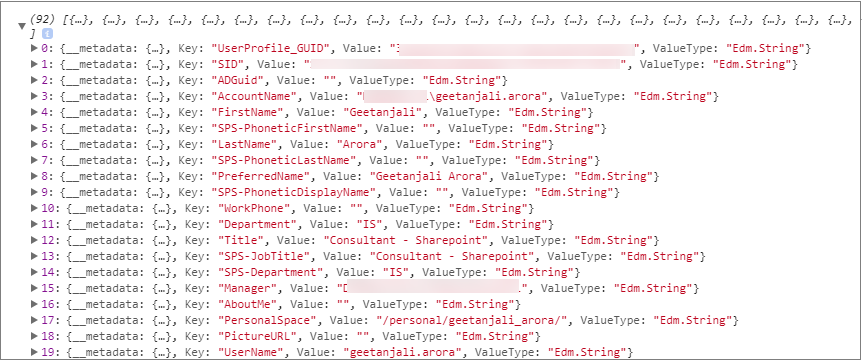
If we check the console, we will see the JSON result in below format.
Check If the user belongs to a particular SharePoint group -
The following method checks if the user belongs a particular group or not.
function CheckIfUserBelongsToGroup(groupName: string, userEmail: string) {

    pnp.sp.web.siteGroups.getByName(groupName).users.getByEmail(userEmail).get().then(rs => {
        console.log("user belongs to group");
    }).catch(error => {
        console.log("user does not belong");
    })

}
Get the extended managers -
In the below method we are getting all the managers for the current logged in user.
function getExtendedManagers() {

    var managers: any = [];

    pnp.setup({
          sp: {
            headers: {
                "Accept": "application/json; odata=verbose"
            }
          }

        });

    pnp.sp.profiles.myProperties.select("ExtendedManagers").get().then(d => {

        managers = d.ExtendedManagers.results;
        console.log(managers);
    });
}
In the console we will see all our extended managers.
Get all user profile properties -
The below piece of code is used to get all the user profile properties of the logged in user.
function getMyProperties() {

    pnp.setup({
          sp: {
            headers: {
                "Accept": "application/json; odata=verbose"
            }
          }

        });

    pnp.sp.profiles.myProperties.get().then(d => {

       var properties = d.UserProfileProperties.results;

       console.log(properties);

    });

}
In the console we can see all our user profile properties.
Get a particular user profile property for a given user
The below piece of code is used to get a particular user profile property for a given user based upon the login name of the user. This is useful in scenarios where we want to fetch a profile property of a user for e.g. Job Title from the login name.
function getUserProfilePropertyForUser(userLoginName: string, propertyName: string) {

    pnp.setup({
          sp: {
            headers: {
                "Accept": "application/json; odata=verbose"
            }
          }

        });

    pnp.sp.profiles.getUserProfilePropertyFor(userLoginName, propertyName).then(result => {


        console.log(result.GetUserProfilePropertyFor);
    });
}
In the console we will see the job title or any other user profile property for the respective user whose login name was passed.
If we look at the code blocks above, we see how rich the pnp library is and how it simplified the developers life for making REST calls. You can modify the above pieces of code by subscribing to these calls and use the JSON results obtained.
In order to transpile the TypeScript file into JavaScript file type Ctrl + Shift + B. This will create app.js and app.js.map file in your scripts folder.
Now we will create a single js file with all the required dependencies using the webpack. To that navigate to the scripts folder using command prompt and type:
webpack ./app.js bundle-app.js
Your final project structure will be like
**

**13. Drag and drop your index.aspx file in SharePoint.
- Type in gulp serve at the command prompt.
- Now if you browse your index.aspx file and check the console of your browser using Developer tools you will find the result retrieved from all the methods above.
References
1. https://github.com/SharePoint/PnP-JS-Core
2. https://github.com/SharePoint/PnP-JS-Core/wiki/Install-and-Use
3. https://angular.io/guide/webpack
4. https://github.com/SharePoint/PnP-JS-Core/wiki/Developer-Guide
6. https://webpack.js.org/concepts/
7. https://docs.npmjs.com/getting-started/using-a-package.json


