FIM Service Management Agent: Deleting the Connector Space
PURPOSE
There could be several reasons as to why you are deleting the connector space. As example, you have recently deleted a connector space that is involved in your FIM Solution. As we all know, the process of exporting to the FIM Portal can be very slow during the process of Additions and Deletions. In light of this, the goal of this article is to provide you a way to get back up and running as quickly as possible. For the FIM Service Management Agent, the recommended process is to join the objects in the FIM Portal with those in the Metaverse. In this article, we will cover those steps to help you accomplish this goal.
RECOMMENDED STEPS
Backup Database
If you are reviewing this article in conjunction with the Deleting the Connector Space document, then you may have already backed up the databases already. If you have not, then please think of disaster recovery, we want to be able to get back to the previous setup without too much trouble should the need arise. To do this, we recommend that the FIM Synchronization Service Database (MicrosoftIdentityIntegration Server database for IIFP/MIIS/ILM) is properly backed up prior to deleting the connector space. If you are using the FIM Service and Portal, then we recommend backing up the FIM Service database as well.
Find more information on backing up the backend database here.
Verify the Object Deletion Rule
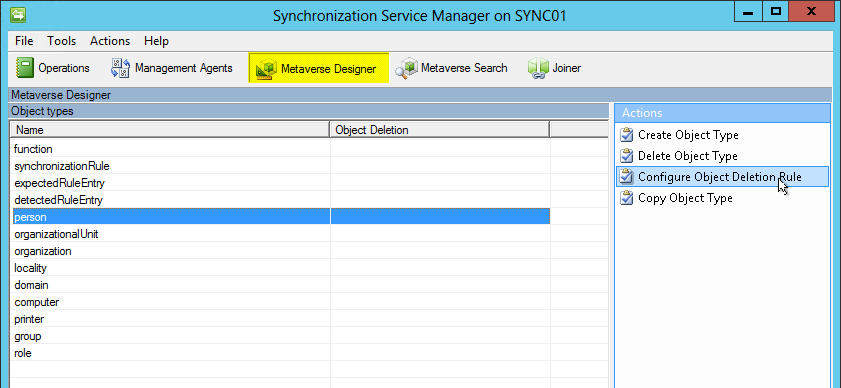
In the Synchronization Service Manager, select Metaverse Designer
Note
You will need to set this for each object type that you are working with in the connector space that is being deleted. (picture displays the person object type)
Click Configure Object Deletion Rule
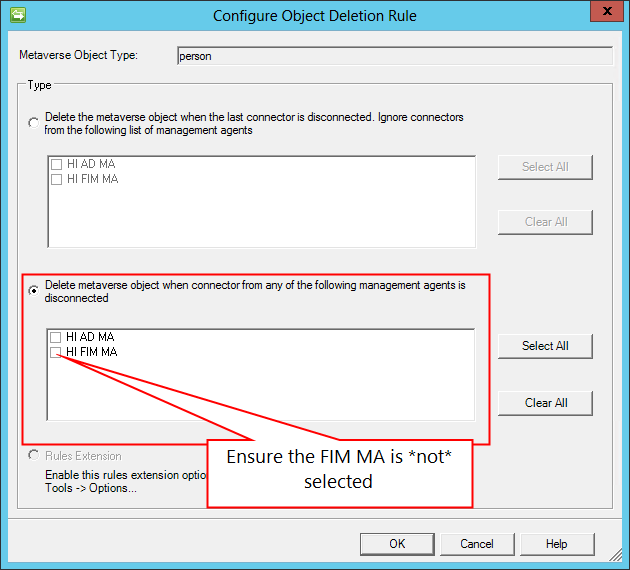
Ensure that you have the second radio button selected and the FIM MA does not contain a check in the check box.
Click Ok
Make them a disconnector (All non-FIM Service Management Agents)
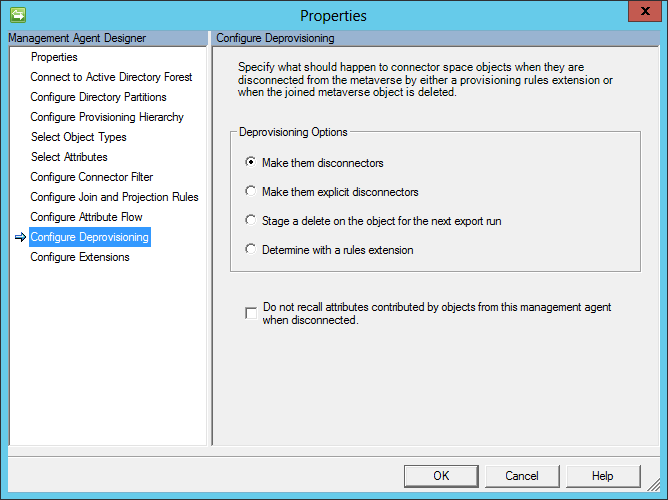
In doing this, we will want all the other non-FIM Service Management Agents to be set to “Make them a disconnector” on the Configure Deprovisioning tab.
However, before you make this change, back up the management agents, or take a snap-shot< of the existing configuration for deprovisioning. It is very important to know how you have your deprovisioning configured, as you want to be able to set it backup once you have completed these steps.
You can get here by:
- Viewing the Properties of the Management Agent
- Selecting the Configure Deprovisioning tab
- Select Make them a disconnector
- Click Ok
Make them a disconnector (The FIM Service Management Agent)
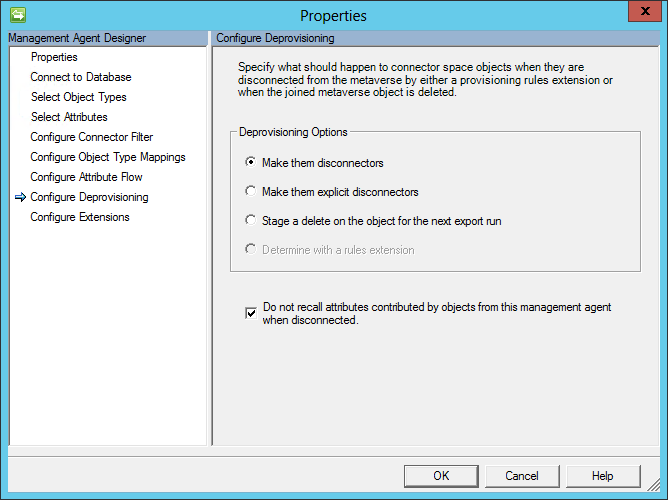
In doing this, we want the FIM Service Management Agent to be set to “Make them a disconnector” and "**Do not recall attributes..."**on the Configure Deprovisioning tab. However, before you make this change, back up the management agents, or take a snap-shot of the existing configuration for deprovisioning. It is very important to know how you have your deprovisioning configured, as you want to be able to set it backup once you have completed these steps.
You can get here by:
- Viewing the Properties of the Management Agent
- Selecting the Configure Deprovisioning tab
- Select "Make them a disconnectors"
- Select "Do not recall attributes contributed by objects from this management agent when disconnected"
- Click Ok
FIM Service Management Agent Import Attribute Flow (IAF)
Since we set the "do not recall" bit on the FIM MAdeleting the FIM connector space does not delete the csObjectID in the metaverse. Hence we can rejoin the objects in the MV when importing/syncing the FIM MA later on.
Delete the FIM Service Management Agent Connector Space
At this point, we are ready to delete the connector space.
In the Synchronization Service Manager, select Management Agents
Select the FIM Service Management Agent
From the Actions menu, select Delete
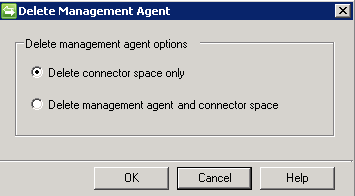
In this case, we are just going to delete the connector space, so we will choose the first radio button Delete connector space only
Note
If you are actually deleting the management agent, then you would choose the second radio button. However, it is still very important to go through all the pieces of this document to ensure that we can get back to a previous state should the need arise.
- Click the Ok button.
Disable Provisioning
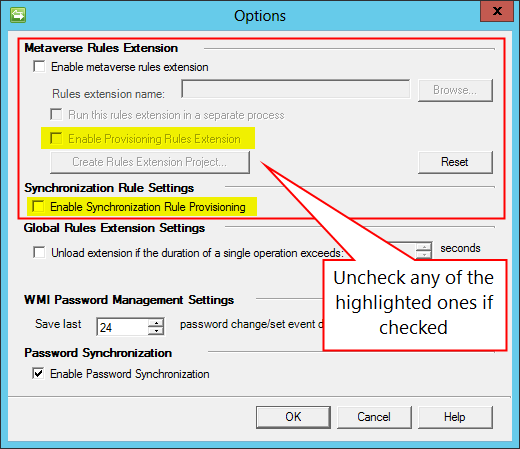
Once the deletion process has occurred, we want to be able to import and synchronize the objects back into the metaverse without running through provisioning. This will allow for objects to join back up to existing objects. If you are using Synchronization Rule Provisioning, you need to ensure that one is disabled as well.
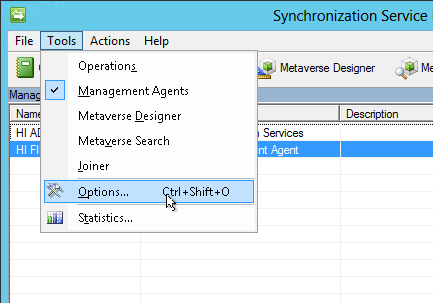
- Inside of the Synchronization Service Manager, from the Tools menu select Options
- Uncheck “Enable Provisioning Rules Extension” and “Enable Synchronization Rule Provisioning”
- Click Ok.
Import / Synchronization of the FIM Service Management Agent
You are now ready to bring the objects from the FIM Portal back into the FIM Service Management Agent Connector Space and then join them up to the objects in the metaverse.
- In the Synchronization Service Manager Console, select Management Agents
- Select the FIM Service Management Agent
- From the Actions Menu, select Full Import (Stage Only)
- Once the Full Import (Stage Only) has completed, then run a Full Synchronization
- You should see joins happening in the Inbound Synchronization Statistics
- Once you have completed the FIM Service Management Agent Full Synchronization, execute a Full Synchronization on all other management agents.
- Reset the Object Deletion Rule back to the original setting
- Reset the Deprovisioning Rules on each management agent
- Enable Provisioning in Tools > Options
- Run a Full Synchronization on all Management Agents
