Save and load images in Universal Windows App with SQLite and Entity Framework Core
This Wiki explains how to save and load images in Universal Windows C# project with SQLite and Entity Framework Core.
In this article, Visual Studio 2017 Community is used.
Create Universal Windows C# project
· Open Visual Studio 2017.
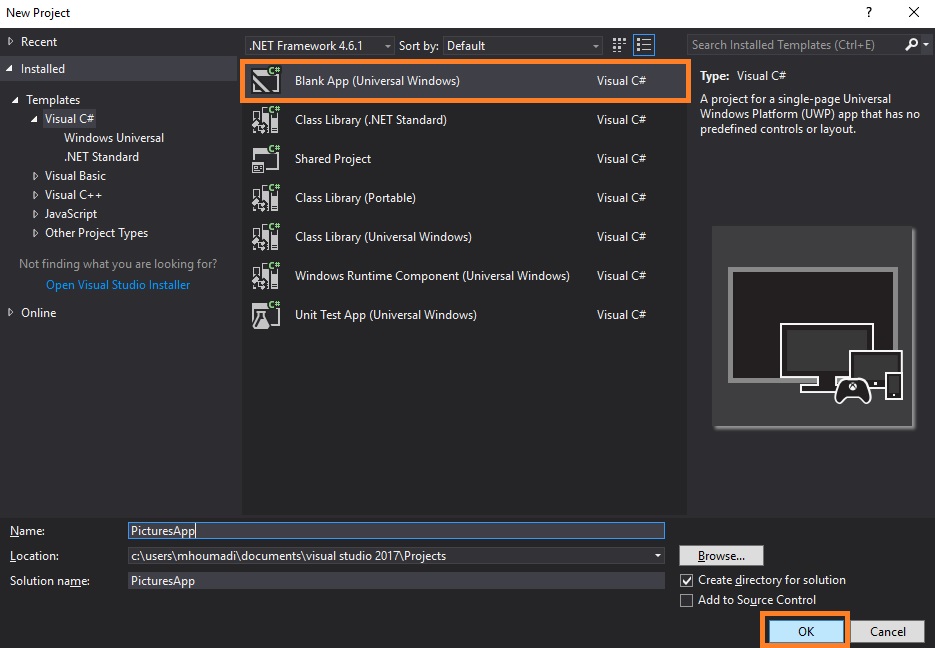
· Create a new Blank App Universal Windows project in C#: PicturesApp
**
**
Upgrade Microsoft.NETCore.UniversalWindowsPlatform
Entity Framework Core needs Microsoft.NETCore.UniversalWindowsPlatform 5.2.2 or later, that’s why we are going to upgrade the Microsoft.NETCore.UniversalWindowsPlatform in order to have the latest version.
· Open the Package Manager Console
· Run: Update-Package Microsoft.NETCore.UniversalWindowsPlatform
Install Entity Framework Core
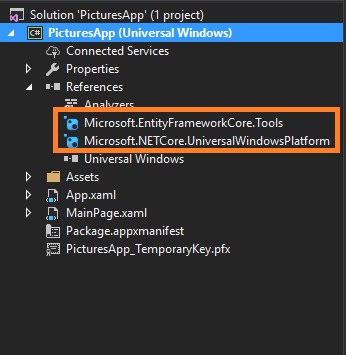
Before using Entity Framework Core with SQLite, you need to install these packages: Microsoft.EntityFrameworkCore.Sqlite et Microsoft.EntityFrameworkCore.Tools*.*
· Open the Package Manager Console
· Run: Install-Package Microsoft.EntityFrameworkCore.Sqlite.
· Run: Install-Package Microsoft.EntityFrameworkCore.Tools.
Your project should have these references:
Create model
· Add in the project a New Folder: Models
· Add in the Models repository a New Item (Class): Picture
· Insert in the Picture.cs the following code:
public class  Picture
    {
        public int  Id {get; set;}

        public String Name {get; set;}

        public byte[] Image {get; set;}
    }
Define Database context
· Add in the project a New Item (Class): PictureAppContext
· In the PictureAppContext.cs, insert the namespace Microsoft.EntityFrameworkCore with this code: using Microsoft.EntityFrameworkCore;
· Insert the following code in the PictureAppContext.cs :
public class  PictureAppContext : DbContext
    {
        public DbSet<Picture> Pictures {get; set; }

        protected override  void OnConfiguring(DbContextOptionsBuilder optionsBuilder)
        {
            optionsBuilder.UseSqlite("Data Source = PictureApp.db");
        }
    }
Now, let’s have a look to the code!
The code: public DbSet<Picture> Posts { get; set; } defines the table Picture in the database. DbSet may be used for a view too. For more informations about the DbSet, click here.
The methode OnConfiguring allows to specify the database.
Create the SQLite database
For creating the SQLite database, we will use the command Add-Migration from the package Microsoft.EntityFrameworkCore.Tools
· Open the Package Manager Console
· Run: Add-Migration MyFirstMigration
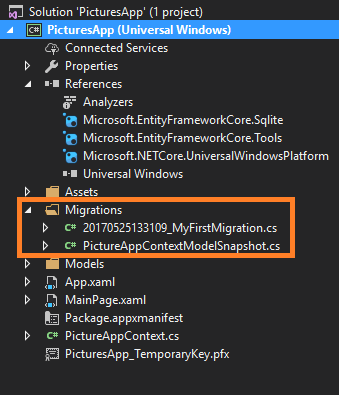
Once the migration is finished, the folder Migrations is created in the project.
To ensure that the database PictureApp.db will be created after the first time the application is running:
· Open the file App.xaml.cs and in the constructor, insert this code:
public App()
        {
            this.InitializeComponent();
            this.Suspending += OnSuspending;

            using (var db = new PictureAppContext())
            {
                db.Database.Migrate();
            }
        }
· Run and close the application PictureApp.
In the folder LocalState of the application’s package you will find the database PictureApp.db.
Add images in the SQLite database
Now, we are going to allow users to select images from the computer in order to add and save them to the database.
Allow the application to access the Pictures Library
· Open the Package.appxmanifest file.
· Access to the Capabilities tab and check the Pictures Library capability.
Convert the selected images to byte[]
You cannot save image directly in SQLite database, that is why we are going to convert image to byte[].
· Open MainPage.xaml.cs file and insert this code:
/// <summary>
       /// Convert Image to byte[]
       /// </summary>
       /// <param name="file"></param>
       /// <returns></returns>
       private async Task<byte[]> ConvertImageToByte(StorageFile file)
       {
           using (var inputStream = await file.OpenSequentialReadAsync())
           {
               var readStream = inputStream.AsStreamForRead();

               var byteArray = new  byte[readStream.Length];
               await readStream.ReadAsync(byteArray, 0, byteArray.Length);
               return byteArray;
           }

       }
Add and save the selected images to the SQLite database
· Open MainPage.xaml.cs file and insert this code:
private async void AddPicture_Tapped(object sender, TappedRoutedEventArgs e)
{
    //Open the FileOpenPicker to select a picture
    FileOpenPicker picker = new  FileOpenPicker();
    picker.ViewMode = PickerViewMode.Thumbnail;
    picker.SuggestedStartLocation =PickerLocationId.PicturesLibrary;
    picker.FileTypeFilter.Add(".jpg");
    picker.FileTypeFilter.Add(".jpeg");
    picker.FileTypeFilter.Add(".png");
    StorageFile file = await picker.PickSingleFileAsync();
    if (file != null)
    {
        Picture picture = new  Picture();
        picture.Image = await ConvertImageToByte(file);
        picture.Name = file.Name;
        //Insert and save image in database
        using (PictureAppContext db = new PictureAppContext())
        {
            db.Pictures.Add(picture);
            await db.SaveChangesAsync();
        }
    }
}
Load images from the SQLite database
· Open MainPage.xaml.cs file and insert this code:
protected override  void OnNavigatedTo(NavigationEventArgs e)
        {
            base.OnNavigatedTo(e);
            Initialized();
        }

        /// <summary>
        /// Initialize datas from the database
        /// </summary>
        private void  Initialized()
        {
            using (PictureAppContext db = new PictureAppContext())
            {
                GVPictures.ItemsSource = db.Pictures.ToList();
            }
        }
· In the MainPage.xaml.cs file insert this code:
private void  Refresh_Tapped(object sender, TappedRoutedEventArgs e)
{
    Initialized();
}
Create a converter
Before saving images in the database, we converted them to byte[]. To display images from SQLite, we are going to convert them to BitmapImage by using a Converter.
· Add in the project a New Folder: Converters
· Add in the Converters repository a New Item (Class): ByteToBitmapImageConverter
· Insert in the ByteToBitmapImageConverter.cs the following code:
public class  ByteToBitmapImageConverter : IValueConverter
 {
     public object  Convert(object  value, Type targetType, object parameter, string language)
     {
         byte[] imageBytes = (byte[])value;
         return ConvertByteToImage(imageBytes).Result;
     }

     public object  ConvertBack(object  value, Type targetType, object parameter, string language)
     {
         throw new  NotImplementedException();
     }

     /// <summary>
     /// Convert byte[] to image
     /// </summary>
     /// <param name="imageBytes"></param>
     /// <returns></returns>
     private async Task<BitmapImage> ConvertByteToImage(byte[] imageBytes)
     {
         BitmapImage image = new  BitmapImage();
         using (InMemoryRandomAccessStream randomAccessStream =  new  InMemoryRandomAccessStream())
         {
             using (DataWriter writer = new DataWriter(randomAccessStream.GetOutputStreamAt(0)))
             {
                 writer.WriteBytes(imageBytes);
                 await writer.StoreAsync();
                 image.SetSourceAsync(randomAccessStream);
             }

         }
         return image;
     }

 }
Create the user interface
· Open the MainPage.xaml file and insert this code:
<Page
    x:Class="PicturesApp.MainPage"
    xmlns="http://schemas.microsoft.com/winfx/2006/xaml/presentation"
    xmlns:x="http://schemas.microsoft.com/winfx/2006/xaml"
    xmlns:local="using:PicturesApp"
    xmlns:converters="using:PicturesApp.Converters"
    xmlns:d="http://schemas.microsoft.com/expression/blend/2008"
    xmlns:mc="http://schemas.openxmlformats.org/markup-compatibility/2006"
    mc:Ignorable="d">

    <Page.Resources>
        <converters:ByteToBitmapImageConverter x:Key="ByteToBitmapImageConverter" />
    </Page.Resources>

    <Page.BottomAppBar>
        <CommandBar>
            <AppBarButton Label="Refresh"
                          Icon="Refresh"
                          Tapped="Refresh_Tapped" />

            <AppBarButton Label="Add"
                          Icon="Add" Tapped="AddPicture_Tapped"/>

        </CommandBar>
    </Page.BottomAppBar>

    <Grid Background="{ThemeResource ApplicationPageBackgroundThemeBrush}">
        <GridView Margin="20"
                  x:Name="GVPictures">
            <GridView.ItemTemplate>
                <DataTemplate>
                    <StackPanel>
                        <Ellipse Width="100"
                                 Height="100">
                            <Ellipse.Fill>
                                <ImageBrush ImageSource="{Binding Image,Converter={StaticResource ByteToBitmapImageConverter}}" />
                            </Ellipse.Fill>
                        </Ellipse>
                        <TextBlock Text="{Binding Name}"
                                   HorizontalAlignment="Center" />
                    </StackPanel>
                </DataTemplate>
            </GridView.ItemTemplate>
        </GridView>
    </Grid>
</Page>
DB Browser for SQLite
DB Browser for SQLite allows you to create, design, and edit SQLite database.
You can download DB Browser for SQLite here.
It is very useful when you’re working with SQLite and I strongly recommend it.
Conclusion
In this article, we explained how to save and load images in Universal Windows App with SQLite and Entity Framework Core.
Download
You can download all project in this link : https://gallery.technet.microsoft.com/Save-and-load-in-Universal-85f94619
Sources
· /en-us/ef/core/get-started/uwp/getting-started


