SQLite interaction on Android with Visual Studio and Xamarin
Scope
In the present article we'll see how to develop a simple Android solution, through the use of Visual Studio and Xamarin, the developer framework which allows the creation of cross-platform solutions. The project will allow us to analyze, more generally, the peculiarities of an Android solution, such as - for example - the organization of the project files (and so its structure), and the peculiarities of the framework itself, speaking about the code syntax. We will use C# language to write down our source code
Project definition
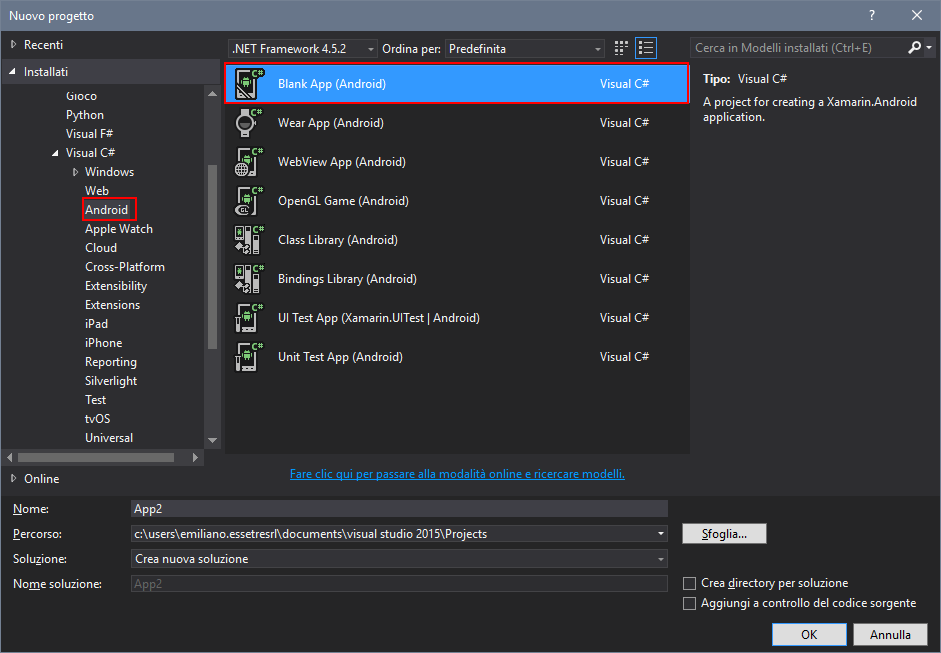
As usual, let's create a new project in Visual Studio. If Xamarin framework has been previously installed (its configuration won't be treated here), Android templates will be available. In the present case, lets choose an empty solution, to later add classes and object of interest.
More specifically, the present article will expose a trivial project: what we want to do here is a simple app which, given a textbox, allows inserting of alphanumeric strings, to save them in a SQLite database. This objective aims to give sufficient elements to further deepen the more general and basic topics for developing an Android app: the structure of the project, the creation of a GUI, its control through code and - important! - the interaction (as essential as it may be) with a database, using here and ORM available as NuGet package.
Project structure
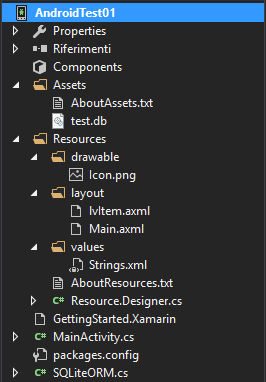
In the following image, it can be seen the structure of an already complete solution, to give a first overview on the general organization of and Android project, and the meaning exposed by each folder.
Leaving alone those classes which defines solution's Activities, two folder can be seen: Assets and Resources. The first contains all the files that you need a copy of the device. In the image, we see in it a file name test.db: it comes to our database, which we will see later development. Here we need only consider that, having to precisely interact with a database, we want it to be regarded as the solution files, before being moved physically on your smartphone / tablet / device that will run the app.
The structure of the Resources folder is more diverse, and contains several sub-folders (for example, the list is not exhaustive), by which go to define string constants, graphic objects, icons and images to use in the program.
In our case, we notice the drawable subfolder (which here contains the Icon.png file or icon to be attributed to the app), the directory layout - containing AXML files, which define using XML syntax of app screens and the controls defined on them, and the values directory, in which to define the constant files, for example by associating to predefined identifiers by referencing app of fixed text strings (in the case of strings.xml files).
Completing the list, in this case, C # classes MainActivity.cs (the class that will control our startup object) and SQLiteORM.cs, class written specifically to perform the mundane tasks of database we're going to define
Main layout
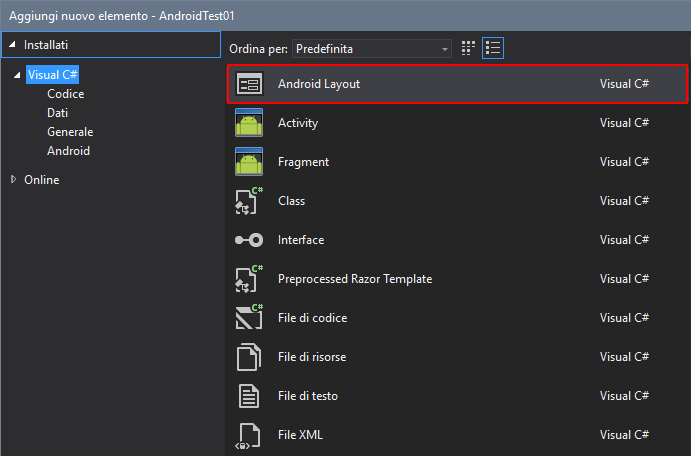
Lets now define the layout for the main screen of our app. Lets add a new item, and select the Android type layout. We'll call this layout Main.axml.
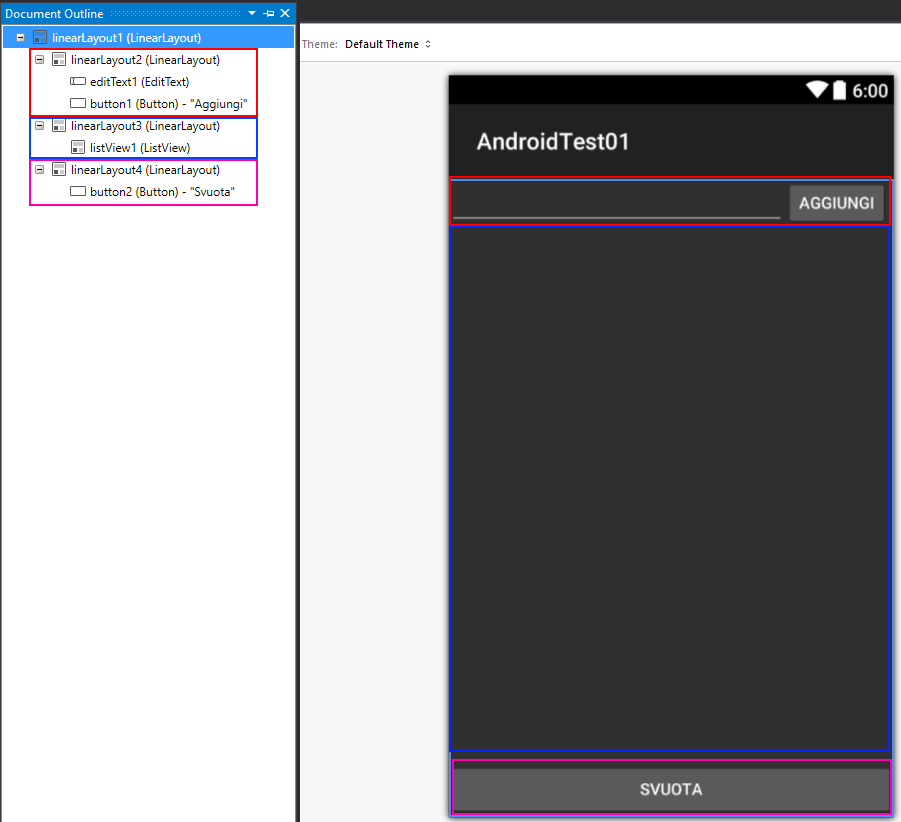
Graphically, we will take care of creating three types LinearLayout objects (containers that allow you to reserve a certain percentage of screen space to their content, and to give an orientation to the same), to populate then each of them with the desired controls in the first LinearLayout insert a EditText (editable text box) and a Button (clickable object); the second will add a ListView (we'll need to list the records added); on the third a Button to perform a possible emptying massive operation of our table.
The XML code that will realize our window is as follows:
<?xml version="1.0" encoding="utf-8"?>
<LinearLayout xmlns:p1="http://schemas.android.com/apk/res/android"
    p1:orientation="vertical"
    p1:layout_width="match_parent"
    p1:layout_height="match_parent"
    p1:id="@+id/linearLayout1">
    <LinearLayout
        p1:orientation="horizontal"
        p1:layout_width="match_parent"
        p1:layout_height="wrap_content"
        p1:id="@+id/linearLayout2"
        p1:layout_gravity="fill_horizontal">
        <EditText
            p1:id="@+id/editText1"
            p1:layout_width="290dp"
            p1:layout_height="wrap_content"
            p1:layout_gravity="fill_horizontal" />
        <Button
            p1:text="Aggiungi"
            p1:layout_width="wrap_content"
            p1:layout_height="match_parent"
            p1:id="@+id/button1" />
    </LinearLayout>
    <LinearLayout
        p1:orientation="vertical"
        p1:layout_width="match_parent"
        p1:layout_height="match_parent"
        p1:id="@+id/linearLayout3"
        p1:layout_weight="75">
        <ListView
            p1:minWidth="25px"
            p1:minHeight="25px"
            p1:layout_width="match_parent"
            p1:layout_height="match_parent"
            p1:id="@+id/listView1" />
    </LinearLayout>
    <LinearLayout
        p1:orientation="horizontal"
        p1:minWidth="25px"
        p1:minHeight="25px"
        p1:layout_width="match_parent"
        p1:layout_height="wrap_content"
        p1:id="@+id/linearLayout4">
        <Button
            p1:text="Svuota"
            p1:id="@+id/button2"
            p1:layout_width="match_parent"
            p1:layout_height="match_parent"
            p1:layout_gravity="fill_horizontal" />
    </LinearLayout>
</LinearLayout>
In it you can appreciate some recurring parameters, for which we note here some important information. First, the parameter id: is a basic setting, as defines the name of a control on their layout. Without it, you can not reference the code from the object, so it is important to point me / customize it (in the form "@+id/name") for all of those controls that are actually used. The layout_width and layout_height properties respectively define the width and height of a control. You can also indicate the value by some reserved words: For example, often we see the use of match_parent, which indicates that the property should have the value of its container, or wrap_content, or that should fit the content as it changes; layout_weight indicates a space occupancy percentage. Note the linearLayout3: for it is indicated a layout_weight of 75, or is the explicit intention of obtaining a 75% of the overall space for such control. As regards the LinearLayout, there is also the orientation property, which indicates how the controls must be arranged in its interior, ie around a tile sorting, or stacked. For controls that have it, the Text property specifies the text to be displayed on them.
The reader is invited to experiment with these and other properties in order to familiarize with them
Main Activity
A layout is referenced and then used by the appropriate Activity, in classes where the operating code. In this case, we define a new activity, which we will call MainActivity.cs
In its OnCreate event, which defines the code runs to the creation of the Activity itself, we can indicate which files AXML use, and then referenziarne - through the use of id property described above - the controls. Consider the following example:
public class  MainActivity : Activity
{
    EditText  t = null;
    ListView lv = null;

    protected override  void OnCreate(Bundle bundle)
    {
        base.OnCreate(bundle);
        SetContentView(Resource.Layout.Main);

        Button b1 = FindViewById<Button>(Resource.Id.button1);
        Button b2 = FindViewById<Button>(Resource.Id.button2);

        lv = FindViewById<ListView>(Resource.Id.listView1);
        t  = FindViewById<EditText>(Resource.Id.editText1);

        b1.Click += B1_Click;
        b2.Click += B2_Click;

        t.KeyPress += (object sender, View.KeyEventArgs e) => {
            e.Handled = false;
            if (e.Event.Action == KeyEventActions.Down && e.KeyCode == Keycode.Enter)
            {
                // TO DO
                e.Handled = true;
            }
        };
    }
}
Through setContentView function, AXML file is indicated for use, specifying the name contained in Resource.Layout class. From here we understand how the hierarchy of directories that make up the project are in fact converted into classes, through which you can reference the elements contained in them. Once that is done, the Resource.Id class will expose all id defined on this layout. Note then how is sufficient to declare objects of a given class (take for example the Button b1) and, through the findViewById function (appropriately cast-ed), tie the graphic object to its variable. In fact, the statement:
Button b1 = FindViewById<Button>(Resource.Id.button1);
Simply said: Define a Button object named b1, which must refer to the control that the layout attached to this activity is called the id button1.
From here on, the object b1 will allow us to capture the different events and properties necessary data while using the app.
Note for example how to be declared the KeyPress event on EditText t: through a lambda routines, you declare what should happen when you press a key while the text box has focus (in this case, something will happen only if the pressed key It will Enter). In addition, and you notice it relatively to the Click event of b1 and b2, the handler to an event can be assigned by simply indicating what routine to perform when the event occurs the same (routine that will have the same signature event caller, as as usual C # syntax).
Database: implementation and control
As stated at the beginning, this application will worry only store strings of text, and so the database will be extremely trivial. However, the principle of implementation does not change, and it is therefore useful to analyze in this seat. Many times, the app gives you the task of creating a database, if nonexistent. Other times, you can create a default database template and make sure that it is copied from the app in the appropriate location. We will see here the second way.
SQLite Expert Personal
A very useful tool to create databases of type SQLite has SQLite Expert Personal. You can download it here: http://www.sqliteexpert.com/download.html.
Once we started, we can create a new database, and - via the convenient GUI - going to define tables and fields that comprise it. The use is very intuitive, reason why we will not dwell here in showing it.
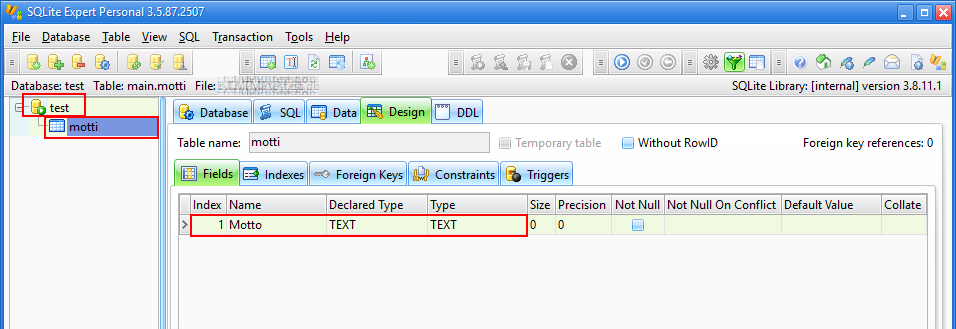
In the example, we will create a simple name test.db database containing a single table, mottos, in turn having a single type TEXT field, Motto. Once saved on your PC, test.db files can be dragged to the Assets directory, as shown earlier: in this way, it will be regarded as binary files compiled with the application, and we will make sure to copy it to your device run the app, if the operating conditions require it (typically, if it still is not present, or if its structure is changed).
SQLite-net
Now we write a class for the database control, or for the execution of the copy just mentioned, and the instructions that we want then used in the development of our app.
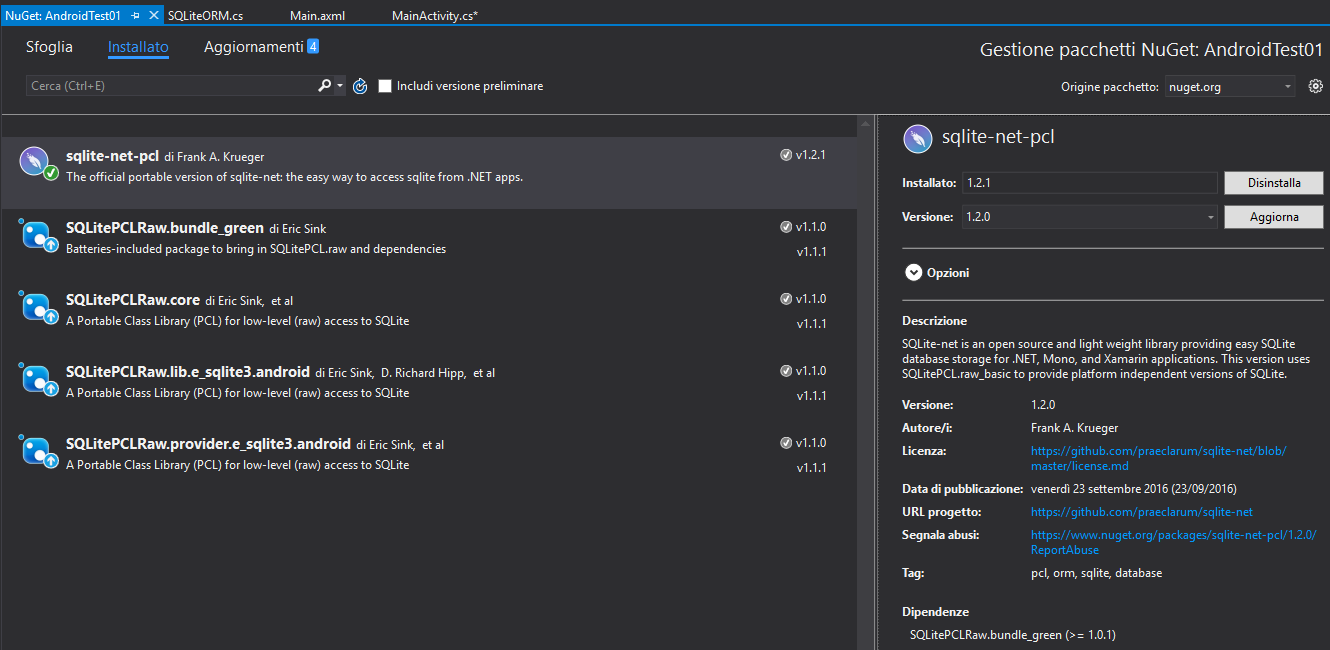
We will rely to an open source library and much lighter, or SQLite-net. It is downloadable as NuGet package, and at GitHub
https://github.com/praeclarum/sqlite-net.
Database management class
Lets create a new class, called SQLiteORM.cs. It follows the full listing of the class, after which we descend further into the details of its structure.
using Android.App;
using SQLite;
using System.Collections.Generic;
using System.IO;

namespace AndroidTest01
{
    public class  SQLiteORM
    {
        [Table("Motti")]
        public class  Motti
        {
            public string  Motto { get; set; }
        }

        public string  PercorsoDb { get; set; }

        public SQLiteORM(string dbName)
        {
            string dbPath = Path.Combine(Android.OS.Environment.ExternalStorageDirectory.ToString(), dbName);
            if (!File.Exists(dbPath))
            {
                using (BinaryReader br = new BinaryReader(Application.Context.Assets.Open(dbName)))
                {
                    using (BinaryWriter bw = new BinaryWriter(new FileStream(dbPath, FileMode.Create)))
                    {
                        byte[] buffer = new  byte[2048];
                        int len = 0;
                        while ((len = br.Read(buffer, 0, buffer.Length)) > 0)
                        {
                            bw.Write(buffer, 0, len);
                        }
                    }
                }
            }

            PercorsoDb = dbPath;
        }

        public List<string> GetMotto()
        {
            List<string> motti = new  List<string>();

            using(var db = new  SQLiteConnection(this.PercorsoDb))
            {
                foreach (var s in db.Table<Motti>())
                    motti.Add(s.Motto);
            }

            return motti;
        }

        public void  InsertMotto(string  motto)
        {
            using (var db = new SQLiteConnection(this.PercorsoDb))
            {
                db.Insert(new Motti { Motto = motto });
            }
        }

        public void  Svuota()
        {
            using (var db = new SQLiteConnection(this.PercorsoDb))
            {
                db.DeleteAll<Motti>();
            }
        }

    }
}
In it, it is first defined as a subclass, indicating the name and the table structure with which to interact:
[Table("Motti")]
public class  Motti
{
    public string  Motto { get; set; }
}
The notation [Table ("Motti")] shall identify the physical name of the table on the database, regardless of the class name that will assign. For practical issues, we manteremmo them identical.
Notice how the routines GetMotto (), InsertMotto () and Clear basically present the same structure: each of them is introduced by the initialization of an object of SQLiteConnection type, which makes the connection to the specified database, and then perform the specific functionality of routine.
For example, in the case of GetMotto (), or the routine will use to populate the view, we see that - after the realization of connection - runs a loop on all the items in Table <Motti>, and how each of them is added to a List <string> that will be the kind of routine return. Still, in the case of InsertMotto (), which accepts a string as a parameter required, after the establishment of the connection is called the insert function, passing an object Motti whose property Headline is the string passed to the method. After the execution of the various commands, to the effect of using keywords, the connection is discharged: in other words, it is maintained for the time necessary to the execution of the commands.
Let's focus now on the constructor.
public SQLiteORM(string dbName)
{
    string dbPath = Path.Combine(Android.OS.Environment.ExternalStorageDirectory.ToString(), dbName);
    if (!File.Exists(dbPath))
    {
        using (BinaryReader br = new BinaryReader(Application.Context.Assets.Open(dbName)))
        {
            using (BinaryWriter bw = new BinaryWriter(new FileStream(dbPath, FileMode.Create)))
            {
                byte[] buffer = new  byte[2048];
                int len = 0;
                while ((len = br.Read(buffer, 0, buffer.Length)) > 0)
                {
                    bw.Write(buffer, 0, len);
                }
            }
        }
    }

    PercorsoDb = dbPath;
}
Since we have the database in the directory Assets, and we want to copy it to your device, first of all we see that it is not already present. Let's assume here that you want to save the database on the external media, typically an SD Card. We check then that our database is not present in that location:
string dbPath = Path.Combine(Android.OS.Environment.ExternalStorageDirectory.ToString(), dbName);
if (!File.Exists(dbPath))
{
    // TO DO
}
Android.OS.Environment.ExternalStorageDirectory is a property by which to read the physical location of the storage card. then we create a path given by this property and our database name, and then verifichiamone existence. If it does not exist, we proceed through BinaryReader and BinaryWriter classes, reading our database file and perform their copy. Note that in order to do this, the app must have the appropriate authorizations. So let's see how to set them.
I/O permissions on SD card
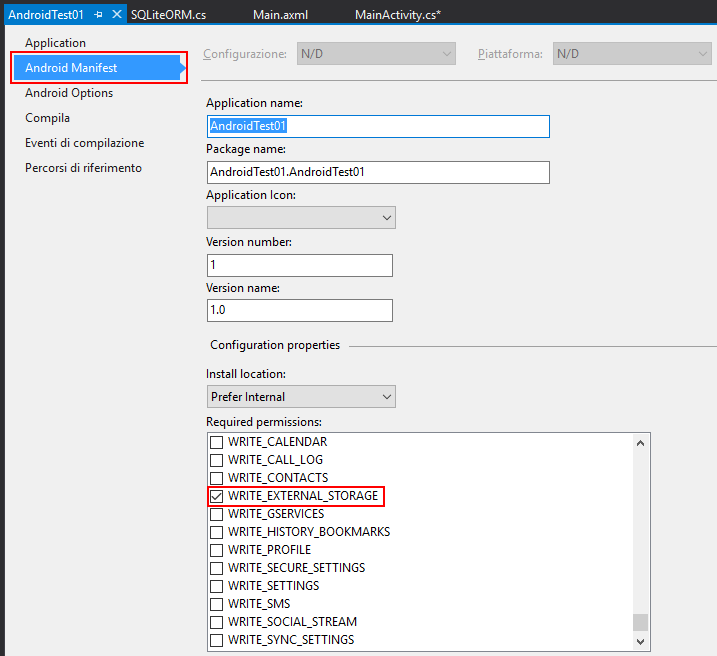
The Android operating system requires that, for apps that make use of special features, these declare their intent through a manifest file. It should be specified all the resources and behaviors that your app needs in order to function correctly. In our case, if we run the app without specifying the use read-write external storage, the application itself would suffer a crash at the attempt to access that resource, because the OS would not have granted permission to do so.
Indicate such permits is simple. We go into the properties of the project, and the Android Manifest entry will describe the program is specific. In our case, the flags will be affixed on READ_EXTERNAL_STORAGE and WRITE_EXTERNAL_STORAGE voices
List layout
Although it seems we now have all the elements to complete the app, actually a separate paragraph is devoted to the ListView control, which we will use to show all the phrases stored in the database. As any list, it is delegated to contain elements; However, unlike for example of a ListView WinForms context, you can not directly access to the Items property, and then highlighting the elements making direct reference to a collection.
Even from the point of view of the layout, you must define how each element is to be shown, and in this sense we are closer to a list of WPF type, however, obliged to customizzarne the DataTemplate. In other words, to properly use a ListView Android (which is only a container), we first define a layout for child elements, and - via an adapter - switch to list the collection of objects to be displayed, together with the graphic model which they will be exposed.
The case presented here is as simple as possible (for a list element only one string), but if this approach may seem excessive, it is instead very versatile when it comes to compose also very complex graphics, in which each object must list submit more data in different forms.
Then we define a new AXML layout. We'll call him lvItem.axml, and in it we will specify a simple object of type TextView (equivalent of a Label in the field WinForms). The XML code of our layout will therefore be:
<?xml version="1.0" encoding="utf-8"?>
<TextView xmlns:p1="http://schemas.android.com/apk/res/android"
    p1:text="Medium Text"
    p1:textAppearance="?android:attr/textAppearanceMedium"
    p1:layout_width="match_parent"
    p1:layout_height="match_parent"
    p1:id="@+id/textView1" />
The ListView has an Adapter property. Consequently, when we use the routine GetMotto (), defined in class SQLiteORM.cs, we can compose an adapter with which to send the same list the data collection and the resource represented by the newly created layout, so as to enable the display.
We now see the complete code of MainActivity.cs, so as to analyze the operations of the database and events that will be assigned to each control.
MainActivity.cs full code
using System;
using Android.App;
using Android.Views;
using Android.Widget;
using Android.OS;

namespace AndroidTest01
{
    [Activity(Label = "AndroidTest01", MainLauncher = true, Icon = "@drawable/icon")]
    public class  MainActivity : Activity
    {
        SQLiteORM o = null;
        EditText  t = null;
        ListView lv = null;

        protected override  void OnCreate(Bundle bundle)
        {
            base.OnCreate(bundle);
            SetContentView(Resource.Layout.Main);

            Button b1 = FindViewById<Button>(Resource.Id.button1);
            Button b2 = FindViewById<Button>(Resource.Id.button2);

            lv = FindViewById<ListView>(Resource.Id.listView1);
            t  = FindViewById<EditText>(Resource.Id.editText1);

            o = new  SQLiteORM("test.db");
            RefreshAdapter();

            b1.Click += B1_Click;
            b2.Click += B2_Click;

            t.KeyPress += (object sender, View.KeyEventArgs e) => {
                e.Handled = false;
                if (e.Event.Action == KeyEventActions.Down && e.KeyCode == Keycode.Enter)
                {
                    B1_Click(sender, e);
                    e.Handled = true;
                }
            };
        }

        private void  RefreshAdapter()
        {
            lv.Adapter = new  ArrayAdapter<string>(lv.Context, Resource.Layout.lvItem, o.GetMotto().ToArray());
        }

        private void  B2_Click(object  sender, EventArgs e)
        {
            AlertDialog.Builder alert = new  AlertDialog.Builder(this);
            alert.SetTitle("Conferma eliminazione");
            alert.SetMessage("Verrà eliminato l'intero contenuto di tabella");
            alert.SetPositiveButton("Procedi", (senderAlert, args) => {
                o.Svuota();
                RefreshAdapter();
            });

            alert.SetNegativeButton("Annulla", (senderAlert, args) => {  });

            Dialog dialog = alert.Create();
            dialog.Show();
        }

        private void  B1_Click(object  sender, EventArgs e)
        {
            if (o != null)
            {
                if (t.Text != "")
                {
                    o.InsertMotto(t.Text);
                    RefreshAdapter();
                    t.Text = "";
                } else
                {
                    Toast.MakeText(this, "È necessario inserire una stringa", ToastLength.Short).Show();
                }
                t.RequestFocus();
            }
        }
    }
}
Compared to the code above, notice the declaration of a variable or SQLiteORM type, whose constructor will pass the name of our database, so as to allow the app to verify their existence or, alternatively, to create it on the external storage. We also note the presence of RefreshAdapter routine: in it is assigned to the Adapter property of an object list ArrayAdapter cast on string. It is created by passing the context to which the adapter must refer the layout to be used for the graphic design of the single element, and the collection of objects to be displayed, which in our case will be the list of strings obtained by GetMotto () method.
Finally, the two routines assigned to the Click event of the on-screen buttons, and B1_Click B2_Click, perform - respectively - the inclusion of the string typed in the database, or the emptying of the database after user confirmation, made by Dialog. In both cases, after the operation, a call to RefreshAdapter makes sure that the list is repopulated with the actual data.
Demo
Follows a video in which to observe a quick demonstration of the app so created (see URL: http://www.youtube.com/watch?v=rNAmeZD2Jzk)
Download
The source code presented here is freely downloadable at the following URL: https://code.msdn.microsoft.com/Interazione-con-SQLite-per-5150e933
Other Languages
The present article is also available in the following localizations:
