SharePoint Online : Performing Batch Operations using REST API
Introduction
This article focusses on the batch queries and operations recently introduced by Microsoft in REST API’s. This capability is supported only in SharePoint Online version. Microsoft might add this to the on-premise version as well, but it is currently available in SharePoint Online version only.
When we say that batch operations are supported in SharePoint Online using REST API, what we actually mean here is that now using a single request to the server we can do multiple operations and thereby improve performance.
Prior to the introduction of the batch operations, REST calls were considered to be chatty, but this capability has greatly enhanced the power of REST API’s.
History
With advent of SharePoint 2010, there has been lot of focus on implementing functionality using client side rather than on server. In a nutshell, there were two ways in which we can make a remote call to the server i.e. using Client Side Object Model (CSOM) or using REST API’s. It has always been a topic of debate which one should be preferred over the other. There is no wrong or right over here. Both have their pros and cons and it entirely depends upon what you want to achieve. One of the major topic of debate was CSOM’s capability to execute multiple operations in a single call to the server which was not supported by REST. Things have now changed, for the good.
Scenario
Let us build up a simple scenario to understand how the batch operations work with SharePoint Online REST API.
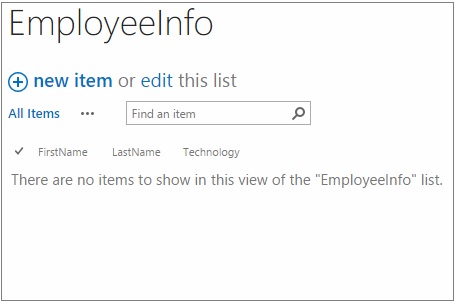
Say we have a simple list called Employee Info list where we are capturing the First Name, Last Name and Technology they are working on. Now what we want to do is using a single HTTP call, we want to add couple of items (let us say 3 items for our scenario) to the list and get all the items.
Previously if we were to use REST then this would require four HTTP calls to the server. Three HTTP POST calls to add the three items to the list and one HTTP GET call to fetch all the items from the list.
But gone are the days when REST used to be chatty. Now, using the batch capability, using a single HTTP call we can carry out these four operations and thereby improving the performance deeply.
The above image shows the structure of our Employee Info list. As mentioned earlier it has three columns i.e. FirstName, LastName and Technology
For demo purpose let us keep the things simple and create a page and add script editor webpart with following html embedded into it.
<script type="text/javascript" src="/sites/RnD/Style Library/POC/JS/jquery-1.11.0.min.js"></script>
<script type="text/javascript" src="/sites/RnD/Style Library/POC/JS/RestSample.js"></script>
<h1>Employee Information</h1>
<br />
<input type="button" id="btnFetchEmployees" value="Create and Fetch Employees" />
<br />

 <table cellpadding="2" cellspacing="2">
    <thead id="tHead">
    </thead>
    <tbody id="tBody">
    </tbody>
</table>
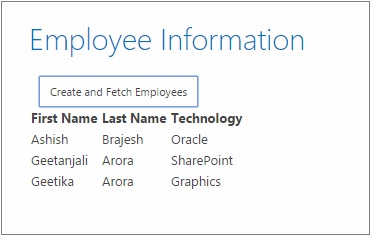
After inserting the above html, the page will render like below.
If you have a look at the html snippet you will observe that we have referenced two JavaScript files one for jquery and another one is the custom js file. It is the custom file that will hold our REST call to create the list items and fetch them.
Before we actually walk through the code let us have a look at the outcome when we click on the button on the page.
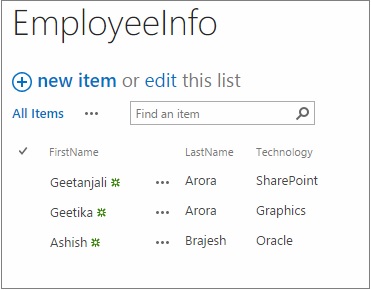
Let us have a look at the list now and see if the items got added to the list or not.
As you can see in the image above, the three items got added to the list.
Now, the question is did all this happen in one single HTTP call or it took four HTTP calls.
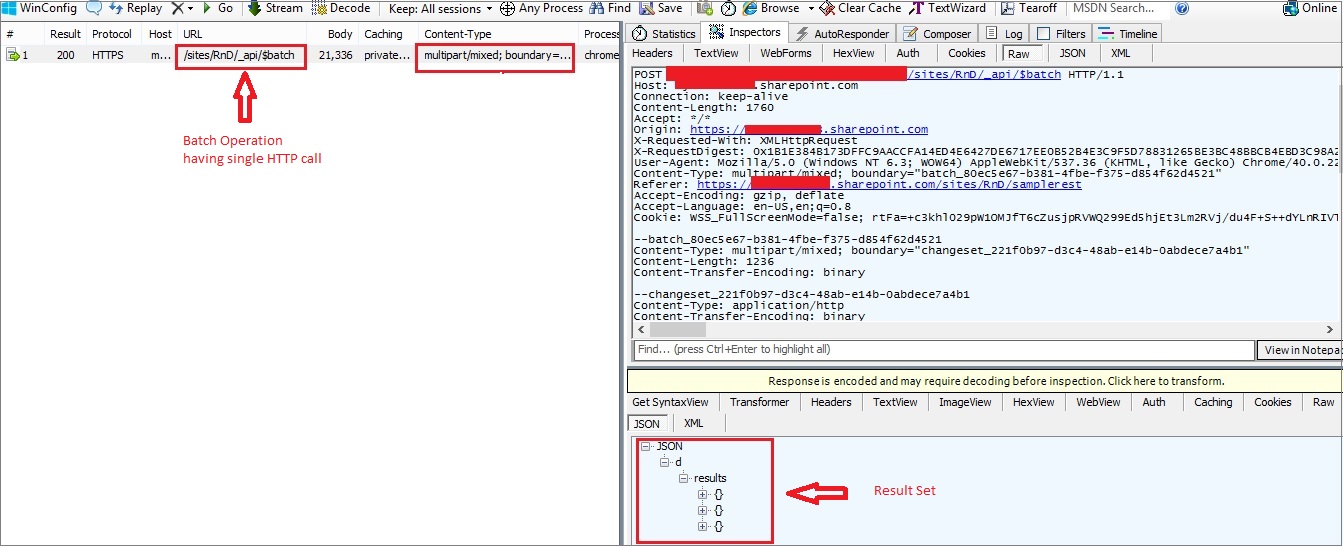
To do this our old friend Fiddler will help us. When we had clicked on the button, we had captured that request in Fiddler to monitor.
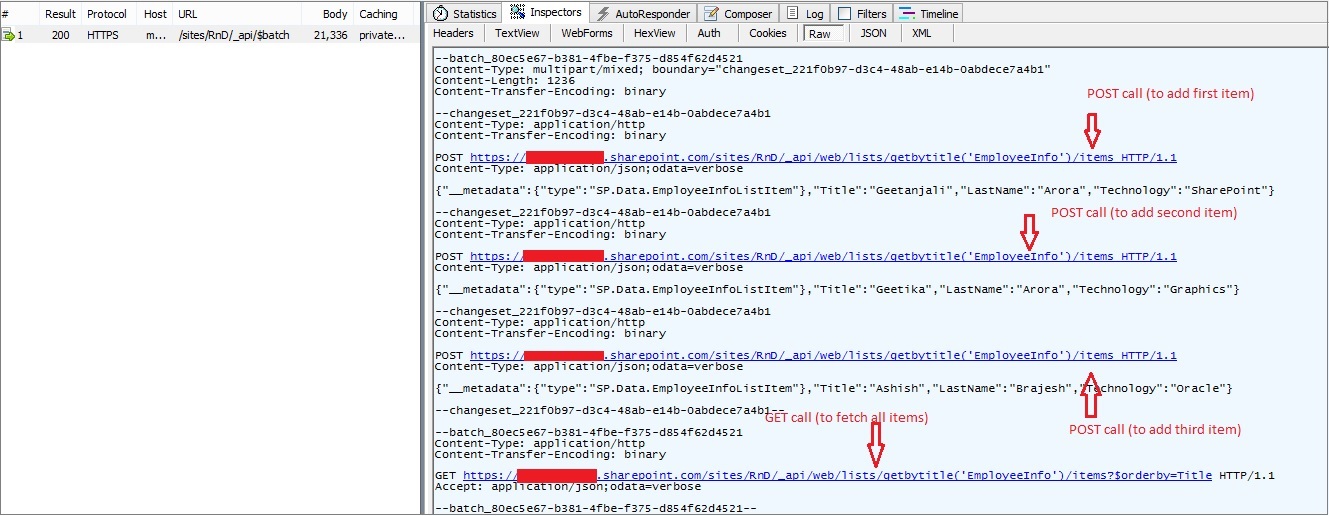
In the above screenshot you can see that in single HTTP call to the server four operations are happening. As a result you can do batch operations now in SharePoint online using REST API.
Now, let us have a look at how this magic exactly happen and have a look at the REST call that we made.
(function () {
    jQuery(document).ready(function () {
       jQuery("#btnFetchEmployees").click(function () {
            addEmployees();
        });
    });
})();
function addEmployees() {
    var employeesAsJson = undefined;
    employeesAsJson = [
            {
                __metadata: {
                    type: 'SP.Data.EmployeeInfoListItem'
                },
                Title: 'Geetanjali',
                LastName: 'Arora',
                Technology: 'SharePoint'
            },
            {
                __metadata: {
                    type: 'SP.Data.EmployeeInfoListItem'
                },
                Title: 'Geetika',
                LastName: 'Arora',
                Technology: 'Graphics'
            },
            {
                __metadata: {
                    type: 'SP.Data.EmployeeInfoListItem'
                },
                Title: 'Ashish',
                LastName: 'Brajesh',
                Technology: 'Oracle'
            }
    ];

    addEmployeeInfoBatchRequest(employeesAsJson);
}

function generateUUID() {
    var d = new Date().getTime();
    var uuid = 'xxxxxxxx-xxxx-4xxx-yxxx-xxxxxxxxxxxx'.replace(/[xy]/g, function  (c) {
        var r = (d + Math.random() * 16) % 16 | 0;
        d = Math.floor(d / 16);
        return (c == 'x'  ? r : (r & 0x7 | 0x8)).toString(16);
    });
    return uuid;
};

function addEmployeeInfoBatchRequest(employeesAsJson) {
    // generate a batch boundary
    var batchGuid = generateUUID();
    // creating the body
    var batchContents = new Array();
    var changeSetId = generateUUID();
    // get current host
    var temp = document.createElement('a');
    temp.href = _spPageContextInfo.webAbsoluteUrl;
    var host = temp.hostname;
    // iterate through each employee
    for (var employeeIndex = 0; employeeIndex < employeesAsJson.length; employeeIndex++) {

        var employee = employeesAsJson[employeeIndex];

        // create the request endpoint
        var endpoint = _spPageContextInfo.webAbsoluteUrl
                       + '/_api/web/lists/getbytitle(\'EmployeeInfo\')'
                       + '/items';

        // create the changeset
        batchContents.push('--changeset_' + changeSetId);
        batchContents.push('Content-Type: application/http');
        batchContents.push('Content-Transfer-Encoding: binary');
        batchContents.push('');
        batchContents.push('POST ' + endpoint + ' HTTP/1.1');
        batchContents.push('Content-Type: application/json;odata=verbose');
        batchContents.push('');
        batchContents.push(JSON.stringify(employee));
        batchContents.push('');
    }
    // END changeset to create data
    batchContents.push('--changeset_' + changeSetId + '--');


    // batch body
    var batchBody = batchContents.join('\r\n');

    batchContents = new  Array();

    // create batch for creating items
    batchContents.push('--batch_' + batchGuid);
    batchContents.push('Content-Type: multipart/mixed; boundary="changeset_' + changeSetId + '"');
    batchContents.push('Content-Length: ' + batchBody.length);
    batchContents.push('Content-Transfer-Encoding: binary');
    batchContents.push('');
    batchContents.push(batchBody);
    batchContents.push('');

    // create request in batch to get all items after all are created
    endpoint = _spPageContextInfo.webAbsoluteUrl
                  + '/_api/web/lists/getbytitle(\'EmployeeInfo\')'
                  + '/items?$orderby=Title';


    batchContents.push('--batch_' + batchGuid);
    batchContents.push('Content-Type: application/http');
    batchContents.push('Content-Transfer-Encoding: binary');
    batchContents.push('');
    batchContents.push('GET ' + endpoint + ' HTTP/1.1');
    batchContents.push('Accept: application/json;odata=verbose');
    batchContents.push('');

    batchContents.push('--batch_' + batchGuid + '--');

    batchBody = batchContents.join('\r\n');

    // create the request endpoint
    var endpoint = _spPageContextInfo.webAbsoluteUrl +  '/_api/$batch';

       var batchRequestHeader = {
        'X-RequestDigest': jQuery("#__REQUESTDIGEST").val(),
        'Content-Type': 'multipart/mixed; boundary="batch_'  + batchGuid + '"'
    };

    // create request
    jQuery.ajax({
        url: endpoint,
        type: 'POST',
        headers: batchRequestHeader,
        data: batchBody,
        success: function  (response) {

            var responseInLines = response.split('\n');


        $("#tHead").append("<tr><th>First Name</th><th>Last Name</th><th>Technology</th></tr>");

            for (var currentLine = 0; currentLine < responseInLines.length; currentLine++) {
                try {

                    var tryParseJson = JSON.parse(responseInLines[currentLine]);

                    $.each(tryParseJson.d.results, function  (index, item) {

                        $("#tBody").append("<tr><td>" + item.Title + "</td><td>" + item.LastName + "</td><td>" + item.Technology + "</td></tr>");

                    });


                } catch  (e) {

                }
            }
        },
        fail: function  (error) {

        }
    });
}
Before we actually dive into the above code, there are few basics that we should be aware of.
Based upon the OData specifications, there are two important aspects of a batch request.
- Batch Request Headers
- Batch Request Body
The batch request header describes the batch being submitted and the batch request body describes what the batch will actually do.
According to OData specifications, a Batch Request Header
- MUST be submitted as a single HTTP POST request to the batch endpoint.
- MUST contain a Content-Type header specifying a content type of “multipart/mixed”.
- MUST include a boundary specification.
So if you monitor below code snippet which is the part of the entire code snippet provided above, you can see how we adhere to the OData specifications to generate our batch request.
// create the request endpoint
var endpoint = _spPageContextInfo.webAbsoluteUrl +  '/_api/$batch';

// batches need a specific header
var batchRequestHeader = {
   'X-RequestDigest': jQuery("#__REQUESTDIGEST").val(),
   'Content-Type': 'multipart/mixed; boundary="batch_'  + batchGuid + '"'
};
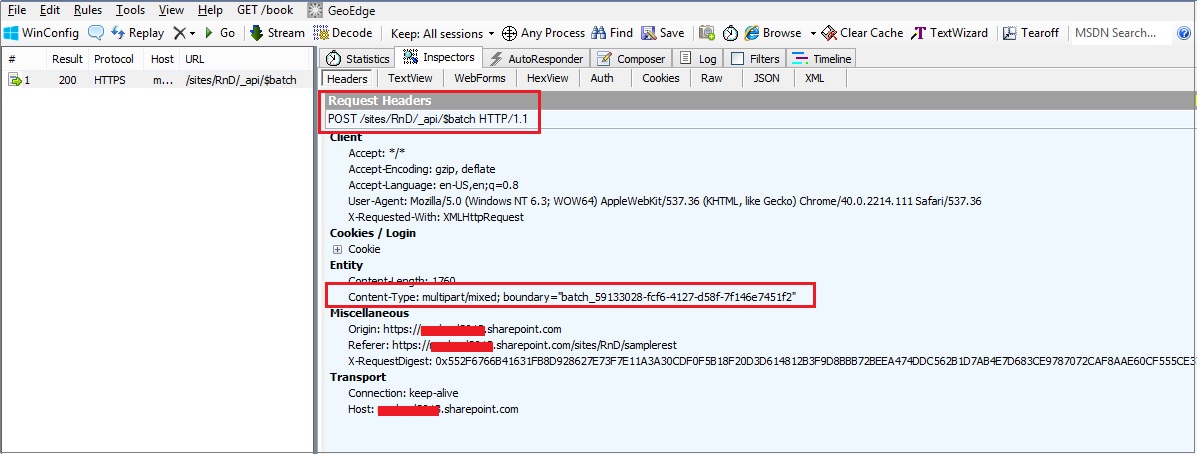
Even if you look at the fiddler you will see how the request header looks.
Now after monitoring the batch header let us look at the batch body.
The body of a batch request is made up of an ordered series of query operations and/or changesets. The changesets contain write operations like insert, update or delete operations. They cannot be HTTP GET requests.
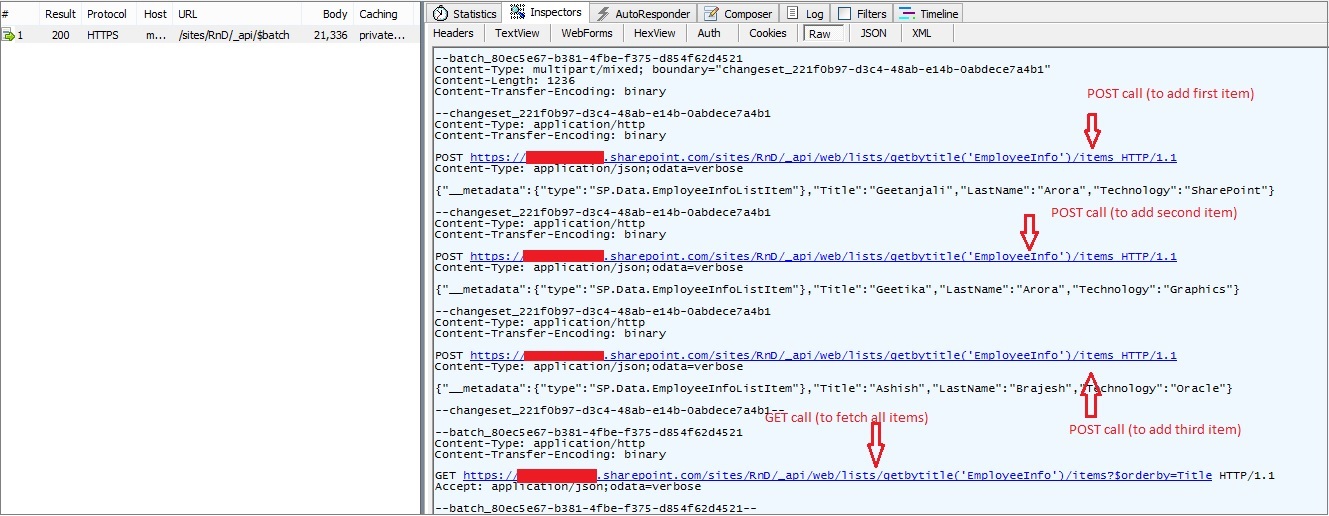
So in our scenario above we are creating three list items and fetching them. If you look at the image below you will observe that we are starting a batch again. Then we are specifying the content type as multipart/mixed and as far as boundary is concerned we are creating a changeset boundary.
After specifying the content-length and content-transfer-encoding, we actually start with the changeset.
We start with a changeset and again provide the content-type and content-type-encoding and after that we specify our request. In the image below you can see how we have specified the first POST request to create an item in the EmployeeInfo list.
Similarly create the changeset for the remaining two items to be created as well. Once we have all the three POST requests in place we end the changeset.
Now what is left is the GET request to fetch all the items for which we create a normal batch request as shown in the image above.
If you walkthrough the code snippet again you will understand what we were trying to achieve there in addEmployeeInfoBatchRequest function call. You can no relate each and every line of code to the batch body that you can see in the fiddler image above.
Conclusion
In this above article we covered how batch requests are created using REST API’s. We talked about batch headers and body. We also discussed changesets and batch boundaries and how they help in making a batch call.
The introduction of batch operations in REST API is a significant improvement for remote server calls. Batching removes the "chatty" part of the REST API. Currently this is supported only in SharePoint Online version only.
References
- http://www.andrewconnell.com/blog/part-1-sharepoint-rest-api-batching-understanding-batching-requests
- http://www.andrewconnell.com/blog/part-2-sharepoint-rest-api-batching-exploring-batch-requests-responses-and-changesets
- http://officespdev.uservoice.com/forums/224641-general/suggestions/6298389-enable-batching-support-for-the-rest-api
- /en-us/sharepoint/dev/sp-add-ins/make-batch-requests-with-the-rest-apis
- http://www.odata.org/documentation/odata-version-3-0/batch-processing
