LDAP over SSL (LDAPS) Certificate
Applies to Windows Server 2003, Windows Server 2003 R2, Windows Server 2008, Windows Server 2008 R2, Windows Server 2012, Windows Server 2012 R2
Reasons for Enabling LDAPS
By default, LDAP communications between client and server applications are not encrypted. This means that it would be possible to use a network monitoring device or software and view the communications traveling between LDAP client and server computers. This is especially problematic when an LDAP simple bind is used because credentials (username and password) is passed over the network unencrypted. This could quickly lead to the compromise of credentials.
Note
Only LDAP data transfers are exposed. Other authentication or authorization data using Kerberos, SASL, and even NTLM have their own encryption systems. The Microsoft Management Console (mmc) snap-ins, since Windows 2000 SP4 have used LDAP sign and seal or Simple Authentication and Security Layer (SASL) and replication between domain controllers is encrypted using Kerberos.
Reasons for enabling Lightweight Directory Access Protocol (LDAP) over Secure Sockets Layer (SSL) / Transport Layer Security (TLS) also known as LDAPS include:
- Some applications authenticate with Active Directory Domain Services (AD DS) through simple BIND. As simple BIND exposes the users’ credentials in clear text, use of Kerberos is preferred. If simple BIND is necessary, using SSL/TLS to encrypt the authentication session is strongly recommended.
- Use of proxy binding or password change over LDAP, which requires LDAPS. (e.g. Bind to an AD LDS Instance Through a Proxy Object)
- Some applications that integrate with LDAP servers (such as Active Directory or Active Directory Domain Controllers) require encrypted communications. To encrypt LDAP communications in a Windows network, you can enable LDAP over SSL (LDAPS).
 Caution Caution |
|---|
| Before you install a certification authority (CA), you should be aware that you are creating or extending a public key infrastructure (PKI). Be sure to design a PKI that is appropriate for your organization. See PKI Design Brief Overview for additional information. |
Enabling LDAPS for domain controllers using a single-tier CA hierarchy
LDAP over SSL/TLS (LDAPS) is automatically enabled when you install an Enterprise Root CA on a domain controller (although installing a CA on a domain controller is not a recommended practice). You can see examples of this in the Test Lab Guide Base Configuration for Windows Server 2008 R2, Building an Enterprise Root Certification Authority in Small and Medium Businesses, and Install and configure Microsoft Active Directory Certificate Services (AD CS) using Windows Server 2008 R2.
Enabling LDAPS for domain controllers using a multi-tier CA hierarchy
When you have a multi-tier (such as a two-tier or three-tier) CA hierarchy, you will not automatically have the appropriate certificate for LDAPS authentication on the domain controller. In order to enable LDAPS in a multi-tier CA hierarchy, you must request a certificate that meets the following requirements:
- Certificate must be valid for the purpose of Server Authentication. This means that it must also contains the Server Authentication object identifier (OID): 1.3.6.1.5.5.7.3.1
- The Subject name or the first name in the Subject Alternative Name (SAN) must match the Fully Qualified Domain Name (FQDN) of the host machine, such as Subject:CN=server1.contoso.com. For more information, see How to add a Subject Alternative Name to a secure LDAP certificate.
- The host machine account must have access to the private key.
Publishing a Certificate that Supports Server Authentication
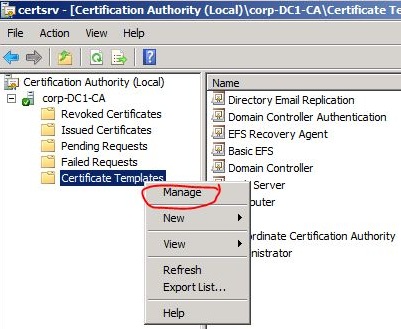
On the issuing Certification Authority computer, open the Certificates console or Certsrv console. To open Certsrv, click Start. Type certsrv.msc and then click OK.
Ensure that Certification Authority is expanded as well as the name of the certification authority.
Right-click Certificate Templates and then click Manage.
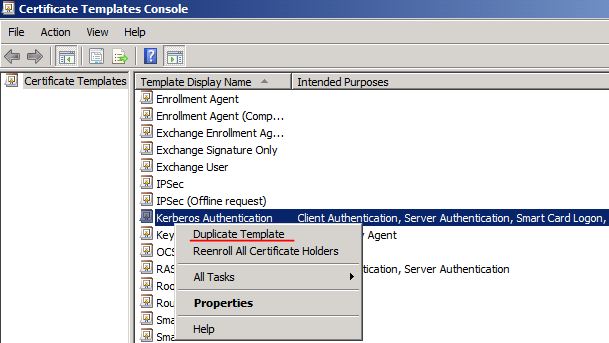
In the Certificate Templates Console, right-click Kerberos Authentication and then select Duplicate Template. You don't have to use the Kerberos template. You can create your own or use one of the existing templates that has Server Authentication as a purpose, such as Domain Controller Authentication, Domain Controller, Web Server, and Computer. Important: You should be planning on having only one certificate on each LDAP server (i.e. domain controller or AD LDS computer) with the purpose of Server Authentication. If you have legitimate reasons for using more than one, you may end up having certificate selection issues, which is discussed further in the Active Directory Domain Services Certificate Storage.
On the Duplicate Template dialog box, leave the default selected Windows Server 2003 Enterprise selected and then click OK.
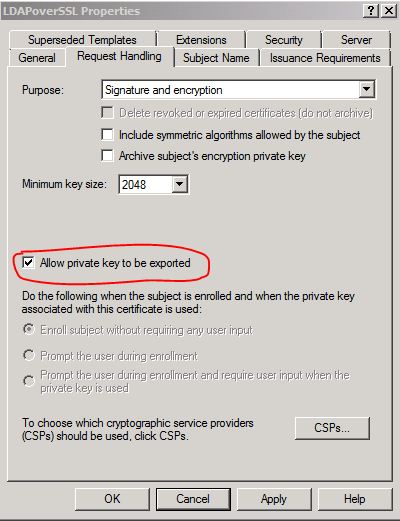
The Properties of New Template appear. Ensure that settings are as you want them to be for this certificate template. Pay close attention to ensure that the Template display name is set to an appropriate name along with the following settings:
Validity and Renewal periods are set according to your organization's security policy
Key lengths are appropriate
Select whether you want to place the certificate in Active Directory
Subject Name tab: DNS name and Service principal name (SPN) are selected
If you plan to import the certificate into the Active Directory Domain Services certificate store, then should also mark the private key as exportable.
Click OK.
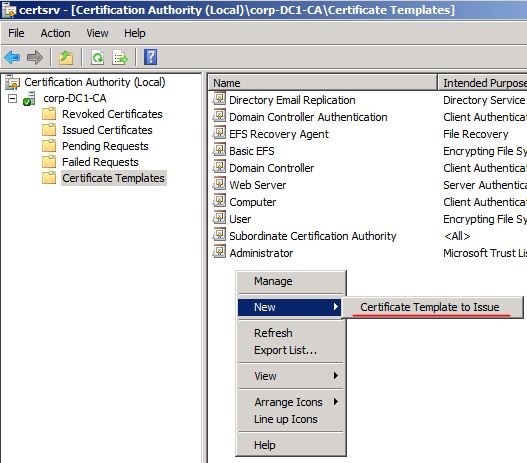
Return to the Certificates or Certsrv console and in the details pane of Certificate Templates, right-click an open area of the console, click New, and then click Certificate Template to Issue.
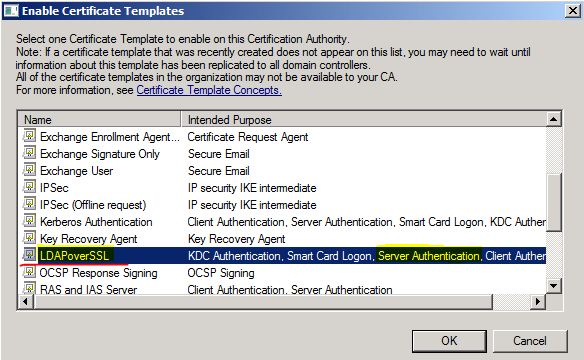
In the Enable Certificate Templates dialog box, select the name of the new template you created and then click OK.
Requesting a Certificate for Server Authentication
To request a certificate from your LDAPSL server, do the following on each domain controller that requires LDAPS connections:
Open the Certificates console. Click Start, type MMC, and then press ENTER. If prompted by User Account Control, ensure it displays the action you want and then click Yes.
In the MMC console that opens (typically Console1), click File and then click Add/Remove Snap-in
In Add or Remove Snap-ins under Available Snap-ins, click Certificates, and then click Add.
In Certificates snap-in select Computer account and then click Next.
In Select Computer, if you are managing the LDAP server requiring the certificate, select Local. Otherwise, select Another computer and click Browse to locate the LDAP server requiring the certificate.
Once you have the correct computer selected, click OK and then click Finish.
In Add or Remove Snap-ins, click OK.
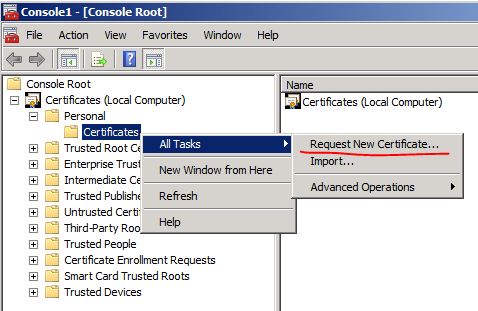
In the console tree, expand Certificates (<computer>)
right click Certificates, click All Tasks, and then click Request New Certificate.
In Certificate Enrollment, click Next.
In the Select Certificate Enrollment Policy, typically you would leave the default of Active Directory Enrollment Policy. If you have a different policy that you should follow, then select that one and click Next.
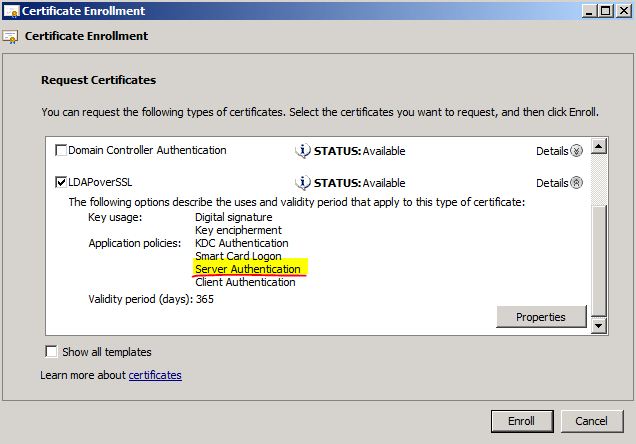
Select a certificate that allows for server authentication, Kerberos works, but you can use a custom certificate as described in Publishing a Certificate that Supports Server Authentication. Click Enroll.
On the Certificate Enrollment dialog box, click Finish.
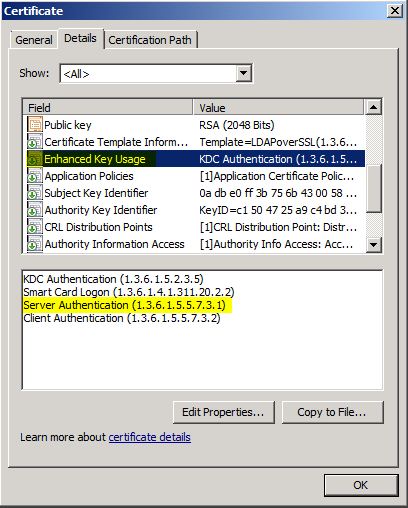
In the results pane double-click the certificate that you received to open the Certificate properties dialog box.
Click the Details tab, in the Field column, select Enhanced Key Usage. Confirm that Server Authentication (1.3.6.1.5.5.7.3.1).
For other step-by-step examples requesting a certificate for server authentication and implementing LDAP over SSL (LDAPS), see the following articles:
- Request a computer certificate for server authentication - Windows Server 2003, 2003 R2 instructions
- How to enable LDAP over SSL with a third-party Certification Authority - Windows Server 2000, 2003, 2003 R2, 2008, 2008 R2 updated instructions
- Appendix A: Configuring LDAP over SSL Requirements for AD LDS - Windows Server 2008 and Windows Server 2008 R2 instructions
Enabling LDAPS for Client Authentication
Enabling LDAPS on the client is not necessary to protect credentials passed from the client to the server when LDAPS is already enabled on the server. This just allows the client to actually authenticate itself to the server - an extra layer of protection to ensure that the client connecting as COMPUTER_X is actually COMPUTER_X and not some other computer trying to authenticate with COMPUTER_X credentials. The client must be using a certificate from a CA that the LDAP server trusts. Client certificates and AD DS accounts are mapped using altSecurityIdentities, which can be done through various methods. For more information on those methods, see HowTo: Map a user to a certificate via all the methods available in the altSecurityIdentities attribute. Certificates are presented to the server during the Transport Layer Security (TLS) key exchange (described in paragraph 7.4 of RFC 2246). To enable LDAPS authentication for the client, ensure the certificate is placed in the personal store for the user account.
Active Directory Domain Services Certificate Storage
When a certificate is selected from the local machine store (as in CertEnumCertificatesInStore) the first valid certificate that can be used for Server Authentication (OID: 1.3.6.1.5.5.7.3.1) is returned for use. In cases where customers have multiple certificates valid for Server Authentication in the LDAP server's (e.g. AD DS domain controller, AD LDS, or ADAM server) local computer certificate store, may see that a different certificate than the one they want is used for LDAPS communications. The best resolution to such an issue is to remove all unnecessary certificates from the local computer certificate store and have only one certificate that is valid for server authentication.
However, if there is a legitimate reason that two or more certificates and a customer using at least Windows Server 2008 LDAP servers, the Active Directory Domain Services (NTDS\Personal) certificate store can be used for LDAPS communications.
** Important** There are several significant details to know before you implement the use of the Active Directory Domain Services certificate store.
- Automatic certificate enrollment (auto-enrollment) cannot be utilized with certificates in the NTDS\Personal certificate store.
- Current command line tools do not allow certificate management of the NTDS\Personal certificate store.
- Certificates should be imported into the store, and not moved (using drag and drop) via Certificates console (MMC)
- Each LDAP server will require its own certificate in order to use this option, but it is only necessary to use this option on a server that has multiple certificates with the purpose of Server Authentication in the local certificates store. The best solution is to have only one certificate in the computer's personal certificate
Exporting the LDAPS Certificate and Importing for use with AD DS
The following steps will demonstrate how to export an LDAPS enabled certificate from a domain controller computer's local certificate store to the Active Directory Domain Services service certificate store (NTDS\Personal). You will have to perform this step for each domain controller that has multiple certificates with the enabled use of Server Authentication. These certificates will have to be manually renewed when they expire and only works starting with Windows Server 2008 domain controllers, as that was the first Windows Server operating system release in which the NTDS was separated out as its own service.
Click Start, type mmc and then click OK.
Click File and then click Add/Remove Snap-in.
Click Certificates and then click Add.
In Certificates snap-in select Computer account and then click Next.
In Select Computer, if you are working at the LDAP server requiring the certificate, select Local. Otherwise, select Another computer and click Browse to locate the LDAP server requiring the certificate.
Once you have the correct computer selected, click OK and then click Finish.
In Add or Remove Snap-ins, click OK.
In the console tree, expand Certificates (<computer>)
In the certificates console of a computer that contains a certificate that can be used for Server Authentication, right-click the certificate, click All Tasks, and then click Export.
On the Certificate Export Wizard welcome screen, click Next.
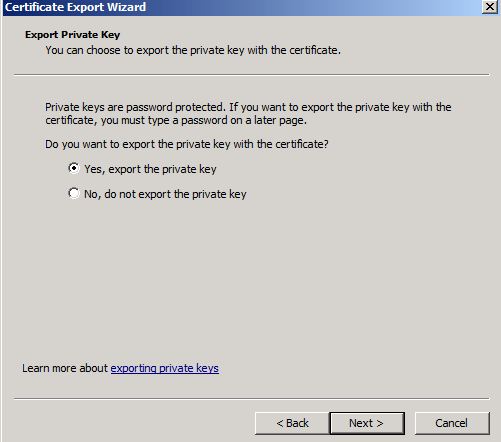
On the Export Private Key screen, select Yes, export the private key and then click Next. If you don't have the option to export the private key, then the certificate template did not allow the exporting of the private key (see Publishing a Certificate that Supports Server Authentication).
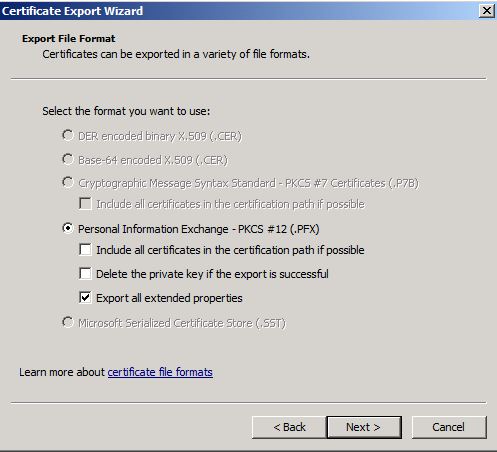
On the Export File Format screen, you should select Export all extended properties. The other selections are optional.
On the Password screen, enter a password that you want to be used when the certificate is imported. You will have to type the password twice: once in the Password box and then again in the Type and confirm password (mandatory) box. Then, click Next.
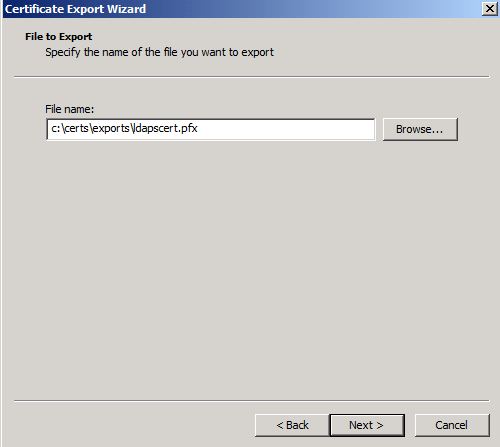
On the File to Export screen, enter a path, file name, and .pfx file extension in the File name box and then click Next.
Confirm the settings on the completion screen and then click Finish. You should see a pop-up message indicating that the export was successful. Click OK.
Click File and then click Add/Remove Snap-in.
Click Certificates and then click Add.
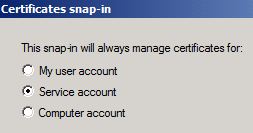
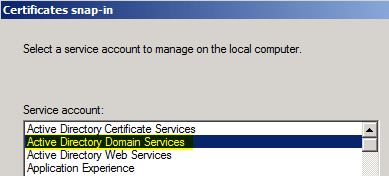
Select Service account and then click Next.
In the Select Computer dialog box, ensure that you target the appropriate computer. If you are running the Microsoft Management Console (MMC) and want to target the local computer, you can leave the default selection of Local computer. Otherwise, select Another computer and then use the Browse button to select the appropriate computer. Then click Next.
Select Active Directory Domain Services and then click Finish.
On the Add or Remove Snap-ins dialog box click OK.
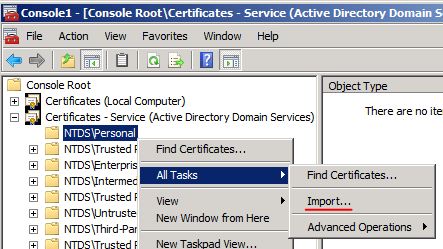
Expand Certificates - Services (Active Directory Domain Services) and then click NTDS\Personal.
Right-click NTDS\Personal, click All Tasks, and then click Import.
On the Certificate Import Wizard welcome screen, click Next.
On the File to Import screen, click the Browse, and then locate the certificate file that you exported previously.
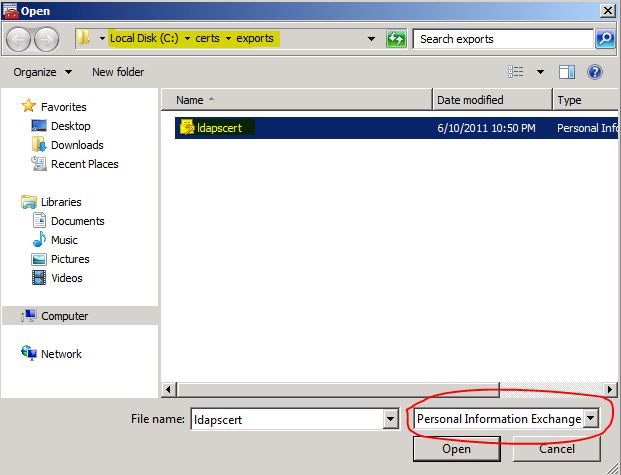
On the Open screen, ensure that Personal Information Exchange (*pfx,*.p12) is selected as the file type and then navigate the file system to locate the certificate you exported previously and then click that certificate.
Click Open and then click Next.
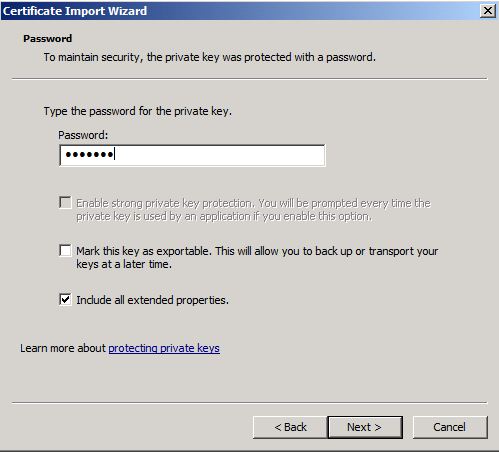
On the Password screen enter the password you set for the file and then click Next.
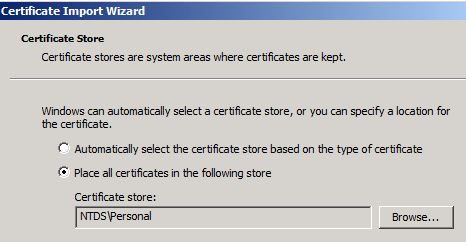
On the Certificate Store page, ensure that Place all certificates in the following store is selected and reads Certificate store: NTDS\Personal and then click Next.
On the Certificate Import Wizard completion screen, click Finish. You should then see a message that the import was successful. Click OK.
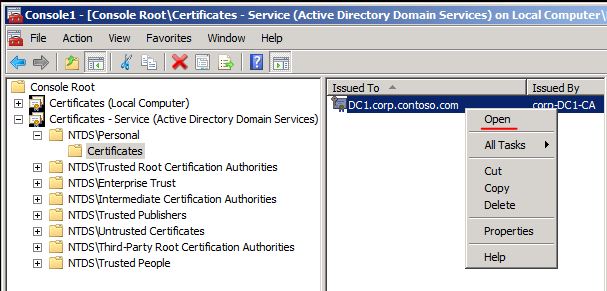
In the Navigation pane, under NTDS\Personal, click Certificates
In the details pane, right-click the certificate you imported and then click Open.
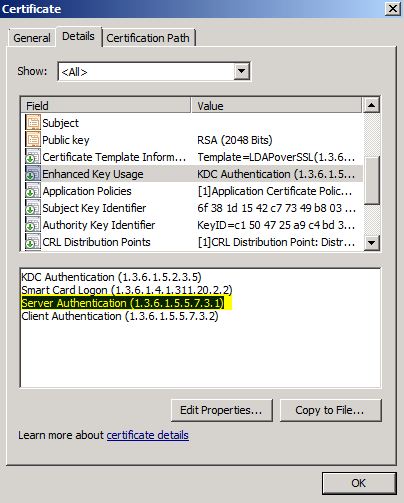
Click Details and then click Enhanced Key Usage, you should see that Server Authentication (1.3.6.1.5.5.7.3.1) is one of the purposes of the certificate and then click OK.
Verifying an LDAPS connection
After a certificate is installed, follow these steps to verify that LDAPS is enabled:
- Start the Active Directory Administration Tool (Ldp.exe)
- To use LDP.EXE on Windows Server 2003, see LDAP Overview.
- To use LDP.EXE on Windows XP, you must download and install Windows XP Service Pack 2 Support Tools.
- For Windows Vista, Windows 7, or non-domain controller Windows Server 2008, or Windows Server 2008 R2 computers, see Remote Server Administration Tools (RSAT) for Windows Vista, Windows 7, Windows Server 2008, and Windows Server 2008 R2
- On the Connection menu, click Connect.
- Type the name of the LDAP server (e.g. domain controller or AD LDS/ADAM server) to which you want to connect.
- Type 636 as the port number.
- Click OK.
Troubleshooting LDAP over SSL
When you have issues with LDAPS, there are several different things that can be wrong. One of the best walkthrough documents regarding troubleshooting LDAPS is on the Ask DS Blog in which a Senior Escalation engineer walks through verification and troubleshooting: Troubleshooting LDAP over SSL. There is only one Event ID that is directly related to LDAP over SSL, which is Event 1220, expanded upon in the destination of the link in the list below. The rest of the links are related to LDAP signing. LDAP signing does not encrypt the communications traveling between the LDAP server and client. LDAP signing verifies the identity of the client attempting an LDAP bind and helps to mitigate the chance of replay and man-in-the middle attacks. For more information on LDAP signing, see LDAP Signing and How to enable LDAP Signing in Windows Server 2008.
- Event ID 1220 - LDAP over SSL
- Event ID 2886 — LDAP signing: is logged one each time the domain controller is started, if you do not have signing required enabled on your domain controller.
- Event ID 2887 - If signing required is not enabled, this event keeps a count of how many unsigned binds occurred in the previous 24 hours. The event is logged every 24 hours.
- Event ID 2888 - If signing required is enabled, then this even keeps a count of how many unsigned LDAP binds occurred in the previous 24 hours. Since LDAP signing is required, the binds would be rejected. This is a notice to administrators to investigate the client computers that are trying to bind without signing.
- Event ID 2889- Administrators can enable this event to to help identify client computers that are attempting to bind without signing. This event is logged with the IP address and the bind identity of the client each time an unsigned bind is performed or attempted.
Additional Information
- HowTo: Map a user to a certificate via ll the methods available in the altSecurityIdentities attribute
- WebSphere to Active Directory over SSL
- How to enable LDAP over SSL with a third-party certification authority
- Installing and configuring an Enterprise Root CA on Windows Server 2003
- Implementing and Administering Certificate Templates in Windows Server 2003
- Implementing and Administering Certificate Templates
- Windows 7/2008 Kerberos Default Encryption and Windows 2003/2000
- Install a SSL certificate on your domain controller
- Appendix A: Configuring LDAP over SSL Requirements for AD LDS
- Configuring the JSS to Use LDAP Over SSL When Authenticating with Active Directory
- Windows Server 2003 domain controller using LDAP over SSL with expired certificate requires restart
- How to add a Subject Alternative Name to a secure LDAP certificate
- Troubleshooting PKI Problems on Windows
