BizTalk: Configuring Certificates for AS2 Messages
Introduction
This article provides procedures for configuring certificates for AS2 messages and includes the following sections:
- Configuring Certificates to Sign Outgoing AS2 Messages
- Configuring Certificates to Verify Signature of Incoming AS2 Messages
- Configuring Certificates to Encrypt Outgoing AS2 Messages
- Configuring Certificates to Decrypt Incoming AS2 Messages
- Troubleshooting Certificates
The following table lists the certificate function, and if a public or private key is used.
| Certificate Function | Private or Public Key |
| Signature | Private Key |
| Signature Verification | Public Key |
| Encryption | Public Key |
| Decryption | Private Key |
For information about what certificate needs to be configured at which location, see Configuring Certificates for AS2 at http://msdn.microsoft.com/en-us/library/bb728096(BTS.10).aspx.
Configuring Certificates to Sign Outgoing AS2 Messages
To sign outgoing AS2 messages in BizTalk Server, you need to configure the following:
- Configure Certificate with Private Key in Current User/Personal Certificate Store
- Configure Certificate in BizTalk Group Hub Page
- Configure Party Settings to Sign Outgoing Documents
| Certificate Usage | Certificate Type | Pipeline Component | User Context |
Certificate Store |
Where Defined |
| Signature (outbound) | Own private key (.pfx) | AS2 encoder | Account used by the host instance associated with the send handler. | Current User/Personal Store of each BizTalk Server that hosts an AS2 encoder pipeline as each host instance service account | Certificate page of the Group Properties dialog box. This is the default signing certificate used when sending signed documents. |
Configure Certificate with Private Key in Current User/Personal Certificate Store
This section covers the following:
- What is digital signing?
- How to confirm certificate has private key
- How to install certificate authority in Windows Server 2008
- How to request certificate from Windows 2008 Root CA
- How to issue certificate from Windows 2008 Root CA
- How to access Current User/Personal Store
- How to export certificate from certificate store to file
- How to import certificate to certificate store from file
What is digital signing?
Signing a message in the digital world is same as signing a paper in the non-digital world. You are the only person allowed to sign the message but other people can look at it and verify your signature.
In order to sign an outgoing digital message, you use a certificate. The certificate is a pair of public and private keys. To sign a message, you will need a certificate that has the private key.
Certificates are stored in certificate stores. Every user has a Personal certificate store. Certificates used for signing, should be stored in the Current User/Personal Certificate Store of the BizTalk Server process account that will be running the AS2Send pipeline (this is because AS2 Decoder in the send pipeline will be signing the message).
It is very important to understand that every account has its own personal user certificate store. If you logged in to the machine using the admin account, you open the MMC and load the certificate snap-in, and then configure the certificate. This certificate will not be accessible to the BizTalkService account. In order to configure the certificate that will be used for signing, you have to do the above operation using the BizTalkService account. Either log in to the machine using the BizTalkService account or run the MMC with the BizTalkService account.
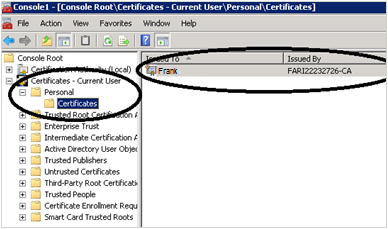
If the certificate is configured properly, when you open the certificate MMC using the BizTalk service account, you should see the certificate under the Current User -> Personal certificate store. If not, then use the procedure to export and import the certificate in the right store.
Make sure that this certificate has a private key. If you see that the certificate is configured correctly with the BizTalkService account, than you can skip all the steps below explaining how to install the Certificate Authority and how to issue a certificate.
How to confirm certificate has private key
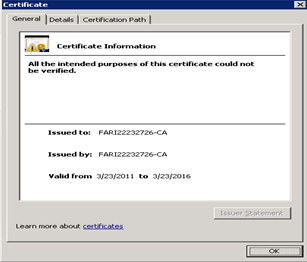
| The following certificate has a private key: | The following certificate does NOT have a private key: |
|
 |
How to install certificate authority in Windows Server 2008
To set up an enterprise root CA in Windows Server 2008:
Click Start, point to Administrative Tools, and then click Server Manager.
In the Roles Summary section, click Add roles.
On the Select Server Roles page, select the Active Directory Certificate Services check box, and then click Next.
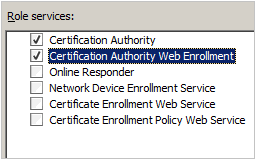
On the Select Role Services page, select the Certification Authority and Certificate Authority Web Enrollment check boxes, and then click Next.
On the Specify Setup Type page, click Standalone, and then click Next.
On the Specify CA Type page, click Root CA, and then click Next.
On the Set Up Private Key, click Create a new private key, and then click Next.
On the Configure Cryptography for CA page, let the default selection remain, and then click Next.
On the Configure CA Name page, click Next.
On the Set Validity Period page, click Next.
On the Configure Certificate Database page, click Next.
How to request certificate from Windows Server 2008 Root CA
In the previous procedure while installing the Root CA, you configured the Certificate Authority Web Enrollment, which allows the CA to be accessed using a Web browser. If your browser settings are too restrictive, you will not be able to access the Root CA from the browser. You will need to allow ActiveX controls in your browser settings.
To request a certificate from Windows 2008 Root CA
Click Start, click Run, and type in "inetmgr". This opens IIS manager.
After you install the CA Web enrollment, you will see the CertSrv directory in IIS Manager.
Click CertSrv, then on the bottom of the screen, click Content View.
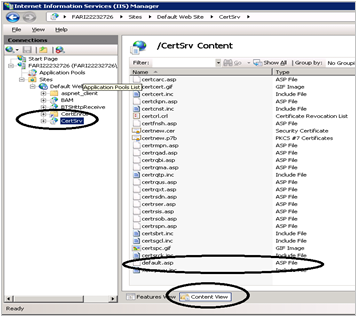
Right-click default.asp, and click Browse. This opens a Web browser and you should see the following:
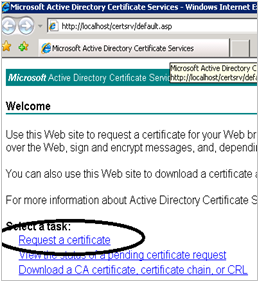
Click Request a Certificate.
Click Advanced Certificate Request.
Click Create and Submit a request to this CA.
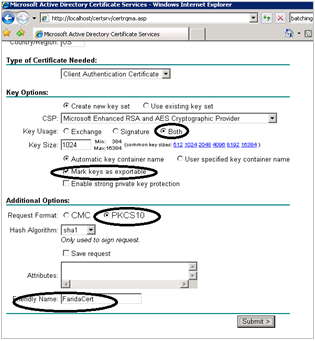
On the Advanced Certificate form, enter your details. For Key Usage, select Both. Check the box Mark keys as exportable. Enter a name for Friendly Name. Click Submit. The Submit button will be grayed out if your browser settings do not allow ActiveX control.
The Certificate Pending Page appears. You will now need to go to root certificate MMC, and then issue the certificate.
How to issue certificate from Windows Server 2008 Root CA
Click Start, click Run, and then click MMC.
Click File, and then click Add or Remove Snap-in.
Click Certificate Authority, and then click Add. On the next screen click Finish, and then click OK.
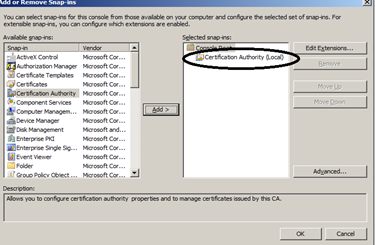
In the Certificate Authority Console, on the left click Pending Requests. In the right pane, right-click the certificate, and then click Issue.

After the certificate has been issued from the root CA, open a browser.
In the browser, go to the default.asp page of the certsrv (http://machineName/certsrv/default.asp).
Click View status of a pending certificate request.
In the View the Status of a Pending Certificate Request page, you will see your certificate with the date when the certificate was issued. Click on your certificate, and then click Install this certificate.
The certificate will get installed in the current logged in user account/personal store. If the logged in user is different than the account under which BizTalk service executing the AS2Decoder pipeline is running, then you will need to save this certificate in a file. Then log back on using the BizTalk service account and re-import the certificate in the user/personal store.
How to access Current User/Personal Store
Click Start, click Run, and type "MMC".
Click File, and then click Add/Remove Snap-in.
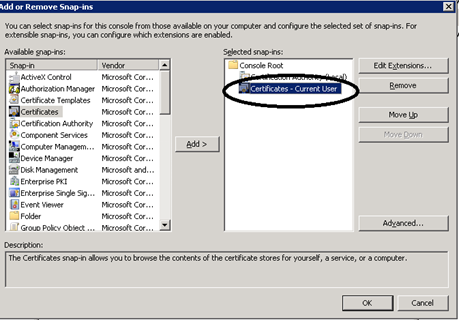
In the Add or Remove Snap-ins window, in the Available snap-ins section, click Certificates, and then click Add.
In the Certificates snap-in window, select My user account, click Finish, and then click OK.
You will see the Current User/Personal/Certificates store in the Console.
How to export certificate from certificate store to file
If you created and configured the certificate using the administrator or some other account besides the BizTalkService account, you will need to export the certificate from the logged in user store to a file. After that, you will need to import the certificate into the BizTalkService account store.
How to export the certificate to a file from a certificate store:
Open Current User/Certificates store.
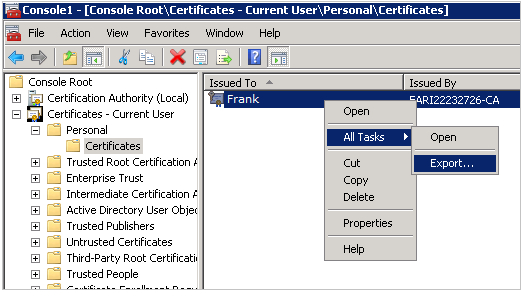
Right-click the certificate, and click Export, and then click Next.
Select Yes, export the private key. This option is available only if the certificate was imported with the settings where the private key was re-exportable. Many times the certificates are installed so that the private key cannot be exported. This export private key option is grayed out if the private key was not marked as exportable when the certificate was originally installed.
Select Include all certificate in the certificate path.
Type in a password.
Browse to the location where you want the certificate to be exported to a file. Type in a name for the certificate file. Click Save.
Click Next, and then click Finish.
How to import certificate to certificate store from file
Login to the machine using the BizTalkService account which you will use to run the AS2 Decoder.
Open and expand the Current User/Certificates store.
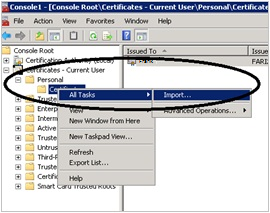
Right-click the Personal or Certificates folder, point to All Tasks, and then click Import. Click Next
Browse to the .pfx file that you exported in the above section. (The default file extension in the drop-down is .cer. You will have to change the drop-down to All Files). Click Next.
Type in the password that you had specified while exporting the file. Select the checkbox Mark this key as Exportable. This will allow you to back up or transport your keys at a later time. Click Next.
On the Certificate Store page, make sure that the certificate store is Personal. Click Next, and then click Finish.
A dialog box appears that says Certificate has been imported. You should see the certificate in the Current User/Personal Store.
Double-click and open the certificate. On the General tab, towards the bottom of the certificate, it should say: You have a private key that corresponds to this certificate.
Confirm this certificate is able to resolve to its Root CA by making sure there is no red X on the top of the certificate. If you do see the red X on the top of the certificate, then import this certificate in the Trusted Root CA store.
Configure Certificate in BizTalk Group Hub Page
In the BizTalk Server Administration Console, the signing certificate is configured on the Group Properties page.
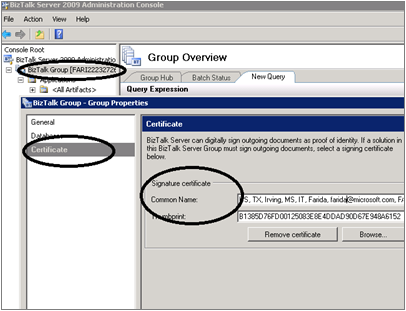
It is assumed that you have already configured the Signing certificate in the BizTalkService account/Personal Store.
Be sure that you do the following procedures using the BizTalkService account that will run the AS2Send pipeline. You can login to the machine using the BizTalkService account or you can run the BizTalk Administration Console using the BizTalkService account.
- Open the BizTalk Administration Console.
- Right-click the BizTalk Group, and then click Properties.
- Go to the Certificates tab.
- On the right, point to Signature Certificate, and then click Browse. This opens up the Current User/Personal Certificate Store. If you do not see the certificate and you have configured the Signing certificate in the Personal Store, then there is a mismatch in the accounts that you have used to configure the certificate and the current logged in user account.
Configure Party Settings to Sign Outgoing Documents
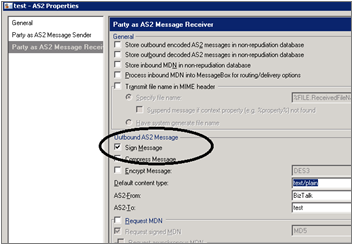
Right-click Party, and then click AS2 Properties. Go to the tab Party as AS2 Message Receiver. Check Sign Message.
The following steps are needed only if you want to request a signed MDN. In order to request a signed MDN, the receiving partner will need to sign the MDN using a private key and you will need the receiver Party’s public key configured to verify the signature on the incoming MDN.
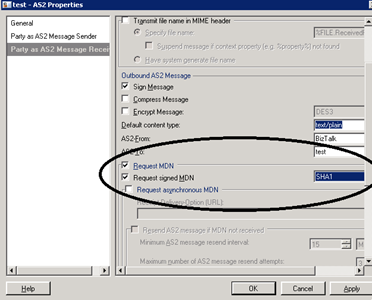
Right-click Party, and then click AS2 properties. Go to the tab Party as AS2 Message Receiver. Check Request MDN and Request signed MDN.
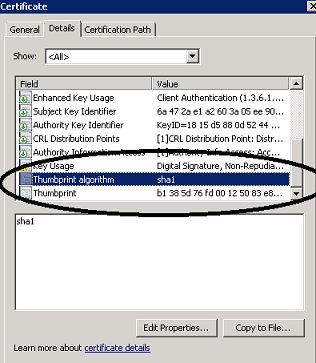
Make sure that the signing algorithm is the same as what you see in the certificate. In the screenshot below, the signing algorithm for MDN is "SHA1". The partner should sign the MDN using a certificate with the SHA1 algorithm. You can validate the signing algorithm by looking at the Thumbprint algorithm in the certificate.
Configuring Certificates to Verify Signature of Incoming AS2 Messages
In this section, we will cover the following:
- What is digital signature verification?
- Loading user profile of account running BizTalk IsolatedHost(IIS Application pool identity)
- How to access Local Computer/Other People Store
- How to export ONLY the public key from a certificate store?
- How to import certificate from a file to Local Computer/Other People Certificate Store
- Signature Verification: Configure signature verification Certificate In BizTalk Server
- Signature Verification: Configure the Party settings to force Signature Verification of incoming documents (Optional)
| Certificate Usage |
Certificate Type |
Pipeline Component |
User Context |
Certificate Store |
Where Defined |
| Signature verification (inbound) |
Trading partner's public key (.cer) |
AS2 decoder | Account used by the host instance associated with the receive handler |
Local Computer/Other People Store of each BizTalk Server that hosts an AS2 decoder pipeline as each host instance service account. |
Local Computer/Other People Store of each BizTalk Server that hosts an AS2 decoder pipeline as each host instance service account. |
What is digital signature verification?
Signing a message in a digital world is same as signing a paper. Only you can sign it but everyone else can look at it and verify your signature.
In order to verify the signature of an incoming digital message, you use a certificate. The certificate is a pair of public and private keys. To verify the signature of a message, you will need a partner certificate, however, you will need only the public key of the certificate to verify the signature in the incoming message.
Example: If a Partner, Fabrikam, signed a message using their private key and sent you the message, you will need to ask Partner, Fabrikam, to send you the public key of the certificate that they used to sign the message.
Certificates are stored in certificate stores. Every computer has a certificate store. Certificates (public key) used for signature verification are stored in the Local Computer/Other People Certificate Store. Incoming messages are received by the AS2 Receive pipeline. Hence the AS2 Decoder is responsible for verifying signature of incoming messages. For AS2, the incoming messages are received using HTTP adapter. The HTTP Receive port runs in Isolated Host. Isolated host runs in IIS application pool. Hence, the identity of the application pool (running the BTSHTTPReceive.dll) will be used to verify signature of incoming message.
User profile of the application pool identity account running the isolated host
The user profile of the account running the IIS Application pool needs to be loaded in memory. An account can access a certificate only if the user profile is loaded in memory. Some of the common things that loads a user profile of an account is logging into the machine, and then opening an MMC. Just a running IIS service will not load the user profile.
In IIS7, there is a checkbox where you need to specify that the user profile needs to be loaded. In previous IIS versions, you will need to run some additional tool to load a user profile if you find that signature verification is failing because the user profile is unloaded. We have seen intermittent signature verification issues because the user profile gets unloaded after a period of inactivity for that account.
The following steps related to user profile applies only to IIS7 (Windows 2008 and Windows 7).
Open IIS Manager.
Go to the application pool running BTSHTTPReceive.dll.
Right-click the application pool. Click Properties. Locate Load User Profile, and set its value to True. Click OK.
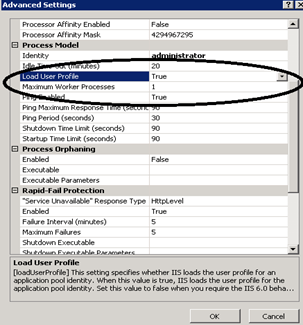
Recycle Application pool.
How to access Local Computer/Other People Store
-
- Click Start, click Run, and type "MMC".
- Click File, and then click Add/Remove Snap-in.
- In the Add or Remove Snap-ins window, in the Available snap-ins section, click Certificates, and then click Add.
- Select Computer Account, click Next, click Finish, and then click OK.
- You will see the Local Computer/Other People Certificates Store in the console.
How to export ONLY the public key from a certificate
If you are the sender of the message, you will need to export the public key of the signing certificate and send it to your partner.
- Open the Current User/Certificates Store.
- Right-click the certificate, click Export, and then click Next.
- Select No do not export the private key, and then click Next. When you choose not to export the private key, it means that you are exporting only the public key.
- Browse to the location where you want the certificate to be exported to a file. Type in a name for the certificate file, and then click Save.
- Click Next, and then click Finish.
How to import certificate from a file to Local Computer/Other People Certificate Store
Your trading partner sends you the public key of the certificate that they use to sign outgoing messages.
You receive a file (most likely with .cer extension) from the partner. This file will contain the public key of the certificate.
Open the Local Computer/Other People Certificate Store.
Right-click the Local Computer/Other people Certificate folder, click All Tasks, click Import, and then click Next.
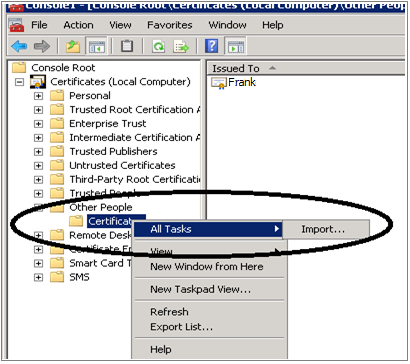
Browse to the .cer file that you received from the partner, and then click Next.
On the Certificate Store page, make sure that the certificate store is Other People. Click Next, and then click Finish.
A dialog box will appear that says The Import was successful. You should see the certificate in the Local Computer/Other People Store.
Double-click the certificate to open it. Confirm the certificate is valid by making sure there is no red X on the top of the certificate. If you do see the red X on the top of the certificate, then import this certificate in the Trusted Root CA store.
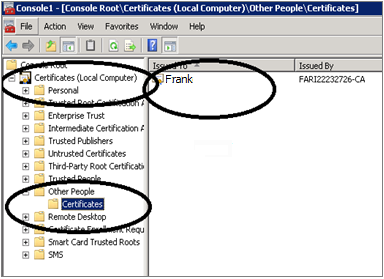
Signature Verification: Configure the certificate in BizTalk Server
Before doing the following procedure, make sure that you have imported your partners public key to the Local Computer/Other People’s Certificate Store.
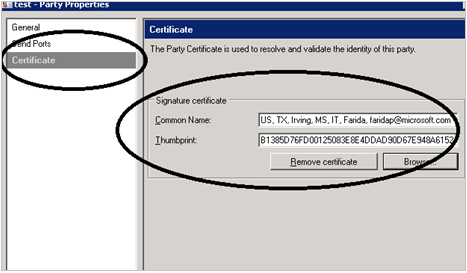
To validate signature of incoming document, the signature verification certificate is configured at the Party properties.
Right-click the Party, and then click Properties.
In the left-hand pane, click Certificate.
Click Browse. This will bring up the certificates from Local Computer/Other People Certificate Store.
Signature Verification: Party Settings
For incoming messages, you may not need to do any Party configurations. The AS2 Decoder will look at the incoming AS2 Message headers and decide whether the message is signed or not. If the certificate is signed, the AS2 Decoder will validate the signature.
However, if you would like to enforce that the incoming message from that partner should be signed, regardless of the AS2 header settings, you can specify that in BizTalk Server Party settings.
Right-click Party settings, and then click AS2 properties.
Select Party as AS2 Message Sender.
Select the options Override inbound message properties and Message should be signed. This will enforce the AS2 Decoder to make sure that the incoming message is signed and will validate the signature of the incoming message regardless of the settings in the AS2 header of the incoming message.

Configuring Certificates to Encrypt Outgoing AS2 Messages
This section first covers encryption concepts, followed by the procedures to encrypt outgoing AS2 messages.
Encryption concepts
Messages are encrypted so that no one can sniff the messages on the wire and misuse them. Messages are encrypted using public key. As mentioned before, certificates are combination of public and private keys. Everyone can encrypt the messages because public keys are public, however, only intended recipient will have access to the private key and will be able to decrypt the message.
| Certificate Usage |
Certificate Type |
Pipeline Component |
User Context |
Certificate Store |
Where Defined |
| Encryption (outbound) |
Trading partner's public key (.cer) |
AS2 encoder | Account used by the host instance associated with the send handler. |
Local Computer/Other People Store of each BizTalk Server that hosts an AS2 encoder pipeline. | Certificate page of the Send Port Properties dialog box. |
To encrypt an outgoing message, you need to do the following configurations:
- Configure the partners’ public key in the Local Computer/Other People Store
- Configure the encryption certificate on the Send Port Properties Certificate page
- Configure party as AS2 Message Receiver
Configure partner’s public key in the Local Computer/Other People Store
To encrypt outgoing messages, you will need to ask the partner to send you their public key for the certificate that they will be using to decrypt the incoming messages. This public key should be placed in the Local Computer/Other People Store. For step by step instructions, refer to How to import into Local Computer/Other People Store.
Configure certificate in BizTalk Server Send Port Properties/Certificate page
The AS2 Encoder in the AS2Send pipeline is responsible for encrypting outgoing messages.
- Right-click the send port that you will be using to send the AS2 Messages and select Properties.
- In the left-hand pane, select Certificates.
- Click Browse. The Local Computer/Other People Certificate Store opens. If you have correctly configured your encryption certificate, you should see the certificate in the list. Select the correct certificate. If you do not see the certificate in the list, then there might be a mismatch in the account that you are logged in with and the account which you had configured the certificate in the Local Computer/Other People Certificate Store.
- Click OK.
Configure party as AS2 Message Receiver
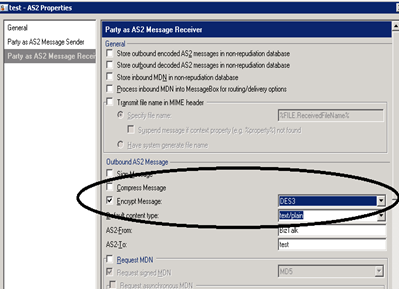
Right-click the Party, and then click AS2 Properties.
Go to Party as AS2 Message Receiver.
Check Encrypt Message, click Apply, and then click OK.
Party changes take effect after 15 minutes. If you want the changes to take effect immediately, restart the BizTalk Services.
Configuring Certificates to Decrypt Incoming AS2 Messages
This section first covers decryption concepts, followed by the procedures to decrypt incoming AS2 messages.
Decryption concepts
Messages are decrypted using private key. Everyone can encrypt the message using public key but only the intended recipient can decrypt it using a private key.
| Certificate Usage |
Certificate Type |
Pipeline Component |
User Context |
Certificate Store |
Where Defined |
| Decryption (inbound) | Own private key (.pfx) | AS2 decoder | Account used by the host instance associated with the receive handler. | Current User/Personal store of each BizTalk Server that hosts an AS2 decoder pipeline as each host instance service account. | The AS2 Decoder will determine the certificate based upon certificate information in the message. For the BizTalk MIME Decoder, the certificate must be in the Certificate page of the host used for receiving the message. This is not necessary for the AS2 Decoder. |
To decrypt an incoming message, you need to do the following configurations.
- Configure private key in the Local Users/Personal Certificate store
- Configure certificate in BizTalk Server for decryption
- Configure certificate in Party Settings for decryption
Configure private key in the Local Users/Personal Certificate store
Decryption is done using your private key. This is configured in the Local Users/ Personal Store.
AS2 Messages are generally received using an HTTP adapter. In BizTalk Server, HTTP Receive host runs under BizTalksolated host, which is under IIS application pool identity running BTSHTTPReceive.dll. Therefore, when you configure the certificate (private key) for decryption, make sure that you are logged in the machine using the IIS app pool identity that is running BTSHTTPReceive.dll that will be receiving the encrypted messages.
If you do not have the certificate that you will be using to decrypt the incoming messages, you can use the same steps you used to generate the certificate by using the Windows CA and also install the certificate using the same steps as in the signing section.
Configure certificate in BizTalk Server for decryption
When using the AS2Receive pipeline, the AS2 Decoder determines that the message is encrypted and then determines the certificate based on the certificate information in the message. Hence no certificate needs to be configured in BizTalk Server for the AS2 Decoder.
If you are using the MIME decoder (not using the AS2 pipeline), then the certificate needs to be configured in BizTalk Server. This configuration should be done in the host that will be running the receive pipeline.
Example: You are receiving the message using HTTP receive.
- Open the BizTalk Server Administration Console.
- Expand Platform Settings.
- Click Host.
- Right-click the BizTalkIsolatedHost, and then click Properties.
- In the left-hand pane, select Certificates.
- Click Browse. This opens the Personal Certificate store of the logged in user.
- Make sure the isolated host is running under the same account as the logged in user. Make sure the certificate that you select has the private key associated with it or else the certificate cannot be used for decryption.
- Click OK.
Certificate configuration in Party Settings for decryption
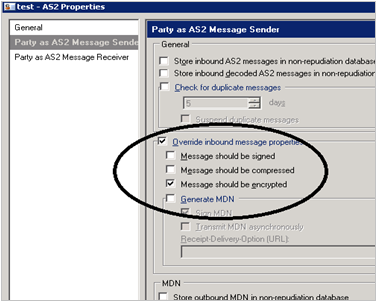
The incoming headers of the AS2 message indicate if the message is encrypted or not, therefore, there is no configuration in party settings that is mandatory. However, if you want to make sure that the incoming message for the partner is always encrypted, irrespective of the AS2 header settings, then you can configure the following in the party settings.
Right-click Party settings, click AS2 properties, and then click Party as AS2 Message Sender. Check Override inbound message properties and Message should be encrypted. These settings enforce that the incoming message for this partner should be encrypted irrespective of the AS2 header properties
Troubleshooting Certificates
- The most common issues are due to account mismatch. You can configure certificates using logged in account that is different than the account that is running the BizTalk Server process or Isolated BizTalk Server process (IIS) responsible for encrypting, decrypting, signing or signature verification.
- In order to sign and decrypt a message, you have to have private keys in the certificate.
- Make sure that the certificates are configured in the correct certificate store using the correct account and in the correct place in BizTalk Server.
- At times, there are intermittent issues because the IIS user profile being unloaded.
Event Type: Error
Event Source: BizTalk Server 2009
Event Category: (1)
Event ID: 5804
Date: 3/23/2011
Time: 11:16:08 AM
User: N/A
Computer: FARI22232726
Description: A response message sent to adapter "HTTP" on Receive Location: "AS2HttpSend" with URI:"http://fari22232727/BTSHTTPReceive/BTSHttpReceive.dll" is suspended.
Error details: An output message of the component "Microsoft.BizTalk.EdiInt.PipelineComponents" in receive pipeline "Microsoft.BizTalk.EdiInt.DefaultPipelines.AS2Receive, Microsoft.BizTalk.Edi.EdiIntPipelines, Version=3.0.1.0, Culture=neutral, PublicKeyToken=31bf3856ad364e35" is suspended due to the following error:
Unable to access Party using Party: AS2-From..
The sequence number of the suspended message is 1.
MessageId: {970C7D69-68F8-40D6-AE3D-36ADA9D6F1E3}
InstanceID: {AB5B15E8-5395-46DB-9E77-ECC2DAB30F32}
See Also
Read suggested related topics:
Another important place to find an extensive amount of BizTalk related articles is the TechNet Wiki itself. The best entry point is BizTalk Server Resources on the TechNet Wiki.
