Promoted Links - Wrap and size tiles with Client Side Rendering
SharePoint 2013 introduces Promoted Links list and the web part is unbelievable hit with my client users. Anyone who has seen it wants it in their team/portal sites.
With increase in usage comes new requirements. And so the requirement did come, for reducing the size of promoted link tiles just so it fits into a web part zone of a custom page layout that was being used. User was adding 3 tiles and the third tile was displayed only partially and a header with scroll buttons was displayed for navigation. Users would prefer to see full 3 tiles in the row. If there are more than 3 items in the list, then they would prefer that the tiles be wrapped to the next row.
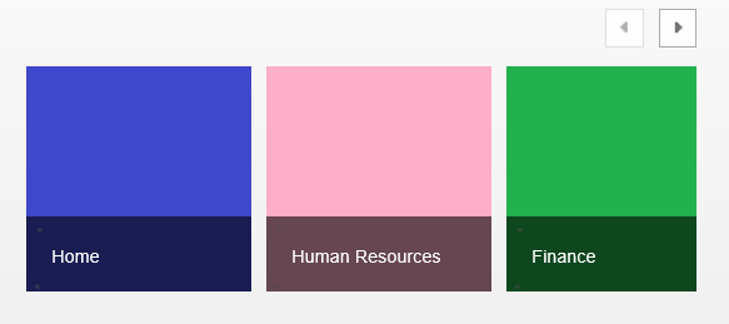
Picture below shows out of the box Promoted Links output. There are 6 items in the list. Notice that the Green tile is truncated:

To display the 3 full tiles in a row within the web part zone required that the tile size be reduced. Promoted links are rendered using Client Side Rendering Template (CSR): SP.UI.TileView.js. The tile size is hard coded as 150px within the script. The script has the logic to display the header div with the navigation if there are more items than that can fit. Research on the Internet brought up couple of different implementations for wrapping and sizing the tiles. While these posts gave me good lot of information, on analysis, were limiting in one way or other. I wanted an approach that would let TileView.JS render the HTML and later modify that HTML using a CSR Template. My quest resulted in the CSR code below. Using the CSR gives me the advantage of the context, which, I can use to find the WPQ value, and build selectors with respect to that WPQ. This way I do not have to hard code for a WPQ, making the script reusable without having to modify and I can support multiple instances of the list/web part on a single page.
To learn about Client side rendering with JS Link feature of SharePoint 2013 see: SharePoint2013 JS Link Tutorial.
JavaScript template code is as below. Notice that JavaScript file does not render the content like, hmm, may be other CSR JS files that you might have come across. Instead, I want SharePoint to do the rendering and then manipulate the HTML.
The JavaScript starts with CSR overrides to take care of MDS enabled sites. MDS feature stores a list of JavaScript files that are already executed and on subsequent page refresh MDS will not execute it again. This will cause the web part to look different from the one when the page was first loaded. For more information on MDS enabled sites and the effect it would have on JS file, see Sridhara's blog "RegisterCSR-override on MDS enabled SharePoint 2013 site".
Override registration section is pretty standard except that there is no template generating HTML markup. I have a "post render handler" and that is where all the actions happen. I register for ListTemplateType of 170 which represents Promoted Links.
CSR JS Template code:
RegisterModuleInit("/_catalogs/masterpage/MyJSFiles/PromotedLinksTileManagement.js", RegisterPromotedLinksOverride); // Let us take care of MDS enabled site

RegisterPromotedLinksOverride();

function RegisterPromotedLinksOverride() {

    if (typeof SPClientTemplates === 'undefined' || SPClientTemplates === null)
        return;

    // Setup the template override
    var overrideCtx = {};
    overrideCtx.Templates = {};
    overrideCtx.BaseViewID = 1;

    // 170 for PromotedLinks
    overrideCtx.ListTemplateType = 170;

    // Register endHTML render handler
    overrideCtx.OnPostRender = PostRenderHandler;

    // Register for template override
    SPClientTemplates.TemplateManager.RegisterTemplateOverrides(overrideCtx);
}


function PostRenderHandler(ctx) {
    try {
        // The number of tiles to be displayed in a row
        var tilesPerRow = 3;
        var rowPosition = 1; // Initialize row position
        var tilesInCurrentRow = tilesPerRow;
        var startHTML = "<tr><td><div class='ms-promlink-body' id='promlink_row_";
        var endHTML = "'></div></td></tr>";
        // Get the wpq of the web part. This will be used to identify the node with id
        var wpq = ctx.wpq;
        // Selector for header element
        var selector = "#promotedlinksheader_" + wpq + " .ms-promlink-headerNav";

        // Remove the header for we do not need it
        $(selector).empty();

        selector = "#script" + wpq + " .ms-promlink-root > table > tbody:last";
        var linksBody = "#promotedlinksbody_" + wpq;

        // Get the total number of list items
        var numberOfTiles = ctx.ListData.LastRow;

        // BEGIN: Rearrange the tiles ... if necessary
        if (numberOfTiles > tilesPerRow) {
            for (i = tilesPerRow + 1; i <= numberOfTiles; i++) {
                // Add a new row , if we have reached the maximum number of links to show per row
                // Handle the first row
                if (tilesInCurrentRow == tilesPerRow) {
                    rowPosition++;
                    // Create a new row of links
                    $(selector).append(startHTML + rowPosition + endHTML);
                    // Reset the number of links for the current row
                    tilesInCurrentRow = 0;
                }

                // Move the Nth (numberOfLinksPerRow + 1) div to the current table row
                $(linksBody + ' > .ms-tileview-tile-root:nth-child(' + (tilesPerRow + 1) + ')').appendTo($('#promlink_row_' + rowPosition));
                // Increment the number of links in the current row
                tilesInCurrentRow++;
            }
        }
        // END: Rearrange the tiles

        // BEGIN: Reducing tile size
        // This is optional. Use only if the tile size needs to be fit into a particular size
        // Resize the tiles to 140px. Resize few different places. Also need to adjust the line spacing and
        // paddings and margins
        var newTileSize = 140;
        var newTileSizeString = newTileSize.toString() + "px";
        var tileRoot = newTileSize + 10;
        var tileRootString = tileRoot.toString() + "px";
        $(".ms-tileview-tile-root").css("width", tileRootString).css("height", tileRootString);
        $(".ms-tileview-tile-content").css("width", newTileSizeString).css("height", newTileSizeString);
        $(".ms-tileview-tile-detailsBox").css("width", newTileSizeString).css("height", newTileSizeString);
        $(".ms-tileview-tile-content").find("img").css("width", newTileSizeString);
        $(".ms-tileview-tile-detailsListMedium").css("height", newTileSizeString)

        // Reduce the margins and padding so the collapsed and details display show up aligned
        $(".ms-tileview-tile-detailsListMedium").css("margin-right", "5px")
        $(".ms-tileview-tile-titleTextMediumCollapsed").css("padding-left", "0px");
        $(".ms-tileview-tile-titleMedium.ms-tileview-tile-titleMediumCollapsed").css("padding-left", "0px");

        // When the tile is resized, a line of text is partially visible. We can address that by reducing the line spacing
        $(".ms-tileview-tile-titleTextMediumCollapsed").css("line-height", "18px");

        // END: Reducing tile size
    }
    catch (err) {
        console.error(err);
    }
}
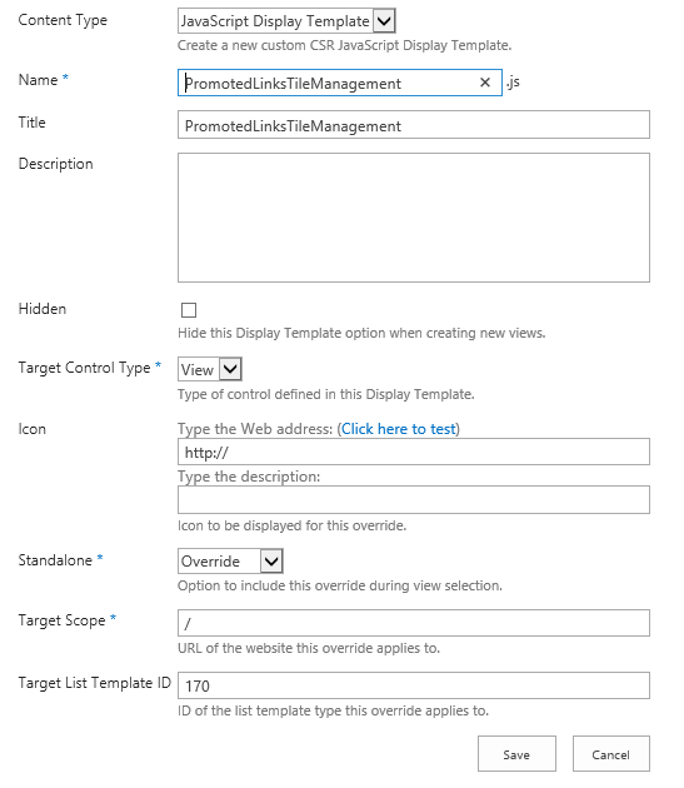
JavaScript template property settings:

Advantage of CSR is the context that is passed along. I make use of the context within "post render handler" to get the WPQ number of the web part. Once we have this, the rest is using proper selectors to get a reference to appropriate elements and adding additional rows if need be. If your requirement is to wrap the tiles to new rows, then stop after the if block (//END: Rearrange the tiles).
The tiles effect is brought about by overlapping with details box. In my case I had to reduce to 140px to fit 3 tiles into a single row of the web part zone to display all 3 tiles completely. "Tile root" sets up the spacing between the 2 tiles. By default this is 10px more than the tile width. And so I have made necessary adjustments to tile root, padding, margin etc., so the text and the details box fits nicely with the readjusted tile size. Fire bug or IE developer tools comes very handy to investigate and make necessary adjustment to get the final result as desired.
Now if my JS file is not rendering the content then what is! I want the tiles to be rendered by SP.UI.TileView.js. The key to make this work is piping the JS Link files. Edit the Promoted Links web part and set the JS Link property as below:
sp.ui.tileview.js | ~sitecollection/_catalogs/masterpage/MyJSFiles/PromotedLinksTileManagement.js
Notice the piping, which is supported by JS Link. This will download and run SP.UI.TileView.js before downloading and applying our custom CSR JS file for the promoted links web part. In my case, I created a folder "MyJSFiles" within Master page gallery to store all of my JS Templates. Change this per your needs and within the script as well.
Enjoy your newly arranged promoted links!
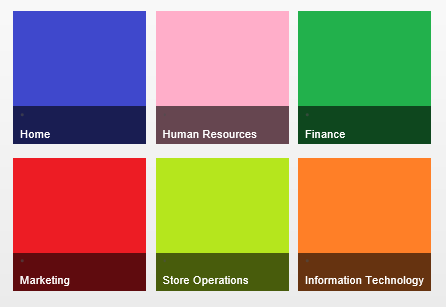
Promoted Links Web Part with custom CSR JS Link:
About Me: I am an Architect/Consulting Manager at Lighthouse Computer Services - Microsoft Technology Group. I have over 20 years of experience in Software Development and recently wrapped up Architecture/Design of an Intranet Portal with SharePoint 2013 in O365 for a large retail client. Lighthouse Computer Services - Microsoft Technology Group specialises in Microsoft Technology with extensive experience in Information Architecture, SharePoint Governance, Architecture, Design, Implementation, Installation, and Deployment.
