Duplicate:Service Manager - How to Schedule a Report Using a Variable Date
You can schedule a report to run using an interval of your choice using the current date as reference using SQL Server 2008 Reporting Services Report Builder 2.0. Using the procedure below you can modify the StartDate and EndDate parameter values. In this example, we use a week interval variable instead of specified dates.
If you do not already have Report Builder 2.0 installed, you can download it at http://www.microsoft.com/downloads/en/details.aspx?FamilyID=9f783224-9871-4eea-b1d5-f3140a253db6 and then install it on the server where you normally view reports. Typically, the Service Manager data warehouse server.
In this procedure, you modify an existing report and save it with updated values and a different name. Although report viewers can open the report in both Report Viewer and in the Service Manager console in the Reporting workspace, this example illustrates the the usefulness of creating a report subscription. The subscription allows periodic report generation without manual intervention using an interval you choose. This allows you to customize reports that are more useful for your on-going work needs.
My thanks to Richard Usher who originally put this together for us.
- Start Report Builder 2.0 and then open http://<ReportServerName>/ReportServer.
- Navigate to \System Center\ServiceManager\ServiceManager.Console.Reporting.IncidentManagement and then open ServiceManager.Report.IncidentManagement.ListOfIncidents.
- In the Report Data pane, expand Parameters, and double-click TimeZone to open its properties.
- Select Default Values and then select No default value and then click OK.
- Under Parameters, double-click EndDate_OffsetValue to open its properties.
- Select Default Values and then select No default value and then click OK.
- Click Save As and save the report with a new name. For example save the report as ServiceManager.Report.IncidentManagement.ListOfIncidents-new. This allows the report to be saved.
- Double-click the EndDate_BaseValue parameter, select the Default Values option and then select Specify values.
- Click Add and remove the Null value then click the function button.
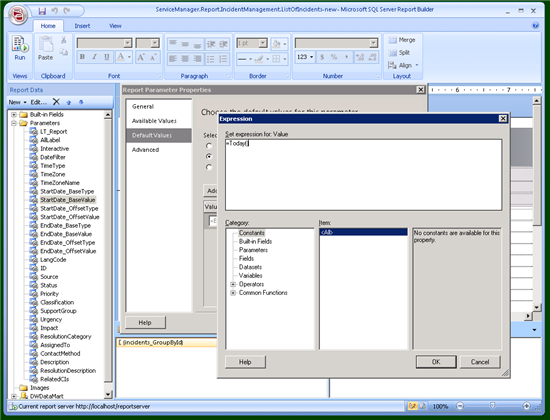
- In the Expression box, under Category, expand Common Functions and then select Date & Time.
- Under the Item list, double-click Today to insert the value into the expression. The expression should resemble =Today(
- Type ) to complete the expression and click OK to close the Expression box and then click OK to close the Report Parameters Properties box.
- Double-click the StartDate_BaseValue parameter, select the Default Values option and then select Specify values.
- Click Add and remove the Null value then click the function button.
- In the Expression box, under Category, expand Common Functions and then select Date & Time.
- Under the Item list, double-click Today to insert the value into the expression. The expression should resemble =Today(
- Type ) to close the expression and click OK to close the Expression box and then click OK to close the Report Parameters Properties box.
- Double-click the StartDate_OffsetType parameter, select the Default Values option and then select Specify values.
- Remove the Month value, type Week, and then click OK to close the Report Parameter Properties box.
- Save the revised report and close Report Builder.
- In your web browser, open Report Manager (http://localhost/reports), navigate to your new report and open it.
- If no incidents appear in the report, select NULL next to Incident IDs.
- Click Subscriptions and then click New Subscription.
- Under Report Delivery Options, select a delivery method and other information needed to configure the delivery options.
- Optionally, under Subscription Process Options, set a schedule to choose when to run the subscription.
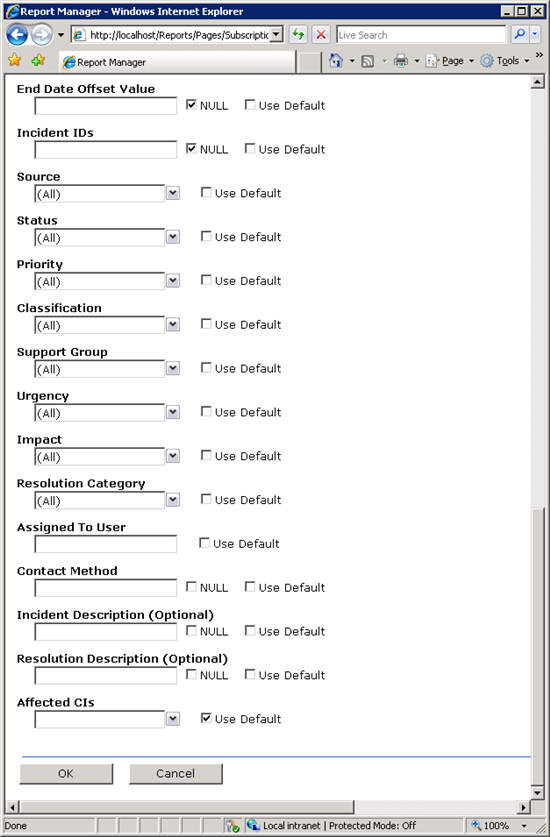
- Under Report Parameter Values, under Affected CIs, select Use Default.
- Under Incident IDs, select NULL.
- Click OK to close the subscription.
- Close Report Manager.
The following image is an example of Report Builder being used to change the default value for a parameter.

The following image is an example of Report Manager being used to change the values in a report.
