System Center - Visual Studio Authoring Extensions
The Visual Studio Authoring Extensions (VSAE) are an add-on for Visual Studio that provide additional functionality to aid with management pack development for System Center Operations Manager 2007 R2, System Center 2012 - Operations Manager, and System Center 2012 - Service Manager.
The latest version of VSAE is available for download here, http://www.microsoft.com/en-gb/download/details.aspx?id=30169.
This article is for sharing useful information on how to use VSAE, how to get the most out of VSAE, and anything else VSAE related.
Go To Definition
Source: http://www.systemcentercentral.com/vsae-go-to-definition/
The Go To Definition command is a neat little command to take you straight to the definition of a module that you are using within a management pack. To show the usefulness of this, here is a little example.
You start building a new MP in VS, and you start writing your registry discovery….
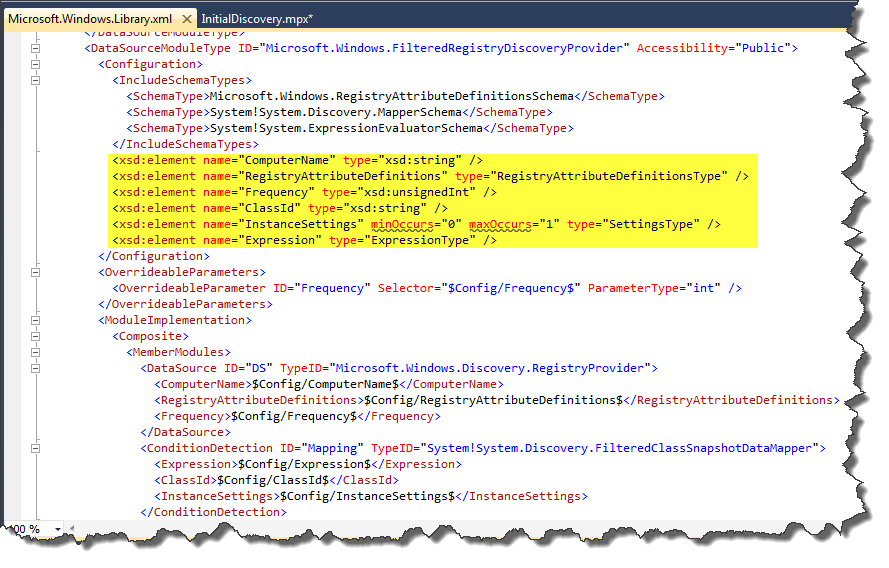
You get to the point where you want to call the Microsoft.Windows.FilteredRegistryDiscoveryProvider to use as a discovery data source, but what configuration items need to be passed to this module?
To find out, simply right click the TypeID, in this case “Windows"!Microsoft.Windows.FilteredRegistryDiscoveryProvider” and select Go To Definition. This will open the referenced management pack in a new tab in VS and take you straight to that module, where you can view the configuration items required for the module (highlighted in yellow).
Management Pack Template Groups
Source: http://www.systemcentercentral.com/vsae-management-pack-template-groups/
Using the Visual Studio Authoring Extensions to build your management packs, one extremely useful piece of functionality is the ability to create multiple rules/monitors/discoveries/tasks/views etc. using management pack template groups. The reason this functionality is so good is because:
1. Easy to Create
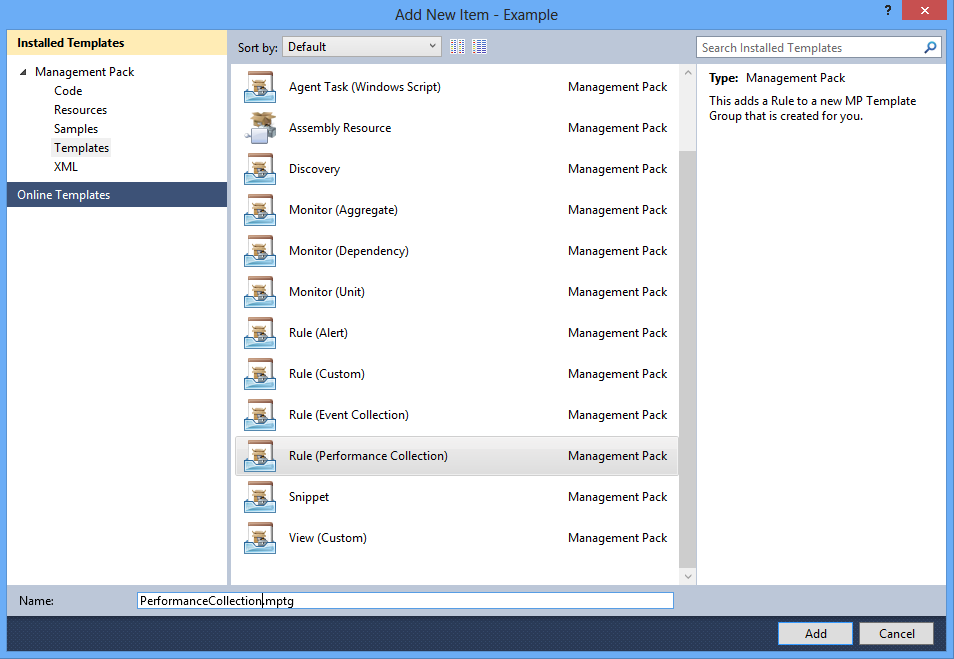
Working with Visual Studio will put a lot of IT Pro's off using the Visual Studio Authoring Extensions, so they have to as easy as possible to use, and the management pack template groups are certainly easy to create and use! All you need to do to create a new template group is simply right-click in your solution and select Add -> New Item...
and then pick the relevant template...
and then name as required.
DONE!
2. No XML Required
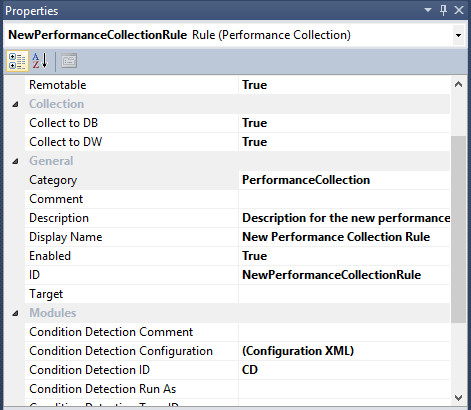
VSAE adds a UI to create monitoring components such as rules and monitors. Using this UI it is possible to configure all the available settings such as name, target, data source, ID, description etc etc. and it will configure all the relevant display strings automatically!
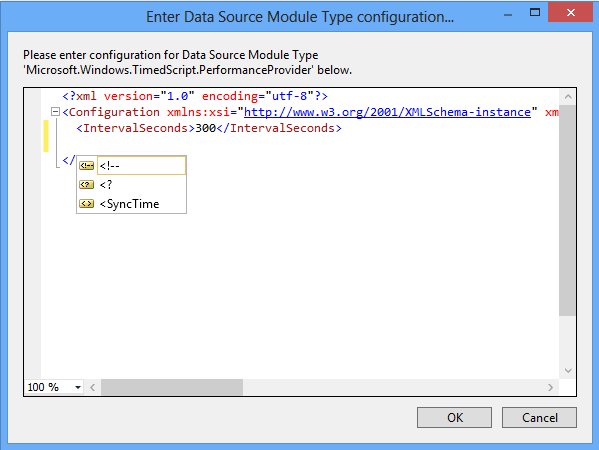
--- OK, so I'll be honest here... Sometimes there may be a requirement to work with the XML a little bit. When working with some items, like rules, you need to configure the data source type the rule is going to use, and usually the data source type will require some configuration items to be passed, and it is this configuration that you will need to configure in the XML. The screen clipping below is displaying the configuration XML for the data source selected.
This isn't as bas as it seems though, as you can use intellisense to return the configuration items required in the XML. Simply hit Ctrl+Space and the configuration item will be available to select, as you can see with SyncTime above. Once the SyncTime has been configured, hit return and do Ctrl+Space again to see if another configuration item is required.
3. Copy & Paste
One of my biggest issues with the SCOM 2007 R2 Authoring Console was that it was not possible to copy and paste. In many cases I had the requirement to create tens, if not hundreds, of rules that were all identical apart from a couple of minor configuration changes, and in the old authoring tool I would have to create each one manually or break out into the XML and copy and paste the relevant rule and display strings. Neither of these solutions were great as they were both very time consuming, but this issue is now resolved using VSAE as after I have created my first rule, I can simply copy and paste and then simply edit the configuration items as required.
It's not just rules that can be copied and pasted though, any template item can be. The next item below covers all the available template types.
4. 14 Templates Available
There are 14 templates available which will cover the majority of your authoring needs! They are:
- Agent Task (Custom)
- Agent Task (PowerShell Script)
- Agent Task (Windows Script)
- Assembly Resource
- Discovery
- Monitor (Aggregate)
- Monitor (Dependency)
- Monitor (Unit)
- Rule (Alert)
- Rule (Custom)
- Rule (Event Collection)
- Rule (Performance Collection)
- Snippet
- View (Custom)
5. Auto-Generated MPX
When using template groups, an MPX file is created automatically which enables you to view the XML behind the UI if you so wish.
WARNING: Do not edit the .mpx file as these changes will not be saved.
MPX files are management pack fragments, and you can have multiple MPX files within an MP. When you build the MP, all the MPX files are combined to form the management pack.
So, they are the top reasons for what makes template groups so good! There are many more as well, but these are the key ones in my opinion that cover all the the different template types.
Switch MP Project between 2007 & 2012
A couple of times now I’ve started a new MP project in Visual Studio using the Operations Manager Visual Studio Authoring Extensions, and about 45 minutes into my development realized I’ve created the wrong project type. There have also been a few occasions where requirements change and it makes more sense to change the project from a Core Monitoring (2007) management pack into a 2012 “add-on” pack.
It’s actually quite a simple change to make, providing you know which files to edit.
Project File
- Open the .mpproj file that represents your management pack project (NOT the solution file).
- Locate the MPFrameworkVersion element in the first PropertyGroup section, and modify it according to the version you want the project to build:
- For 2012, use <MpFrameworkVersion>v7.0</MpFrameworkVersion>
- For 2007, use <MpFrameworkVersion>v6.1</MpFrameworkVersion>
- If downgrading from 2012 to 2007, under the ItemGroup element containing the MP Reference elements, remove any references to MPs that don’t exist in 2007.
- Save the file.
Management Pack Fragments
Next, you’ll need to update the SchemaVersion attribute of the ManagementPackFragment element at the start of every .mpx file in your project. The good news is that you can just use Visual Studio’s find and replace option to replace this in all files in the solution simultaneously!
- Open the Project/solution in visual studio.
- Open one of the .mpx files, and hit Ctrl+H to open the “Find and Replace” window.
- To go from 2007 to 2012, in the “find what” box, enter <ManagementPackFragment SchemaVersion=”1.0″ and in “replace with” enter <ManagementPackFragment SchemaVersion=”2.0″
- Otherwise, do the reverse and in the “find what” box, enter <ManagementPackFragment SchemaVersion=”2.0″and in “replace with” enter <ManagementPackFragment SchemaVersion=”1.0″
- Make sure “**Look in” **is set to Current Project.
- You can now either click “Find Next” and “Replace” repeatedly if you aren’t comfortable letting VS just replace everything, or hit “Replace All“
Save all files in your project, and attempt a build. If you get any build errors relating to Management pack references or Schema Versions, just look for the reference/file that you missed and update the values.
Needless to say, you should always think carefully before you do this, and thoroughly test the MP to ensure that there aren’t any side effects from now using earlier/later versions of the default SCOM management packs. Going from 2007 -> 2012 is safer as 2012 is backwards compatible and will support your previous module configurations.
Referencing MPBs and other 2012 MPs
One of the great features of the SCOM Visual Studio Authoring Extension is the ability to easily view the definitions of content in sealed management packs you are referencing. Sometimes (especially if you are exporting a MP from the SCOM management group for further customization) you’ll need to reference an MP that is installed in your SCOM management group but that isn’t included in the VSAE package, or isn’t available online. Most likely this is a system MP or a MP that’s only available as part of a bundle (If your MP contains 2012 dashboards, it’s probably got a reference to Microsoft.SystemCenter.Visualization.Library or Microsoft.SystemCenter.Visualization.Internal). How can you reference these?
Well if you’ve still got your SCOM installation media to hand you can find all of the MPs imported at installation in the ManagementPacks folder. This can be great if you’ve got a required reference, or even just want to have a look at how the product group implemented some piece of functionality!
Note however that some of the MPs are wrapped up in MPBs (Management pack bundles). It’s still perfectly possible to reference these in your project:
- Make sure you’re editing a 2012 MP project. If you’ve chosen an Operations Manager Core MP, you’ll be unable to add a reference to MPBs as they didn’t exist at that time.
- In Solution Explorer (by default on the right panel) right click on **“References” ** and choose “Add References from Management Pack bundle…”
- Browse to and select your file (Lets say Microsoft.SystemCenter.Visualization.Internal.mpb from the SCOM 2012 install media)
- You’ll be then given a dialog detailing the MP(s) that were added from the bundle into the project.
- Now you can view the definition of any module you need from that MP via the Management Pack browser (View -> Management Pack Browser) or by selecting the module in-code and hitting F12 (go to definition hotkey).
Pretty simple procedure! If you have accidentally created your MP project as a Operations Manager Core (2007) MP, you can modify your solution files to upgrade it. Think carefully about doing this however – would you be better off including the extra functionality you need in an additional “feature” pack? If you decide to go ahead and upgrade/downgrade, you can follow the steps in this blogpost.
Oh and one final tip: If you don’t want to find yourself having to constantly keep hold of the 2012 install media, you can just copy the MPs into the VSAE installation folder (they will now automatically be resolved when referenced). You’ll find them in Program Files (x86)\System Center 2012 Visual Studio Authoring Extensions\References\OM2012. I’d advise not to overwrite any of the existing MPs (you’ll get some conflicts) to be safe. Also, be careful about copying updated versions of MPs that come from CU’s/SPs into this location, unless you don’t mind all the MPs you create requiring that updated version of the MP in future. Not all customers have/can install the latest patches..
Include File Content
Source: http://www.systemcentercentral.com/vsae-include-file-content/
One of the features I love in the Visual Studio Authoring Extensions is IncludeFileContent. This feature enables you to include script files into a management pack, without needing to write the script with the relevant XML tags such as <ScriptBody>.
In MP development up to now, you would need to write your script in the XML of the management pack, like this:
<ScriptBody><![CDATA[
Option Explicit
SetLocale("en-us")
Dim oAPI
Set oAPI = CreateObject("MOM.ScriptAPI")
….
….
]]>
</ScriptBody>
Now, with VSAE you can write your script in a VBS, PS1 or JS file just as you would outside of SCOM and then include it in the MP, like this:
<ScriptBody>$IncludeFileContent/Scripts/MonitoringScript.vbs$</ScriptBody>
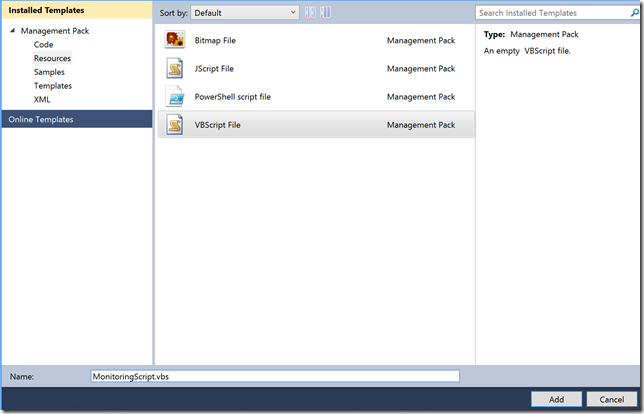
To do this is very simple, just right click in your MP project and select Add -> New Item…, select Templates, and then select the relevant script type with a relevant name.
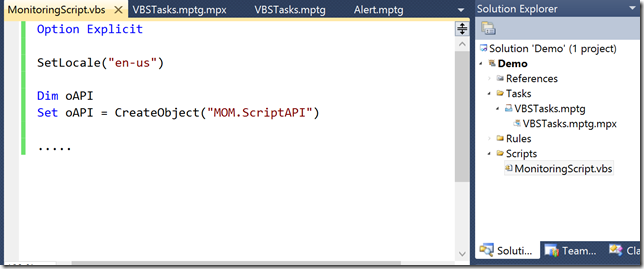
Once you’ve added your new script, you can add the contents of your script to file.
Once you have your script completed, you can now include it in your management pack. In the example below I have included my new MonitoringScript.vbs file in a task using the Microsoft.Windows.ScriptProbeAction module.
The include syntax in this example is $IncludeFileContent/Scripts/MonitoringScript.vbs$, and this is generated based on the path of the file. In this MP, I stored the VBS file in a folder called Scripts, which is why “Scripts/MonitoringScript.vbs” is added to “IncludeFileContent”.
I think this is a great feature as you can use it wherever you need to use a script. This means you can you store all your scripts under one folder in your project which makes them easily accessible and makes editing much safer, as now you can just simply edit the script with no risk of a typo in the XML of the MP itself.
I encourage everyone to use this feature.

