Using a Site Extension on Azure Websites to Automatically Bundle and Minify Your Content
I am a big fan of making websites run faster and this is certainly a way to get your web content to the customer faster and most efficiently. I wrote many pages about this is my Azure book, here, that walked through the C# code required to bundle and minify your code. The C# code description and logic are still very valid and work just fine on both the Azure platform and within an ‘on premise’ installation of IIS.
If you host your website on Azure Web Apps (Websites), you might consider using the Azure Image Optimizer and the Azure Minifier.
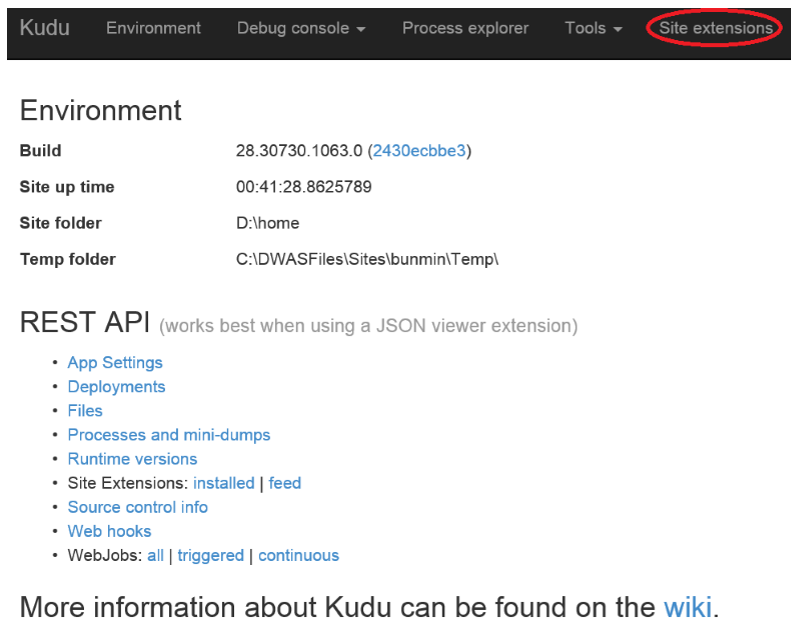
To install the site extensions you can access the Kudu console as described here and click on the Site Extensions link as shown on Figure 1.
Figure 1, install Azure Website ‘Site extensions’ using Kudu
You can also use the new Azure Portal accessible here. Select Browse-> Web Sites -> select the Azure Websites site in which you want to install the site extension, then scroll down until you find the Extensions lens towards the bottom as shown in Figure 2.
Figure 2, Configure site extensions for an Azure Websites site using the new Azure Portal
Prior to installing the Azure Image Optimizer and the Azure Minifier site extensions, I created a test website and tested it using the F12 Developer Tools in IE. I can see that it makes numerous requests for CSS and JS files, plus many ‘potentially’ un-optimized image files. Figure 3 illustrates this.
Figure 3, Using F12 Developer Tools trace to find number and size of requests
I select both site extensions from the portal and after accepting the licensing agreement they get installed onto my website. As illustrated in Figure 4, they are now shown as being added to my website.
Figure 4, how to see which site extensions are installed on my website
To run the site extensions, you need to access them via Kudu as shown previously in Figure 1. After clicking on the Site Extensions link, press the ‘Play’ button to execute the logic which optimizes and minifies your website. Figure 5 illustrates what you may see.
Figure 5, How to run a site extension on Azure Websites
When you click each of the ‘Play’ buttons, your website is analyzed, optimized and minified and a report of what has been done is presented to you. An example is shown in Figures 6 and 7.
Figure 6, Minifying your website for faster delivery of your content
Figure 7, Optimizing your website for faster performance and happier customers
If I run the F12 Developer Tools network trace, I see the results shown in Figure 8. Compare the values in the Received and Taken columns and notice the positive changes.
Figure 8, How to optimize you website for optimal performance
This is a very small website which does very little and you can still see the positive results. Imagine if you have a much larger website with much more content to optimize and minify. Using these tools can reduce the time required to render your page into your customers’ browsers.
Comments
Anonymous
September 02, 2014
Great read! I'll gladly share thisAnonymous
September 08, 2014
Guessing there's plans to integrate the kudu bit into the azure portal? Also is there any way to automate this? Running on deploy and automatically installing into new sites?Anonymous
September 10, 2014
@Betty, these two site extensions run continuously and watches the file system for changes. So it will optimize after you deploy and after users upload files as well.Anonymous
November 10, 2014
@Mads: The extensions run continuously after they have been installed. Betty's question, to which I would also like to know the answer, is how can we automate the installation of an extension? Powershell using a resource group template? REST API?Anonymous
April 05, 2015
The comment has been removed


