Solving Configuration Management Obstacles with Chef
Chef is a powerful configuration management system that can be used to programmatically control your infrastructure environment. Leveraging the Chef system allows you to easily recreate your environments in a predictable manner by automating the entire system configuration.
- Chef accomplishes this by describing your infrastructure as code!
- Policy can be versioned, tested, reproduced, and automated
- Integrates with existing VPCs and APIs
- Implements consistency across servers (no more snowflakes) and critical event recovery
So why should students be learning scripting?
To be an effective systems administrator IT Implementer you should be usingl scripts for installing and setting up services, most large organisation now have approx. 1 IT Admin per 10,000 machines so without some form of orchestration tools and scripts the role would simply be impossible.
Lets take an easy example,
installing a Web Servers.
How many times do you do this? Not much, Really? Consider platforms like Email Server, Document Server all these now need a Web Server as prerequisite software, Web farm deployments, testing environments and development environments. You might spend more time installing web servers more than you think.
Add to this the need for disaster recovery automation.
Can you bring your Web farm back online in minutes? Installing and configuring Web Servers with your Web sites is a simple task. It’s a long and boring process if you have a lot of servers.
Scripts can help
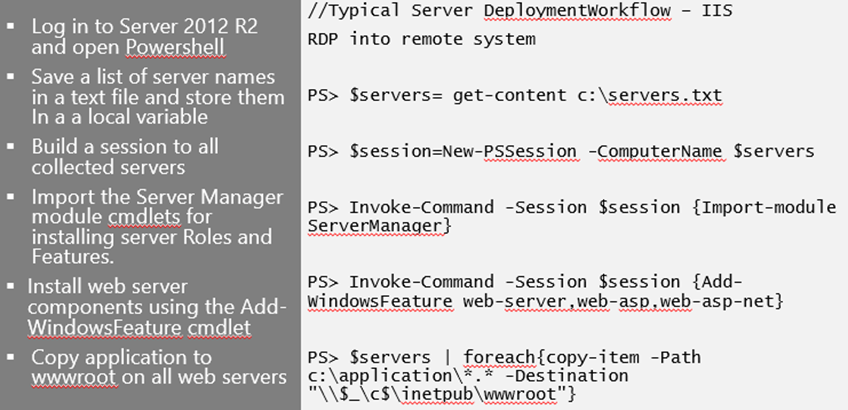
1.Store a list of all the server names that are going to be part of the deployment to a variable.
You can create a list in notepad if you wish, and then a scripting tool like Windows PowerShell to read that list with a single command
PS> $servers= get-content c:\servers.txt
2.Build a session to all those servers we collected
Again a single line
PS> $session=New-PSSession -ComputerName $servers
3. Import the Server Manager module on the remote computers.
This module has the cmdlets that will install and remove server Roles and Features. You can use the Invoke-Command cmdlet with a parameter for the session you have created previously. All servers will immediately receive any instructions sent inside the script block { }
PS>Invoke-Command – Session $Session {Import-moduleServerManager}
4.We want the default install and the additional components for ASP and ASP.NET. Once again, use the Invoke-Command cmdlet. Once this command is run, all servers will install the Web Servers
5.Write a default.htm and a testpage.asp file. Mapping drives to the servers and copying the files to the default Web site would take a long time.
The Power of Scripting
Instead, use Windows PowerShell and the server list to do the copying.
In this example, the web files are located in c:\application.
We simply copy them with the Copy-Item cmdlet to a destination that’s a UNC path.
The UNC needs the server name. We passed the server list ($Servers) to the Foreach-Object cmdlet.
Foreach will iterate through each server name in $Server.
To fix the UNC path so that we don’t have to type in the server names, use the Windows PowerShell special variable “$_”. This variable holds the current server name from $Server:
Infrastructure as Code
The Chef DSL is platform agnostic and manages any system component
System Resources:
packages, files, services, users, groups, mount points, symlinks, networking components, registry keys, Powershell scripts….
These resources are represented as code components, and are stored in version control so do you know version control VSTS, Git, Subversion? If not get learning now..see how to get started with GitHub in Visual Studio and other great FREE courses at https://mva.microsoft.com
Your infrastructure becomes versionable, testable, and repeatable, while abstracting complex implementation details out
With Chef, we can automate configuration tasks
Chef has built-in resources, like package, that can manage MSI packages.
Custom resources can also be utilized, such as the Chocolately package manager
Here’s an example of installing Chocolately by calling the default recipe for the Chocolatey community cookbook. This installs Chocolatey, and then installs Git 2.8.0
The Chef Architecture
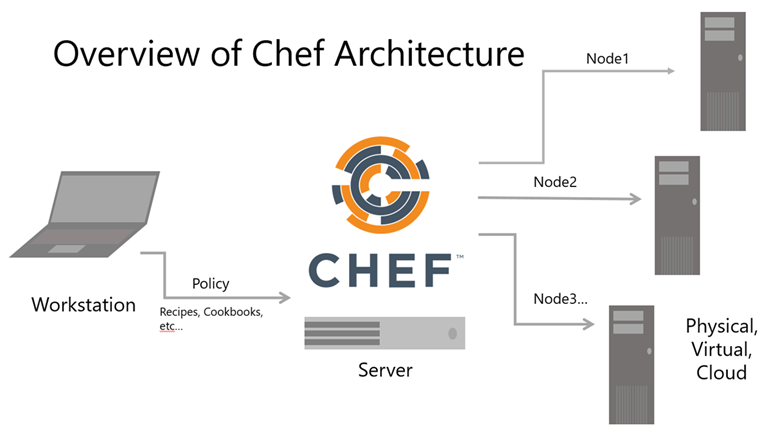
Workstation
The Chef Workstation is where you will develop and test your code
The Workstation uses Chef command-line tools that synchronize with a local Chef repository
The Workstation is where you author and test Chef code
The Workstation allows interaction with a Chef Server and any managed nodes
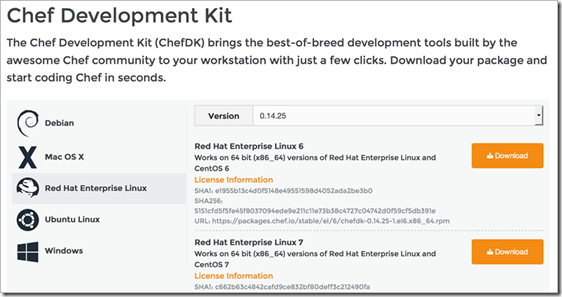
To set up a workstation, install the Chef Development Kit (ChefDK) Navigate to https://downloads.chef.io/chef-dk/ and select the appropriate installer.
ChefDK
This installer includes all the tools needed to get started with Chef, including:
knife – interface with your Chef Server and Nodes
chef – generate Chef components, like a chef-repo, cookbooks and recipes
kitchen – test your cookbooks inside a VM or a cloud provider
Foodcritic, Rubocop – lint your Chef Cookbooks for common errors
See https://docs.chef.io/workstation.html
Chef Server:
Chef Server is your hub for Configuration Data
The Server Stores Cookbooks, Roles, Environments, and other Policy needed for configuration
Indexes metadata about registered nodes, allowing for dynamic searches
Acts as a pull server for your nodes
This means the nodes do the heavy-lifting of configuring themselves, not the Chef Server itself. The Chef Server is highly scalable because of this distributed model.
The Chef server acts as a hub for configuration data. The Chef server stores cookbooks, the policies that are applied to nodes, and metadata that describes each registered node that is being managed by the chef-client. Nodes use the chef-client to ask the Chef server for configuration details, such as recipes, templates, and file distributions. The chef-client then does as much of the configuration work as possible on the nodes themselves (and not on the Chef server). This scalable approach distributes the configuration effort throughout the organization.
•Starting with the release of Chef server 11, the front-end for the Chef server is written using Erlang, which is a programming language that first appeared in 1986, was open sourced in 1998, and is excellent with critical enterprise concerns like concurrency, fault-tolerance, and distributed environments. The Chef server can scale to the size of any enterprise and is sometimes referred to as Erchef. see https://docs.chef.io/server_components.html
Nodes
A node is any machine that is managed by Chef
A Node can be physical, virtual, cloud, network devices, containers, etc.
A Node uses the chef-client service to pull policy from the Chef Server (“convergence”)
A Node Run system inventory and gather host-details with the Ohai tool
Convergence on a Node
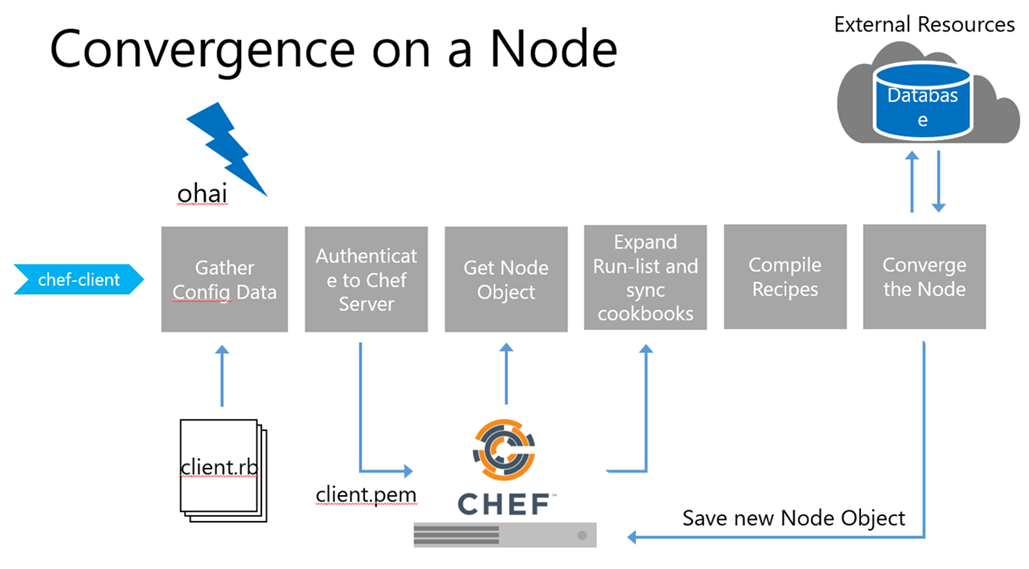
The “chef-client run” is the term used to describe a series of steps that are taken by the chef-client when it is configuring a node.
The diagram shows the various stages that occur during the chef-client run
1)Gather Config Data: The chef-client gets process configuration data from the client.rb file on the node, and then gets node configuration data from Ohai. One important piece of configuration data is the name of the node, which is found in the node_name attribute in the client.rb file or is provided by Ohai. If Ohai provides the name of a node, it is typically the FQDN for the node, which is always unique within an organization.
2)Authenticate to Chef Server: The chef-client authenticates to the Chef server using an RSA private key and the Chef server API. The name of the node is required as part of the authentication process to the Chef server. If this is the first chef-client run for a node, the chef-validator will be used to generate the RSA private key.
3)Get Node Object: The chef-client pulls down the node object from the Chef server. If this is the first chef-client run for the node, there will not be a node object to pull down from the Chef server. After the node object is pulled down from the Chef server, the chef-client rebuilds the node object. If this is the first chef-client run for the node, the rebuilt node object will contain only the default run-list. For any subsequent chef-client run, the rebuilt node object will also contain the run-list from the previous chef-client run.
4)Expand Run-list and synchronize cookbooks: The chef-client expands the run-list from the rebuilt node object, compiling a full and complete list of roles and recipes that will be applied to the node, placing the roles and recipes in the same exact order they will be applied. (The run-list is stored in each node object’s JSON file, grouped under run_list.) The chef-client asks the Chef server for a list of all cookbook files (including recipes, templates, resources, providers, attributes, libraries, and definitions) that will be required to do every action identified in the run-list for the rebuilt node object. The Chef server provides to the chef-client a list of all of those files. The chef-client compares this list to the cookbook files cached on the node (from previous chef-client runs), and then downloads a copy of every file that has changed since the previous chef-client run, along with any new files.
5)Compile Recipes (aka Build Resource Collection): The chef-client identifies each resource in the node object and builds the resource collection. Libraries are loaded first to ensure that all language extensions and Ruby classes are available to all resources. Next, attributes are loaded, followed by lightweight resources, and then all definitions (to ensure that any pseudo-resources within definitions are available). Finally, all recipes are loaded in the order specified by the expanded run-list. This is also referred to as the “compile phase”.
6)Converge the Node: The chef-client configures the system based on the information that has been collected. Each resource is executed in the order identified by the run-list, and then by the order in which each resource is listed in each recipe. Each resource in the resource collection is mapped to a provider. The provider examines the node, and then does the steps necessary to complete the action. And then the next resource is processed. Each action configures a specific part of the system. This process is also referred to as convergence. This is also referred to as the “execution phase”.
7)Update Node Object Process Event Handlers (not shown): When all of the actions identified by resources in the resource collection have been done, and when the chef-client run finished successfully, the chef-client updates the node object on the Chef server with the node object that was built during this chef-client run. (This node object will be pulled down by the chef-client during the next chef-client run.) This makes the node object (and the data in the node object) available for search.The chef-client always checks the resource collection for the presence of exception and report handlers. If any are present, each one is processed appropriately.
8)Stop and Wait for Next Run (not shown): When everything is configured and the chef-client run is complete, the chef-client stops and waits until the next time it is asked to run.
See https://docs.chef.io/chef_client.html
The process of convergence describes bringing a node into the desired state
When a node converges, it:
Authenticates to the Chef Server
Builds the “Node Object” by taking system inventory with Ohai
Synchronizes cookbooks by pulling from the Chef Server
Compiles the “Resource Collection” by compiling your cookbooks
Executes the Resource Collection, bringing the node into the desired state
Uploads the Node Object to the Chef Server, where it is indexed
Basic Chef Terms and Concepts:
Resource
In Chef, a Resource is a “statement of configuration policy”. It describes the desired state of a system component or configuration item. These are the fundamental Chef building blocks.
Resources
Describe the “desired state” of a configuration item
Declares the steps needed to bring the Resource into the desired state
Are classified by type, i.e. package, file, service, template, registry_key, etc.
Are grouped into Recipe files (ruby files) that are executed during convergence
Recipe
A recipe is a file that contains Resources. Recipes are the fundamental configuration element for any Node under management by Chef.
Authored using Ruby, and have a .rb file extension
Essentially collections of resources and any needed Ruby logic as helper code
Group configuration tasks into logical units
May include or call other recipes using the include_recipe method
Have direct access to the Chef Server’s indexes via the search method
Added to the Run-list for any node
Stored and distributed with Cookbooks
Cookbook
A cookbook is a container for recipes and any supporting policy or files. A Chef cookbook is the fundamental unit of configuration and policy distribution.
Cookbooks
May contain many recipes
Define a scenario, and contain all the components needed to support that scenario
For example, all the components and instructions for setting up MySQL
Are distributed to all managed nodes who should apply that policy, either manually or by a Chef Server
Attribute
We use Chef to control many different servers that may be nearly identical. The details of any node are called Node Attributes.
Attributes
Reflect the current state of the node the attribute belongs to
Inventory host-specific details, such as IP Address, hostname, memory, CPU speed
Are stored and indexed by a Chef Server
Can be utilized and referenced (often as variables) inside of recipes and resources
see https://docs.chef.io/attributes.html
The Node Object
For the chef-client, two important aspects of nodes are groups of attributes and run-lists.
An attribute is a specific piece of data about the node, such as a network interface, a file system, the number of clients a service running on a node is capable of accepting, and so on.
A run-list is an ordered list of recipes and/or roles that are run in an exact order.
The node object consists of the run-list and node attributes, which is a JSON file that is stored on the Chef server. The chef-client gets a copy of the node object from the Chef server during each chef-client run and places an updated copy on the Chef server at the end of each chef-client run.
An attribute is a specific detail about a node.
Attributes are used by the chef-client to understand:
The current state of the node
What the state of the node was at the end of the previous chef-client run
What the state of the node should be at the end of the current chef-client run
Attributes are defined by:
The state of the node itself
Cookbooks (in attribute files and/or recipes)
Roles
Environments
During every chef-client run, the chef-client builds the attribute list using:
Data about the node collected by Ohai
The node object that was saved to the Chef server at the end of the previous chef-client run
The rebuilt node object from the current chef-client run, after it is updated for changes to cookbooks (attribute files and/or recipes), roles, and/or environments, and updated for any changes to the state of the node itself
After the node object is rebuilt, all of attributes are compared, and then the node is updated based on attribute precedence. At the end of every chef-client run, the node object that defines the current state of the node is uploaded to the Chef server so that it can be indexed for search.
Attribute precedence (the 4th bullet point in the above slide) is a more advanced topic usually not introduced to beginners. If a student asks though, an instructor should be familiar with the following docs article
See
https://docs.chef.io/nodes.html#attribute-precedence
https://docs.chef.io/nodes.html
https://docs.chef.io/nodes.html#node-objects
Putting this together with an Example
As I stated above convergance is the process of having an application on the node (chef-client) read the recipe, and do whatever is needed to make sure the instance adheres to the policies written in the recipe.
For example:
- If the recipe (policy) states that Apache should be installed, but Apache is currently not installed, then chef-client invokes the instances package manager to install Apache.
- If the Apache is already installed, chef-client tests and sees this, and does nothing since the instance is already in policy
Verifying the web server in this example I simply going to be using ‘smoke test’ where we simply look to see if it is running.
I’m not going to talk about testing in this blog but you should implement unit and integration testing, using the instance and web servers.
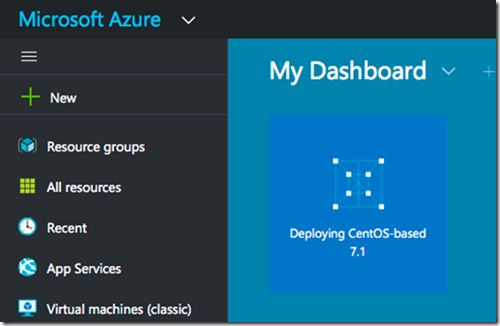
Step 1. Launch a CentOS VM within the Azure Portal
Access the Azure Portal https://portal.azure.com if you do not have an Azure account you can Apply for Azure Educator Grant at https://aka.ms/azureforeducation
Select New
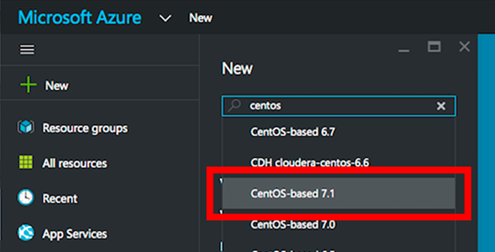
Step 2 Select Centos Image
Simply select Search Centos choose a CentOS-Based 7.1 VM
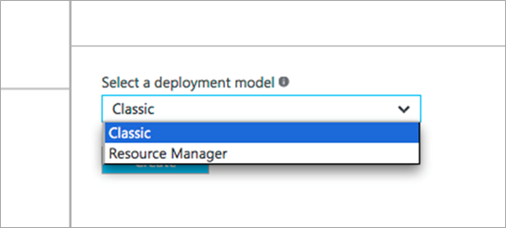
Step 3. Select Classic Deployment
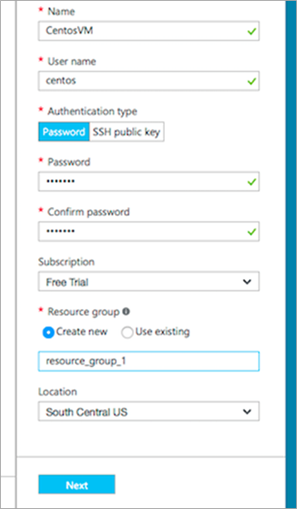
Step 4 Configure your Instance
Complete the form:
Use any VM Name
Use any User name
Create a Password
Create a new Resource Group (with any name)
Choose default Location
Click ‘Next’
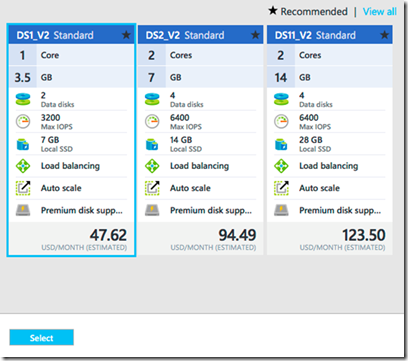
Step 5 Select a Machine Size
Choose Machine Size:
Choose the smallest machine size offered this will have the lowest $
Click ‘Select’
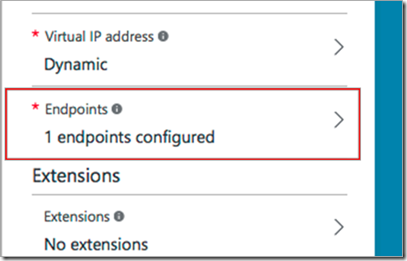
Step 6 Configure Server Endpoints
Endpoints open access permissions to specific ports.
Without this step, even if the node converges correctly, you won’t be able to access it via a web page
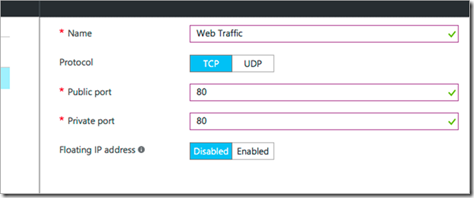
Step 7 Adding Port 80 Web Server End Point
Complete the form
Use TCP as the Protocol
Give the Endpoint a name
Use port 80 as the Public and Private port
Click OK to clear the screens and launch the instance
Step 8 Launching your Server
Once complete the VM instance with deploy once the deployment has completed your CentOS server will be operational
Step 9 Installing ChefDK onto your CentOS VM
The ChefDK will enable the use of Chef without using a Chef Server
The ChefDK includes other development tools such as Berkshelf, Foodcritic, Test Kitchen and chef-client
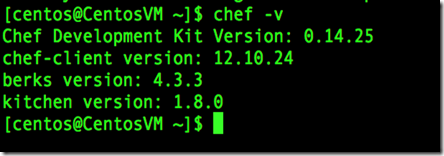
Step 10 Verify CgefDK Installation
$chef -v will verify the
ChefDK is installed
Reporting of the version numbers indicates a successful installation
Step 11 Creating a Cookbook
First you need to create a cookbook folder, The chef-client application requires a cookbooks directory. It will look in this directory for its cookbooks and recipes.
:The ‘chef generate cookbook’ command creates cookbooks. Cookbooks can also be created manually (by creating the directories) or with the ‘knife cookbook create <cookbook_name>’ command as well. ‘chef generate cookbook’ creates a lighter-weight cook structure than ‘knife cookbook create’
The command is ‘chef generate’
The item to generate is ‘cookbook’
The path and name of the cookbook in this case is ‘cookbooks/apache’. This is assuming the command is run from the home directory and has access to the cookbooks directory.
chef generate template cookbooks/apache/templates/default/my_template.rb This creates a new templates/default directory in the apache cookbook, and creates a template file named ‘my_template.rb’
As we simply want to install Apache web server we need to use the chef generate command to create the apache cookbook.
$chef generate cookbook cookbooks/apache
Step 12 Creating a Recipe
Create a simple recipe to install Apache
In the new file, add the resources to install, configure and start Apache
Start with the ‘package’ resource to install Apache
The package name is ‘httpd’
package ‘httpd’ do
action :install
end
The ‘package’ resource invokes ‘yum’ if being run on a CentOS machine, and invokes ‘apt-get’ on an Ubuntu machine.
‘httpd’ is the name of Apache on CentOS. If this was being run on an Ubuntu machine where the name of the Apache package is ‘apache2’, the line would read
package ‘apache2’ do
The line ‘action :install’ is the default action. This line could be left out for brevity since the default action will be taken if no action is specified, and the default action for the package resource is ‘install’.
Step 13 Adding a Web page
Next, use the ‘file’ resource to create a web page
The file name is ‘/var/www/html/index.html
file ‘/var/www/html/index.html’ do
content ‘<h1>Hello World</h1>’
action :create
end
You could also include file permissions here with ‘mode’ for Linux and ‘rights’ for Windows.
Linux mode example to set permissions to 644:
file ‘/var/www/html/index.html’ do
content ‘<h1>Hello World</h1>’
action :create
mode “0644”
end
More advanced recipes might use the ‘cookbook_file’ or ‘template’ resources, rather then the more simplistic ‘file’ resource. ‘file’ is a good resource for learning Chef, but not necessarily for using Chef.
Step 14 Starting Apache Web Server
Use the ‘service’ resource to start Apache (httpd)
Brackets denote that two separate actions are being implemented
The two actions ‘enable’ the service to start upon reboot as well ‘start’ the service now
service ‘httpd’ do
action [:enable, :start]
end
We need both actions if we want the service to automatically restart should the node be rebooted for any reason.
This invokes the ‘service’ command on the node to perform the requested task
If the node is already configured to restart the service, and if the service is already running, then this resource will be skipped. This is the nature of ‘idempotence’.
So the completed Recipe Apache.rb will look like this
 package ‘httpd’ do
 action :install
 end
 file ‘/var/www/html/index.html’ do
 content ‘<h1>Hello World</h1>’
 action :create
 end
 service ‘httpd’ do
 action [:enable, :start]
 end
Step 15 Convergence of the Nodes
As stated above we simply want to instruct the node to execute the Chef recipe
Converging the node will instruct the node to run the commands necessary to adhere to the policy written in the recipe
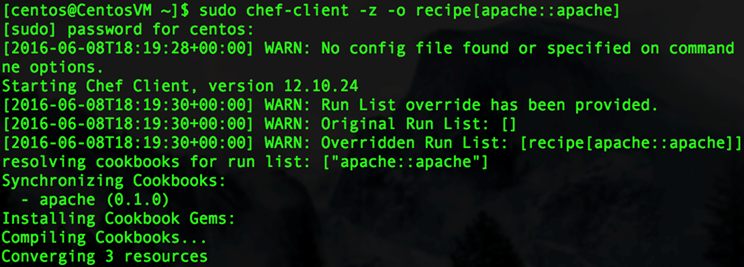
chef-client -z -o recipe[apache::install-apache]
Uses the chef-client application in local mode, without a Chef server
chef-client only takes the actions needed – this is called ‘idempotence’
The ‘z’ option runs chef-client in local mode. Without this flag chef-client would try to connect to a chef-server.
The ‘o’ option creates the run-list, the ordered list of recipes to run.
recipe[apache::install-apache] is read as follows:
recipe: this is a recipe and not a role
apache: this recipe is to be found in the Apache cookbook
:: this separates the cookbook from the recipe
install-apache: this points to the install-apache.rb recipe in the ‘recipes’ directory within the cookbook. Note we have left off the .rb file extension because it automatically looks for a .rb file. If you were to include the file extension such as recipe[apache::install-apache.rb] then chef-client would look for a file called install-apache.rb.rb
Idempotence in configuration management means that if if you apply the same recipe to a node a second time it won’t break anything because actions are only taken if needed. If the instruction is to create a file but the file already exists with the desired content, then no action is taken. If the file exists but has the wrong content, the file will be fixed to match the content specified in the recipe.
Chef Client finished’ message
Total number of resources updated
Time taken by the run
The next time this chef-client command is run, since the node is already adhering to the stated policy, you should see “0/4 resources updated…”.
If you were to change something about the node, like manually edit the content of the Hello World file and then rerun chef-client, it would test to see that the contents of the file were correct (which they would not be) and then chef-client would repair the file, setting it back the way it should be with ‘Hello World’ as the content. This is called test and repair. You would then see “1/4 resources updated…” since the file resource was updated.
Why are there 4 resources to update if we only put 3 resources in our recipe? The ‘service’ resource has two actions, enable and start. These count as two, plus the package resource and file resource gives us 4 total resources. Some windows machines always have at least one resources updated, even if nothing has changed. This is just the nature of how windows resources are tested by chef-client.
Step 16 Verifying Server is Running
$curl localhost
can verify (without being limited by network issues):
the web server has been installed
the httpd service is running
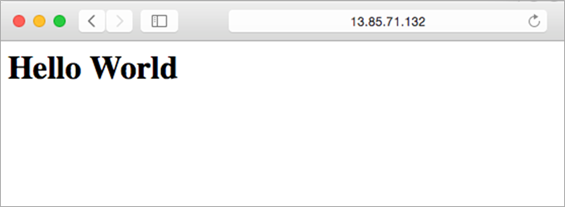
Step 17 Checking the web site
Find the IP Address of the virtual machine
Enter the IP Address into a web browser to see the ‘Hello World’ page displayed
the web page is being served correctly
Summary
So from this blog you should have a better understanding of Chef
How to launch a virtual CentOS machine in Azure
How to write a Chef recipe to Install, Start and Configure an Apache web server on the CentOS VM
Use of the chef-client command to converge the node
The steps needed to visually ensure that a web server is properly running
If your interested in learning more about DevOps see Microsoft UK DevOps Evangelist Marcus Robinson blog and resources https://www.techdiction.com/ also check out Microsoft technet UK blog https://blogs.technet.microsoft.com/uktechnet/
Want to share your DevOps curricula story or teaching get in touch!
