Demystifying GameMaker Studio
GameMaker Studio is a free, code-optional game engine. It creates 2-Dimensional games and is a well-documented tool that has been a staple in the independent games community for many years. The engine is robust, and a lot of well-known indie games have been made in it, such as Spelunky by Mossmouth and Undertale by Toby Fox. This Integrated Development Environment (IDE) includes an object editor for structuring workflow, a tabbed script editor, drag-and-drop features to enable game creation without going near code (hence the phrase “code-optional”), an extensive library of events and actions, and code preview tools for the GameMaker programming language (GML), based on C.
To get started making 2D games on a PC right away, just look up “GameMaker Studio Yoyo Games” or visit https://yoyogames.com. Follow along to go to the website, download GameMaker, install it, and then create a new project!
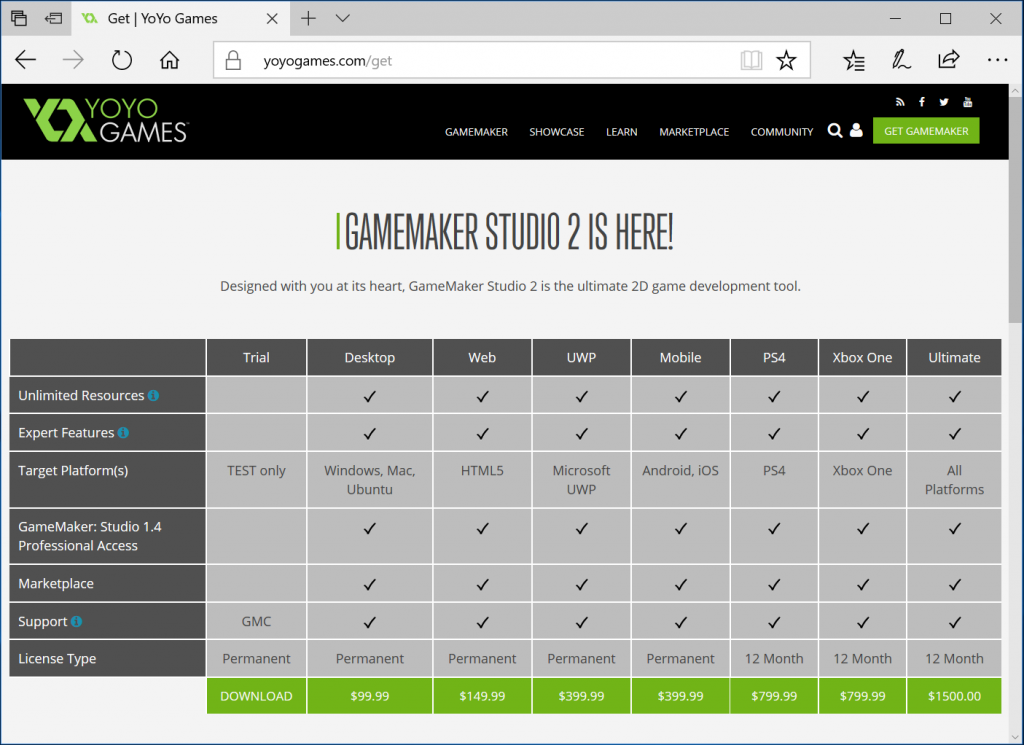
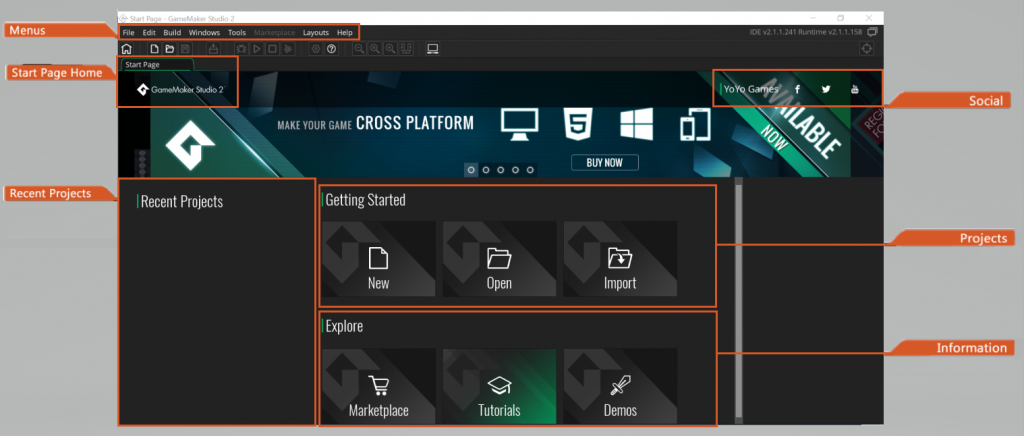
[caption id="attachment_715" align="alignnone" width="1024"]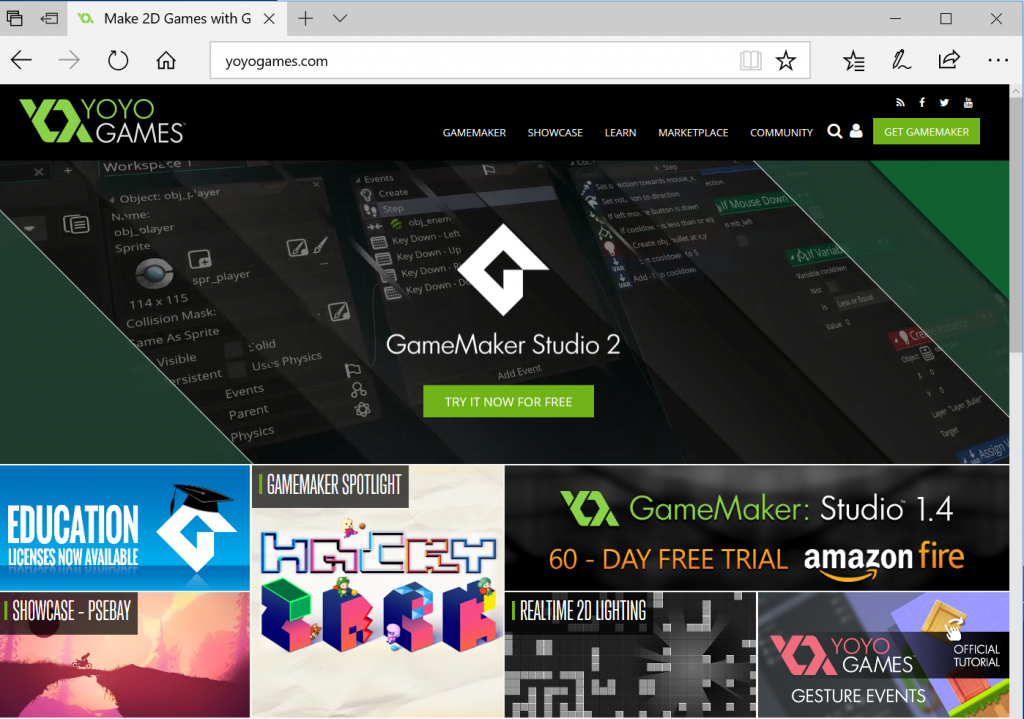 Screenshot as of October 2017[/caption]
Installing the Tools
GameMaker Studio (GMS) is designed for use on desktop computers with the following minimum specifications:
Windows
- For the Windows platform, you will need to have the following minimum setup:
- 64bit Intel compatible Dual Core CPU
- 2GB RAM
- DX11 compliant graphics card
- Microsoft 64bit Windows 7 or higher
- At least 3GB free Hard Disk space
- However, the recommended specifications are:
- 64bit Intel compatible Quad core CPU
- 8GB RAM
- DX11 based graphics card
- Microsoft 64bit Windows 10
- SSD Hard Disk
Mac OS
- For the Mac OS platform, you will need to have the following minimum specs:
- Mac OSX El Capitan or higher
- An Intel Dual Core i3 processor
- 4GB or more RAM
- Xcode 7 or higher
- However, the recommended specifications are:
- macOS
- An Intel Quad Core i5 processor
- 8GB RAM
- SSD Hard Disk
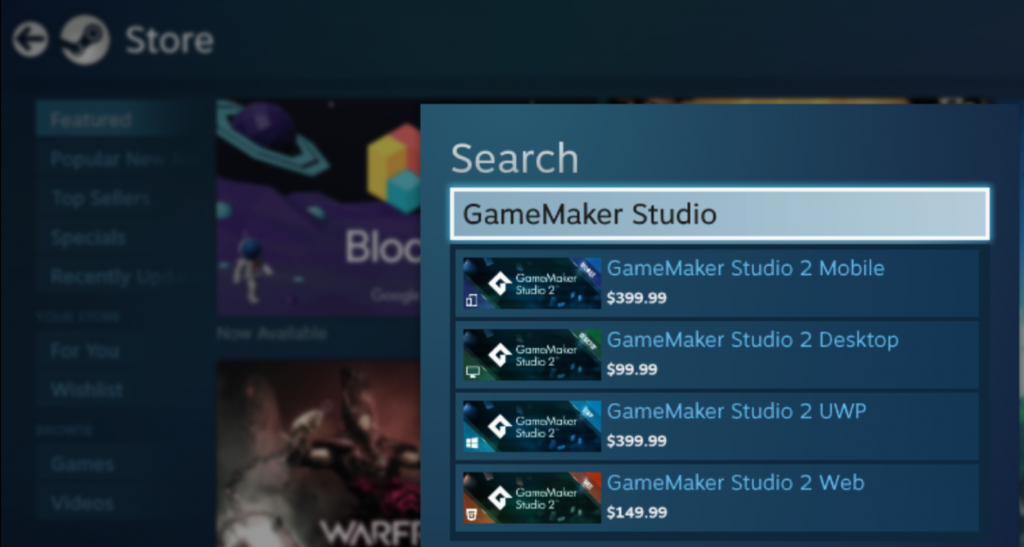
You can either download GameMaker from YoYo Games’s website, or you can install it through Steam. Is there an advantage to getting it through Steam? It depends—the installation process can be easier because it makes sure that you have all the additional DirectX components that you might need installed before getting GMS. Steam also auto-updates the program and simplifies the installation process.
If you decide to download it through YoYoGames.com, click on “GAMEMAKER” at the top in the main menu.
Trial
You’ll be presented the option to “Try for free today,” which takes you to yoyogames.com/get. The Trial includes everything you need to make and test a game. If you want to release & distribute games via Windows and other platforms such as iOS, mobile devices, or consoles, you must purchase an additional license for GMS. You can have infinite sprites, backgrounds, and levels in the free version.
GMS has a few more drawbacks to it than a drag-and-drop engine like Construct2 does. For one thing, it uses its own programming language (GML). For another, you can only export executable files, meaning your players have to download and run .exe files. Thirdly, there is currently no support for Linux in the free version. Even if you do buy a license, you have to pay upwards of a hundred dollars to export to a variety of formats. At the time of this writing, GameMaker Studio can still be used for free, indefinitely. YoYo Games Ltd. says, “The Trial is free to use for as long as you want, but does have some limitations.”
From yoyogames.com/get, click on the green button that says “DOWNLOAD.”
The “DOWNLOAD” button takes you to your YoYo Account Management login page. the first time you use GameMaker Studio 2, you must have an internet connection. After the initial login, you should be able to use the product offline.
Assuming you’ve never had GMS before, you’ll want to create an account. A free GMS license is included in creating an account, so enter your email address in the text fields, check all the boxes, and click Register.
After your account has been created, check your email for an activation link. Click on the link received by email to activate your account, then log in. It’ll ask you to create and confirm a new password. Type in a password you can remember or keep safe.
You may or may not see a page that lists GM’s Terms and Services. If so, read them, scroll to the bottom, and click “I accept these terms.”
After you successfully log in, look for the green button that either says “Download GameMaker: Studio 1.4” or “Download GameMaker Studio 2.”
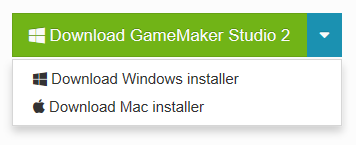
Notice a nice new feature of GameMaker Studio 2: You can download a Mac installer! That’s right, for all you users who develop on laptops (MacBooks included!) YoYo officially launched GameMaker Studio 2 on macOS for the first time in September 2017! However, for the purposes of this tutorial, I will be showing screenshots of downloading the Windows installer.
Clicking “Download Windows installer” will download a “GameMakerStudio-Installer” (with a current version number) .exe executable file to your computer’s Downloads folder. This should only take a minute or two on a good internet connection.
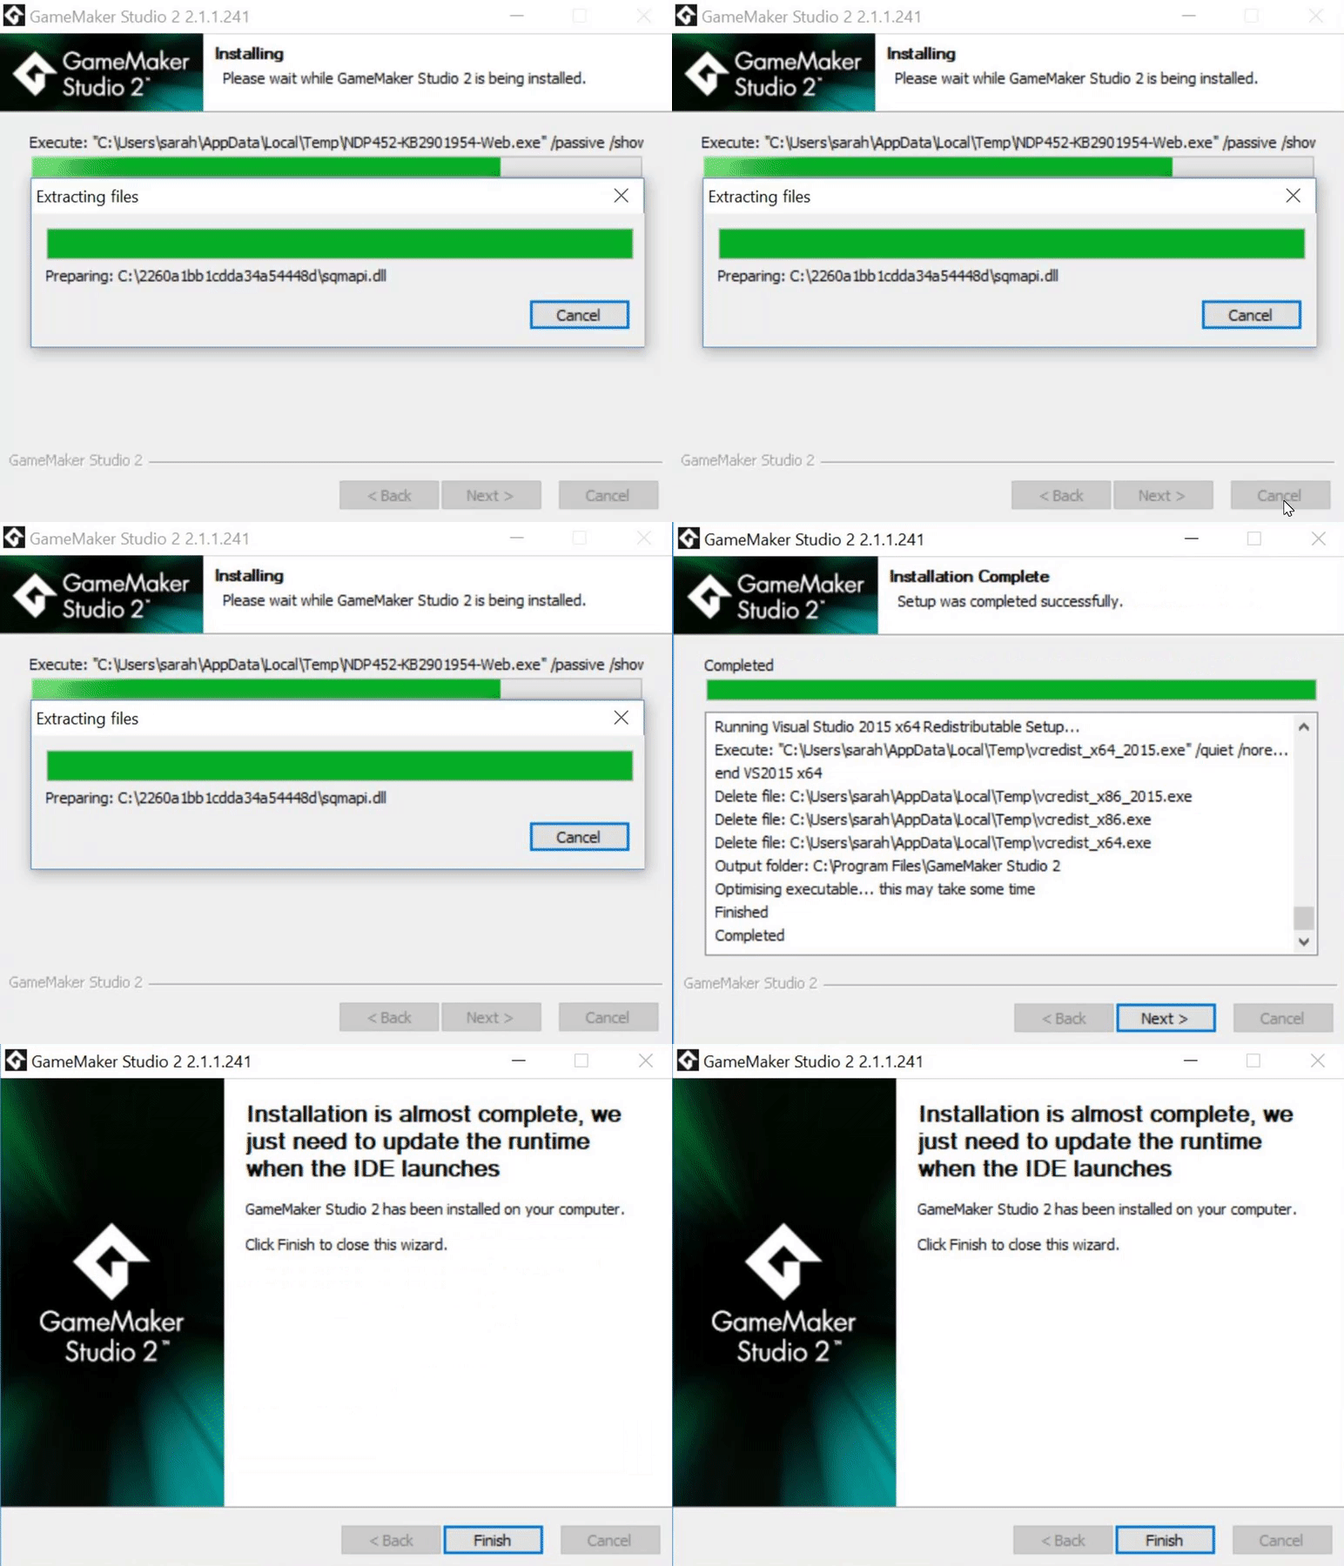
A standard Installer Wizard should pop up and ask for a License Agreement while explaining the legal terms and conditions that apply when you use the YoYoGames Platforms. I highly recommend leaving the “File associations” box checked, since it only applies to specific YoYo Project Files (.yyp) and Compressed Project Files (.yyz).
The boxes that are required are: GameMaker Studio 2, DotNet Install (Microsoft .NET 3.5sp1 and 4.5 Frameworks), Visual C++ Redistributable (Microsoft Visual Studio 2012 and 2015 C++ x64 runtimes), and Optimize Executable (to optimize the executable and add the Global Assembly Cache). Click “Next.”
The setup wizard will install GameMaker Studio 2 in the folder of your choosing. The space required for this IDE is approximately 353.2 MB. On my machine, this finished installing in under a minute.
Congratulations! GameMaker Studio 2 has been installed on your computer! Click Finish to close the wizard. The GameMaker program is living on your computer and it's ready to go!
Login
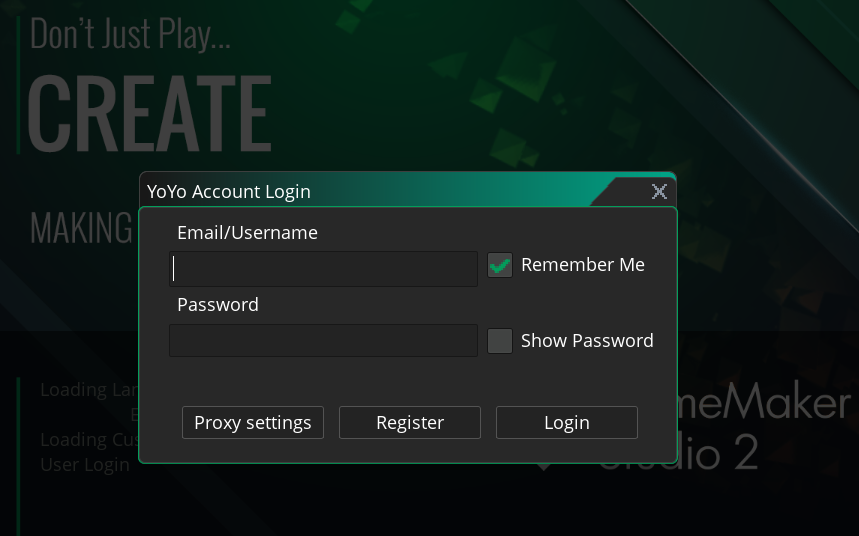
You will be presented with a brand new, black-and-green-themed Login screen. When you first open GameMaker Studio 2, you will be asked to log in to your YoYo Account (or register for one if you haven't already). Your license is tied to a YoYo Account, and you are required to have made one to be able to use GameMaker Studio 2. This account holds all your license details for the YoYo Games products that you own, and is also used for the YoYo Games Marketplace. Enter in the same email address and password you used to create your account to login and install your profile to your new IDE.
Make Games, Not Excuses!
It’s important not to stop here, even though it feels like you’ve already accomplished a lot. You must click on “Tutorials” or “New Project” so that you don’t just stop here.
Oftentimes, when you get to this stage, you’ve downloaded the program, it’s on your computer, and you own it… but you've never really opened up a new project. You just sort of get overwhelmed by all the buttons and dials and gizmos and doodads.
Keep reading to learn about movement controls, sprites, objects, rooms, and more.
Tutorials
Once registered and logged in, the main IDE will open on the Start Page:
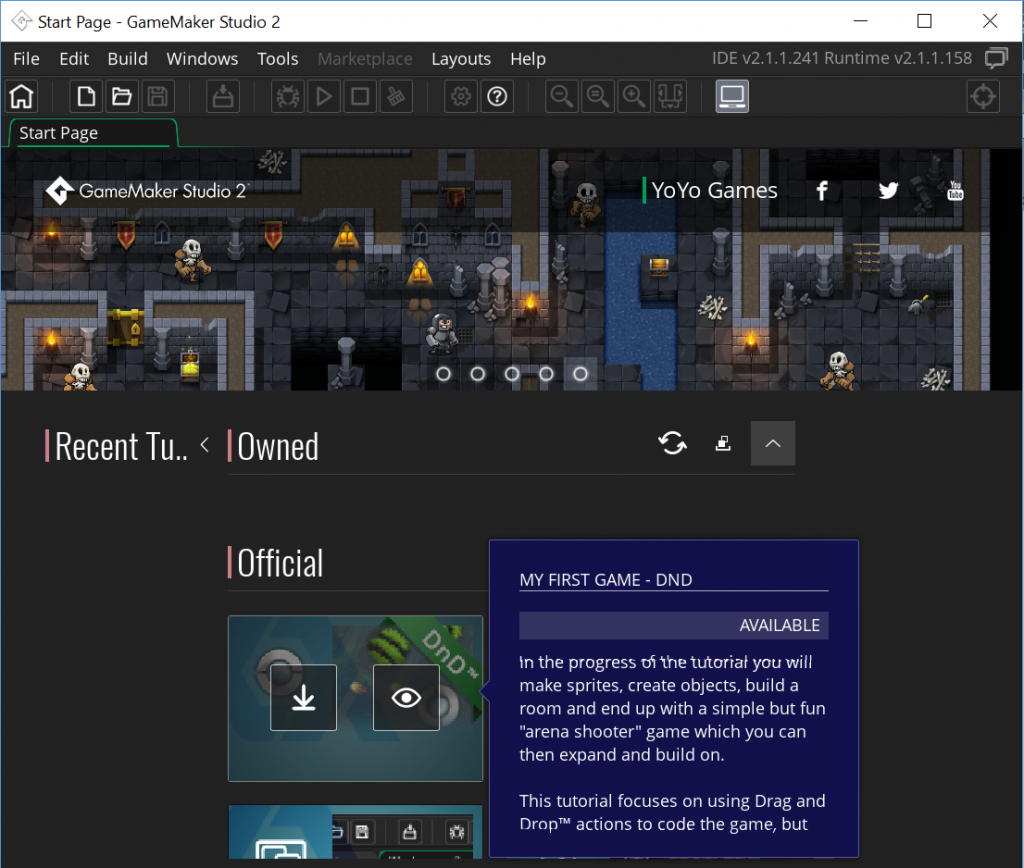
When you click on the Tutorials or Demos buttons, you will be shown the tutorials/demos that you own (none yet), and the official tutorials/demos that are available for downloading. To download, simply click on the icon, and it will be added to your Owned section at the top (you may be required to login to the Marketplace before this can be done). Once the tutorial or demo is in the “Owned” section, you can mouse over it and either install it, or view the information on it from the Marketplace.
For those that are new to programming, or who have never used any game creation tool before, GMS offers an easy-to-use Drag and Drop (DnD) interface of icons that allow you to start creating your own games using visual scripting. Starting up the official tutorial for “My First Game - DnD” will get one of these started for you. (That’s Drag ‘n’ Drop, not Dungeons and Dragons. 😉) This creates a top-down arena shooter game.
If you are a more experienced programmer, then you can use the propriety scripting language GML to create your games, or you can even combine both and call GML functions with (and from) Drag and Drop actions, giving you a great deal of flexibility when it comes to how you write things. Starting up the official tutorial for “My First Game - Code” will start one of these project for you.
Once a tutorial or demo has been installed, click on it to open it. You will be prompted to provide a location to save the tutorial project to before the IDE opens for you to begin. GameMaker Studio provided a default location in my Documents folder.
GMS comes with a complete Image Editor for creating your own sprites and tile-sets that will also import images that you have made in any external editor. Once you have your images, it’s simply a question of assigning them to objects in the Object Editor, adding some code or DnD actions, and then placing instances of these objects into a game room in the Room Editor. There are also additional tools for creating Paths, Timelines, Shaders, and more.
The tutorial “My First Game - DnD” will take you through the process of creating a small top-down shooter game. The tutorial itself is extensive and covers the user interface, game graphics, animation, player interaction within a game, and more. For reference, it is split into the following chapters:
- Chapter 1 - Movement
- Chapter 2 - Shooting
- Chapter 3 - Enemies
- Chapter 4 - Tiles and Views
- Chapter 5 - Scoring
- Chapter 6 - Sounds
- Chapter 7 - Title Screen
- Chapter 8 - Spawners
Each chapter is also accompanied by a short video that takes you through each of the steps. You can close GMS at any time in the progress of the tutorial, and when you next load the project, you will be taken to the place where you left off.
Create a New Project
On the Start Page, the Projects section is where you can create, open, or import projects. You can click New to create a new project, Open to open an existing project, or Import to open a GameMaker: Studio 1.4 GMX project file, or to open a compressed YYZ GameMaker Studio 2 project file. Both Open and Import will open the file explorer for you to browse to the project file you require.
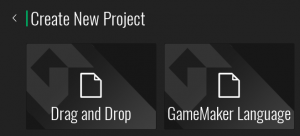
GameMaker is ‘code-optional,’ which means you can start with drag-and-drop (absolutely no code), then move on coding simple movement, then to coding everything in your game. When you create a new project, GMS asks you to choose between “Drop and Drop” and “GameMaker Language.”
The available options are:
- New Drag and Drop Project: This will create a new project in which the Object Editor (and any other editors that permit code) will be set up to use the GameMaker Studio 2 Drag and Drop (DnD) interface. Note that this is not an exclusive DnD interface, and you can switch between DnD and GML code by right-clicking your mouse.
- New GameMaker Language Project: This will create a project where the default programming is done using the GameMaker Language (GML). This is also not an exclusive GML interface, and you can switch between GML code and DnD by right-clicking your mouse.
No matter what you select, you will then be prompted to choose a save location for the project, and then it will be opened in GameMaker Studio 2.
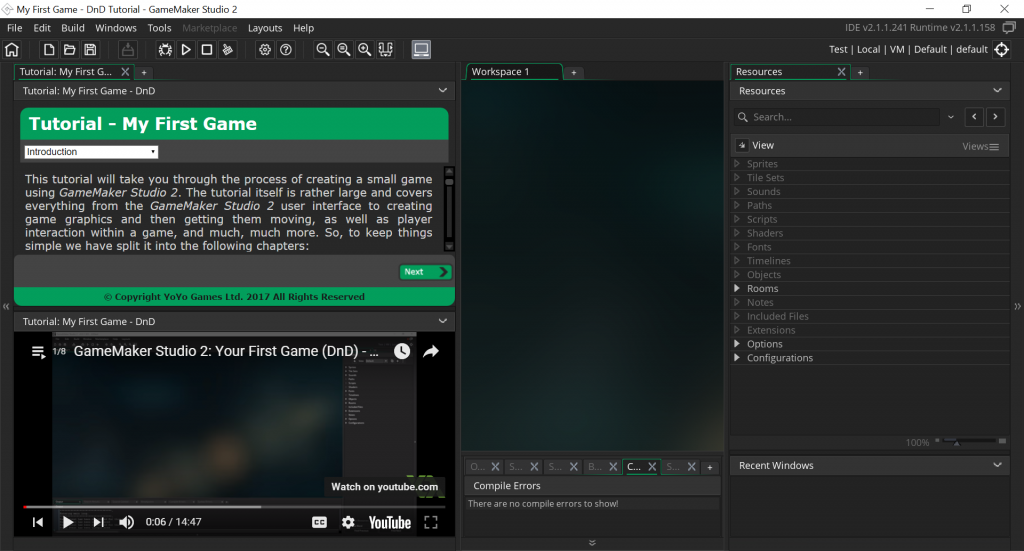
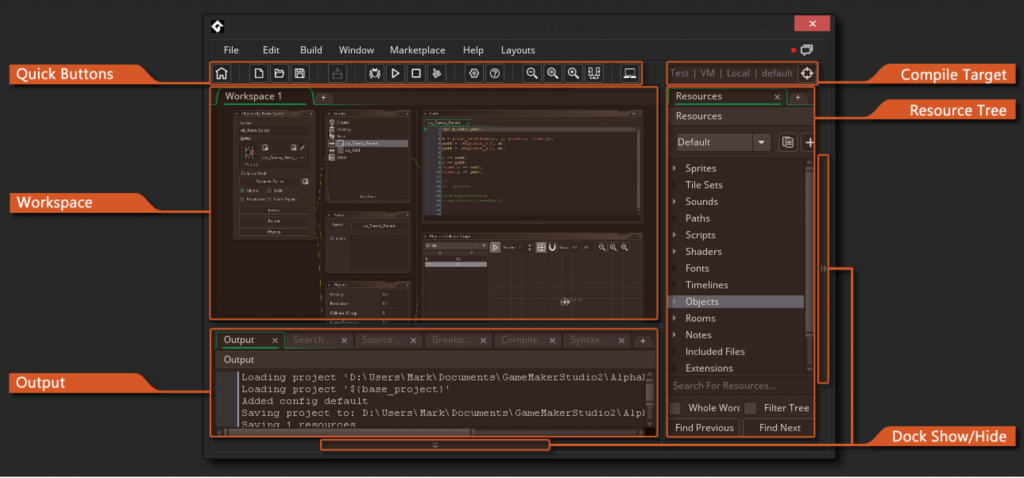
After logging in and starting a new project, GMS will take you to the initial IDE with some basic windows docked to the sides. This is simply an area where you can organize the different resources of your game while you are working:
The workspace is the name of the main area in the middle of the window where you will be doing the bulk of your work. On the right of the workspace, we have the Resource Tree, which lists all the different elements your project can use, like sprites, objects, or rooms.
Sprites
A great way to start learning how to use tools is to pick a classic game to reproduce, like Space Invaders, Pong, Pac Man, or Asteroids. In this quick example, let’s make our own copy of Space Invaders.
Sprites are the first things you’ll need when making any project in GMS. A sprite is an image that represents a game object and can be animated—although it doesn’t have to be—and then drawn to the screen. A sprite will usually be associated with an object, but you can draw sprites on their own. When you create a new project from the Start Page, your resource tree will only contain empty folders.
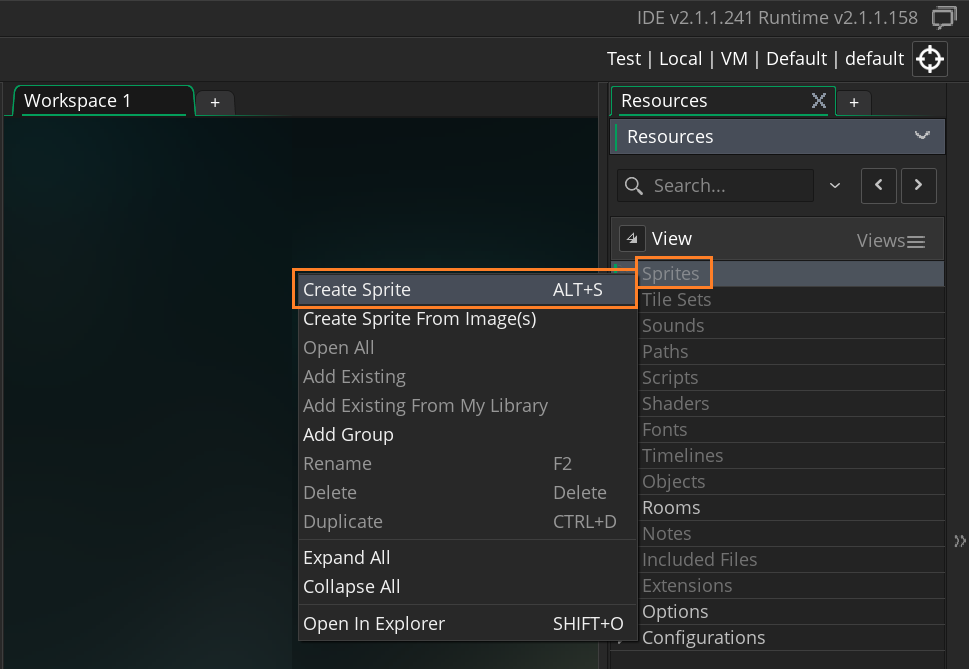
Right-click on the Sprites Resource Folder, and then select the option Create Sprite. This will create a new sprite and open the sprite editor for you. (If the sprite editor does not open, simply double-click on the new resource.)
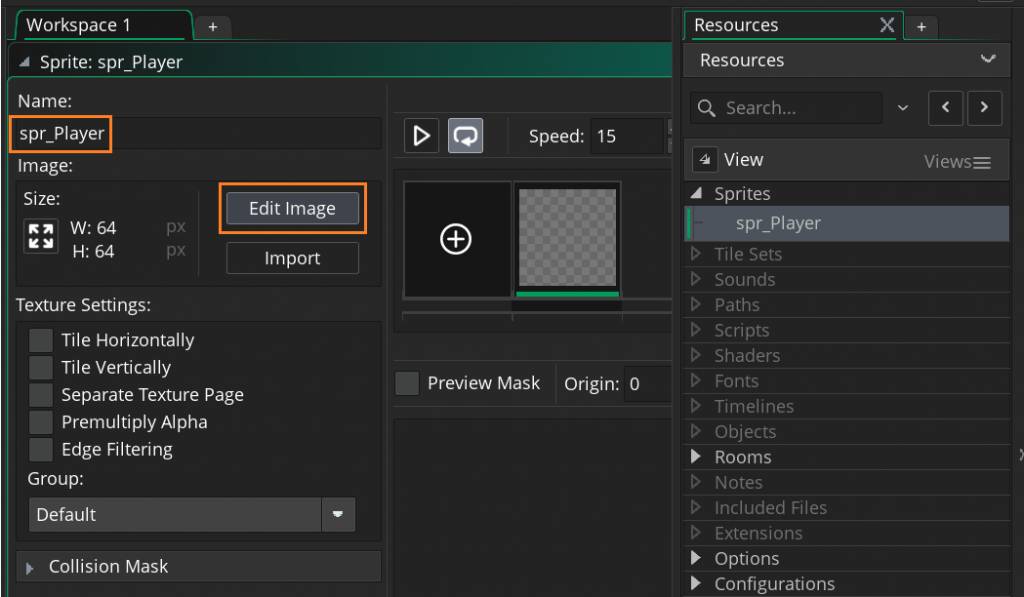
All resources must be given a name, so that GMS can identify them easily. This is just a variable that holds an ID value that “points” to the resource (in this case a sprite). Give a descriptive name so that you can tell at a glance whether a resource is a sprite or an object or something else. (Many people do this by prefixing or suffixing the resource with the letters “spr”—for example, “spr_Player.”) Resource names can only use letters, digits, and the underscore symbol, no spaces. All resources must start with a letter, not a number.
It’s a good idea to start with the protagonist, i.e. the player-controlled object. Once you’ve named it, click Edit Image. 32x32 pixels is a good standard size; in the “Room” interface, the grid in each room also happens to snap to 32x32 pixels, so this makes it easy to snap sprites into a room.
Double-click on the resource you just created to open it. An image editor pops up that you can use to zoom in, color, draw, color-fill, et cetera. Notice a property called “Opacity.” Note: This can sometimes get set to “0” randomly, for no reason. Several people have had this randomly set itself to 0 upon opening. If it’s set to 0, you don’t draw. Nothing comes out of your pen. So your pen “isn’t working,” your mouse is “broken,” and you don’t know why. The trick to fix this little quirk is to set the Opacity back to 255.
When prototyping a new game project quickly, you can just fill in the 32x32 box with a solid color to use as placeholder art. You can always go back and edit this, and GMS will automatically change it throughout your game. So, as you edit your first sprite, spend as much or as little time as you want on the artistic value. The sprite-editor interface is similar to MS Paint, and uses keyboard shortcuts such as Ctrl+Z to Undo.
For some free open source 2D assets, check out OpenGameArt and FreeGameArts. Also try LostGarden, open.commonly.cc, and tigsource. These links are all gathered in one convenient spot at pixelprospector.com/royalty-free-graphics.
I found some free “Bug Blaster” sprites from OpenGameArt.org, thanks to original author Master484, but you can draw your own space invaders if you want.
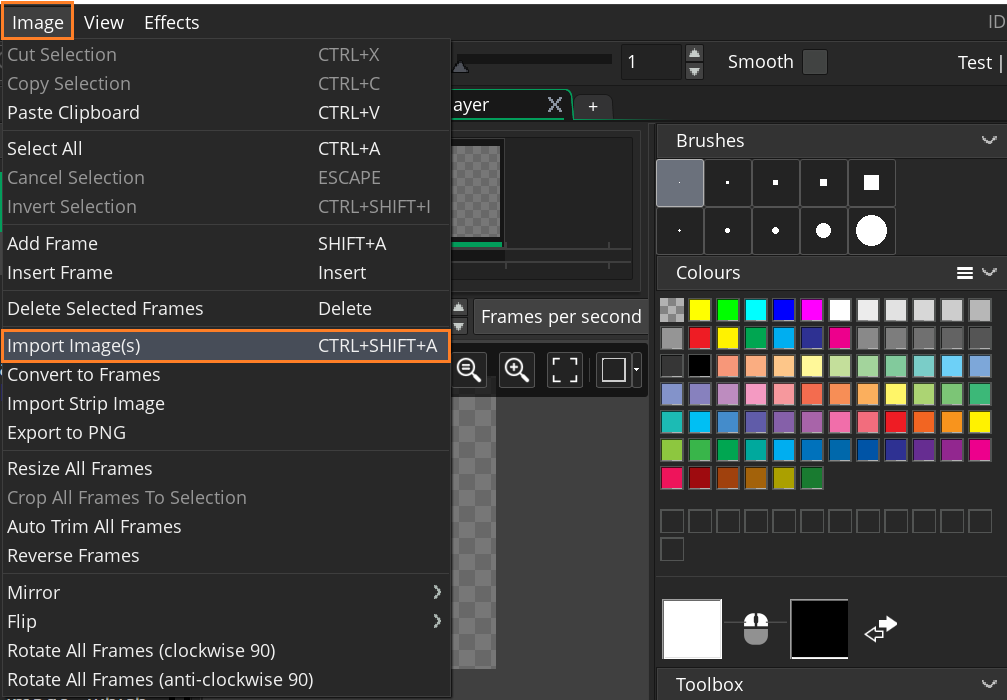
To import a pre-built sprite sheet, you need to click on the Image > Import Image(s) button to open the file explorer where you can browse for an appropriate image, which must be either PNG, GIF, or JPG format.
You’ll get a warning about replacing the existing sprite frames, which is fine, since this is a new sprite and we aren’t going to over-write anything. Click “Yes” to continue. The Sprite Editor will now look like this:
If you import a sprite animation, the top part will show each individual frame and clicking on them would show that frame in the preview window below. Uploading only one image in the sprite would only show that image.
Now that we've added an image, we need to set its origin. The origin is simply a point on the sprite that will be used to position it within our game room, and you can set it by either clicking anywhere on the preview image to set the origin to the mouse position, or using the drop down menu to set a fixed position for it.
After you’re done drawing your protagonist, close the image editor and save the changes you made.
There is also a separate “Save” floppy-disk icon that saves your image externally as a PNG. So if you want to use a different art program, such as Photoshop, and GMS’s sprite-editor isn’t cutting it for you, you can save as a .PNG, open it with Photoshop, then re-import it later and use it exactly the way as something you’d make in the Image Editor.
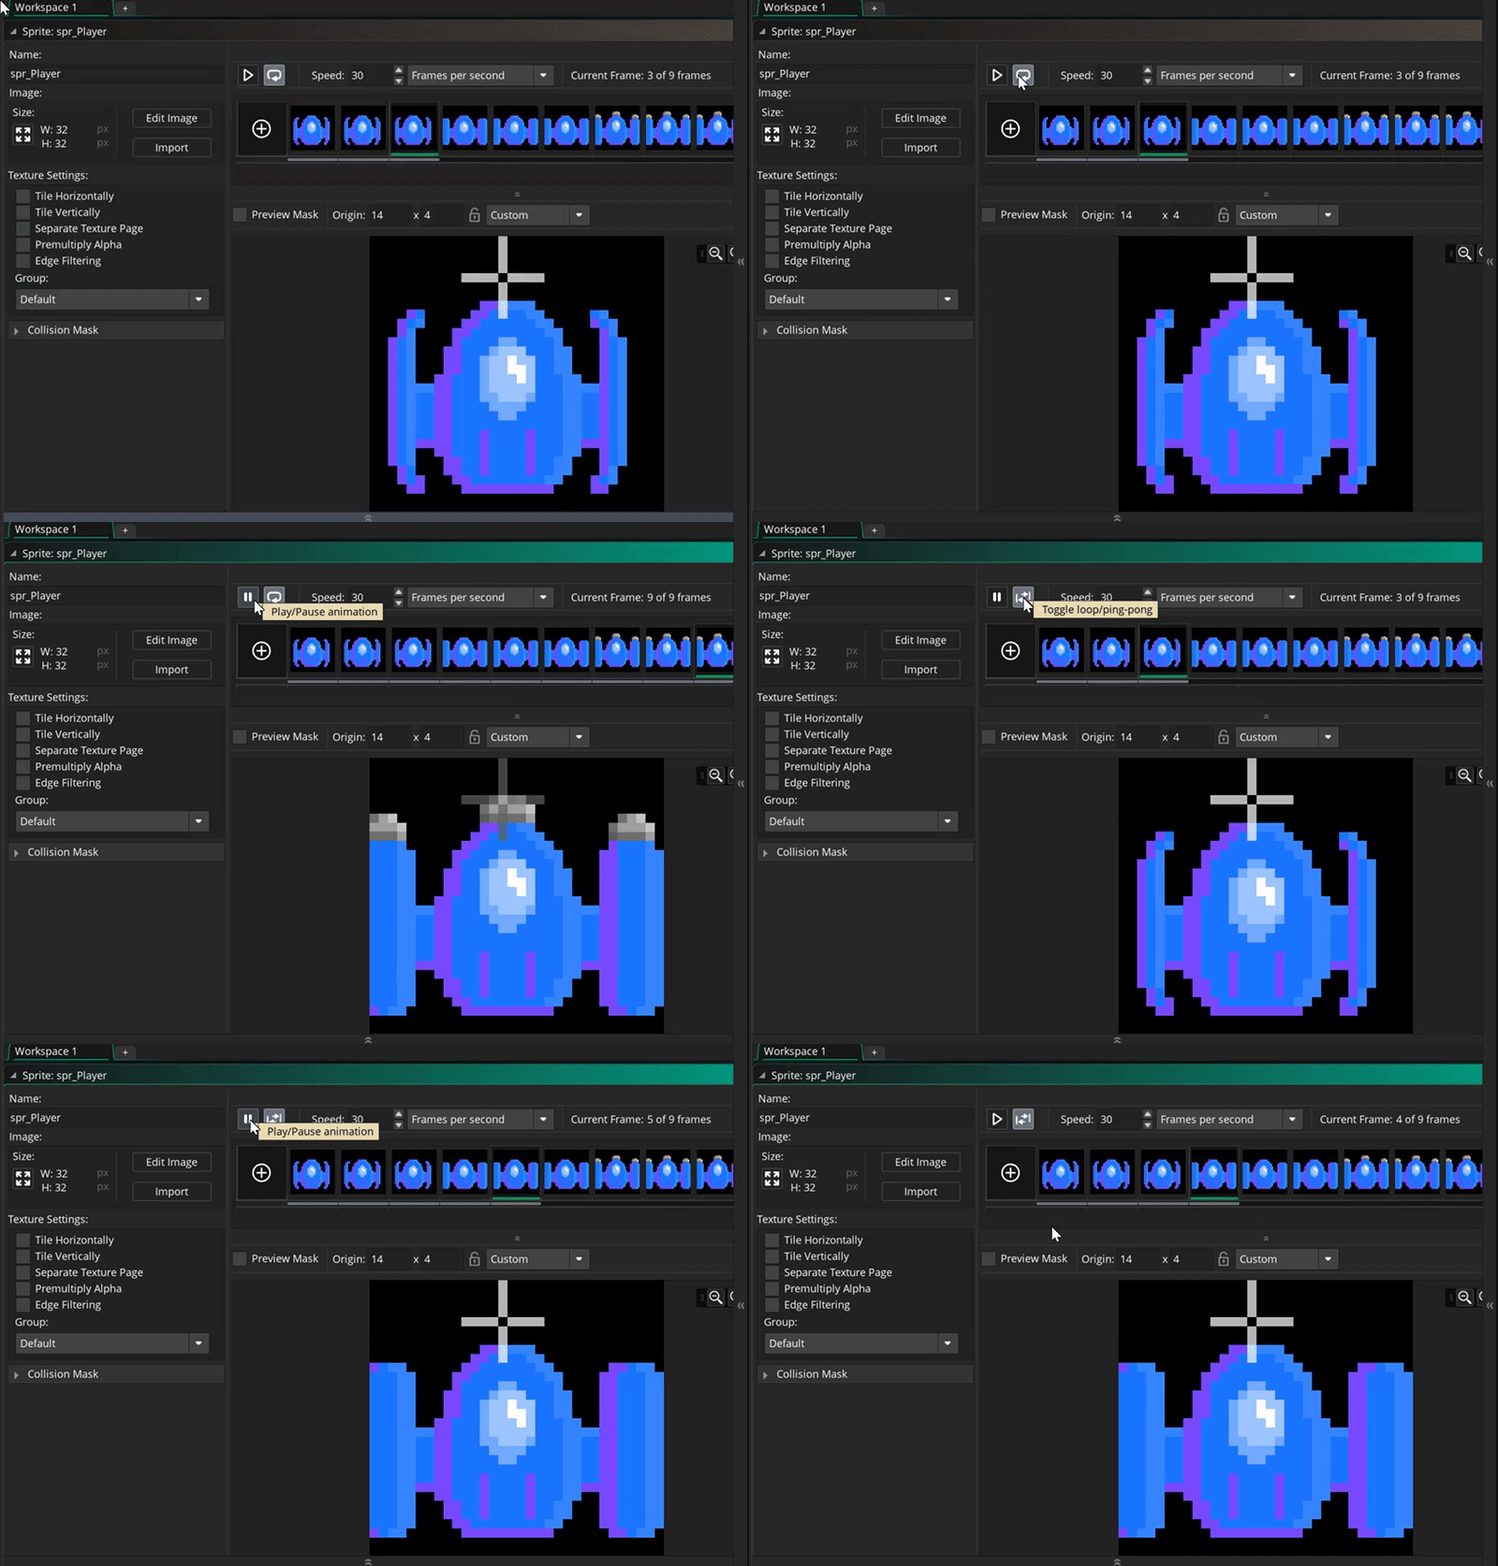
The “Show Preview” button gives you the option to view a sprite’s animation.
Animation
The easiest way to animate a sprite is to duplicate your initial image by clicking “Copy” up at the top, paste it, then double-click on the second image to open it, then use the editor to make a second “frame” in an animation sequence slightly different from the first. Close again when you’re done.
The preview window will show you the animation of your sprite. The changes are shown at a rate of either 15 or 30 frames per second. Changing the rate of frames per second in the editor ONLY changes your view in the preview window. The game itself still runs at 30fps all the time. You must change the speed rate in the ROOM if you actually want it to run differently. The editor does NOT display the speed used in the game, therefore, use it only in the preview window.
You could change the speed of the game in the editor, but that can mess with your gravity and movement speed. Your movement speed is based on a consistent number of pixels “per step,”—so if it’s 5 pixels per step, at 30 frames per second, your character moves 5 pixels every 1/30th of a second. If you change that to 15, it moves 5 pixels every 1/15th of a second, so your entire game moves more slowly. You can’t just change something for one sprite; changes affect the entire game universe.
The best way to create a “slower” animation for one sprite would be to select that first image again, then copy & paste it a few times so that for 2 frames it shows the first image, and then for the subsequent frames, it shows your second image “frame.”
“Image1” and “Image0” would be the same, and “Image2” would the different one you edited. Copying and pasting images places duplicates next to the originals, which can reorder your images. Keep copying and pasting images to act as frames until you are satisfied with the speed of your sprite’s animation. Close to save.
Switching between animation cycles is how you change your sprite from idle to walking, or walking to attacking, and then back to idle based on key presses.
This example animation script needs to run every frame, so is called a Step event.
  //Walking animation
if (speed > 0)
{sprite_index = spr_player_walking;
image_speed = 0.5;}
else
{sprite_index = spr_player;}

 //Shooting animation
sprite_index = spr_player_shooting;
Objects
Moving forward, you could choose to make all of your game’s sprites first, or you could make one sprite at a time, turn it into an Object, put it in the Room, then go back and do the same process again for each. A game like Space Invaders has a protagonist sprite, an enemy sprite, a wall sprite, and a projectile.
Note: Sprites are merely pictures. They have no code or underlying body to give them physical presence. You can’t just put a sprite into a Room. First you have to initialize a sprite as an Object to put it into a Room. 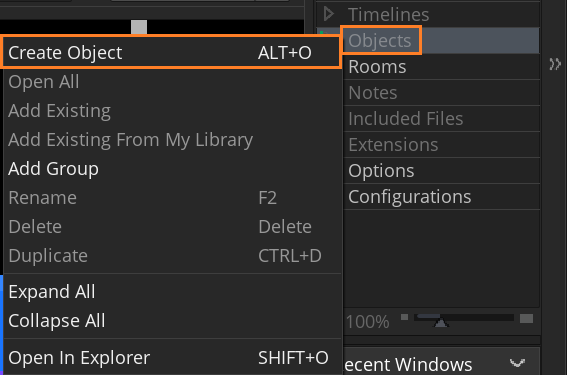
Right-click on “Objects,” and select Create. GameMaker doesn’t let you name things the same name, even if they’re different types, so a sprite and an object cannot share the same name. Another work-around for this issue is naming your sprite’s object as “obj_Player” which references the protagonist object instead of the protagonist sprite. What matters most is the sprite you connect it to. Select it from the list of available sprites by clicking the button labelled “No sprite” and select the sprite "spr_Player" from the list of available resources. Now your sprite will have an Object form.
There is a small list of check-boxes next to properties to examine.
“Collision Mask” you don’t need to change for simple games.
“Visible” is pretty self-explanatory. “Invisible” objects are very useful for adding an invisible object on either side of the screen for an enemy patrol unit to bounce between. (Invisible objects do show up in the game editor, so when you’re looking at your Room, you’ll be able to see them. But when you press “Play,” they won’t show up.)
“Solid” means that other solid things can’t pass through it.
“Persistent” means that it will last, regardless of the level, and it will stay in the same location. (Things like health bars, life counts, and high scores numbers are good things to persist.)
“Uses Physics” is something beginners shouldn’t need to worry about. GMS has built-in physics, but they are hyper-realistic. This can look very strange in a sprite-based game like Super Mario, where Mario jumps 3x his height.
“Parent” is useful if you want a set of objects to have the same functionality. For example, there could be a Room in your game where you have to collect a bunch of pieces, and each piece has different attributes that you have to code differently. So you can make 1 piece the parent, and code to check if there are any of these objects left, and if they’re all gone, the room is complete. “Children” belong to the “Parent.”
Close this when you’re done.
If you haven’t drawn the sprite you want to turn into an object yet, you can click on the New Sprite button to create a new sprite resource and edit it as you wish. Now it will automatically be assigned to the object that you had open when you started to create it. Once you select a resource, you can also click on the “Edit Sprite” or “Edit Image” buttons to edit either the image itself or the sprite resource.
The object editor opens within the same workspace as the sprite editor, and it may push the sprite editor out of the visible space. You can hold down your middle mouse button and move the mouse to pan around the workspace, or you can use Ctrl + Tab to open the workspace switcher and select the editor that you want to see directly.
Events and Code
Re-open our Object by double-clicking on it. Now we get down to the functionality of GameMaker! “Events” are moments in the game loop where things are made to happen based on what you have programmed for them. GMS splits game time into “steps,” with the game speed defining how many of these steps there are per second. A “step” is the loop that runs constantly with all the events being checked and triggered while the game runs. GMS works with cycles of events. From the moment a room is started to the moment it is finished, there is a game loop running. A series of events are run every step, and you can choose to place code or drag-and-drop actions in your instances that respond to these events.
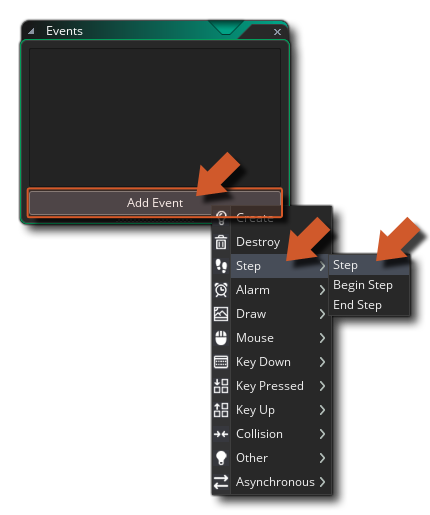
In the Event Editor window chained to our Player object window, click “Add Event” to bring up a whole menu that has a lot of options. It can be kind of overwhelming!
A game in GameMaker Studio 2 is simply a selection of code within events that are performed a number of times every second. This is called the “game loop” and a single game loop is called a game frame. The number of game frames in a second is what gives us our Frames per Second (FPS) value.
You can see all the event categories by clicking on the Add Event button:
In the image above, you will see that we have highlighted the “Step” category.
“Collision Event” is an event that you place in an object and then specify against which other object you should be checking for collisions.
“Create Event” happens when an instance of the object is first created, and is the very first thing that happens when a room is entered. This event is the ideal place to initialize variables, start Timelines, set paths, and do anything else that generally only needs to be done once or only when an instance first appears in the room.
“Destroy Event” is the very last event to be executed when an instance is destroyed. It can be very useful for creating explosions when an enemy is killed, for re-spawning a new instance of the object in another part of the room, or for adding points onto a score.
“Step Event” is an event that is checked every single step of the game while the instance exists. In general, you will use the main Step Event most.
Since we’re making a Space Invaders game, we’ll want to move our protagonist left and right, so we’ll want to use the keyboard’s arrow keys inside of a Step Event.
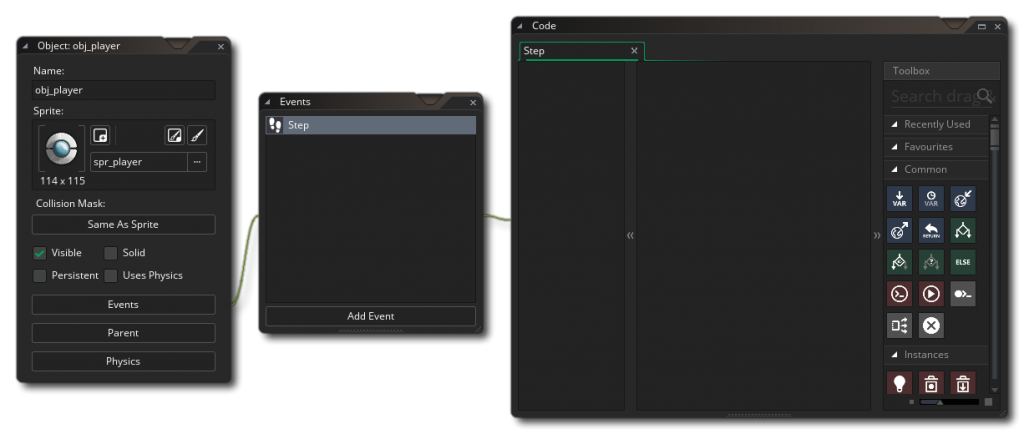
If you select it, you'll see the event added into the Event Editor window and a new window chained to it:
The new window is the Drag and Drop Editor, split into three parts:
- Left: the action list - this gives a list overview of all the actions in the event
- Middle: the action workspace - this is where you drop the actions that you want to perform and edit them
- Right: the action toolbox - Here you can find all the Drag and Drop™ action blocks that you can use to create your games.
You select an action from the action toolbox and drag-and-drop it onto the action workspace. Once in the workspace, you edit the parameters that it requires, then continue to drag and drop further actions to “chain” them to the previous one. Actions are added in a linear fashion, so each subsequent action that you add will be added after the previous one. Let’s see how that works in practice by adding an action.
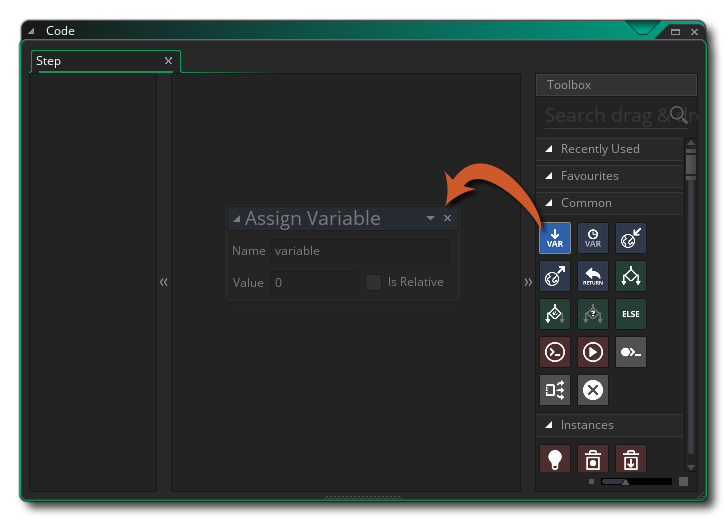
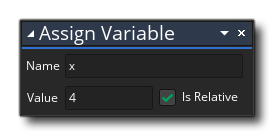
As mentioned above, the Step Event is run each and every game loop, so anything we put in here will happen once per game frame (30 times in a second for a 30 FPS game). In this case, we are going to add an action to the event to make the player instance move right across the screen. We are going to set the built-in variable "x" to move and use the action “Assign Variable”.
We want to set the value of “x” to 4 relative to its previous value, so we set the action to look like this:
Note that now in the list view on the left of the editor, we have the action written as plain text:
What does this do? All instances have some built-in variables, of which “x” and “y” are perhaps the most important, as they set the position of the instance in the game room. In this case we are telling GMS to take the x position value and then add 4 to it. In GMS, the (0, 0) position is considered as the top left hand corner of your room. Horizontal axis is “x” and vertical axis is “y”:
If we hadn’t flagged the “relative” check-box, then we would be setting x to 4 rather than adding to it, and if we’d used -4 instead of 4, then we would have been subtracting 4 from x.
(If you now run the game again, you'll see the player instance move off to the right!)
Left is negative movement on the X axis. (It’s important to check the “Relative” checkbox.) Negative -5 is a pretty standard rate of movement. The higher you make the number, the faster your sprite will appear to move. The lower you make this number, the slower you will move. The “Relative” checkbox means that the movement of your coordinates is relative to your current location, not to the grid of the whole room.
We want to now make the player instance move when the user presses the Arrow Keys on the keyboard. Currently we are adding 4 to the "x" value every game frame, so what we want to do is only add 4 if the keyboard right arrow is being pressed. For that we use the “if key down” action, which will evaluate to either true or false if the given key is being held down. If it evaluates to true, then we will move the instance by 4. The action can be found in the “Mouse and Keyboard” section of the action toolbox and you should drag it into the action workspace above the Assign Variable action:
If you drag it near an existing action, an area will be highlighted, indicating that it can be placed either above or below the action in the chain (in the image above we place it above), and once you drop it you will see that it is connected to the Assign Variable action like this:
That square chain on the left means that the "if" action will be called and then the Assign Variable action, but that they are independent of each other. We want to change this so that the Assign Variable action will only be called if a key is pressed, so now we need to drag it onto the right-hand side of the “if keyboard down” action, like the screenshot below. Now what we have is the “if” checking for a key, and only if it returns true (the key is being held down) will it run the assign variable action. We only need to set the key that is being checked now, so change the "vk_space" value for "vk_right." (The "vk_" variables are special built-in constants that are used to signify different keyboard keys) It should all now look like this:
The conditional we are checking is the value returned by the function "keyboard_check" which returns true if the key (in this case the right arrow) is being held down, and false otherwise. Note that the assign variable action is placed to the right to indicate that it is only being run if the conditional check is true, and that this is also reflected in the action list on the left, where the assign variable entry has been tabbed too.
Run your game again (press the Play arrow button) and this time the player instance should do nothing unless you press the right arrow key.
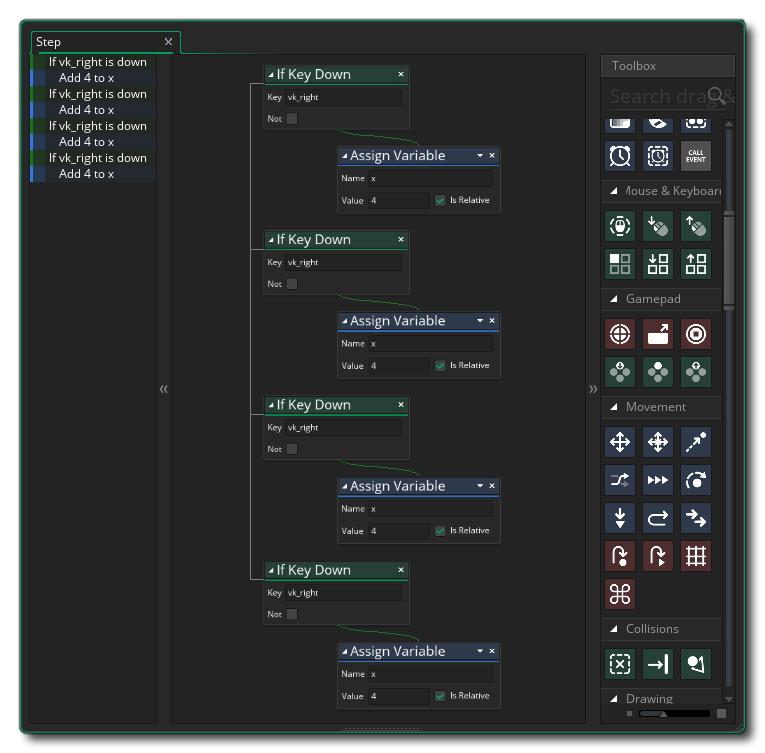
We can expand the current action list now to cover the remaining three directions: up, left and down. You could repeat the whole process and add each action, or you could do what we’ll do now, which is to copy and paste the actions we have and then edit them. To copy multiple actions, first select them by holding down the Ctrl key and then left clicking on each of the actions we want to copy. Now hold down Ctrl again + C to copy them and then Ctrl + V to paste them. They will automatically be pasted after the previous actions, so you can go ahead and do this three times so that we have a total of four “if” checks:
You can now edit the actions so that you have:
- if right arrow key down (vk_right): x + 4
- if left arrow key down (vk_left): x - 4
- if up arrow key down (vk_up): y - 4
- if down arrow key down (vk_down): y + 4
As you can see, we subtract from x to go left this time, and we have also changed the last two conditionals to change the “y” position instead of the x position, where subtracting from “y” moves up, and adding to “y” moves down. Again, the (0, 0) position is considered as the top left-hand corner of your room and the horizontal axis is the x axis and vertical axis is the y axis:
Run the game now and move the instance with the arrow keys.
Now your character moves left and right! The next step is to put it in a Room.
Rooms
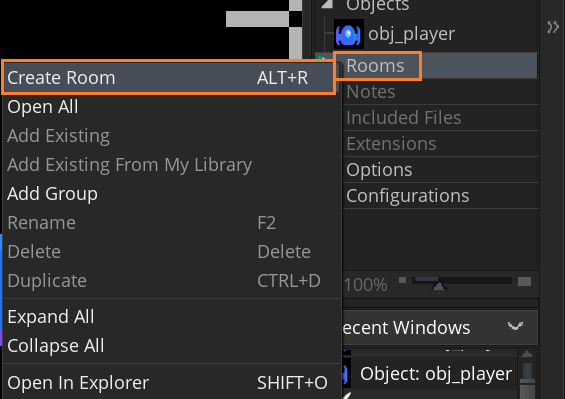
Right-click on the Rooms Resource Folder, and choose Create Room. All games that you make in GMS need at least one room to run.
A room is just a space where you place instances of the objects that make up your game, as well as tiles and any other graphical resources. When you first create a room in your resource tree, you will be presented with a new window with which to edit its properties. This is a grid comprised of 32x32 pixel units, which is the size of your object and sprite.
By default, the room tools will be placed on the left, with three main sections:
- Layer Editor: Everything in a room is placed on layers. Layers are ordered by depth and this depth is what defines the order in which the layer contents will be rendered to the screen when the game runs. “Depth” is on somewhat of a Z-axis that can go up to 1000 and down to -1000. Projectiles should be underneath your protagonist layer, because you’re firing from the origin of your protagonist. You can always come back and edit the depth if you’re playing your game and something seems layered incorrectly.
- Layer Properties: Each layer that you add to the room will have its own properties, and those properties will change depending on the layer type.
- Room Properties: Rooms have a number of properties too, and these can be set here. Things like the room size and the camera view ports that are active can be set here.
We've mentioned that there are different layer types, so let's just go over what they are and how they can be used when building your games:
- Background Layer
- The background layer can be filled with a single color or a single image. It can be moved and positioned within the room, and you can have multiple background layers.
- Instance Layer
- The instance layer is where you place all the instances of the objects that you require for the game.
- Tilemap Layer
- Add tiles from any of the tile set resources you’ve created. This will be set up automatically to use a grid the size of the tile set cells. You can only add a single tile to each grid cell, so if you require multiple tiles to occupy the same space, then you should be using multiple tilemap layers.
- Path Layer
- The path layer is the only one that does not actually get rendered when you run your game. This is more of a “convenience” layer for helping you to create or edit Path resources, since it permits you to add or edit paths within the actual room space.
- Asset Layer
- The asset layer simply takes a sprite resource and draws it using the parameters that you set when you add it into the room. Sprites can be added to this layer by clicking on the sprite in the resource tree and then dragging it into the room editor workspace.
If you have your protagonist selected under the Objects tab when you go into your first Room, GMS will interpret that as, “wherever you click, that’s where you want your protagonist to be.” (You can click multiple times around the room to create multiple objects, as well as clicking multiple times in one spot to create a “stack” of objects layered on top of one another.) Right-click to delete if you made a mistake.
You can drag an instance of the object "obj_player" into the room by clicking on the object in the resource tree and dragging it into the room where you want it to appear.
Once they’re in there, you can move them around by clicking and holding, which is nice if you put something in the wrong spot. One thing you should avoid doing is scaling within the room, because it messes with the boundaries of the objects. GMS lets you stretch things from the corners, but that messes with the boundaries and it doesn’t interact with the room the same way as it would if it were actually sized correctly. Go back into your sprite-editor and make your sprite the size you want. Once your protagonist object is in your room, click OK.
You can delete “room0” as long as you have another room to replace it. If you want to add more sprites to your game, remember to right-click the Sprites folder to create new ones, name it using the convention “spr_block,” then right-click the Objects folder to associate your sprites with new tangible objects, using the “obj_block” naming convention as well, then drag and drop those objects into your game’s room. Click Play to run your game and see your progress so far!
Tile Sets
Tile Sets are optional features created from sprites, but are classified as separate resources, since the way that GMS handles them is a bit different from both sprites and objects. A tile is simply a graphical resource that gets drawn to the screen with very little CPU/GPU overhead, making them ideal for designing any static items in levels. A tile set is a collection of tiles created together in one sprite. Tiles can only be rectangular or square.
To start making a tile set for walls or floors in a top-down game, we would need to have a tile set image made in the sprite editor. The very first tile is blank in that image. The way that the tilemap for the room is stored in GMS means that tile (0) will always need to be blank, as it’s essentially the “delete” tile or the “empty space” tile. So, when creating your maps, the top left corner tile will always need to be empty in this way.
With a sprite created, you can define the tile set by first creating a new tile set resource. To do this, right-click the Tile Sets resource folder and select Create Tile Set. This opens the Tile Set Editor, where you can add the sprite and set its properties. Set the tile set size to 32px, and leave the rest of the values at their default. You can now close the tile set editor, as you can use the tile set “as is” to create tilemap layers in the room editor.
Creating Sounds
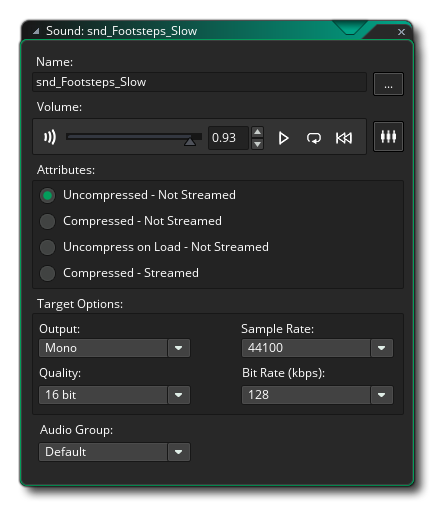
Adding sound effects and background music can be done through the Sound Editor, which is opened whenever you create a new Sound Resource.
Sounds can be compressed or uncompressed. You’ll usually want small sound effects to be WAV, and larger effects or music to be MP3 or OGG. (Again, it is recommended that you name your sounds using an appropriate prefix like “snd_” so you can easily identify it later.)
Adding a sound is as simple as clicking the add sound ellipsis button (…) and then browsing in the file explorer that opens to the file you want to use. Once you have selected one and loaded it in, you can then preview it using the playback controls, as well as change certain attributes for how the file should be exported. Sounds take up a lot of space on disk, so you should be careful when creating them for your game projects.
For some open source sounds, check FreeSound, pdsounds, and Flashkit. For a web-based soundboard that will let you export stuff to WAV files, go to bfxr.net.
For open source music, check Free Music Archive, Open Music Archive, and Incompetech. For chiptune music, check out the archive of 8-Bit Collective here.
One of the best tools for editing any kind of audio is Audacity. If you need some tutorials for using it, check here. Additionally, Fmod is a piece of software specifically geared to creating audio for games, even integrating with some game creation engines like Unity. Check out some tutorials here.
You can close the sound editor once you’re done.
Compiling
If you would like to test out your controls at this point, you may click the Arrow “Play” button.
This will compile your project, and will also be where any errors pop up. Compiling your game can mean one of two things: compiling it for testing, or compiling it to create an asset package for a specific target platform.
Testing your game can be done by simply pressing the Play button at the top of the IDE, which will launch the game for testing using the specified target. You can also run the game in Debug Mode by testing using the Debug button. By default, GMS will run and debug using the built in virtual machine, which is basically the same as running on the desktop OS being used.
At this point, the left and right arrow keys keys should move your character left and right in your room. …You might notice you can run off your screen for forever, and there is nothing to stop you! When programming a game, it can be very easy to make mistakes. These mistakes are not always detected by the syntax checker, which means that these mistakes will only become apparent when you actually run or compile your game.
Let’s add some game room boundaries.
To add some boundaries to stop your protagonist from running off the screen, right-click on the word Sprite, “Create Sprite,” name it spr_Border or something similar, then choose the size of your outside border by clicking the “Resize Sprite” button. In the case of Space Invaders, we don’t want any of the characters to ever go off the screen to the left, right, or bottom, so these borders should be solid and persistent. A border size of Width: 32, Height: 320 should be OK for the left and right walls, depending on the canvas size of your room, and Width: 320, Height: 32 should work for the top. You could set the Visibility to false to make these borders invisible, too, but for debugging purposes you can leave it visible.
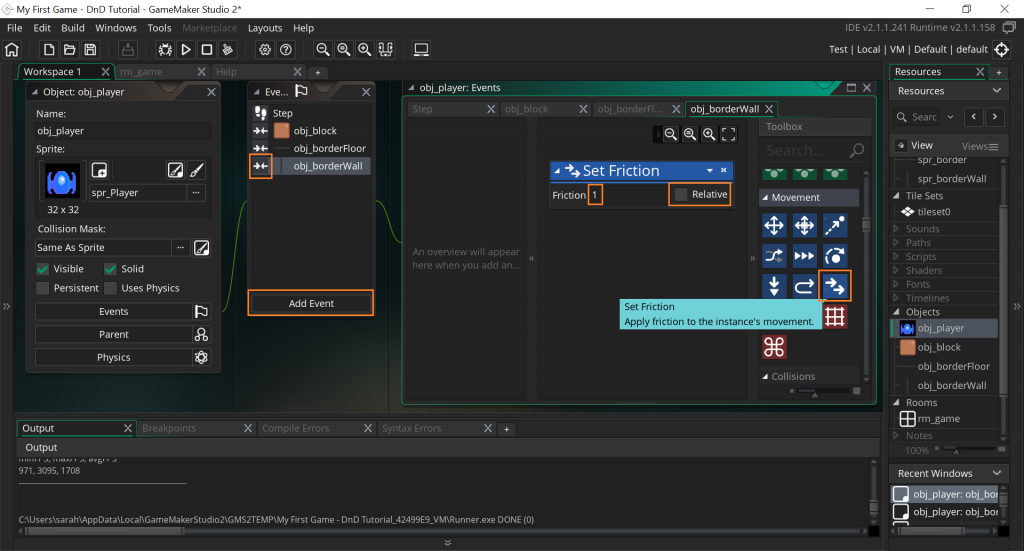
Don’t forget to right-click the Objects folder and create a new object for each sprite you want to put into your game room! Select your obj_Player character and “Add Event” to make player stop when they collide with solid objects—a “Collision” event. The screen should look similar to this:
Next, inside the Event Editor, scroll down through the Toolbox on the right to the “Movement” section. Here you will find an action to “Set Friction.” This action is used to set the “friction” for the instance. Friction simply means that a specific amount will be deducted from the speed vector each game frame, where you specify the amount to deduct, with a number between 1 and 0. Usually smaller values work best, like 0.2, but the actual amount will depend on the setup of your project. Setting the friction from 0 to 1, for example, will stop a moving object in its tracks. Leave the Relative box unchecked here. If you set the relative flag, then the amount given will be added to the current friction value, instead of setting it.
Now when you run your game, if you have set up solid blocks, walls, and a floor, your player object should not be able to pass through these new elements you have added, but should still be able to maneuver around them. Excellent progress for our Space Invaders game!
Your First Game
To dive deeper into learning more about enemy movement, shooting projectiles, spawning, tiles and views, keeping score, sounds, and creating a title screen, please check out the official tutorial for “My First Game - DnD” available inside GameMaker’s start screen, or the YoYo Games YouTube video tutorials found at youtube.com/user/yoyogamesltd/videos. If the game that you’re thinking of building falls into a similar genre, it’s really nice to not have to start completely from scratch.
Conclusion
The goal of this blog post is to pass on technical knowledge and to make games development easier for beginners new to the world of programming. I hope that I’ve done a good job of Demystifying GameMaker Studio!
If you have any requests for other game engines, or wish to share tips and tricks of your own, hit me up on Twitter at @Saelia. Thanks for reading, and keep on building!!
Comments
- Anonymous
November 05, 2017
GameMaker Studio 2 is not free and you can't even get GameMaker Studio for free anymore so you should really change that so people don't get the wrong idea.- Anonymous
November 09, 2017
I certainly was confused about that same issue when I was writing this blog post! After some digging, the official word I found from GameMaker Studio was that the TRIAL version is free, and will be free indefinitely, but it has some limitations. I accepted those limitations and installed the trial, and I was able to do so completely free. That's how I was able to take so many screenshots and gifs! I was using GameMaker Studio 2 while I wrote this blog, and I did not at any point have to pay for it. I worked with developers at a Game Jam who followed this blog post tutorial too, and they were able to use it without paying for it.
- Anonymous
