Git- Introduction and Basic Commands
If you are a programmer of any type, you are probably either familiar with Git or at the very least have heard of it. I have heard of Git for a long time, but just recently have taken the time to begin to truly understand what it is and how to leverage it. For that reason, I figured I would document everything I learn about Git as I learn it. This way, not only do I have a way to share and help others through the same learning curve, but I also have a resource to go back to when I forget :) If you would rather follow this intro in video form, you can use this YouTube video.
So first off, we have to answer the most basic question, “What is Git”. According to its website, “Git is a free and open source distributed version control system designed to handle everything from small to very large projects with speed and efficiency.” The idea of Git is centered around version control. If you aren’t familiar with version control, let me try to describe it with an example. Say you start working on a project. You create it, work on it for a while, and then save and close it. The next day you come back, make more changes, and then save and close again. Then, on the third day, you open up the project, and you realize in the previous day that some of the changes you made really messed “something” up. I put “something” here in quotes because it could really be anything. Nonetheless, you realized that you have a problem. Since you saved and closed your work previously, you can’t just start undoing everything you did the previous day.
How do you solve this problem? You could spend a ton of time debugging trying to figure out where you went wrong, but what if you could magically just go back to the day before last when you know everything was working ok. That is the beauty of source control. It can keep track of every change you make, and provide you with snapshots of your work that you can go back to. In our example, if you had been using source control, you could just go back to day 1 and continue from there. Keep in mind that Git only keeps track of these changes when you tell it to, but before we get into how Git works, let’s go ahead and download it!
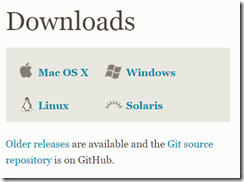
You can download Git here. Once you get to this site, you will have four download options for Linux, Mac, Windows, and Solaris.
Choose whichever fits your OS, but for me, I am going to choose Windows. The download and installation process is pretty straight forward. One thing to note during the set up though is that you will be asked the following, “How would you like to use Git from the command line”. I choose to “Use Git from the Windows Command Prompt”, so that I can just use the Command Prompt in Windows. This works well for me, but again, this will be based on preference.
Once you have finished the installation, take a second to double check that the installation went through okay. To do this, open up your command (Press Windows Key then type “Command Prompt”) and type the command “git”. If the install went smoothly you should see this.
Now that we have ensured a successful installation, let’s talk about the basics of how Git works. The first step is to initialize a folder as a Git Repository. This will allow anything within that folder to be tracked by Git. To do this, go ahead and create a folder somewhere. I am going to create one on my desktop called GitTest. After you have created the folder, navigate to that folder inside of the command prompt, and give the “git init” command which will initialize that folder as a Git Repository.
Now, if you look inside that folder you should see a .Git subfolder. This is one way we can verify that the init command worked.
Now that we have our Git repository, we need to create a file here to be able to track changes. You can right click inside of your folder and choose New->Text Document and call it “Test”. The general cycle of using Git is that you create and edit files, then add them to be committed, and then commit them. The commit part is where we actually tell Git to keep track of the changes we made in our project since the last commit. So, let’s take a look.
At any point, from the command prompt we can check the status of our Git repository to see whether or not there have been any changes that need to be committed. Since we just added a new file if we check the status, we should see a message like below saying that we have created a file but it has not yet been added or committed.
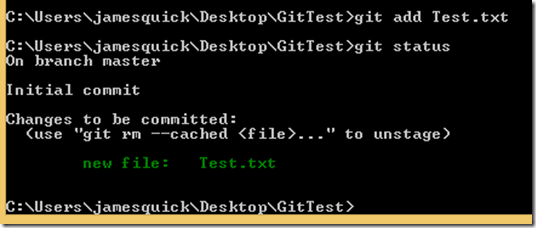
So based on our cycle (create/edit->Add->Commit), the next step if to add this file to be committed. To do this, we can use the Add command adding on the file that we want to add. Your command will look like below. Notice that after executing the Add command, I rechecked the status and it shows now that we have one file that has been added and is waiting to be committed.
So, the final step here would be to commit our files, telling Git to take a snapshot of them as they are right now. To execute the Commit command, you need to include a description about your commit. This one will be really simple for me and will just say “Second commit”. In general be descriptive as possible when doing this for your own sake. To tack on this message the command will look like this.
Again, I will check the status of the folder after executing this command. In the status, it shows that I have nothing to commit and that my working directory is clean! Perfect!
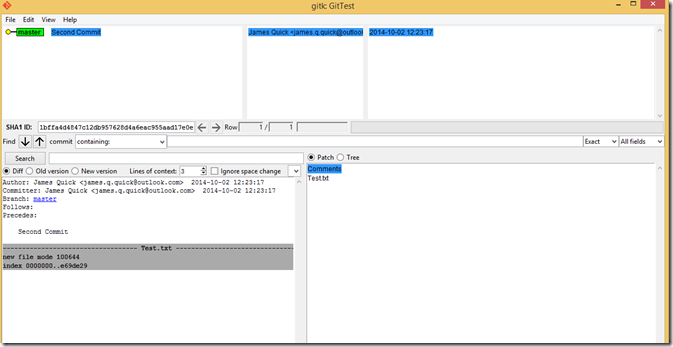
Following this cycle of create/edit, add, and commit, is the basic idea behind using Git. Keep this cycle in mind when you develop and it will save you tons of time. There is one additional command I want to mention also. That is the Gitk command which opens up the Git graphical user interface (GUI).
This gives you a more visual way to go through your previous commits and see changes that you have made. This is useful if you are not very comfortable with the Command Prompt.
That covers the introduction and basics of Git. If you would rather, here is a link to the YouTube video that covers the same subject. Additionally, check out Part 2 where we cover Git integration with Visual Studio 2013. As always if you have any questions, comments, or concerns, please comment below or find me on twitter @jquickwit.
Comments
- Anonymous
October 05, 2014
Thanks fot he guide!


