How to build a cloud business app with SAP data
Visual Studio 2013 introduced a new project template for Office 365 Cloud Business App to enable developers to build modern business applications that can integrate with and extend the Office 365 platform experience quickly. The Cloud Business App template provides a rich set of tools and features that make it easy to work with data and leverage services such as identity and social to provide mobile-first experiences for Office 365.
For the Office Developer Tools – March 2014 Update, we’ve added several new features to Cloud Business Apps (CBAs) that enhance the experience for connecting to enterprise data sources. With a CBA, you can now create a line of business app that:
- Connects to SAP as a first-class data source.
- Allows you to easily integrate custom data with SAP data.
Overview
SAP provides a tool called SAP NetWeaver Gateway that enables the ability to expose SAP application data as an OData service. This OData service can then be used by a CBA to create custom line of business apps. SAP has several sample gateway services you can use for testing and app building. For our example, we will use the SAP Enterprise Procurement Model (EPM) service. Read the SAP documentation to learn how to access to the EPM service and other sample services from SAP. Be aware that these sample services are read-only; however, NetWeaver Gateway does support read-write services.
Our SAP CBA app will be based on a fictional company that sells computers and accessories. This company has several locations worldwide, including a distribution branch that we will be building a line of business app for, named Contoso Shipping Management. Specifically, our app will help the branch manager of Contoso Shipping Management with their daily tasks. The branch manager routinely views product information in the system and adds supplemental production information that is specific to their branch (such as the item location and whether items are out of stock).
Define the data model
Begin by creating a CBA app; in Visual Studio. Choose the Cloud Business App project template under the Office/SharePoint>Apps node.
Attach to SAP Data Source
When you have created the app, attach it to the SAP service.
- In the Server Explorer, under the Server project, choose the Data Sources>Add Data Source.
- In the Attach Data Source Wizard, notice the option to select SAP as a data source; after selecting it, choose Next.

Figure 1. Select SAP in the Attach Data Source Wizard - On the Enter Connection Information page, enter the URL to SAP EPM service along with the credentials that you received after signing up for access to their test feeds; choose Next.
Although, it is possible to select None for the authentication type, typically SAP feeds are configured to require authentication (CBA apps currently support connecting to SAP using basic authentication). For more information, see the Authentication section listed at the end of this post.
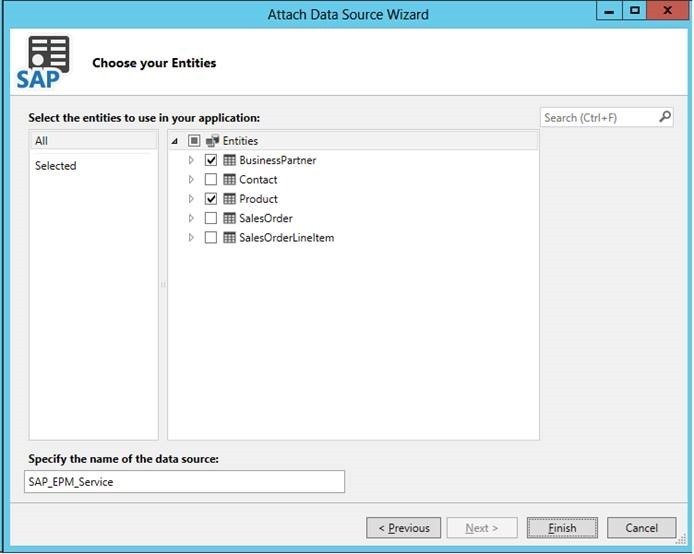
Figure 2. Enter connection information in the Attach Data Source Wizard - On the Choose your Entities page, select the BusinessPartner and Product entities and rename the data source to SAP_EPM_Service; choose Finish.

Figure 3. Select the BusinessPartner and Product entities in the Attach Data Source Wizard
As a result, you will now see the SAP_EPM_Service added as a data source to your Server project including the BusinessPartner and Product entities that you selected.

Figure 4. Entity Designer showing the Product entity
You can use the ctrl + up arrow\down arrow keys to change the order of the properties. It is useful to define the desired order on the entity, so that later when screens are created, the fields on the screen will automatically be added in the same order. For example, you may change the order of the properties so that ProductId, Name, ProductURL, and Description appear first.
One feature of an SAP data source within a CBA is the recognition of certain SAP-specific annotations that can adorn entity properties within the service. Specifically, the annotations that will be recognized by a CBA are those that have the sap:semantics value set to “email”, “tel”, or “url”. The BusinessPartner entity that was selected in the Attach Data Source Wizard happens to have properties that demonstrate all three of these annotations. You can view the semantic annotations by viewing the $metadata from the SAP feed.
https://sapes1.sapdevcenter.com/sap/opu/odata/sap/ZGWSAMPLE_SRV/$metadata

Viewing the BusinessPartner entity in the Entity Designer, observe that the EmailAddress, PhoneNumber, and WebAddress fields have their respective types set to the Email Address, Phone Number, and Web Address business types.

Figure 5. Properties on the BusinessPartner entity have been set to the appropriate business type
Extend the Product Entity Properties
For our line of business app, we need to track some additional product information that is specific to our branch, Contoso Shipping Management. With a CBA, we can easily extend any entity properties by relating data from the internal database of the app with data from an external data source. Furthermore, CBAs support relating data between external data sources, such as SharePoint\Office 365 and SAP.
Add a Relationship
In our example, we would like to track two additional pieces of product information: the item location and whether a product is out of stock. First, we need to add an entity to the internal database of our app that will be used to store this additional information. Second, we will relate this entity to the Product entity (that exists in the SAP data source) using a one-to-one or zero-to-one relationship.
- To add an entity in the internal database, choose the Data Sources node in the Solution Explorer and select Add Table.
- Rename the table to ProductDetail and add the following properties: OutOfStock and BackroomLocation. Clear the Required check box for these properties.

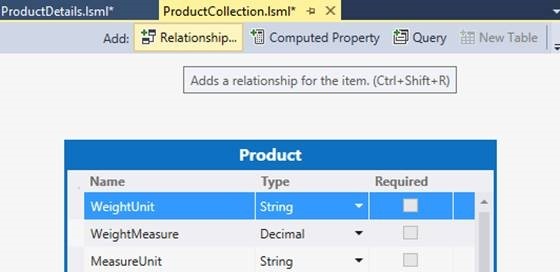
Figure 6. The ProductDetail entity - Add a relationship between Product and ProductDetail. To do this, open Product in the entity designer and choose the Add: Relationship button.

Figure 7. Adding a relationship - In the Add New Relationship dialog box, add a relationship so that each Product can have one ProductDetail (and a ProductDetail must have a Product). Choose OK to close the dialog box.

Figure 8. Configuring the relationship
Create the client screens
Now that the data model is defined, add some screens to the app. While working with the screens, remember that the sample SAP service that we are using is read-only. As a result, the only data that we can edit is the ProductDetail entity because it is stored in the internal database of the app. If instead we were using a read-write SAP service, we would be able to edit all of the information on these screens and automatically save the data back to SAP.
Create the Common Screen Set
Choose Screens node in the Solution Explorer and select Add Screen.
In the Add New Screen dialog box, select the Common Screen Set template and set the Screen Data to SAP_EPM_Service.ProductCollection. Finally, choose OK to close the dialog box.

Figure 9. Adding a new Common Screen SetAs a result, you will now see a ProductCollection folder created in the SolutionExplorer that contains three screens: AddEditProduct, BrowseProductCollection, and ViewProduct.
Since we defined a one-to-one or zero-to-one relationship between Product and ProductDetail, we need to add code that automatically creates a new ProductDetail entity when the AddEditProduct screen is opened. Choose the AddEditProduct screen from the Solution Explorer, choose the Write Code drop-down in the Screen Designer toolbar and choose created.

Figure 10. Writing "created" code on the AddEditProduct screenTo create a ProductDetail instance for this Product instance, use the following code.
 myapp.AddEditProduct.created = function (screen) {
  if (!screen.Product.ProductDetail) {
    var productDetail =
      myapp.activeDataWorkspace.ApplicationData.ProductDetails.addNew();
    productDetail.Product = screen.Product;
  }
};
Now when the AddEditProduct screen is opened, a related ProductDetail is created, if one does not already exist.
To make the fields that were added from the ProductDetail entity more prevalent on the screen, move the Out of Stock and Backroom Location controls to the top of the right Rows Layout group on this screen. Do the same on the ViewProduct screen as well. Notice that you can also change other appearance properties on controls, such as the font. There are many other properties that you can set on the screen designer to customize the screens.
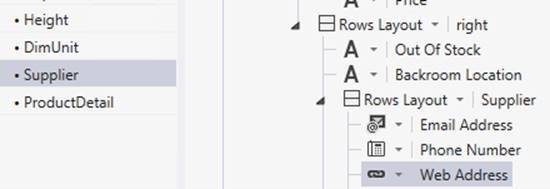
Also on the ViewProduct screen, drag out the Supplier field under our ProductDetail controls to show data from the BusinessPartner entity. This will create a group called Supplier (with properties from the related BusinessPartner entity). For this example, remove all the fields from this group except Email Address, Phone Number, and Web Address. Notice that these controls appear respectively as an Email Viewer, Phone Viewer, and Web Address Viewer (due to the annotations feature described earlier).

Figure 11. Control layout
Finally, we want to display the Product images on the ViewProduct screen. First change the Product Pic Url control to be an Image control. To do this, choose the ViewProduct screen in the Solution Explorer, then find the Product Pic Url control on the screen and change it from a Text control to an Image control.

Figure 12. Changing Product Pic Url to an Image control
Because this SAP service stores the image URLs in a relative format, we need to write more code to set the full URL to the image. With the Product Pic Url control still selected, choose the Edit PostRender Code link in the Properties window.

Figure 13. Properties of the Product Pic Url control
Add the following code to the PostRender method.
 myapp.ViewProduct.ProductPicUrl_postRender =
  function (element, contentItem) {
    contentItem.dataBind("value", function (value) {
      if (value) {
        var totalUri = "https://sapes1.sapdevcenter.com" +
                        contentItem.value;
        setTimeout(function () {
          $("img", element).attr("src", totalUri);
        }, 0);
      }
  });
};
Run the app
Now, run the app (press F5).
If prompted, enter your SharePoint credentials. When the app starts, also choose Trust It (if prompted).
Notice the following:
The app home screen allows you to browse Product data from the attached SAPdata source.
When you choose a Product, the detailed Product information is displayed—this includes fields from both the attached SAPdata source and the fields defined on the intrinsic ProductDetails entity.

Figure 14. The ViewProduct screen
On the ViewProduct screen, you can choose the Edit button to open the AddEditProduct screen. Since the particular SAP service that the app is accessing is a read-only service, the fields defined on the SAP Product entity cannot be updated, but those defined on ProductDetail can be . If your app is accessing a read-only service, it is a good idea to remove the Add button on the ViewProduct screen and make the controls on the AddEditProduct screen “view” controls instead of “edit” controls.

Figure 15. The AddEditProduct screen
Additional notes
Authentication
SAP can be configured with a variety of authentication providers. For this release, we support HTTP Basic authentication. Basic authentication is enabled on most NetWeaver Gateway installations, and is easy to configure in both test and production. If you find that CBAs aren’t working with your SAP environment, let us know how we can support you better in the future.
For our debut of SAP support, we wanted to enable a complete read and write scenario with SAP data. Therefore, in addition to basic authentication support, we’ve also implemented the session and CSRF token handling that SAP requires to be able to modify SAP data via the NetWeaver Gateway. This means that your CBAs will be able to write changes back to SAP if your SAP feeds support it. Don’t worry—when you attach to SAP data, we negotiate the SAP sessions and tokens automatically. There is nothing for you to configure.
Non-addressable entities
If your data fails to load and you see a diagnostics error similar to the following, it’s because you’re attempting to navigate directly to an SAP entity that is non-addressable.
Error: The SalesOrderLineItemCollection is not addressable. Please use the Navigation Property via the SalesOrder Collection or Entity.
For example, in the EPM service, the SalesOrderLineItemCollection entity set is marked as non-addressable which is evident in the service root document (for example, https://sapes1.sapdevcenter.com/sap/opu/odata/sap/ZGWSAMPLE\_SRV).

This means that SalesOrderLineItemCollection is a child of SalesOrderCollection and that you can only access it by navigating to it through the parent.
To solve this, be sure that you do not have a Browse Data Screen that is bound directly to a non-addressable entity (for example, SalesOrderLineItem). Instead, bind the Browse Data Screen to the parent (for example, SalesOrder) and create a View Details Screen that displays the SalesOrderLineItems data for the selected SalesOrder. This is done for you if you use the Common Screen Set template and select the parent as the primary entity for the Browse Data Screen.
That’s a wrap!
SAP support is one of the many new features that we’ve added for this Office Developer Tools Update.
Download the Office Developer Tools for Visual Studio 2013 – March 2014 update.
After you’ve tried building a CBA that connects to an SAP service, let us know what you think by leaving a comment below or visiting the forums.
For more information about building Cloud Business Apps, read the walkthroughs, watch the videos, and browse the docs on MSDN.
Thanks!
David Kidder, Senior Software Developer Engineer in Test, Cloud Business Apps
Matt Evans, Senior Software Developer Engineer in Test, Cloud Business Apps
Nicole Haugen, Senior Test Lead, Cloud Business Apps
Comments
Anonymous
April 14, 2014
Homepage erstellen? Negeso Website/CMS ist ein umfangreiches und benutzerfreundliches online Content Management System: aktualisieren Sie die Inhalte Ihrer Webseite ganz einfach über Ihren Browser.Anonymous
July 08, 2014
Hi, When I try to Deploy the app it gives me the following error, Web deployment task failed. (Object of type 'manifest' and path 'C:UsersDellDocumentsVisual Studio 2013ProjectsSAPEPMAppSAPEPMAppSAPEPMApp.SharePointbinDebugapp.publish1.0.0.0SAPEPMApp.SharePoint.Web.SourceManifest.xml' cannot be created. Learn more at: go.microsoft.com/fwlink.) SAPEPMApp.SharePoint Please let me know if any one can tell us the reason for this error.Anonymous
March 18, 2015
Hi, strange thing here, I can see SAP as a data source type. However I have install the November 2014 Update of Office developpement tools. Anybody got a clue ?