How to Build Your Personal Schedule Using the Schedule Builder
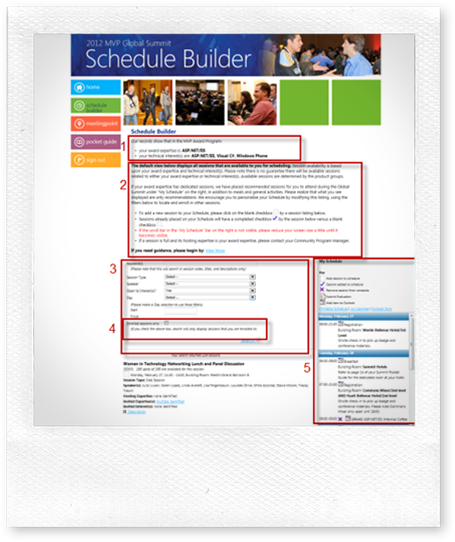
The Schedule Builder is the tool to use to enroll in sessions and build your own personal schedule based on your Technical Expertise and your Technical Interests. If you’ve been to previous MVP Summits, the interface will be familiar. However, each year we make a few improvements. For example, we’ve added some expand and collapse functionality to guidance information and for sessions that invite multiple expertises. You can expand these to get the full list, but the default collapsed view will make the screen less cluttered.
The URL to visit the Schedule Builder is at Please complete your session enrollment by February 16, 2012.
Login In Process
Login to the site using the same credentials you used when you registered to come to the Summit. To remind you, at that time you had two options. You could set up a new username and password or you could use your Windows Live ID credentials. I made a new username and password, and typical for me, I forgot them both! Luckily you can retrieve those almost immediately. Just click through the “forgot your username” and then “forgot your password” and they will be sent to the email address you specify. Note that our registration team can’t help you if you forgot your Windows Live ID username or password.
Sections of the Schedule Builder 
| Section | Description |
1 |
This section lists the Technical Expertise and Technical Interests (if you selected any) associated with your MVP ID. You will see all options that are available to your Expertise or Interests. |
2 |
This section explains how sessions are tied to your Expertise and Interests. |
3 |
You may have a large list of sessions that you can consider. To help you find sessions based on particular topics, speakers, or times, use this filtering tool to target session options. |
4 |
If you want to filter just by the sessions you are enrolled in, check this box. |
5 |
On the right is where you build your schedule. At the top you will see a legend that explains the icons and that the “post it to you Outlook” option will be available starting February 2st. Below this section is your schedule broken out by day. You will notice that some items are already on your schedule. Registration, meals, Welcome Reception, keynotes and Attendee Party are listed. Additionally, you will see sessions that are considered to be highly recommended for you to attend. If you see other sessions that are available to you that you’d prefer to attend, you can move the pre-populated sessions off your schedule and replace it with an alternate. |
5 |
In this section, you’ll find all the sessions that are open to your expertise and interests. |
How to Use the Filters
Type an expertise keyword into the text box for quick and easy filtering for those sessions which are specifically targeted to your award expertise.
Set up the Session Type filter to “Breakout Session” to filter out the product group dinner and optional pre/post side sessions.
This will give you all the sessions targeted at your core area of expertise that you can consider first and then build the rest of your schedule around. Review and select each topic (paying close attention to the time slot) to start building out your schedule.
Then you can remove the expertise keyword filter (or filter based on other specific terms or criteria) to find the additional sessions available to you which alight to your technical interests. It gets really interesting here because you can choose to attend anything that appears on the list of sessions.
Next Steps
Once you have completed building your schedule, plan on returning to the Schedule Builder on February 21st. At that time, all the rooms will have been assigned to the sessions. That’s when you can use the Outlook option to add them to your calendar and print a final copy of your schedule.
MVP Summit Connect
Now that you know what your schedule is, you may want to schedule some time with your MVP peers or others attending the event. If you’ve opted into this service, you can complete your profile and begin scheduling meetings. This option is at the same URL as the Schedule Builder and is an option on the left navigation menu.
Thanks!
Paulette Suddarth
Global Events Marketing Manager