Release Management as a Service
This post provides a quick overview of the Release Management Service (in Preview) just announced on November 12th. In addition I will walk you through doing a deployment to three environments in Azure using the service. This walkthrough requires that you have the Release Management client for Visual Studio Update 4. Finally, there are still some issues being worked and I’ll let you know about some of the gotcha’s I’ve run into – the product team is aware of all of them and they should be fixed by the time the service is out of preview.
Overview
For those who haven’t used or heard of Release Management, it is a part of Microsoft’s DevOps strategy to help enable the three ways made popular by the book The Phoenix Project. There are other parts such as the automated testing, automated builds and App Insights. Depending on what technologies you are using there may be other technologies that play into this story but these are the four core ones. In this post I’ll be talking specifically about RM and a little bit about team build since I have tied them together (Team Build is not a requirement to use RM).
At its core, RM can turn on environments, configure them through various means (we’ll look at using Desired State Configuration or DSC in this post), deploy your application across as many servers as needed and then execute a series of tests. It allows for a gated approval process which is controlled and auditable.
In this series of posts I will walk you through using RM with DSC and Visual Studio Online (hint, if you know how to use it on-premises you know how to use it in the cloud). We’ll start small and simple at first and work our way to more complex, more real-world examples such as multi-tier deployments.
Connecting to Visual Studio Online
In a large part it’s pretty underwhelming because it just works – which is the way it should be. The only pre-requisite for this is that you have a Visual Studio Online (VSO) account and that there is a Team Project already created. When RM launches the first time you’ll be asked to enter a URL. Simply enter your VSO URL (in my case jefflevinson.visualstudio.com) and click OK as shown in Figure 1 (note the URL is different because this is the fully qualified URL but you can just enter the shortened version).
Figure 1 – Configuring the RM Service
The first thing you’ll want to do is to avoid a specific bug I discovered. To do this, go to the Administration > Manage Users screen. Change the “Admin” account to your name as shown in Figure 2 (Admin was changed to Jeff Levinson).
Figure 2 – RM Users
**Warning**
There is currently a known issue here – DO NOT change the e-mail address of the Release Management Service no matter what. You will lock yourself out of the RM Service and will have to open a ticket with the VSO service which may take a little while to fix. The team is currently aware of this issue.
Connecting to Azure Environments
The next step is to set up your Azure environments for each stage of the deployment process. There is a definite structure you need to follow to get the most out of this. Each environment needs to be hosted in a separate cloud service. Whether or not they are in the same subscription is immaterial. For the purpose of this demonstration I have created three virtual machines in three different cloud services (you can have more than one machine in a cloud service but make sure each cloud service contains one environment). The names, for this series, are MyApplication1Dev, MyApplication1Test and MyApplication1 (which represents the production environment). The virtual machine names are all the same – MyApplication1 which is permitted because they are in different cloud service environments. This is obviously an optimal situation if you are running tests from the local servers. If you are running tests from another machine, consider putting a client machine in each cloud service – if you access these machines external of the environments you have to use the fully qualified name which means you have to parameterize the URL’s (i.e. you have to access them with https://myapplication1dev.cloudapp.net).
One note, for our purposes (and probably yours as well) is that I have opened up port 80 for each of the VM’s in order to be able to see the changes on the website in the VM without having to log into the VM.
Once you have the Azure virtual machines created you can go to town in Release Management.
To being, go to the Configure Paths tab, Environments page (Figure 3).
Figure 3 – Environments page
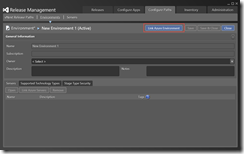
Click New vNext: Azure in the upper right which will bring up the new Azure Environments page as shown in Figure 4.
Figure 4 – New Environment page
Click Clink Azure Environment in the upper right. Select the subscription to use, select the cloud service and click Link (Figure 5).
Figure 5 – Linking an existing cloud service
You can add as many subscriptions as you like from the Administration > Manage Azure page. And this requires a small aside so it’s easier to do. The easiest way to get the required information is to grab the publishing profile for your azure subscription. To do this, go to https://manage.windowsazure.com/publishsettings/index?client=powershell. This will trigger a file download which will allow you to save your publishing profile. This file contains all of the information you need to link RM to your subscription. This screen is shown in Figure 6.
Figure 6 – New Azure Subscription link page
The name can be arbitrary. The Subscription ID is included in the file and the Management Certificate Key is the whole string contained in the ManagementCertificate element of the publishing profile. The storage account is whatever storage account you want to use from Azure.
Okay, back to linking environments… After an environment is linked, click Link Azure Servers in the lower left of the window. Select one or more servers from the given cloud service and click OK. The resulting screen will look like that in Figure 7.
Figure 7 – A linked environment with a single linked server
After linking however many cloud services you want, you’ll have an Environments screen that looks like those in Figure 8.
Figure 8 – Environments linked to RM
After doing this, click the Servers tab to review the cloud services and servers which are now linked to Release Management.
Configuring the Release Path
The next step is to configure the release path. To do that we need to specify which environments will be supported. Go to the Administration tab > Manage Pick Lists and select the Stage Type entry. I have added the Dev, Test and Production entries as shown in Figure 9.
Figure 9 – Stage Types
Once this has done we can now configure the actual release path which involves mapping the stage types to the environments. To do this, head to the Configure Paths > vNext Release Paths page and click New. Enter the stages as needed. For each stage, click Add, select the stage label and then select the environment. The end result of this operation is shown in Figure 10.
Figure 10 – A fully configured release path
The only absolutely critical thing about this is that the first stage (Development in this case) Acceptance Step must be set to Automated. The reason for this is that if it is manual and you trigger it from a build, the build will fail if it is not automated.
Once the release path is configured you’re ready to start building out the actual release process.
Creating the Application
We’ll create the ASP.NET MVC application next and structure it so that it is optimal for our purposes.
To begin with, create a new MVC project and change the authentication to “No Authentication”. In addition, uncheck the Host in Cloud checkbox (note that currently RM doesn’t support Azure Websites but it will in the future and you can make it work with Azure PowerShell scripting today but that’s a story for another day). I have opted to add unit tests to my project as is a best practice but that’s entirely up to you. The generated project structure looks like that in Figure 11.
Figure 11 – New MVC project
Note also that this is in version control in VSO which is required for this series of walkthrough’s. It is absolutely not a requirement to use RM in VSO – you can build code in any system and have RM deploy it but I’m not covering that in this series of posts.
Next, add a new Console Application project to the solution and call it “DeploymentScripts”. This is a quick and dirty way to get extra files deployed on build. There are various other options to accomplish this but this is by far the simplest. Delete the Program.cs file and change the output to Class Library. This project will contain any deployment scripts used for our application. The next step is to add in our DSC file. However, we’re going to edit it in PowerShell ISE as opposed to Visual Studio because there is no IntelliSense for Visual Studio at this time and I’ll show you a simple trick to figure out what functionality is available to you.
Open PowerShell ISE and copy and paste this script as follows:
1: configuration FileCopy
2: {
3: Import-DscResource -Module xWebAdministration
4:
5: node localhost
6: {
7: File CopyDeploymentBits
8: {
9: Ensure = "Present"
10: Type = "Directory"
11: Recurse = $true
12: SourcePath = join-path $applicationPath "_PublishedWebsites"
13: DestinationPath = "C:\inetpub\wwwroot"
14: }
15:
16: xWebsite DefaultSite
17: {
18: Ensure = "Present"
19: Name = "Default Web Site"
20: State = "Stopped"
21: PhysicalPath = "C:\inetpub\wwwroot"
22: DependsOn = "[File]CopyDeploymentBits"
23: }
24:
25: xWebsite NewWebsite
26: {
27: Ensure = "Present"
28: Name = "BlogDemo"
29: State = "Started"
30: PhysicalPath = "c:\inetpub\wwwroot\BlogDemo"
31: DependsOn = "[xWebsite]DefaultSite"
32: }
33: }
34: } 35: FileCopy
DSC has many parts. More information on DSC can be found by looking at the ALM Rangers guidance which was just released (I am on this ALM Rangers team).
The first thing is, “how do I know what to put in here – what are my options?” I’m glad you asked! The components used here are either the built-in File module or the xWebAdministration module available for download and noted above. The PowerShell DSC gallery has very good documentation and source code! In order to use these modules they need to be imported, hence the Import-Dsc statement in Line 3.
Once you have this statement you have to set which node (server) to apply this configuration to (i.e. you can apply a configuration to more than one server at a time but for clarity sake we will not do that and will configure each server separately. Localhost here refers to whatever server this DSC is deployed.
So, what does “File” do? On line 7 put your cursor on the word “File” and press Ctrl + spacebar. You end up with the tooltip shown in Figure 12 (the CopyDeploymentBits statement is a label that identifies the section as you can have multiple configuration sections).
Figure 12 – File DSC tooltip
In many cases these values are straightforward. The benefit of this list is it provides you with the allowed array values. For this walkthrough the values are easy to understand. We want to ensure that a directory (Type) is present (Ensure). The source of the files is $applicationPath (this is a built-in parameter passed by RM which points to C:\Windows\DtlDownload\[Component Name]) plus the _publishedWebsites folder. The destination is the deployment path (note that this can be completely arbitrary but again this is for simplicity sake) and we want to take all of the contents recursively.
This file is so clear that it can be passed from a development team to an operations team and there should be a common understanding of what is happening.
The next section stops the default website since our plan is to deploy our website to port 80 which the default website runs on. This is fairly straightforward but we’ve added another line down at the bottom: DependsOn. This tells DSC not to execute this section until the CopyDeploymentBits section has executed successfully. In this way we can chain a series of actions together to run in a specific order.
Finally the last section creates a new website and starts it but only if the default website was first stopped (there are options to deploy it to another port).
The last line actually triggers the DSC to create a Managed Object Framework file which causes the configuration to be executed.
Save this file as DeploymentScript1.ps1 and add it to the DeploymentScripts project in Visual Studio (and make sure that the properties on the file are such that the copy output is “Copy if Newer” so it is deployed as part of our build) and check it in.
Create the build
The build is very straightforward. Unlike previous versions of Release Management, the Release Management Service executes deployments based on triggers from the build service itself, not the build template so no special templates are needed now.
Create a new build using any template (I’m using the Default Template with no changes to the build). Because I have the solution currently opened in Visual Studio it is automatically pulling the correct solution. Save the build definition as BlogDemo OnDemand (you could trigger this as a CI build if desired). Save the build definition and jump back into the Release Management client.
Configuring the Release Process
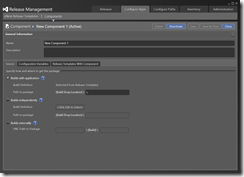
The first part of configuring a release process which is going to use DSC and VSO is to tell the Release Management tool where the build is located. To do this we’re going to add the most basic component. Head over to the Configure Apps > Components page and click New vNext. Without making any other changes, select Builds with Application on the Sources tab as shown in Figure 11 and put a single backslash in the [Build Drop Location] field (also shown in Figure 13).
Note that it is critical you leave the name as “New Component 1”. If you’ll remember from the DSC script, this is part of the path that our application is copied to as part of the deployment.
Figure 13 – Build location setting
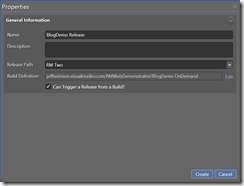
Save and close the new component. Now it’s time to configure the actual release process. Go to the Configure Apps > vNext Release Templates page and click New. This opens the properties page for the designer as shown in Figure 14.
Figure 14 – Release Template properties page
Rename the release process, select the release path that you created earlier and select the team project and build definition. Then check the “Can Trigger a release” checkbox and click Create.
You’ll start out with a blank slate with tabs defined for the number of environments you created in your release process as shown in Figure 15.
Figure 15 – Blank release process
The first thing to do is add the component you created previously. Right-click the Components node and select Add and then choose New Component 1. Because we are using PowerShell DSC drag a Deploy Using PS/DSC action to the Deployment Sequence and click the double arrow in the upper right to expand the activity.
Select the server from the ServerName field. Enter the UserName and Password of an account which has administrative access to the server. Select New Component 1 from the ComponentName dropdown. Finally, in the PSScriptPath field, enter DeploymentScript1.ps1.
To copy the configuration to the Test and Production environments, right-click the deployment tab (shown in Figure 16) and select Copy Deployment Sequence. Then right-click the Test and eventually Production tabs and select Paste Deployment Sequence. Change the ServerName field to the correct server and you’re done!
Figure 16 – Copying the deployment sequence
At this point you can trigger a build in Visual Studio and watch the application deploy.
In the next post in the series I’ll look at configuring a completely clean server and using more variables so as to avoid hard-coding entries in the DSC file.
Comments
Anonymous
January 28, 2015
Hi Jeff, Can Release Management as a Service be used to deploy to on-premise virtual machines? Is there a version of this walk through explaining how to set up on-premise virtual machines with RM as a Server? We currently use an on premise build controller linked to VSO, can this be used as the bridge between on-premise environments and RM as a Service? Thanks, PhilAnonymous
February 04, 2015
@AESPhil, currently it cannot. I'm sure this will be changing but I don't have any hard information on that as I'm not part of the product team. So for your third question, right now it cannot be. I'm not sure I understand the second question though. If you mean is there a walkthrough for the on-premises RM and VM setup? If so, this is the blog that I would point you towards: blogs.msdn.com/.../how-to-configure-team-foundation-server-with-release-management.aspx. I hope this helps, if not, let me know!Anonymous
May 25, 2015
How do you handle config (csdef, cscfg) files across stages? I need other configuration for DEV as QA but want to deploy the same package.Anonymous
July 08, 2015
Hi @Orhan, you can use the dsc tokenization module created by the ALM Rangers. You can get it here: gallery.technet.microsoft.com/xReleaseManagement-db1baef1 on the powershell gallery.


