Build Intelligent Web App with Machine Learning Service
In an earlier article: How to operationalize TensorFlow models in Microsoft Machine Learning Server, we showed how you can deploy a TensorFlow image classification model pre-trained using ImageNet as service in Machine Learning Server, and download a Swagger specification of the service as a JSON file, which can be passed on to app developers who will use it to generate a client for consuming the service.
In this article, we will walk through the process of consuming an ML service from a single-page app (SPA) built using the popular progressive web apps (PWA) framework Vue.js. At a very high level, it involves:
- Generating API client from the Swagger JSON file of the service
- Linking in the client as npm module package
- Adding Vue component with javascript code that leverages the generated client to make service consumption API calls
Before we start, we assume you have gone through the previous article: How to operationalize TensorFlow models in Microsoft Machine Learning Server, and published the image classification ML model as a service and download the swagger.json file, and you have also installed a version of Node.js that is current.
Creating a VueJS App
We can use the Vue.js webpack template to scaffold our project. The webpack template is part of the vue-cli, which can be installed through:
Once that's installed, we can run the following commands to create our project and run it. For this example, let's use "ml-app-vuejs" as the name of our app.
At this point, you should be able to point your browser to https://localhost:8080 and see a responsive Vue.js web app. You can change the browser to a responsive mode through the dev tools and see how the app renders on mobile.
Setting up the Swagger Generated Javascript Client
Next, we will generate a javascript client and set it up for use in our javascript code. To do that, go to https://editor.swagger.io, upload the previously downloaded "swagger.json" file and choose to generate a javascript client. Save and extract the zip file containing the generated client. Let's rename the folder to "image-classification-client", making sure there's a "package.json" file directly under it among other files and folders. Then create a "lib" folder under our project root, and drop the entire "image-classification-client" folder under "ml-app-vuejs/lib". Run the following commands under the project root folder to link in the package and install its dependency "superagent":
After that, inspect the "node_modules" folder, and you should see a link named "image_classification" there. In addition to linking in the package, we also need to disable AMD loader through "webpack.base.conf.js" to avoid potential module loading error:
See the "Webpack Configuration" section in README.md of the generated client for more details.
In this example, all API requests are sent to the same domain where the web app is hosted and then proxied (see "proxyTable" in "config/index.js") to Machine Learning service. In production, API requests can be re-routed to the API servers using reverse proxy, or you can also enable CORS to allow cross-domain API requests from the web app in the browser directly.
To proxy the API calls the Machine Learning service, we need to update "config/index.js" to have the following:
Implementing the Login Screen
In order to consume the ML service to perform image classification, we need an access token. So, we will implement a login screen, where the the app will acquire an JWT access token using the credentials provided by the user on the login screen.
Let's add a new file "ImageClassification.vue" under "src/components" with some login HTML elements inside the "template", and javascript code inside "script":
Go to "src/router/index.js" to wire up the component we just created to the main "App.vue". It should look like this:
To actually call the login API and obtain an JWT access token, we need to update the "login" function above to:
For details on the usage and code example of the "image_classification" module, consult the README of the generated client.
At this point, you should be able to login and see a login request in the dev tools coming back with an access token.
Implementing the Image Classification Screen
For image classification, we will let the user provide an image, and the app will draw it out on a canvas, then base64 encode the image to a string, because we will be sending it in JSON format to the API. If you recall from the previous article, the service deployed already understands the encoding and it will decode it properly to pass onto the TensorFlow model.
Here's the HTML elements to be added to the "template" and right after the "login-container" div:
and the corresponding javascript code:
Again, usage and sample code for "ImageClassificationApi" can found in the documentation inside the generated client package.
The Final Product
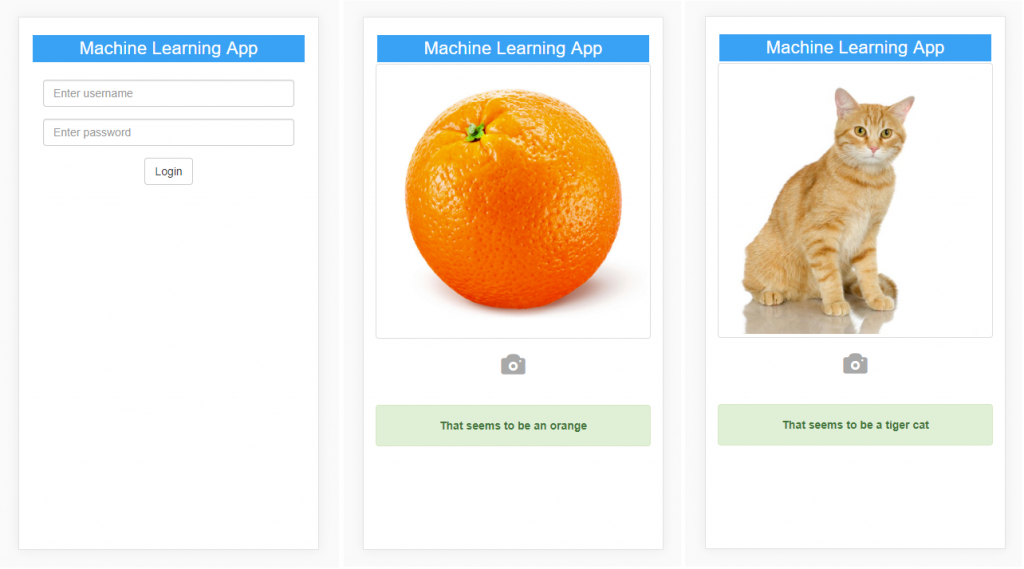
Here's what the final product looks like, slightly styled using Bootstrap.

The source code of the full project can be found at:
https://github.com/Microsoft/microsoft-r/tree/master/ml-app-vuejs