How to get a computer by computer view of installed software using the MAP toolkit
One of the most frequent questions we get at MAPFDBK@microsoft.com is how to get a list of the software discovered by the MAP toolkit on a computer by computer basis. Most of the users who ask are using this to help them answer a licensing question but it can be used in a number of other scenarios as well for example Software Asset Management or user profiling for VDI (see https://blogs.technet.com/b/mapblog/archive/2012/07/09/planning-for-desktop-virtualization-with-the-map-toolkit-7-0-4-of-4.aspx).
In MAP 7.0, provided this information through a database view and Microsoft Excel. The name of the view is InstalledProducts_view.
In MAP 8.0, this view has been renamed to [UT_WinServer_Reporting].[InstalledProductsView].
This view contains several key pieces of information that you can use to do a number of things including:
- Understand what applications and versions are installed throughout your organization
- See the Operating Systems on which these apps are running and whether the machine is physical or virtual
- See who is using the machines on which the apps are running
- Get important license related information such as processor counts, total cores and logical processor counts
To get started, you will need to open Excel and connect to your local SQL Server database that is storing the MAP data that you want to view. There are two different ways to connect, depending on the version of SQL Server that you are using.
Using your own SQL Server instance
If you are using your own instance (the non-default MAP install), you will select the Data option on the Excel ribbon and select the ‘From other sources’ option. Then select ‘From SQL Server’.
Enter your server name and instance name and click ‘Next’.
Select the database that contains the data you want and then pick InstalledProducts_view row under ‘Name’ for databases created with MAP 7.0.
For MAP 8.0, use [UT_WinServer_Reporting].[InstalledProductsView].
You can also add some additional information to help describe the connection. Then click ‘Finish’ and select the location where you want the query results to populate.
Using the default (LocalDB) instance
In MAP 7.0, the default database installed moved to SQL Server 2012 LocalDB. There are a couple of steps that are different than those used in other versions of SQL Server.
First, make sure that you have the SQL Server 2012 Native Client installed. You can get it from
https://www.microsoft.com/en-us/download/details.aspx?id=29065.
With Excel open and the Data ribbon highlighted, select the ‘From other data sources’ option and select ‘From Data Connection Wizard’
Select the ‘Other/Advanced’ option.
Then select the option for SQL Server Native Client 11.0 as highlighted below. If this option is not available, make sure that you have the native client installed - https://www.microsoft.com/en-us/download/details.aspx?id=29065.
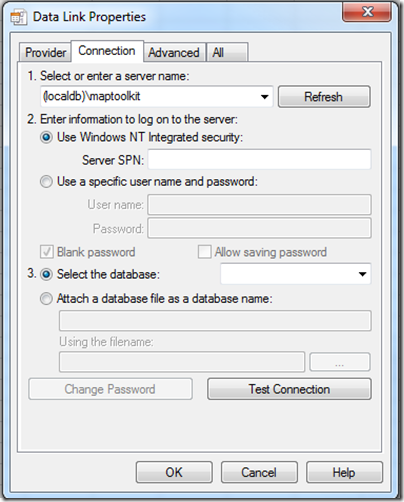
Next, you enter in the server name. If you are using the default install the server name will be: (localdb)\maptoolkit.
Set the option in #2 to Use Windows NT Integrated Security
Hit ‘Test Connection’
If you’ve done it correctly, you will get a success message!
Then follow the same steps as above where you select the database name and the InstalledProducts_view for 7.0. For 8.0, use [UT_WinServer_Reporting].[InstalledProductsView].
Populate the results in your spreadsheet!
What do I do next?
Well – that is entirely up to you. One thing that we like to do is to create a pivot table and drill down into this information. Here is one that I created. I filtered down the application name to include only those that had SQL Server components. I could look at this by physical/virtual and by operating system.
Pretty cool – huh!
As a reminder, here is a link to some valuable MAP community supported content.
Enjoy!
Rob
Comments
Anonymous
January 01, 2003
Note: If you are logged in as a standard user, you will not be able to view the user created databases unless you use “Run As…” and open Excel as an administrator.Anonymous
January 01, 2003
very nice, thank you


