Couchbase on Azure: Creating Virtual Machines
This is the third post of a walkthrough to set up a mixed-mode platform- and infrastructure-as-a-service application on Windows Azure using Couchbase and ASP.NET. For more context on the application, please review this introductory post.
 In this post, the goal is to build out the Couchbase cluster, which resides in a Cloud Service that contains three Windows 2008 R2 virtual machines with Couchbase 2.0 installed. To the right you can see the relevant portion of the architectural diagram I introduced in the first post.
Couchbase implements a peer-peer model with a “smart-client” interface. Each machine in the cluster is co-equal, and the client interface (which will be .NET in this case) maintains knowledge of the cluster configuration; therefore, adding one or more machines to a cluster involves setting up a virtual machine with an image identical to that of all the other machines in the cluster.
There are two primary options for creating Windows Azure Virtual Machines (VMs):
- Quick Create provisions Windows Server images quickly and requires just a service name, administrator password, and service location
- From Gallery offers more options for configuring the virtual machine including what base images to use, both Windows and Linux.
You can extend your view of the Gallery with your own images as well, perhaps built on other operating systems or ones that are preconfigured with software, like say Couchbase. Each image in the Gallery can then be the common source of multiple virtual machine instances, and that’s precisely the route I’m going to take here. I’ll create a Couchbase image that will reside in the Gallery and then create three VM instances from that image to form the cluster.

Creating a Virtual Machine Image
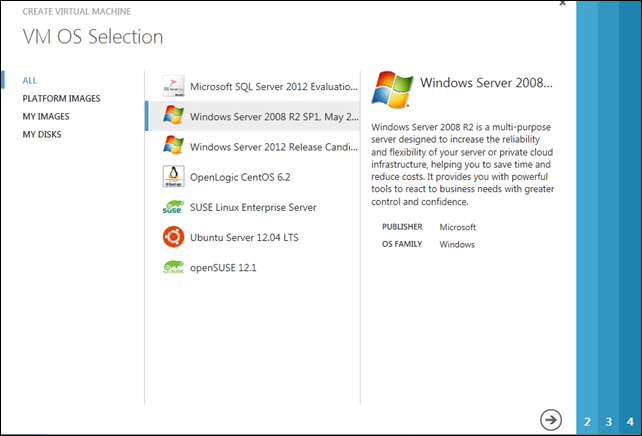
To create the base Couchbase image, I’ll start by building a new virtual machine, just as if I were going to use it directly. The From Gallery creation option brings up the following dialog listing the various images in the Gallery. By default, I’ll see only the Windows Server options and the Linux distributions provided by some Windows Azure partners. My goal is to add a Couchbase option to this list.

The first step of the process is supplying pretty much what the Quick Create option also prompts for:
- Virtual machine name,
- Administrator password, and
- VM size (extra-small to extra-large).
Note below that the size defaults to a single core. Since this virtual machine instance will eventually become an image, that value is actually irrelevant and instead must be set when each instance is created off of this base image (I’ll get to that later in this post).
That said, I will indeed use single core VM instances for each of the nodes in the Couchbase cluster, and that’s due to capacity constraints on the demo account I’ve used to set up this example. Per Couchbase best practices, you’ll want to use at least a dual core configuration in production, and your decision to go beyond that will largely be driven by the amount of RAM that comes with each of the instance sizes (since Couchbase performance is tied more to I/O and RAM capacity than it is to CPU).

The mode for this VM is Standalone, meaning that it will the the one and only instance associated with the endpoint (DNS Name). For the template image I’m creating that makes sense; a bit later we’ll look at combining three instances of this VM image (once it’s built) into one Cloud Service (using the Connect to Existing Virtual Machine option). By the way, the DNS Name that’s created here won’t really be used for long, since I won’t be deploying this particular VM into a service.
 For each virtual machine, the associated VHD is stored in a blob storage account; here I’m using an account I created called fielddemo163vhds. The fact that your VHDs are stored as blobs in a storage account has an ancillary benefit: the VHD, like any data in that storage account, is replicated three times within the host data center, in a strongly consistent fashion, and presuming geo-replication is engaged, the VHD is also asynchronously replicated to a second data center in the same region - built in disaster recovery!
As with any other cloud assets, I also need to specify where I want this VM to reside. The options here include Regions, Affinity Groups and Virtual Networks, all of which are related: each of the eight Windows Azure regions can have a number of affinity groups (that you define to organize related architectural components logically and physically in the data center), and each affinity group can contain one or more virtual networks.
It turns out the selections of storage account and Region/Affinity Group/Virtual Network are quite important; something I learned only after doing it wrong a few times!
As you know, storage accounts are also associated with a given region or affinity group. As of this writing, to successfully build an image for the VM Gallery, the storage account housing the VHD for that image must be in the same affinity group as specified on the VM Mode dialog – and not just the same region.
If you select the automatically configured storage option, the account will be located in the current region but will not be associated with an affinity group. As a result, the VM image that is created will not correctly support creating new VM instances from it. Essentially, the VM image becomes disassociated from the virtual network and affinity group that you thought you were specifying here.
This limitation is being addressed, but it never hurts to be explicit when creating your cloud assets and to compartmentalize them as much as possible, so creating your own storage account and explicitly assigning the affinity group is still a good practice.
The next dialog prompts for an availability set, which is the analog of upgrade and fault domains applied to virtual machines. Windows Azure distributes VMs in a given availability set over multiple racks (for failure isolation) and ensures that all of the instances within that availability set are not off-line at the same time, like when applying host OS patches. To get the 99.95% SLA (once the feature emerges from preview stage), you’ll need to place your VMs within an availability set.
The other input requested here is the subnet to which I want to assign this virtual machine instance. This instance is really destined to become an image, which is a template for additional instances, so the subnet designation (and the availability set, for that matter) aren’t really relevant. If I were to set them, the settings wouldn’t even be recorded as part of the image. The same dialog appears a bit later, where I will specify the values for each of the actual cluster instances.
Configuring a Virtual Machine Instance
Once the VM instance has been created, you’ll be able to access and ultra-cool visualization of activity on that VM right from the portal, and you can connect directly to that instance via Remote Desktop Protocol (RDP) using the administrator password supplied when the image was created. That’s the mechanism I’ll use to access this instance and perform my Couchbase configuration tasks. 
Installing Couchbase on the Virtual Machine
You may not plan on using Couchbase, but many of the steps I cover below may still apply to installing and configuring whatever software or services you do host on your VM image. It’s my hope the core concepts are still relevant to you, even if the specifics are not.
The first (and most obvious) step is that I need to install Couchbase. The installation images are available on their web site, so it should be an easy process to download via the internet. Well, it’s not quite that easy! The basic VM platform images are locked down, as you’d probably expect, to reduce the attack surface after your applications are hosted on the public cloud. In particular, IE’s Enhanced Security Configuration (ESC) is enabled, and nearly all of the incoming ports are disabled via Windows Firewall.
To make downloading the needed assets from the web a bit easier, I temporarily disable IE ESC via the Server Manager option shown below (you’ll find an icon to launch Server Manager already on your VM instance’s toolbar, right next to the Start button). Disengaging IE ESC does put me at risk, albeit briefly, for any site that I then visit via the Web, so if there is some concern over this brief exposure you may want to download any web-hosted assets on a different machine and transfer just the needed files via some other secure mechanism. In this case, I’m just downloading a single file and then am careful to reengage IE ESC before proceeding.

Couchbase’s various installation images can be downloaded from their website at https://couchbase.com/download, so I’ll grab the 64-bit Windows version of their 2.0 preview release (at rel-4 as of this writing). I’ll save the setup executable on the VM’s local disk; recall that these are persistent virtual machine instances, so the file will remain across reboots.
Do not save items to a user directory, like Documents or Downloads, if you are building a virtual machine image for later use. The sysprep step (which I’ll cover later) will reset the contents of these directories!
I am not actually going to install Couchbase at this point, because that installation process records machine specific information – like the IP address - as part of the server configuration. Since this VM will be a master image (or template) for multiple instances, the IP address of this instance is not the one I want. There is a series of steps I could run to reset the IP address, but I’d have to do that for each of the VM instances I’d create, and it’s just as easy (and less error prone) to install from scratch each time. So in this case, the master image I’m creating will just have the installer file sitting on the file system – in c:\couchbase.

Configuring the Firewall
In the previous step, I needed to loosen the reins (temporarily) to download the installer from Couchbase site. In that same vein, I need to loosen the reins – permanently – on the network traffic this VM image has locked down. Per Couchbase’s documentation, there are a number of ports (8091, 8092, 11211, 11210, 4369, and 21100 to 21199) that need to be opened for the server cluster to operate correctly and for client applications to be able to access the cluster.
The modifications are made via Windows Firewall with Advanced Security: Start–>Run->wf.msc to create a new Inbound Rule:
 I select Port for the Rule Type,

TCP as the protocol, and then specify the required Couchbase ports: 8091, 8092, 11211, 11210, 4369, 21100-21199.

For Action and Profile, the defaults are appropriate, and on the last screen of the wizard I just need to provide a name for the rule; “Couchbase” seems descriptive enough.
This leaves me with the following new rule, and this VM instance now has all of the common components (the Couchbase installation file) and configuration (firewall) that each of the individual instances of the Couchbase cluster will require.

Sysprep
To create a new VM image, one that appears in the Gallery and from which subsequent instances can be created, I need to generalize the current instance via the sysprep process. To do so, I run the command located in c:\windows\system32\sysprep, specifying the following parameters:
- System Cleanup Action: Enter System Out-of-Box Experience (OOBE)
- Generalize: checked
- Shutdown Options: Shutdown

Once I hit ok, the VM instance will shut down, and its status in the portal will soon after update to “Stopped.” Since this VM is now ‘generalized’ it can no longer be used as a VM instance within a cloud service; it’s on its way to becoming a template from which I can create multiple VM instances that have the same contents and configuration.
Capturing an Image
The next step is to “capture” the image, and that’s initiated via the menu option at the bottom of the portal. 
That results in a prompt requesting a name for the image. That name is what will appear in the Gallery along with the Windows and Linux images there by default. I also need to confirm that the image has been sysprepped in order to proceed.

Once the capture is done, you might be a bit taken aback by what you see (or don’t see) on the portal. Where’d the VM go?!

There was a bit of foreshadowing in a previous dialog - where the verbiage states: “This virtual machine will be deleted as part of this operation.” What’s happened is that the virtual machine instance I started with has been transformed into an image, and indeed it’s now listed under the Images section of the Virtual Machines tab.
Additionally, I suddenly have a new Cloud Service listed too! That Cloud Service is essentially the shell that contained the single virtual machine instance before it was transformed into an image. Prior to performing the capture, I switched over to the Silverlight portal (via the green Preview button at the top of the new portal) and grabbed the status of the deployment.
 There was always a Cloud (or Hosted) Service instance in play; it was just hidden by the abstractions the new portal implements. At the point the instance was “captured,” it was no longer part of a deployment, and the couchbasevm hosted service became empty, so it’s just a regular, empty Cloud Service now. It ‘reappears’ as such in the new portal but can be safely deleted.
Creating Couchbase VMs from a Custom Image
So now I’m at the point where I have a basic image that has the software and firewall configuration needed for my Couchbase cluster. My cluster will contain three servers, so I need to create three new instances based off of the couchbase20-rel4 image I just captured.
 As you might expect, I’ll revisit the New>Virtual Machine option and again select a Gallery image, just like I did at the very beginning of this post. The Couchbase20-rel4 image I created now appears under “My Images” as well as “All,” of course.

To create the first machine of the cluster, I’ll supply a VM name (using the uninspired convention of couchbase1, couchbase2, and couchbase3) and provide an administrator password for remote access. Here the VM Size is important, and as mentioned earlier, I’m using a single core VM for each node in the cluster.

The first VM of the cluster definition must be a Standalone Virtual Machine, essentially defining a new Cloud (Hosted) Service as well; that’s what the DNS Name entry is for. This VM instance is technically exposed to the public internet via this action, but my application will only be accessing it via internal ports. The only external port enabled on that instance is the one supporting Remote Desktop, although I can (and will later) enable additional access.

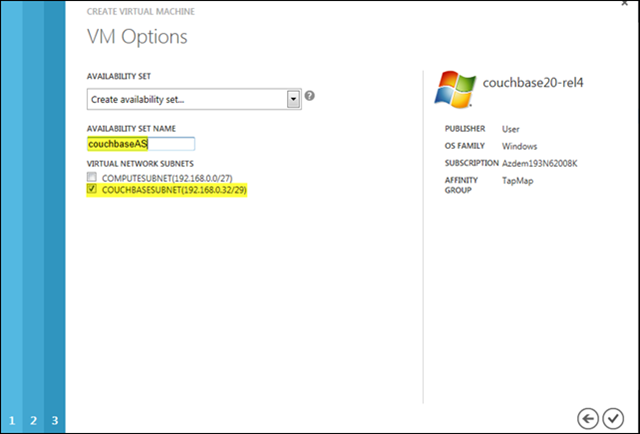
Lastly, I’ll add the VM instance to a new availability set. This is the same dialog I ran into earlier when creating the base Couchbase image. At that point, the values weren’t important, but since this VM instance will be part of the actual cluster (and not just a template image), I need to supply a availability set name and select the appropriate subnet of the virtual network to host it.

Once the provisioning is complete – it takes a few minutes - couchbase1 is shown running as a virtual machine in the portal. Remember, behind the scenes it’s housed in a Cloud Service deployment called couchbase.

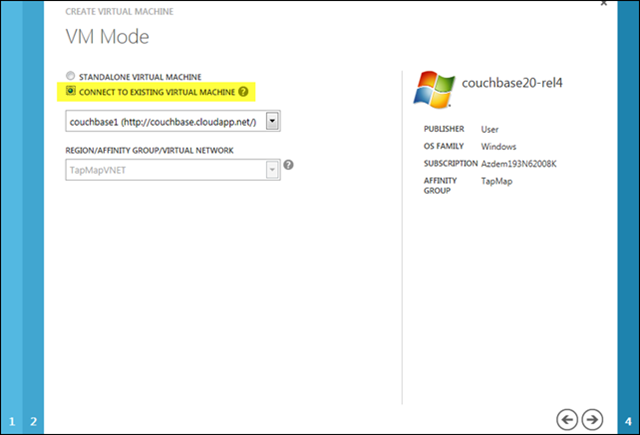
The process to create the other VMs in the Couchbase cluster is nearly identical to creating the first one. The exception is Step 3 of the new Virtual Machine wizard. Here couchbase2 and couchbase3 need to be connected to an existing virtual machine (and therefore its enclosing Cloud Service). So for these and any subsequent VM instances added to the cluster, I need to select Connect to Existing Virtual Machine and pick couchbase1 from the drop down list

Of course, I need to set the availability set and virtual network subnet as well:

You must create the VM instances sequentially! Since each VM added to an existing service (via the Connect to Existing Virtual Machine option) modifies its common parent Cloud Service configuration, you have to add (and delete) VMs sequentially; otherwise, you’ll get an error indicating that “Windows Azure is performing an operation that requires exclusive access.”
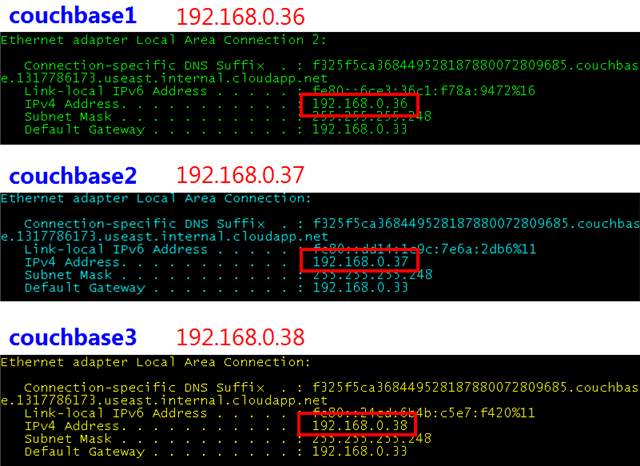
Once all three virtual machine instances in the cluster have been created, I can connect each via RDP and and double-check the configurations, verifying the presence of the Cloudbase installation file, the configuration of the firewall, and the IP assignments within the ClusterSubnet. Recall that these IP addresses are persistent, so they can be referenced from any client application (with access to the subnet) without worry of VM reboots.

The next step is to carry out whatever setup tasks are required on each VM instance, one by one. That will involve running the Couchbase installer on each VM instance, the topic of my next post.