The Intelligent Agent Assistant: Bots in the Agent Desktop – Part 1
When we think of how bots fit into a Customer Service strategy, the typical scenario envisioned is often that of a customer-facing bot, providing customers a conversational support experience powered by automated intelligence. But even with the deployment of a customer-facing bot, most contact centers will still need to support a significant number of customer engagements with the help of a Customer Service Representative (CSR).
This post will be the first in a series in which we explore how we can leverage natural, conversational experiences powered by automated intelligence to empower the CSR, by building a contextually-aware Intelligent Agent Assistant, integrated into the Unified Service Desk agent desktop.
By providing a conversational Agent Assistant experience for the CSR that is tightly integrated into the Unified Service Desk, we can:
- Expedite agent productivity with fast and intuitive access to insights and procedures
- Provide a natural engagement experience
- Proactively provide contextually-relevant information and alerts
The Intelligent Agent Assistant that we build will have:
- Awareness of the context of the agent desktop and current customer interaction
- The ability to provide insights, guidance or alerts based on the current context, both proactively and reactively
- The ability to trigger and automate actions and activities within the desktop
- The ability to be engaged via voice or text/typing
This 2-minute video shows the types of experiences we will be able to provide for agents at the conclusion of our series (with sound) :
[video width="1920" height="1040" mp4="https://msdnshared.blob.core.windows.net/media/2017/06/IntelligentAgentAssistant1.mp4"][/video]
Building our Intelligent Agent Assistant
In Part 1 of our series, we will focus on:
- Surfacing a bot within the Unified Service Desk
- Enabling the bot to communicate with the Unified Service Desk by initiating actions within the desktop
Prerequisites:
The prerequisites for building and deploying our Intelligent Agent Assistant include:
- An instance of Dynamics 365 for Customer Service (Online)
- You can request a trial of Dynamics 365 for Customer Service here
- A Microsoft Azure subscription for hosting your bot
- The Dynamics 365 Software Development Kit (SDK)
- Visual Studio 2015 or higher
- Microsoft .NET Framework 4.6
- The Bot Builder SDK for .NET
- The Bot Framework Emulator (for Windows)
- The Bot Connector Visual Studio Project Template
- Save the downloaded zip file to your Visual Studio 201X templates directory, which is typically found in %USERPROFILE%\Documents\Visual Studio 201X\Templates\ProjectTemplates\Visual C#
Surfacing a Bot in USD
There are several options for incorporating a bot into the Unified Service Desk, including:
- Configuring a bot for the Web Chat channel, and hosting it in a USD Standard Web Application hosted control
- Configuring a bot for the Direct Line channel, and using the WebChat control for your bot client, hosting your control in a USD Standard Web Application hosted control
- Configuring a bot for the Direct Line channel, and creating your own bot client, hosted in a Custom Hosted Control in USD
For our Intelligent Agent Assistant, we will configure a bot for the Direct Line channel, and use the WebChat control for the bot client, hosting the control in a USD Standard Web Application hosted control. This option allows us to leverage a pre-built bot client for our user interface, while still allowing us to programmatically communicate with the bot via the Direct Line REST API, sending and receiving event activities, as outlined in the Backchannel example on GitHub.
While we will get into more depth on the specifics of our bot code later on you can review some of the basics of building and deploying a bot using the Bot Builder SDK for .NET in some of the previous posts on this blog, and in the Bot Framework documentation.
Once you have deployed a bot and registered it with the Bot Framework, you can enable your bot for the Direct Line channel:

Ensure you capture your Bot Application ID during registration, and your Direct Line secret while enabling your bot on the channel.
Next, we will create a basic full-window HTML page that makes use of the WebChat, based on the fullwindow example on GitHub:
[snippet slug=agentbot1_bothtml line_numbers=false lang=html]
After deploying this page to Azure Blob Storage, or an alternate web server, you should be able to access your bot like so:
https://<YourAzureSubdomain>.blob.core.windows.net/mycontainer/usdagentbot.html?s=<YourSecret>&botid=<YourBotId>&username=<Username>
(As a more secure alternative to using your Direct Line secret directly, you can use a Direct Line token, obtained by calling Direct Line's Generate Token.)
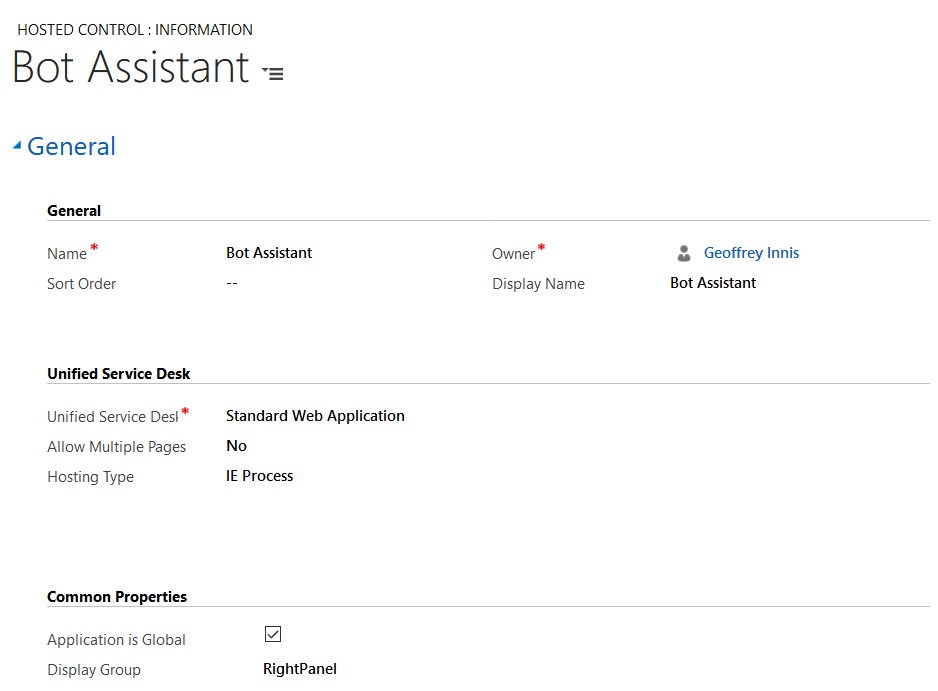
In the Dynamics 365 Web Client, we now create a new Hosted Control for our bot, using the Standard Web Application type. You can opt to make your control Global, or Session-specific; in our example we will make it Global:
We want to instantiate our control when USD is launched, so we create an Action Call to navigate our control to our bot URL:
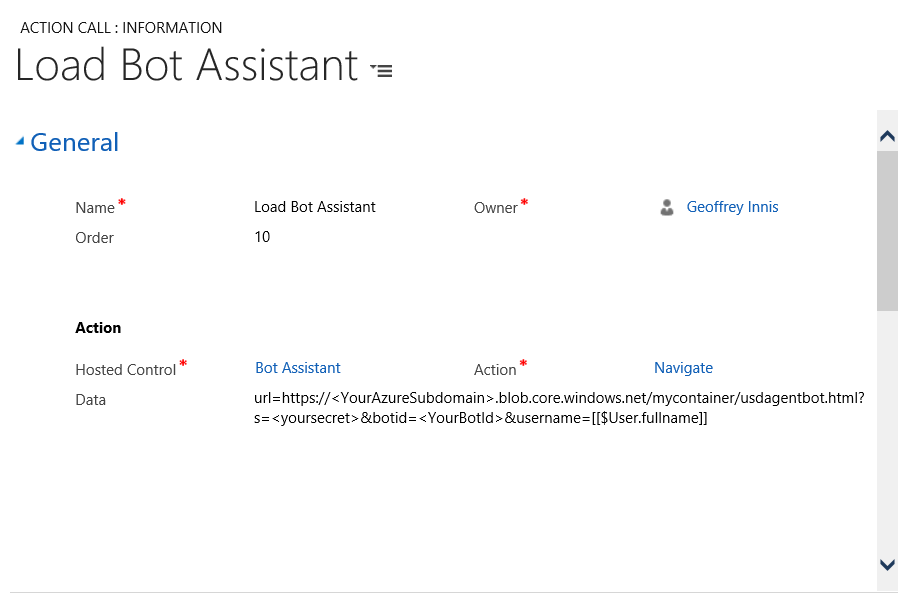
We then add this Action Call to the DesktopReady event of the Global Manager control. Now when we launch USD, we should see our bot in the RightPanel:

Triggering Events and Actions in USD from our Bot
Now that our bot appears in USD, let’s see how we can enable our bot to use the event model of USD to trigger actions in the desktop, by creating a custom event on our Bot Assistant control, then calling it via a URL that is opened by a Card Action in our bot.
In this basic example, we will show how we can search for contacts by name, and allow our users to initiate a session with that contact.
First, we will add a custom event to our Bot Assistant control, called ContactSessionRequested:
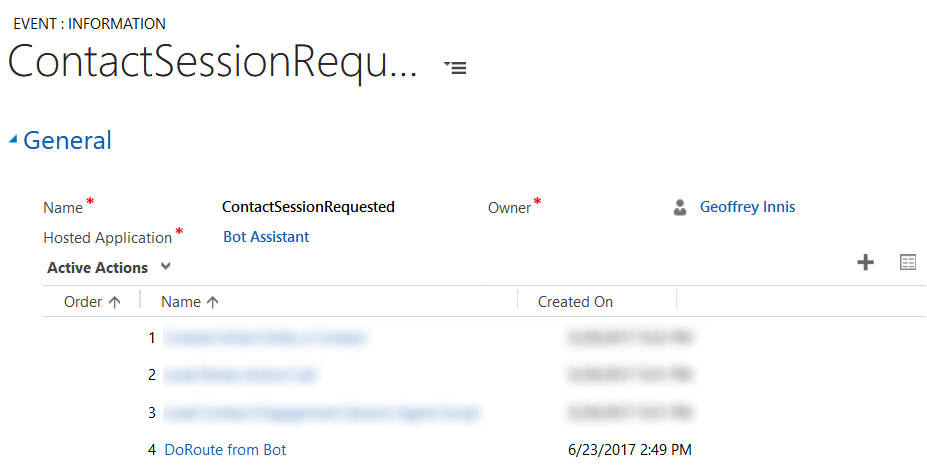
To this event, we can call any actions we wish to in preparation for a new session, and include an Action Call called DoRoute from Bot. Note how we are including a Replacement Parameter that references a parameter from our event:
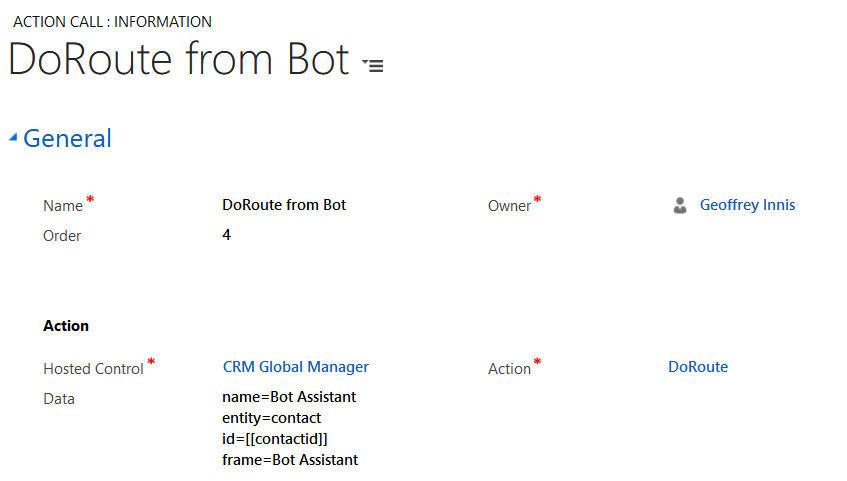
This will trigger our Window Navigation Rule, which in turn will create our session and load our contact:
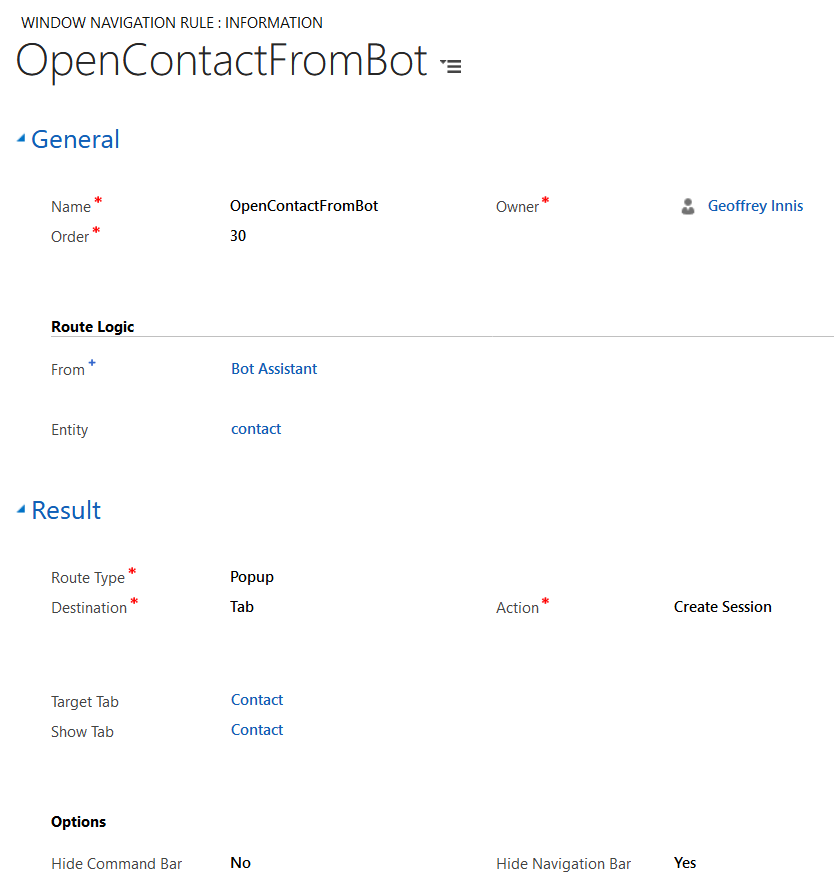
We now need to call the event from our bot. USD provides a means of calling events on hosted controls using an event moniker syntax, as outlined in the Unified Service Desk documentation on user-defined events. We can use this syntax to call the event we created in USD:
https://event/?eventname=ContactSessionRequested&contactid=<contactid>
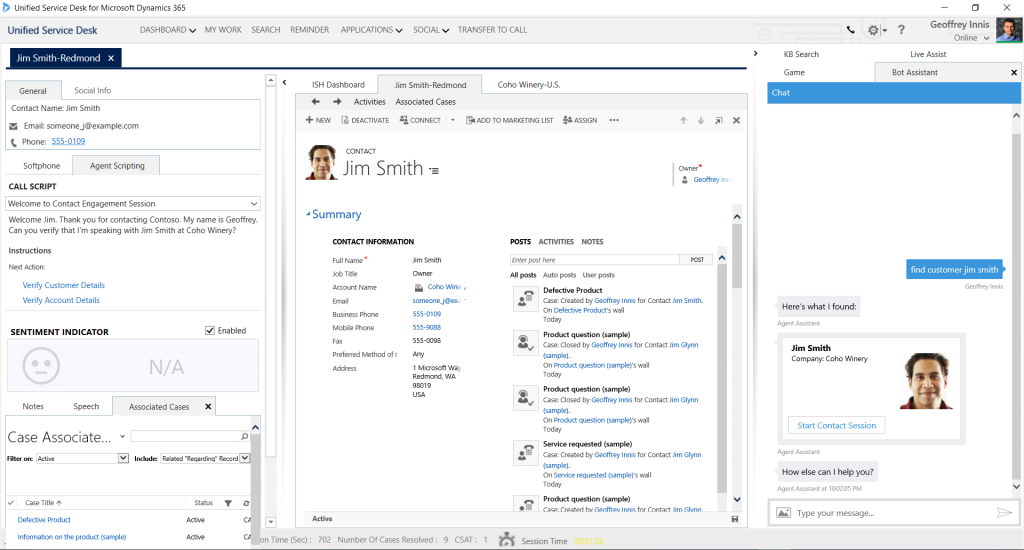
We will now add code to our bot to allow the bot to call the URL above when appropriate. Making use of the code from our previous blog post that allows us to query Dynamics 365 data via the Web API, we can use the following code to use our bot dialog context, and a contact search term, to find matching contacts, and return them to our user. In this example, we are using a ThumbnailCard to present our information and CardAction objects to allow our user to select a button. When the button is selected, the URL will be opened, and our custom event will be called:
[snippet slug=agentbot1_contact line_numbers=false lang=c-sharp]
Included in the code is an overloaded ReadyForNextCommand method for reusability.
Here is an example of how you can call this method in the context of a dialog that uses LUIS for natural language interaction:
[snippet slug=agentbot1_luiscontact line_numbers=false lang=c-sharp]
(see Enable language understanding with LUIS for more information on LUIS dialogs)
When our Card Action button that is presented to the user is clicked, the event moniker URL will be called, and a session with the selected contact will be initiated:
Stay tuned for more posts in this series, in which we will cover:
- Making our bot aware of contextual information from USD
- Enabling our bot to proactively notify our agent of alerts and insights based on the USD context
- Enabling our bot for engagement via speech, in addition to typing
- and more