Publish LightSwitch 2013 Preview Applications to Windows Azure Web Sites (without the Azure SDK)
We recently announced the preview release of Visual Studio 2013 and as we noted in the LightSwitch release notes,
“Publishing to Azure requires a newer version of Azure SDK, which is not yet released to the public. You can't reliably publish to Azure until the SDK is available. We will announce the availability on the LightSwitch team blog.”
Now that I am reading this again, I am not sure why we put the word “reliably” in there. Given that there isn’t a compatible SDK yet, I’d say the reliability of publishing to Azure via the Azure path of the wizard, is somewhere in the neighborhood of 0% ![]() While you can’t currently publish to an Azure Cloud Service, it is possible to publish to an Azure Web Site by going through the IIS path of the Publish Wizard. Here are the steps to take to do this:
While you can’t currently publish to an Azure Cloud Service, it is possible to publish to an Azure Web Site by going through the IIS path of the Publish Wizard. Here are the steps to take to do this:
First, navigate to the Windows Azure portal and login. Click on the “Web Sites” tab on the left pane of the screen and click on your target web site under the “NAME” column (for this post, I will assume that you have already created an Azure Web Site)
What we want to do now, is download the publish profile for our web site. There are a couple of places to do this from the portal. If you still have the “Quick Start” page turned on for your web site, you will find the “Download the publish profile” link under the “Publish your app” section:
The other place you can find the link is under the “quick glance” section on the right side of the “Dashboard” page of the portal (in case you have disabled the Quick Start page)
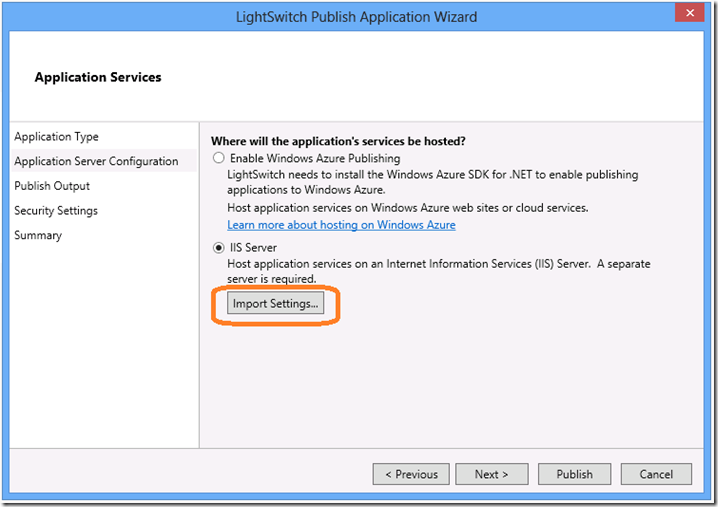
Click on one of the “Download the publish profile” links and save the file when prompted. We’re now ready to use this file to publish our LightSwitch application to our Azure Web Site. Open up your LightSwitch project and bring up the Publish Wizard. Pick your desired selection on the “Application Type“ page, then when you get to the “Application Server Configuration” page, click on the Import Settings button, under the “"IIS Server” radio button:
When the “Import Settings” dialog opens up, browse to the location where you saved your publish settings and select that file, then hit the Next button on the Publish Wizard. When you get to the “Publish Output” page, you will see that all the details have been filled in by importing the settings file:
In addition, if you had a SQL database setup as a Linked Resource, this information will be entered on the Data Connections page (same as it does if you publish to an Azure Web Site through the “normal” path of the wizard.
So that’s it. Just download the file, import it in the publish wizard and you are good to go for publishing the project to your Azure Web Site.


