Implementing Authentication/Security with a WPF client app and a WCF Service using Azure Directory Services
Not for the faint of heart
This post will require your inner geek to emerge. There are many assets for you to leverage to complete this post, including source code, Word documents, and tons of images. the word document alone is over 45 pages.
the core document to use is the word document just discussed. This will give you the context for this post. The goal of this post is to merely provide you some guidance about what exactly is modified in the Visual Studio projects and what the Azure portal might look like.
It does not show that I have provisioned in Azure website called terkalyexpenses.azurewebsites.net. Refer to my previous post for more information about that part of the project.
Be clear that the URL/name (terkalyexpenses.azurewebsites.net) you choose to host your Azure website, will correlate directly with what you provide for directory services and Azure.
A roadmap to enable security with WCF service applications
This post is unique. It provides a roadmap to enable you to add security to an existing WCF application. It presents to applications, the server-side WCF expense application, and also the WPF client application that makes WCF service calls.
Retrofitting existing WCF applications
There is enough information here for you to understand how to retrofit your existing client applications as well as your WCF server applications.
The portal, the client, and the server side WCF service
As of 4/2, all of the guidance is presented that will enable you to go to the Azure portal and make the necessary configuration entries using Azure directory services. This is somewhat complex so I have presented a number of images to help you understand the relationship between the Azure portal as well as the applications that use it, which includes the WPF client application, and the WCF expense service.
This is a buildup from this previous set of posts
This represents the fourth post in a series of posts.
You can ignore the previous three posts, but that means you will need to come up with your own example of the WCF service and a WPF thick client application.
I do provide all the solutions and code that you will need without needing to refer to the previous posts.
See prerequisites for more information.
Prerequisites
The following is required to complete this hands-on lab:
- Microsoft Visual Studio 2013
- The latest Windows Azure SDK for .NET
- A Windows Azure subscription
- See previous labs below
Previous Labs
The following is required to complete this hands-on lab:
How to Implement a Service Architecture on Windows Azure using WCF, WPF, and Unit Testing
Moving a WCF Service and Database to the Cloud
Exercise 3: Securing a WCF service using Windows Azure Active Directory
Download some content before moving forward
Download link for WPF Client and WCF Service
- This is the client and server before security has been implemented
- https://1drv.ms/1flI1wA
Download link for Word Document Step by Step Walkthrough
You will walkthrough this document to implement the security features.
Download link for the completed version of the WPF client and the WCF service
- This is the WPF Client and WCF Server Download with WCF security implemented.
- It can be used as a starting point for your own code base
- https://1drv.ms/PjGei0
Task 1: Code changes to the WPF client and WCF Service
I would say that this process is error-prone. There are several source code modules and a close coupling situation with the Azure portal. You need to be careful about entering the correct strings where required. Be aware that the entries you make at the portal will differ from mine.
Note: What you will need to do
You will need to create a Azure website
You will need to leverage directory services in Azure
Getting started
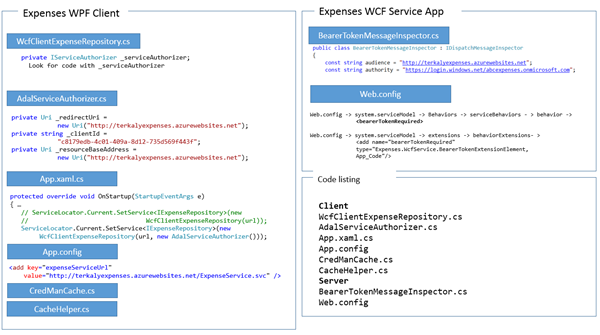
Notice there is a client and a server side.
- The Expenses WPF Client is a native client application, not a web-based one.
- The expenses WCF service application is the server-side. It gets deployed to Azure websites.
- The blue boxes represent source code that you need to modify an existing application with.
- The complete code listing can be seen on the lower right.
- There are six files to modify on the client side and two on the server side.
Viewing the overall scope of adding security to client and server
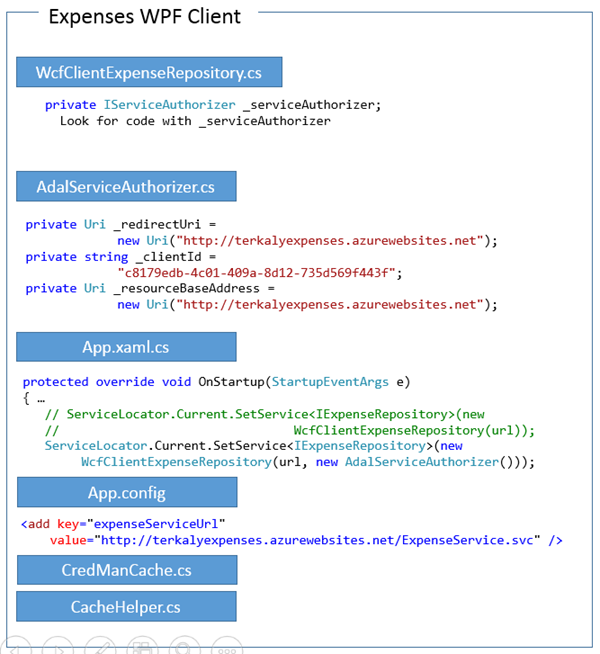
This is the drill down into the client-side.
- The Service Authorizer represents code that will add to implement security on the client side.
- The actual string literals that you will use for the redirection URI, the client ID, and the resource base address will be obtained from the Azure portal.
- You will need to add code for the startup of the client application to hearken to the service authorizer.
- App config will contain the URL for the deployed server-side application (WCF Expenses).
_Viewing the details of the changes needed on the client side _
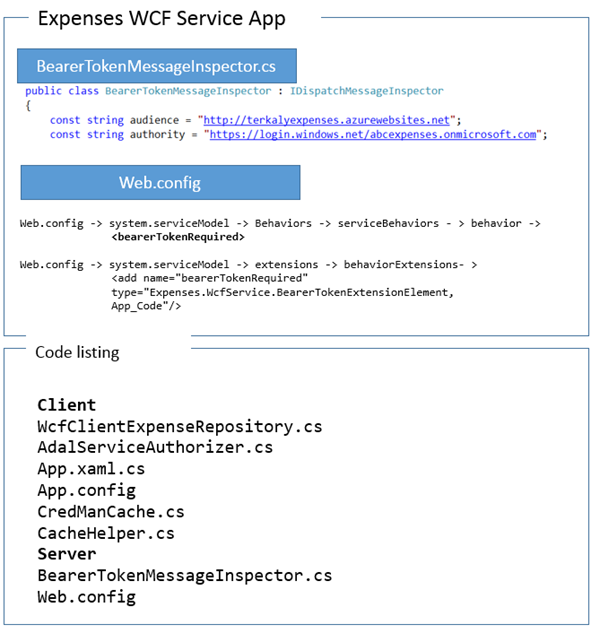
There are only two files to modify on the WCF service application.
- Naturally, there will be a lot of work in the portal that you have to do.
- Again the string literals you see here for audience and authority will be different for you.
- When you set things up at the Azure portal you will need to copy the strings so you can paste them into your Visual Studio code.
Viewing the changes needed on the server side ( WCF expense application )
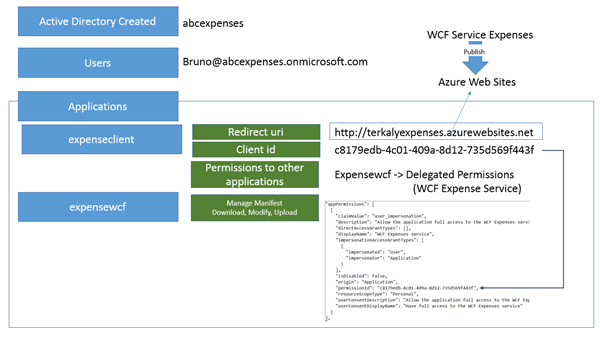
When you create your active directory or your directory services, you will provide a name.
In my case the directory name is abcexpenses. Yours will be different.
I also added a user called Bruno.
The redirect URI and the client ID will be obtained from the portal.
Notice that there are two applications that you need to add in the Azure portal.
- The first is expenseclient, which represents the WPF client that will need access to the WCF service.
- The second one is expensewcf, which represents the WCF service application.
Essentially, in the portal you will need to indicate to the service and to the client that you are integrating security between client and server.
Viewing the information from the portal
The bottom image is what you will see at the Azure portal.
When you click new you will be able to create a new directory.
In my case I called it abcexpenses.
- Yours will be different.
- You will need to write this down so you can modify your code appropriately.
The active directory menu at the Azure portal
The main screen at the portal lists the active directories that have been created.
- In my case you can see I have created abcexpenses. Your name will be different.
Viewing the list of directories created
Notice there are several menu selections for the directory you just created.
There are two menu selections that we will drill into.
The first menu is the users menu.
- We will need to add a user.
The second menu is the applications menu.
- This is where we will set up security between the WPF client and the WCF server application.
Viewing the details of abcexpenses
Once you drill into the user menu, you will be able to add a user. You can see that the login user I added was called Bruno.
- It is important that you notice that the domain is called abcexpenses.
Adding a user
Notice that the user Bruno has been successfully added using the users menu.
Viewing the added user
This screen shows that we added to applications menu.
- The first application is for the client, the WPF application.
- The second application added is expensewcf, which is a server-side WCF service / Expenses application.
Viewing the applications added to the abcexpenses directory
You are viewing the details of the client application.
The important points here relate to the configuration menu.
- You will need to copy the client ID so that you can enter it into Visual Studio in the appropriate places.
- The redirect URI will also be pasted into Visual Studio files.
Finally, at the bottom notice that you are granting delegated permissions to the WCF expenses service applications.
Viewing the details about expenseclient ( the WPF application )
One of the key steps to getting this to work is to manage the manifest file as seen in the red box.
- This means you will download it to your client machine, make some modifications, and then upload it back to the portal.
- The modifications that you make in this manifest file is to paste in the client ID that you just received from the portal. See the previous step.
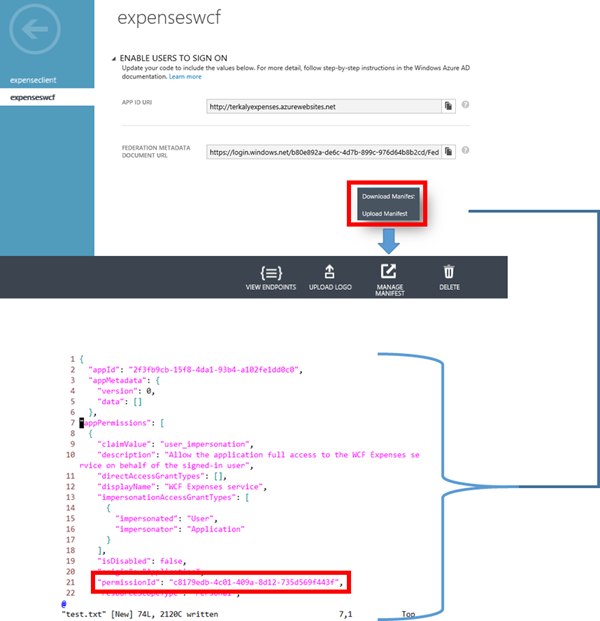
Viewing the details of the expensewcf, server-side application
Notice that you can download and upload the manifest file.
Notice the permission ID in the red box, which represents the client ID for the expenseclient application that has been added to the abcexpenses directory.
As mentioned previously, you will download the manifest file, then heavily modify the appPermissions JSON element in the manifest file.
- The appPermissions was initially empty square brackets, but has been filled in significantly.
Take special note to paste in the correct client ID into the red box seen below.
Viewing details about the manifest file
Summary
Remember that there are two sets of projects for Visual Studio here. Each set contains the client and the server.
The first set represents the client and server that do not support security
The second set represents a client and server that have been modified to support Azure directory services as the authentication mechanism.
You will need to spend some time working through the Word document. It will also need to take special note that you don't confuse the strings that I used when I built the example, with the strings that you are going to use when you build your example.
I recommend that you write down with pencil and paper or paste into a document those things from the portal that you are entering.
Good luck. Like I said, this is not for the faint of heart.
Comments
Anonymous
May 05, 2014
First, Thanks much for detailed steps and series of Posts Bruno. After following all the steps for WCF service when we try to add as a Web Reference at client side. It is prompting for credentials and we provide the Azure AD (Our Custom AD) user credentials its not showing any error, but still it is showing up the pop up to enter credentials. Am I missing something? please correct/help me in fixing this.Anonymous
December 03, 2014
Hi Bruno, Thank you very much for your article, It's what I looking for. However the link to download content above is not accessible, http://1drv.ms/PjGei0. Could you please provide new link to download the content please ?Anonymous
December 03, 2014
Try this link http://1drv.ms/1FNapRzAnonymous
December 16, 2014
Hi Bruno, Are these samples still supported? When I download the manifest for the client, I do not see the 'appPermissions' key. Thanks.Anonymous
January 05, 2015
Hi Bruno, thanks for the example! Does Azure AD allow you to sign the bearer token with a custom cert the way that ACS/ADFS can?Anonymous
February 25, 2015
You get prompted for a user name and password because of the <bearerTokenRequired/> in the ServiceBehavior definition. When I need to build the wsdl from a client, I comment this out in the WCF services web.config file, update the WSDL and then ucomment it back out for it to work.Anonymous
June 29, 2015
Hi, Thanks for sharing this great info. However, the link to the word doc points to an empty spot? Also, some of the describing pics above does not show. Any fixes for these things coming up?
