Windows 8, XNA and MonoGame - Part 3, Getting Windows 8 Store Ready
 |
 |
In Part 1 of this series I introduced you to MonoGame for Windows8, an implementation of the XNA namespace that allows you to get your XNA code running on Windows 8 as a Metro Style App.
In Part 2 I documented how to get your development environment configured using GitHub and Visual Studio 2012
In Part 3 I will cover migrating XNA code to Windows 8.and the Windows 8 features you will need to support in order to make your game Windows 8 Store worthy.
The Shooter Tutorial
As my first test of MonoGame, I decided to follow the Game Development Tutorial for XNA Game Studio 4.0 to see if I hit any snags or blocking issues as I progressively built up a simple 2D shooter. The one thing I learned was that the Content Pipeline compiler is not part of the MonoGame implementation (at least not yet). Here is how to solve for this.
The Content Pipeline
From XNA Content Pipeline Overview
The Content Pipeline is a special set of assemblies included with XNA Game Studio that use MSBuild to compile game assets such as image and sound files into streamlined, pre-processed binary files called XNBs (so named for the fact that the file extension of the compiled version of a source file is changed to .xnb) which load quickly at run-time.
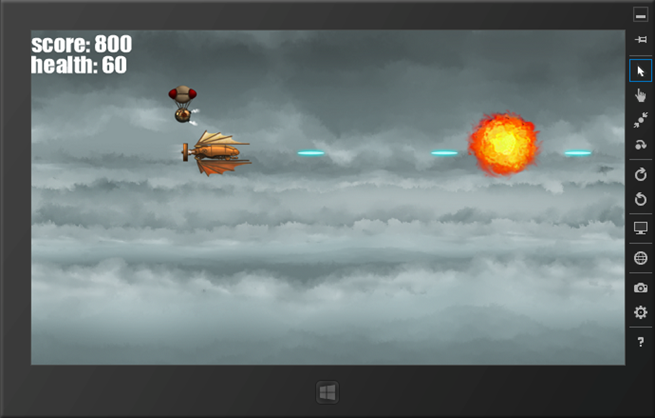
Fig. A screen shot if the running Shooter tutorial app running in the VS2012 Simulator
Metro Tic-Tac-Toe
My next project with MonoGame was to build a simple 2D game from scratch and add the feature support necessary for Windows 8 Store submission. I decided to implement the ancient game of strategy, intrigue and cunning…tic-tac-toe.
Code Review
I am not going to go into great detail on how the application was written as this is not an XNA tutorial. To help you find what you are looking for as you map the code to the Windows 8 topics below here is a description of each class in the project:
| Class | Description |
TicTacToeGame |
Main game class. Initializes the game and is the top level entry point for Update and Draw game loop events. |
GameState |
Static class with global game state settings and handles window and app events such as ScreenResize, Suspend and Resume. |
Background |
Displays a background image or color. |
Board |
Board manages the array of tiles and can determine if there is a winner and will display the line across the winning tiles. |
Tile |
Represents a tile on the board. Traps touch/mouse events, maps input coordinates to game viewport coordinates and displays blank, X or O depending on game state. Tile will ‘jiggle’ when touched. |
Player |
Represents a player. Displays player name and score. |
NewGameTile |
Tile displayed when a game completes. Offers the user an opportunity to play again |
Package.appmanifest |
App settings and runtime specifications such as name of Tile and SplashScreen image files, preference for Landscape or Portrait screen mode, capability requests such as access to file system, Internet, webcam, etc. |
Download this repository from CodePlex here
Supporting Windows 8 Features to Make Your App Store Worthy
Once you have your XNA application running on Windows 8 you will want to add the features that the Windows 8 Store requires for all Metro Style Apps. Chris Bowen has written a great piece called The Top Ten Secrets of App Success that details several of the most critical features you need to support. I will cover some of these here. These features include but are not limited to:
- App Tiles and Splash Screens
- Using the MessageDialog
- Screen Management – Snap, Landscape and Portrait
- Process Lifetime Management (PLM)
App Tiles and Splash Screens
The first step is to create your Tiles and Splash screens in the required sizes and add them to the Assets folder in your VS2012 project.
| Image | Size | Example |
Logo |
150 x 150 pixels |
|
Wide Logo |
310 x 150 pixels |
|
Small Logo |
30 x 30 pixels |
|
Splash Screen |
620 x 300 |
Note: Some people have noted that the Looks Familiar Splash Screen eye will follow them as they move about the room
Next you need to reference them in your Package.appmanifest. Open that file in VS2012 and add references to your logos and splash screen images. As my splash screen was white, I found it necessary to set the Background Color setting here to white (#FFFFFF) as well to get a beautiful splash experience.
By adding these different logos to your app manifest, your app supports Tile features of the Start Screen in Windows 8:
Using the MessageDialog
The UX guidelines for Games are much less strict than for Apps. The game designer/developer can choose to place any type of controls on the game surface they need to create the game experience they desire. That said you may want to look for opportunities to add Metro Style UI elements to your game to create a more cohesive Windows 8 experience for the user. MessageDialog is one way to do that.
MessageDialog has a command bar that can support up to three commands. If you don't specify any commands, then a default command is added to close the dialog. The dialog dims the screen behind it and blocks touch events from passing to the app's canvas until the user responds. Message dialogs should be used sparingly, and only for critical messages or simple questions that must block the user's flow. The Message Dialog can display up to 3 commands.
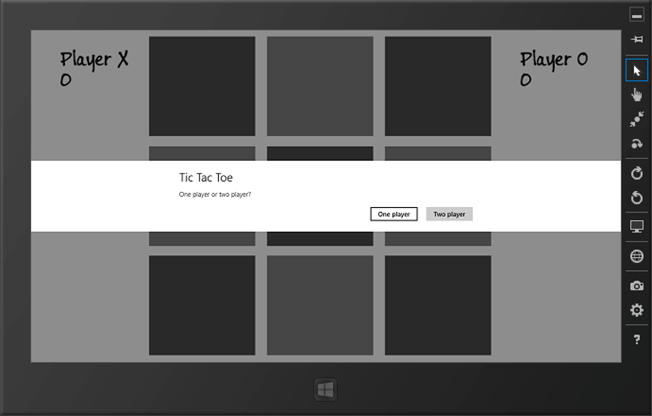
For my game I decided to use a MessageDialog to ask the user if they want to play the computer or another person. I want the dialog to popup at the start of the game. One of the first issues I ran into was that the call to show the MessageDialog had to be done after the initialized but before game play began. If I tried to invoke the dialog during the Initialize() routine, I got an exception. If I tried to make the call in Draw(), I got an exception. I placed the call at the start of Update() and all was fine. The issue resulted from an attempt to lock the main UI thread too early in the startup process.
The MessageDialog code is in the TicTacToe.cs file. The SmartPlayer class supports a brute force tic-tac-toe algorithm so that a person can play against the app. See Player.cs.
    1: using Windows.UI.Popups;
    2:
    3: public class TicTacToe : Game
    4: {
    5: //...
    6:     // MessageDialog object
    7:     MessageDialog gameType;
    8: //...
    9:
   10: protected override void Initialize()
   11: {
   12: //...
   13:     // initialize MessageDialog
   14:     InitGameTypeDialog();
   15: //...
   16: }
   17:
   18: private void InitGameTypeDialog()
   19: {
   20:     gameType = new MessageDialog("One player or two player?");
   21:
   22:     gameType.Title = "Tic Tac Toe";
   23:
   24:     // Add commands and set their callbacks; both buttons use the same callback function instead of inline event handlers
   25:     gameType.Commands.Add(new UICommand("One player", new UICommandInvokedHandler(this.OnSetGameType)));
   26:     gameType.Commands.Add(new UICommand("Two player", new UICommandInvokedHandler(this.OnSetGameType)));
   27:
   28:     // Set the command that will be invoked by default
   29:     gameType.DefaultCommandIndex = 0;
   30:
   31:     // Set the command to be invoked when escape is pressed
   32:     gameType.CancelCommandIndex = 0;
   33: }
   34:
   35: // called when the user makes a selection or hits esc
   36: private void OnSetGameType(IUICommand command)
   37: {
   38:     if (command.Label.Equals("Two player"))
   39:         playerX.IsPerson = true;
   40:     else
   41:         playerX.IsPerson = false;
   42: }
   43:
   44: public async void ShowGameTypeDialog()
   45: {
   46:     await gameType.ShowAsync();
   47: }
   48:
   49: protected override void Update(GameTime gameTime)
   50: {
   51:     // if this is our first time in, ask the user
   52:     // what type of game it is, one player or two
   53:
   54:     if (GameState._startup)
   55:     {
   56:         ShowGameTypeDialog();
   57:         GameState._startup = false;
   58:     }
   59: //...
Screen Management, Snap View and Landscape and Portrait Support
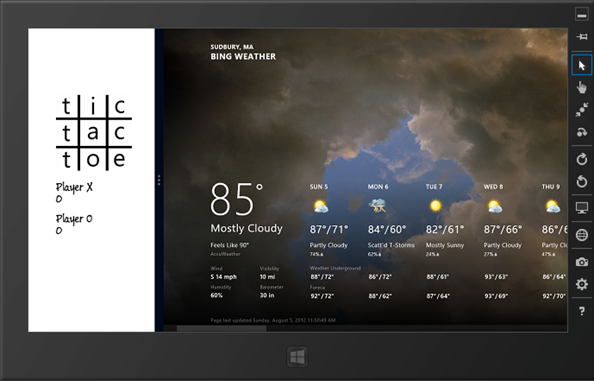
One of the first items I discovered that needed special attention when developing Tic-Tac-Toe was consistently mapping from window coordinates to the game viewport coordinate space. These may or may not be the same dimensions so you will need to transform input coordinates coming from mouse or touch to viewport coordinates so that you can detect exactly where the user in touching or clicking on the screen.
To solve for this I reference the Windows.UI.Core namespace and added a CoreWindow member to my GameState class. On Initialization I get a reference to the CoreWindow and grab the window bounds and store them in a Rect. I also setup an event handler to catch screen resize events. When the screen resizes I determine the screen view, Full, Quarter Snap, Three Quarter Snap (my terms) and grab the updated screen dimensions ( see GameState.cs):
    1: using Windows.ApplicationModel.Core;
    2: using Windows.Foundation;
    3: using Windows.UI.Core;
    4:
    5: namespace TicTacToe
    6: {
    7:     public enum WindowState { Full = 0, Snap1Quarter = 1, Snap3Quarter = 2 };
    8:
    9:     public static class GameState
   10:     {
   11:         public static WindowState _windowState;
   12:         public static CoreWindow _window;
   13:         public static Rect _windowsBounds;
   14:
   15:         public static void Initialize()
   16:         {
   17:             _window = CoreWindow.GetForCurrentThread();
   18:             _windowsBounds = _window.Bounds;
   19:             _windowState = WindowState.Full;
   20:             _window.SizeChanged += _window_SizeChanged;
   21:         }
   22:
   23:         //called when the window is resized
   24:         static void _window_SizeChanged(CoreWindow sender, WindowSizeChangedEventArgs args)
   25:         {
   26:             if (args.Size.Width == _windowsBounds.Width)
   27:             {
   28:                 _windowState = WindowState.Full;
   29:             }
   30:             else if (args.Size.Width <= 320.00)
   31:             {
   32:                 _windowState = WindowState.Snap1Quarter;
   33:             }
   34:             else
   35:             {
   36:                 _windowState = WindowState.Snap3Quarter;
   37:             }
   38:
   39:             _windowsBounds.Height = args.Size.Height;
   40:             _windowsBounds.Width = args.Size.Width;
   41:         }
   42:     }
   43: }
Game viewport height and width can be found in the XNA object GraphicsDevice.Viewport. Here is an example of accessing those coordinates (see TicTacToeGame.cs, note the implementation code in Board.cs and Tile.cs):
    1: // update the tile positions based on the current viewport dimensions
    2: board.UpdateTilePositions(GraphicsDevice.Viewport.Width, GraphicsDevice.Viewport.Height);
Whenever testing for user input, you can use this information to perform the necessary coordinate transformation. Note that mouse input and 1-finger touch input are the same. (See Tile.cs)
    1: void UpdateMouse()
    2: {
    3:     MouseState mouseState = Mouse.GetState();
    4:
    5:     // The mouse X and Y positions are returned relative to the top-left of the game window.
    6:     mousePosition.X = mouseState.X;
    7:     mousePosition.Y = mouseState.Y;
    8:
    9:     // calculate % adjustment to map mouse coordinates into viewport coordinates
   10:     float xAdjust = _viewPortWidth / ((float)GameState._windowsBounds.Width);
   11:     float yAdjust = _viewPortHeight / ((float)GameState._windowsBounds.Height);
   12:
   13:     // adjust the mouse coodinates from screen to viewport
   14:     mousePosition.X *= xAdjust;
   15:     mousePosition.Y *= yAdjust;
   16: }
Finally you will want to make sure you display your game appropriately depending on the portrait/landscape orientation and snap view state. The Snap View state can be Full (no snap), snapped Three Quarter and snapped One Quarter (my terminology). For detailed guidelines on Snap View see this article. Using the window state information I am tracking in the GameState class, I can add logic to my draw routine to do the right thing (see TicTacToeGame.cs)
    1: protected override void Draw(GameTime gameTime)
    2: {
    3:     GraphicsDevice.Clear(Color.White);
    4:
    5:     // Start drawing
    6:     spriteBatch.Begin();
    7:
    8:     switch (GameState._windowState)
    9:     {
   10:     //++++++++++++++++++++++++++++++++++++++++++++++++++++++++++++++++++++++++++++++
   11:     // window is snapped to the left or right and is only taking 25% of the screen
   12:     // so just display the logo and the players scores
   13:     //++++++++++++++++++++++++++++++++++++++++++++++++++++++++++++++++++++++++++++++
   14:
   15:     case WindowState.Snap1Quarter:
   16:
   17:         SpriteFont _font = Content.Load<SpriteFont>("TicTacToeBuxtonSketch");
   18:
   19:         // draw the logo tile
   20:         Rectangle rect = new Rectangle(((int) (GraphicsDevice.Viewport.Width * 0.22)),
   21:                                        ((int) (GraphicsDevice.Viewport.Height * 0.22)),
   22:                                        ((int) (GraphicsDevice.Viewport.Width * 0.6)),
   23:                                        ((int) (GraphicsDevice.Viewport.Width * 0.6)));
   24:         Texture2D logo = Content.Load<Texture2D>("TicTacToeLogo");
   25:         spriteBatch.Draw(logo, rect, Color.White);
   26:
   27:         // draw the player scores
   28:         Vector2 vect = new Vector2(((float) (GraphicsDevice.Viewport.Width * 0.22)), ((float) (GraphicsDevice.Viewport.Height * 0.5)));
   29:         spriteBatch.DrawString(_font, playerX.Name, vect, Color.Black);
   30:         vect.Y = vect.Y + 30;
   31:         spriteBatch.DrawString(_font, playerX.Score.ToString(), vect, Color.Black);
   32:         vect.Y = vect.Y + 50;
   33:         spriteBatch.DrawString(_font, playerO.Name, vect, Color.Black);
   34:         vect.Y = vect.Y + 30;
   35:         spriteBatch.DrawString(_font, playerO.Score.ToString(), vect, Color.Black);
   36:
   37:         break;
   38:
   39:     // ++++++++++++++++++++++++++++++++++++++++++++++++++++++++++++++++++++++++++
   40:     // the windows is either in full screen mode or 3/4 screen snap mode sp
   41:     // the game is playable, display the board and the game state
   42:     // ++++++++++++++++++++++++++++++++++++++++++++++++++++++++++++++++++++++++++
   43:
   44:     case WindowState.Full:
   45:     case WindowState.Snap3Quarter:
   46:
   47:         // draw the backgroeund
   48:         background.Draw(spriteBatch, GraphicsDevice);
   49:
   50:         // draw the state of the board and the player scores
   51:         board.Draw(spriteBatch);
   52:         playerX.Draw(spriteBatch, 0.05);
   53:         playerO.Draw(spriteBatch, 0.83);
   54:
   55:         if (GameState._gameOver == true)
   56:         {
   57:             // draw line threw winning tiles
   58:             board.DrawWinLine(Content, spriteBatch, GraphicsDevice.Viewport.Width, GraphicsDevice.Viewport.Height);
   59:
   60:             // draw the new game tile
   61:             newGameTile.Draw(spriteBatch);
   62:
   63:             // check to see if the new game tile is clicked
   64:             if (newGameTile.ButtonClicked)
   65:             {
   66:                 // reset the game board for a new game
   67:                 ResetGame();
   68:             }
   69:         }
   70:         break;
   71:     }
   72:
   73:     // Stop drawing
   74:     spriteBatch.End();
   75:
   76:     base.Draw(gameTime);
   77: }
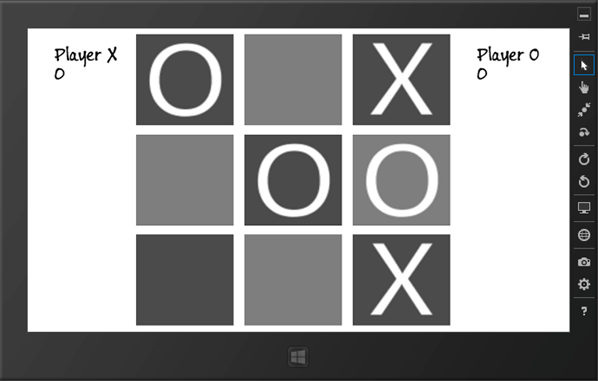
Once you have this code in place your app will respond to user input and screen size change events smoothly:
PLM – Process Lifetime Management
A Metro Style App has 3 possible execution states: Running, Suspended and Terminated. On Windows 8 you are not in control of your applications execution state. The user and the system are in control. This has a significant impact on how you handle state management.
Whenever your app is on the screen, it is running (duh!). If the user swipes to another app, or goes to the start screen and runs another app, your app is put into Suspend mode (Oh!). It remains in memory but is not scheduled by the Kernel. If the user comes back to your app, it resumes with the state it had at the time of suspension (Nice!). For a game this should work out just fine.
If your app requires storing state between invocations such as user level completion, scores, navigation within a level, etc. you will need to determine when and where you want to store that data. Your choices for When are a) when it happens, and b) on suspension. Your choices for Where are a) local storage, b) roaming storage or c) cloud service. Performance will be a guiding factor in determining the best solution for your app. For details on PLM you can watch this Channel 9 video.
Tic-Tac-Toe does not store any state between invocations(this is a planned feature or version 7) but to demonstrate where you might put that code I added a 2 event handlers in the GameState class using the CoreApplicaiton object (see GameState.cs):
    1: public static void Initialize()
   2: {
   3:     _window = CoreWindow.GetForCurrentThread();
   4:     _windowsBounds = _window.Bounds;
   5:     _windowState = WindowState.Full;
   6:     _window.SizeChanged += _window_SizeChanged;
   7:
   8:     CoreApplication.Suspending += CoreApplication_Suspending;
   9:     CoreApplication.Resuming += CoreApplication_Resuming;
  10: }
  11:
  12: static void CoreApplication_Resuming(object sender, object e)
  13: {
  14:     // coming back from suspend, probably don't need to do anything as current state is in memory
  15: }
  16:
  17: static void CoreApplication_Suspending(object sender, Windows.ApplicationModel.SuspendingEventArgs e)
  18: {
  19:     // suspending, save appropriate game and user state
  20: }
Other Things to Consider
This should help you to getting you well on your way to completing your Metro Style Game for the Windows Store using MonoGame and Visual Studio 2012. Here are a few more things to consider for your game:
- Live Tiles – display updated current level, score, etc.
- Cloud Services – use Windows Azure for leaderboards and multi-player configuration
- Use the Settings panel in Windows 8 for user specified game settings
- Use Contracts to provide Search and Share within your app if it makes sense for your gamer community
Generation App: Getting You There
We are here to help you get your app on Windows. Here is how you can gain an advantage and stand out from the crowd through the programs we’re offering:
- Design Consultation
- Technical Consultation
- Online training and tips from insiders
Technorati Tags: Windows 8,Win8,W8,Metro,Metro Style App,Visual Studio,MonoGame,Game Development,GameDev,C#,XNA
Comments
Anonymous
August 09, 2012
The comment has been removedAnonymous
August 16, 2012
Hi Jules! Games own the screen outright do no need to comply with the Windows UI Style guidelines such as fonts, margins, etc. You will need to make sure you support screen resolutions, deal with portrait and landscape and snap as those are common capabilities of all windows Store Apps. Those are not difficult to code for (see sample).Anonymous
September 14, 2012
The comment has been removedAnonymous
September 18, 2012
I'm having problems loading music into Monogame. Music works fine for my game in XNA, but isn't loading correctly in here. Any ideas?Anonymous
October 06, 2012
Great. I got all the way to the end. I can even pass, windows app cert kit. but when i turn it app package to put it on the store. it fails to add the content that was in the debug or release folder. Is there another way i can add that info. or am i doing somthing wrong.Anonymous
October 06, 2012
I found it. You just add The Full Content Folder To your solution and make all the files Content and Copy if newer. Or you can mess around with the contentmanager.cs but both ways workAnonymous
October 27, 2012
Gr8 article.Anonymous
October 27, 2012
Good article.Anonymous
October 28, 2012
The comment has been removedAnonymous
October 29, 2012
Hi Daniel. At this time you need to compile your graphic assets using VS2010 using an XNA 4.0 Project and then move the XNB files over to your VS2010 project. The reason is that MonoGame does not yet implement the content pipeline compilation tools. When drawing your sprites in Windows 8 do not use hard coded dimensions. Use % of GraphicsDevice.Viewport.Width and GraphicsDevice.Viewport.Height. That way your game will scale properly regardless of screen resolution.Anonymous
November 09, 2012
Hi All, Can we create windows 8 xna desktop game which run in desktop mode with all RT based features like touch and accelerometer etc? I guess Mono event can't help with that is it? Here is my question if you like you answer - stackoverflow.com/.../13302537 ThanksAnonymous
March 02, 2013
Im confuse. On win7 theres a template for windows and openGL only, in win8 theres only a generic template?


