Understanding HDInsight Custom Node VM Sizes
With the 02/18/2015 update to HDInsight and Azure Powershell 0.8.14 we introduced a lot more options for configuring custom Head Node VM size as well as Data Node VM size and Zookeper VM size. Some workloads can benefit from increased CPU performance, increased local storage throughput, or larger memory configurations. You can only select custom node sizes when provisioning a new cluster, whereas you are able to change the number of Data Nodes on a running cluster with the Cluster Scaling feature.
We've seen some questions come up regarding how to properly select the various sizes, and what that means for the availability of memory within the cluster.
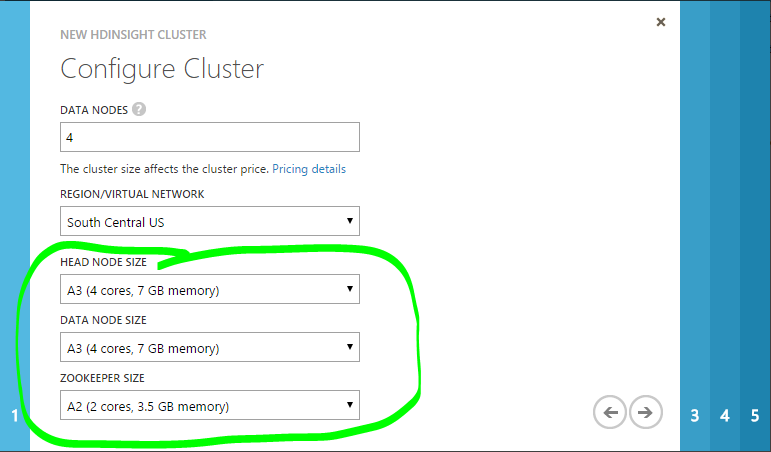
If you are creating an HDInsight cluster through the Azure Management Portal, you can select custom VM sizes by using the "Custom Create" option.
In the second page of the wizard, you will have the option to customize the Head Node and Data Node Size for Hadoop clusters, the Head Node, Data Node and Zookeeper Sizes for HBase clusters, and the Nimbus Node, Supervisor Node, and Zookeeper Sizes for Storm Clusters:
If you are using Azure PowerShell, you can specify the node sizes directly in New-AzureHDInsightCluster like:
 # Get HTTP Services Credential
$cred = Get-Credential -Message "Enter Credential for Hadoop HTTP Services"

# Set Cluster Name
$clustername = "mycustomizedcluster"

# Get Storage Account Details
$hdistorage = Get-AzureStorageAccount 'myazurestorage'

# Create Cluster
New-AzureHDInsightCluster -Name $clustername -ClusterSizeInNodes 2                    `
                                             -HeadNodeVMSize "A7"                     `
                                             -DataNodeVMSize "Standard_D3"            `
                                             -ZookeeperNodeVMSize "A7"                `
                                             -ClusterType HBase                       `
    -DefaultStorageAccountName $hdistorage.StorageAccountName                         `
    -DefaultStorageAccountKey                                                         `
     (Get-AzureStorageKey -StorageAccountName $hdistorage.StorageAccountName).Primary `
    -DefaultStorageContainerName $clustername                                         `
    -Location $hdistorage.Location -Credential $cred
or you can include them in New-AzureHDInsightClusterConfig like:
 # Get HTTP Services Credential
$cred = Get-Credential -Message "Enter Credential for Hadoop HTTP Services"

# Set Cluster Name
$clustername = "mycustomizedcluster"

# Get Storage Account Details
$hdistorage = Get-AzureStorageAccount 'myazurestorage'

# Set up new HDInsightClusterConfig
$hdiconfig = New-AzureHDInsightClusterConfig -ClusterSizeInNodes 2         `
                                             -HeadNodeVMSize "A7"          `
                                             -DataNodeVMSize "Standard_D3" `
                                             -ZookeeperNodeVMSize "Large"  `
                                             -ClusterType HBase
# Add other options to hdiconfig
$hdiconfig = Set-AzureHDInsightDefaultStorage -StorageContainerName $clustername     `
    -StorageAccountName $hdistorage.StorageAccountName                               `
    -StorageAccountKey                                                               `
    (Get-AzureStorageKey -StorageAccountName $hdistorage.StorageAccountName).Primary `
    -Config $hdiconfig

    # Create Cluster
    New-AzureHDInsightCluster -config $hdiconfig -Name $clustername `
               -Location $hdistorage.Location -Credential $cred
Note: The cmdlets only understand "HeadNodeVMSize" and "DataNodeVMSize" parameters, but the naming conventions for these nodes is a bit different for HBase and Storm clusters. HeadNodeVMSize is used for Hadoop Head Node, HBase Head Node, and Storm Nimbus Server node size. DataNodeVMSize is used for Hadoop Data/Worker Node, HBase Region Server, and Storm Supervisor node size.
Finding the right string values to specify the different VM sizes can be a bit tricky. If you specify an unrecognized VM size, you will get an error back that reads: "New-AzureHDInsightCluster : Unable to complete the cluster create operation. Operation failed with code '400'. Cluster left behind state: 'Error'. Message: 'PreClusterCreationValidationFailure'.". The allowed sizes are described on the Pricing page at: https://azure.microsoft.com/en-us/pricing/details/hdinsight/ but the string values that relate to the different sizes can be found at: https://msdn.microsoft.com/en-us/library/azure/dn197896.aspx. Note that the first column in the table of sizes has a heading "Size – Management Portal\cmdlets & APIs". You have to use the value to the right of the '\', unless of course it says "(same)" in which case you use the value on the left. This means that for an "A3" size, you have to specify "Large", "A7" is just "A7", and "D3" needs to be specified as "Standard_D3".
Special Considerations for Memory Settings:
If you use the default cluster type, or specify 'Hadoop' as your cluster type, then the Hadoop, YARN, MapReduce & Hive settings will be modified to make use of the additional memory available on Data Nodes. If you specify 'HBase' or 'Storm' for the cluster type, these values currently remain at the lower defaults associated with the default node size and the additional memory is reserved for the HBase or Storm workload on the cluster. You can see the relevant settings by connecting to the cluster via RDP and examining yarn-site.xml, mapred-site.xml, and hive-site.xml in the respective configuration folders under C:\apps\dist.
It is possible to alter all of these memory configuration settings by customizing them at cluster provisioning time, but this can be a complicated endeavor when you consider that you have to balance the different allocations to make sure that you don't allocate beyond the physical memory on the nodes.
