IP Restrictions on Azure App Service as expected behavior
A method to 100% shutdown the public endpoint of an App Service running in the public tenant is not provided. However, you can create an ILB ASE (which is not a public tenant) or you can restrict the access using an IP Restriction. Here is some information on the detailed feature for setting this up in IIS and into the web.config file. If you want to do the same on an Azure App Service, then check this out.
An interesting behavior I wanted to document concerns what happens when you have made some configuration in the portal for your App Service but also added some ‘supplemental’ configurations into the web.config file for the application running on the platform…
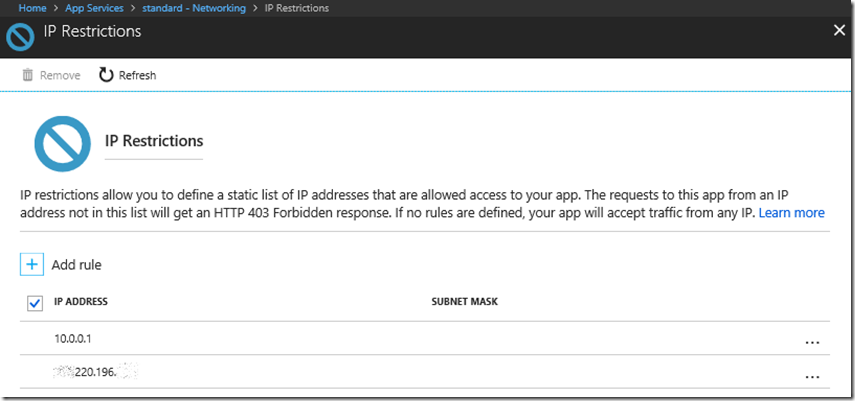
As seen in Figure 1, I created an IP Restriction that allows only a client with an IP address of 10.0.0.1 to access the App Service. I knew this was not my client IP so it was good for testing.
Figure 1, IP Restrictions not applying, not working
Once applied, when I accessed my App, I received the following:
You do not have permission to view this directory or page.
This is because the default denyAction is set to Forbidden and which returns a 403.503
But, if I modify my web.config file
<ipSecurity allowUnlisted="true" />
Then the setting in the portal is overridden by the configuration in my web.config file, and now I can access my App Service regardless of the portal setting.
A cool thing I found though was that instead of accepting the default denyAction I can configure that in my web.config so a different status is returned to the client.
<ipSecurity allowUnlisted="false" denyAction="NotFound" />
Adding that configuration to the web.config results in the following being returned, along with a 404.503
The resource you are looking for has been removed, had its name changed, or is temporarily unavailable.
I confirmed also that having this configuration, I.e. the change to the denyAction does not override the IPs allowed to access, see Figure 2. After adding my client IP address, I was able to access even after customizing the denyAction in the web.config.
Figure 2, IP Restrictions not applying, not working
Which leads to the possible misunderstanding. Suppose I have a configuration in my web.config file like the following which allows my client IP address.
<ipSecurity allowUnlisted="false" denyAction="NotFound">
    <add ipAddress="###.220.196.###" />
</ipSecurity>
You may get a mixture of behaviors depending on the IPs entered via the portal and IPs configured in the web.config. The recommendation is to use the portal. At the same time, my experience was positive that changing the denyAction had no negative impact.
TIP #1:
You can get the IP configuration you made in the portal via the Azure Resource Explorer here. Navigate to the following URL:
https://management.azure.com/subscriptions/"1"/resourceGroups/"2"/providers/Microsoft.Web/
       sites/"3"/config?api-version=2016-08-01
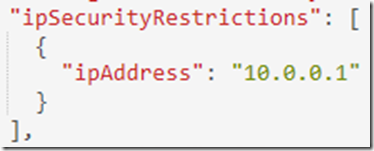
Where 1 = subscriptionID, 2 = resource group name and 3 = the App Service name. You would see similar output as seen in Figure 3.
Figure 3, viewing IP Restrictionsconfigurations in resource explorer
TIP #2:
You can learn a lot about IIS and the ASP.NET pipeline via Failed Request Tracing. I mention how to enable that here “Enable Failed Request Tracing for an Azure App Service Web App”. However, as seen in Figure 4, I was quickly able to find my client IP address, the status and sub-status code plus, see that it was indeed the IpRestrictionModule which applied to request restriction on the request.
Figure 4 IP Restrictions not applying, not working
Cool stuff.


