Lab Ops 18 Getting started with Software Defined Networking
In my last post I finished up where I had my host under management of Virtual Machine Manager (VMM) and that was about it. As with Hyper-V I can’t really use VMM until I have my fabric configured and after adding in hosts the first thing we need to do is look at Networking. To recap my current setup now looks like this
Where RDS-Switch is an internal virtual switch, and my RDS-DC is my DC & DHCP server with one scope of 192.168.10.200-254. VMM has a dynamic ip address and is also hosting SQL Server for its own database.
If I go to VMM and go to VMs & Services | All Hosts | Contoso | Orange (which is my Dell Orange laptop) I can right click and select View Networking. If I look at the Host Networks all I can see are the physical NICs, If I look at VM Networks all I see is my VMs but no networks and the Network topology screen is entirely blank so what’s going on? Basically things are very different in VMM than they are in Hyper-V, and frankly we don’t want to use Hyper-V for managing our networks anymore than a VMWare expert would configure networks on individual ESXi hosts. In our case we use VMM to mange virtual switches centrally where in VMWare distributed switches are controlled in VCenter. So my plan is to use VMM to create a network topology that reflects what my VMs above are for; to manage my datacentre. Later on I’ll add in more networking which will enable me to isolate my services and applications from this, in the same way that Cloud providers like Azure hide the underlying infrastructure from customers.
If we look at the Fabric in VMM and expand Networking we have 8 different types of objects we can create and there is a ninth VM Networks that shows up under VMs and Services so where to begin?
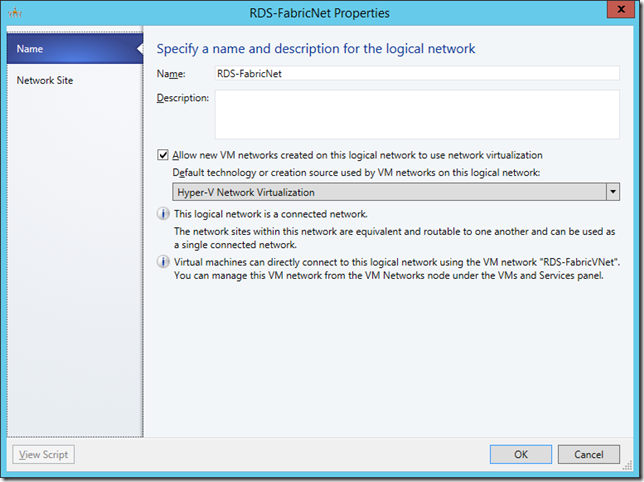
Your starter for ten (or nine in this case) is the TechNet guide Configuring Networking in VMM, and once you dig into that you realise that VMM wants to control not just the switching but ip management as well. The core to all of this are the Logical Network and Virtual Networks which are just containers for various properties including sites and ip pools. I am going to start simple and as I only have one host just create the first object we need, a Logical Network, that has one connected network. For now I am going to ignore the sub options to get us started.
note this is a screen grab from the end of the process
I can’t create a Logical Network without a Network Site which has a specific subnet and optionally VLAN set..
The small printAs per usual in this series I am going to share the PowerShell to do this. VMM is very good at allowing you to see the equivalent script when doing something, however I have modified what VMM spits out to make it easier to read, while ensuring it still works Note the segments in this post are all using the same variables so you will need to turn them in the order shown |
The equivalent PowerShell is:
$logicalNetwork = New-SCLogicalNetwork -Name "RDS-FabricNet" -LogicalNetworkDefinitionIsolation $false -EnableNetworkVirtualization $true -UseGRE $true -IsPVLAN $false
$allSubnetVlan = New-SCSubnetVLan -Subnet "192.168.10.0/24" -VLanID 0
$allHostGroups = Get-SCVMHostGroup -Name "All Hosts"
$logicalNetworkDefinition =New-SCLogicalNetworkDefinition -Name "RDS-FabricNet_Site192" -LogicalNetwork $logicalNetwork -VMHostGroup $allHostGroups -SubnetVLan $allSubnetVlan -RunAsynchronously
Note that in the code above a network site is referred to as a Logical Network Definition.
VMs are connected to virtual machine networks and we had the option to create one of these when we created the logical network with the same name. In this case that would have been fine for what I am doing here, as my two VM’s are actually there to manage the hosts in much the same way as a VMWare appliance does. so I am going to create a virtual network that is directly connected to the logical one..
$vmNetwork = New-SCVMNetwork -Name "RDS-FabricVNet" -LogicalNetwork $logicalNetwork -IsolationType "NoIsolation"
However this and the logical network and site are just a containers in which we put our settings as points of management. We now need to create an uplink port profile from Fabric | Networking | Port Profiles. This needs to be an Uplink Port profile, and when we select that option we can describe how the underlying NIC can be teamed directly from here rather than doing that it in Server Manager on each host. We then simply select our Network site (RDS-FabricNet_Site192) and we are done..
The one line of PowerShell for this is..
$nativeProfile = New-SCNativeUplinkPortProfile -Name "RDS-FabricUplink" -Description "" -LogicalNetworkDefinition $logicalNetworkDefinition -EnableNetworkVirtualization $false -LBFOLoadBalancingAlgorithm "HostDefault" -LBFOTeamMode "SwitchIndependent" -RunAsynchronously
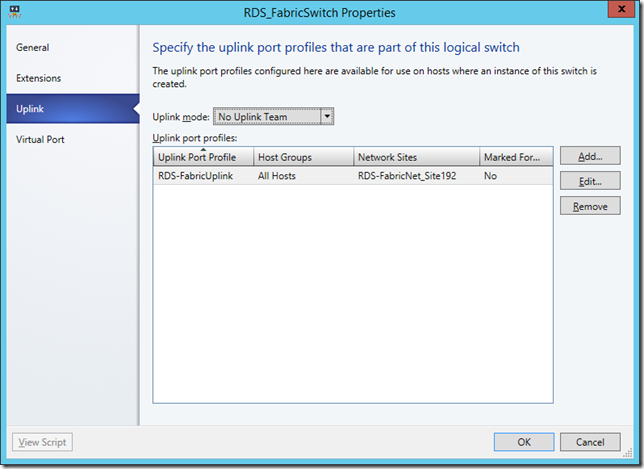
The next piece of the puzzle is to create a Logical Switch. This is a logical container that emulates a top of Rack switch in a real server room. It can have a number of virtual ports but unlike VMWare these are limited by numbers but are there to manage traffic through the use of port classifications. We’ll need at least one of these and I am going for Host management for the port classification as that is what all of this is for..
The PowerShell is:
$virtualSwitchExtensions = Get-SCVirtualSwitchExtension -Name "Microsoft Windows Filtering Platform"
$logicalSwitch = New-SCLogicalSwitch -Name "RDS_FabricSwitch" -Description "" -EnableSriov $false -SwitchUplinkMode "NoTeam" -VirtualSwitchExtensions $virtualSwitchExtensions
$UplinkPortProfileSet = New-SCUplinkPortProfileSet -Name "RDS-FabricUplink-Set" -LogicalSwitch $logicalSwitch -RunAsynchronously -NativeUplinkPortProfile $UplinkProfile
We should also create a Virtual port with the host management port classification:
The PowerShell is..
$portClassification = Get-SCPortClassification -Name "Host management"
$nativeProfile = Get-SCVirtualNetworkAdapterNativePortProfile -Name "Host management"
New-SCVirtualNetworkAdapterPortProfileSet -Name "Host management" -PortClassification $portClassification -LogicalSwitch $logicalSwitch -RunAsynchronously -VirtualNetworkAdapterNativePortProfile $nativeProfile
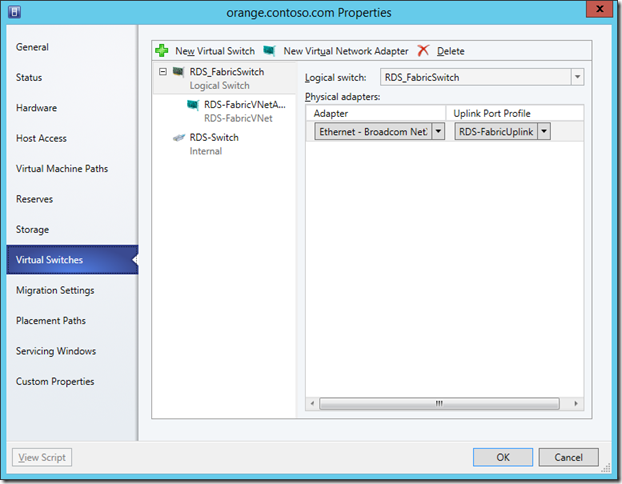
We can now apply this logical switch is then applied to our hosts by going to its properties and navigating to Hardware | Virtual Switches and adding a new Virtual Switch | New Logical Switch. Immediately our RDS-FabricSwitch is selected and we can see that our adapter (physical NIC) is connected to the Uplink we have created through this switch.
However that is just like using virtual switches in Hyper-V manager what we also need to do is to add in a Virtual Network Adapter as in the diagram above. This picks up the VM Network we already created (RDS-FabricVNet). Notice I can have all kinds of fun with ip addresses here..
BTW I should have set the Port Profile to the only option available, Host Management, in the above screen shot. If I look at Hardware | Network adapters I can also see my logical network and site..
The equivalent PowerShell to connect the logical switch virtual network adapter to the host is ..
#My Host is called Orange
$vmHost = Get-SCVMHost -ComputerName Orange
#Note you’ll need to at least change the Get-SCVMHostNetworkAadpter –Name to reflect the NIC in your host.
$networkAdapter = Get-SCVMHostNetworkAdapter -Name "Broadcom NetXtreme 57xx Gigabit Controller" -VMHost $vmHost
Set-SCVMHostNetworkAdapter -VMHostNetworkAdapter $networkAdapter -UplinkPortProfileSet $uplinkPortProfileSet
New-SCVirtualNetwork -VMHost $vmHost -VMHostNetworkAdapters $networkAdapter -LogicalSwitch $logicalSwitch -CreateManagementAdapter -ManagementAdapterName "RDS-FabricVNetAdatper" -ManagementAdapterVMNetwork $vmNetwork -ManagementAdapterPortClassification $portClassification
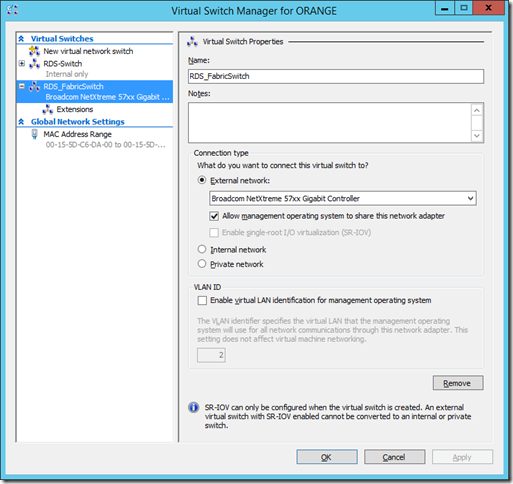
Now we can finally see what on earth we have been doing as this Logical switch we have created is now visible in Hyper-V Manager..
and if we look at it’s extensions we can see a new Microsoft VMM DHCPv4 Server Switch Extension in here which allows to control all the virtual switches from VMM.
The tricky part now is to add the VMs to the virtual network. This isn’t tricky because it’s hard it’s tricky because if VMM and the DC loose sight of each other or VMM can’t see the host then we are in trouble so as we can’t easily change these settings in the UI or PowerShell plus we’ll need to flush DNS as DHCP will kick in and change things as well. However what we are doing is moving VMs that are essentially part of the data centre fabric. Other VMs would not be affected like this indeed that’s the point we should be able to move VMs together across hosts and datacentres without affecting their connectivity.
Here is a diagram of what we have created to contrast with what was above.
This has been quite a lot of work to achieve very little, but we now have the foundations in place to quickly add in more networks and more hosts and to isolate and manage our networking without needing to use VLANs. However if there are already VLANs in existence then all of this will work just fine as well (for more on that check this post from the VMM engineering team).
Now I have a basic network for VMM and the hosts I need to do some of this again for the VMs that will serve out applications. Until next time have a go at this stuff read the stuff on TechNet and create a lab like this to get your head around it.
Comments
- Anonymous
February 09, 2014
Hi Andrew, thanks for sharing. I'm working on this issue here in Brazil and this post helped me.


