Azure Service Bus 기본 또는 표준에서 분할을 사용하도록 설정
Service Bus 파티션을 사용하면 큐 및 토픽 또는 메시징 엔터티가 여러 메시지 broker에 분할될 수 있습니다. 분할은 분할된 엔터티의 전체 처리량이 단일 메시지 broker의 성능으로 제한되지 않는다는 의미입니다. 또한 메시지 broker의 임시 중단(예: 업그레이드 중)은 분할된 큐 또는 토픽을 사용할 수 없게 렌더링하지 않습니다. 분할된 큐 및 항목은 트랜잭션 및 세션에 대한 지원 같은 모든 고급 Service Bus 기능을 포함할 수 있습니다. 자세한 내용은 분할된 큐 및 토픽을 참조하세요. 이 문서에서는 Service Bus 큐 또는 토픽에 대해 중복 메시지 검색을 사용하도록 설정하는 다양한 방법을 보여 줍니다.
Important
- 분할은 기본 또는 표준 SKU의 모든 큐와 토픽에서 엔터티 생성에 지원됩니다.
- 기존 큐 또는 토픽에서는 분할 옵션을 변경할 수 없습니다. 큐 또는 토픽을 만들 때만 옵션을 설정할 수 있습니다.
- 표준 계층 네임스페이스에서 Service Bus 큐 및 항목은 1, 2, 3, 4 또는 5GB 크기로 만들 수 있습니다(기본값은 1GB). 분할을 사용하는 경우 Service Bus는 엔터티의 16개 사본(16개 파티션)을 각각 지정된 동일한 크기로 만듭니다. 따라서 크기가 5GB인 큐를 만들 경우 16개의 파티션에서 최대 큐 크기는 (5 * 16) = 80GB가 됩니다.
Azure Portal 사용
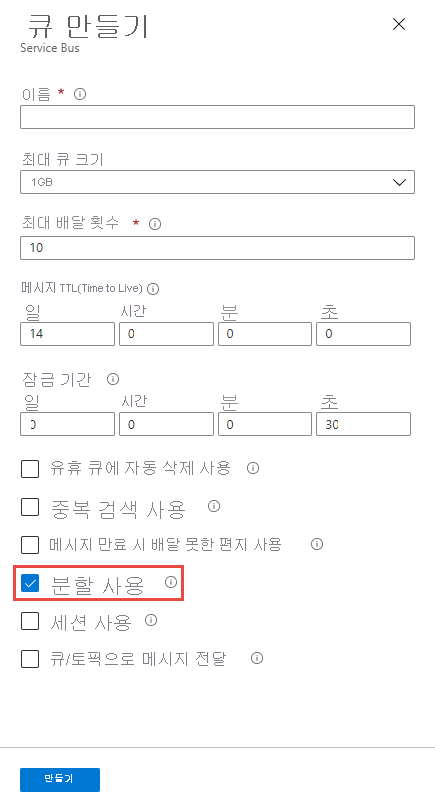
Azure Portal에서 큐를 만들 때 다음 이미지에 표시된 것처럼 분할 사용을 선택합니다.

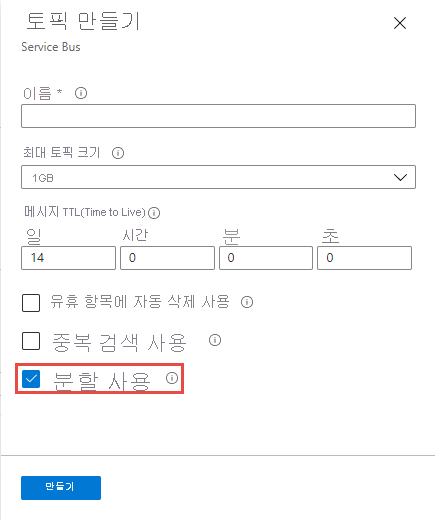
Azure Portal에서 토픽을 만들 때 다음 이미지에 표시된 것처럼 분할 사용을 선택합니다.

Azure CLI 사용
분할이 사용하도록 설정된 큐를 만들려면 --enable-partitioning을 true로 설정한 az servicebus queue create 명령을 사용합니다.
az servicebus queue create \
    --resource-group myresourcegroup \
    --namespace-name mynamespace \
    --name myqueue \
    --enable-partitioning true
분할이 사용하도록 설정된 토픽을 만들려면 --enable-partitioning을 true로 설정한 az servicebus topic create 명령을 사용합니다.
az servicebus topic create \
    --resource-group myresourcegroup \
    --namespace-name mynamespace \
    --name mytopic \
    --enable-partitioning true
Azure PowerShell 사용
분할이 사용하도록 설정된 큐를 만들려면 -EnablePartitioning을 $True로 설정한 New-AzServiceBusQueue 명령을 사용합니다.
New-AzServiceBusQueue -ResourceGroup myresourcegroup `
    -NamespaceName mynamespace `
    -QueueName myqueue `
    -EnablePartitioning $True
분할이 사용하도록 설정된 토픽을 만들려면 -EnablePartitioning을 true로 설정한 New-AzServiceBusTopic 명령을 사용합니다.
New-AzServiceBusTopic -ResourceGroup myresourcegroup `
    -NamespaceName mynamespace `
    -Name mytopic `
    -EnablePartitioning $True
Azure Resource Manager 템플릿 사용
분할이 사용하도록 설정된 큐를 만들려면 큐 속성 섹션에서 enablePartitioning을 true로 설정합니다. 자세한 내용은 Microsoft.ServiceBus namespaces/queues 템플릿 참조를 참조하세요.
{
  "$schema": "https://schema.management.azure.com/schemas/2019-04-01/deploymentTemplate.json#",
  "contentVersion": "1.0.0.0",
  "parameters": {
    "serviceBusNamespaceName": {
      "type": "string",
      "metadata": {
        "description": "Name of the Service Bus namespace"
      }
    },
    "serviceBusQueueName": {
      "type": "string",
      "metadata": {
        "description": "Name of the Queue"
      }
    },
    "location": {
      "type": "string",
      "defaultValue": "[resourceGroup().location]",
      "metadata": {
        "description": "Location for all resources."
      }
    }
  },
  "resources": [
    {
      "type": "Microsoft.ServiceBus/namespaces",
      "apiVersion": "2018-01-01-preview",
      "name": "[parameters('serviceBusNamespaceName')]",
      "location": "[parameters('location')]",
      "sku": {
        "name": "Standard"
      },
      "properties": {},
      "resources": [
        {
          "type": "Queues",
          "apiVersion": "2017-04-01",
          "name": "[parameters('serviceBusQueueName')]",
          "dependsOn": [
            "[resourceId('Microsoft.ServiceBus/namespaces', parameters('serviceBusNamespaceName'))]"
          ],
          "properties": {
            "enablePartitioning": true
          }
        }
      ]
    }
  ]
}
중복 검색이 사용하도록 설정된 토픽을 만들려면 토픽 속성 섹션에서 enablePartitioning을 true로 설정합니다. 자세한 내용은 Microsoft.ServiceBus namespaces/topics 템플릿 참조를 참조하세요.
{
  "$schema": "https://schema.management.azure.com/schemas/2019-04-01/deploymentTemplate.json#",
  "contentVersion": "1.0.0.0",
  "parameters": {
    "service_BusNamespace_Name": {
      "type": "string",
      "metadata": {
        "description": "Name of the Service Bus namespace"
      }
    },
    "serviceBusTopicName": {
      "type": "string",
      "metadata": {
        "description": "Name of the Topic"
      }
    },
    "location": {
      "type": "string",
      "defaultValue": "[resourceGroup().location]",
      "metadata": {
        "description": "Location for all resources."
      }
    }
  },
  "resources": [
    {
      "apiVersion": "2018-01-01-preview",
      "name": "[parameters('service_BusNamespace_Name')]",
      "type": "Microsoft.ServiceBus/namespaces",
      "location": "[parameters('location')]",
      "sku": {
        "name": "Standard"
      },
      "properties": {},
      "resources": [
        {
          "apiVersion": "2017-04-01",
          "name": "[parameters('serviceBusTopicName')]",
          "type": "topics",
          "dependsOn": [
            "[resourceId('Microsoft.ServiceBus/namespaces/', parameters('service_BusNamespace_Name'))]"
          ],
          "properties": {
            "enablePartitioning": true
          }
        }
      ]
    }
  ]
}
다음 단계
선택한 언어로 샘플을 사용하여 Azure Service Bus 기능을 살펴봅니다.
- .NET용 Azure Service Bus 클라이언트 라이브러리 샘플(최신)
- Java용 Azure Service Bus 클라이언트 라이브러리 샘플(최신)
- Python용 Azure Service Bus 클라이언트 라이브러리 샘플
- JavaScript용 Azure Service Bus 클라이언트 라이브러리 샘플
- TypeScript용 Azure Service Bus 클라이언트 라이브러리 샘플
이전 .NET 및 Java 클라이언트 라이브러리에 대한 샘플은 다음을 참조하세요.
2026년 9월 30일에 Azure SDK 지침을 따르지 않는 Azure Service Bus SDK 라이브러리 WindowsAzure.ServiceBus, Microsoft.Azure.ServiceBus 및 com.microsoft.azure.servicebus를 사용 중지합니다. 또한 SBMP 프로토콜에 대한 지원이 종료되므로 2026년 9월 30일 이후에는 더 이상 이 프로토콜을 사용할 수 없습니다. 해당 날짜 마이그레이션에 중요한 보안 업데이트와 개선된 기능을 제공하는 최신 Azure SDK 라이브러리로 마이그레이션합니다.
이전 라이브러리는 2026년 9월 30일 이후에도 계속 사용할 수 있지만 더 이상 Microsoft로부터 공식 지원 및 업데이트를 받을 수 없습니다. 자세한 내용은 사용 중지 공지 지원을 참조하세요.