빠른 시작: Spring Boot 앱에 기능 플래그 추가
이 빠른 시작에서는 Azure App Configuration을 Spring Boot 웹앱에 통합하여 엔드투엔드 기능 관리를 구현하는 방법을 보여줍니다. App Configuration을 사용하면 모든 기능 플래그를 중앙에 저장하고 해당 상태를 제어할 수 있습니다.
Spring Boot 기능 관리 라이브러리는 포괄적인 기능 플래그 지원을 통해 프레임워크를 확장합니다. 이러한 라이브러리에는 Azure 라이브러리에 대한 종속성이 없습니다. 또한 해당 Spring Boot 구성 공급자를 통해 App Configuration과 원활하게 통합됩니다.
필수 조건
- 활성 구독이 있는 Azure 계정. 체험 계정 만들기
- App Configuration 저장소. 저장소를 만듭니다.
- 버전 11이 설치된 지원되는 Java Development Kit SDK
- Apache Maven 버전 3.0 이상
기능 플래그 추가
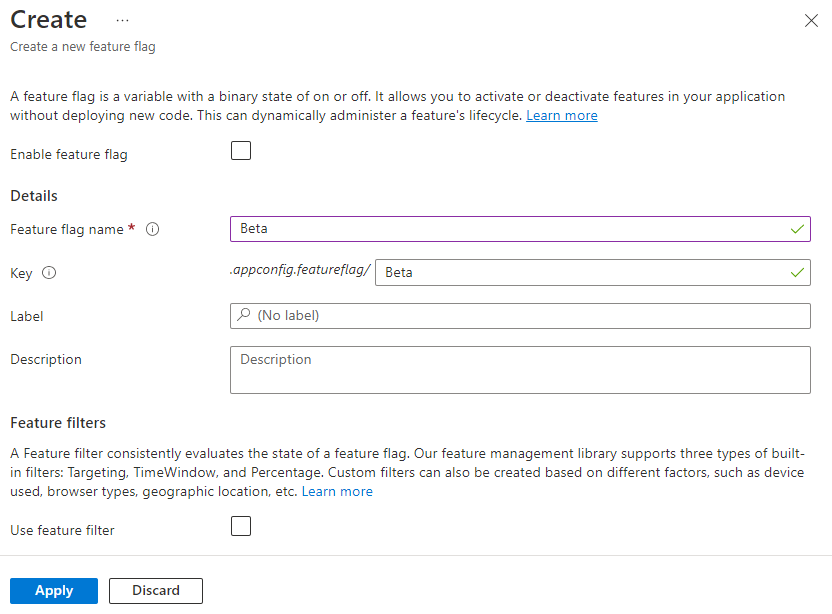
App Configuration 저장소에 베타라는 기능 플래그를 추가하고 레이블 및 설명을 기본값으로 둡니다. Azure Portal 또는 CLI를 사용하여 저장소에 기능 플래그를 추가하는 방법에 대한 자세한 내용은 기능 플래그 만들기로 이동하세요.

Spring Boot 앱 만들기
새 Spring Boot 프로젝트를 만들려면 다음을 수행합니다.
Spring Initializr로 이동합니다.
다음 옵션을 지정합니다.
- Java를 사용하는 Maven 프로젝트를 생성합니다.
- Spring Boot 버전 2.0 이상을 지정합니다.
- 애플리케이션에 대한 그룹 및 아티팩트 이름을 지정합니다. 이 문서에서는
com.example및demo를 사용합니다. - Spring Web 종속성을 추가합니다.
이전 옵션을 지정한 후 프로젝트 생성을 선택합니다. 메시지가 표시되면 프로젝트를 로컬 컴퓨터로 다운로드합니다.
기능 관리 추가
로컬 시스템에서 파일의 압축을 풀면 Spring Boot 애플리케이션을 편집할 수 있습니다. 앱의 루트 디렉터리에서 pom.xml을 찾습니다.
텍스트 편집기에서 pom.xml 파일을 열고
<dependencies>목록에 다음을 추가합니다.
<dependency>
    <groupId>com.azure.spring</groupId>
    <artifactId>spring-cloud-azure-appconfiguration-config-web</artifactId>
</dependency>
<dependency>
    <groupId>com.azure.spring</groupId>
    <artifactId>spring-cloud-azure-feature-management-web</artifactId>
</dependency>
<dependency>
    <groupId>org.springframework.boot</groupId>
    <artifactId>spring-boot-starter-thymeleaf</artifactId>
</dependency>

<dependencyManagement>
    <dependencies>
        <dependency>
        <groupId>com.azure.spring</groupId>
        <artifactId>spring-cloud-azure-dependencies</artifactId>
        <version>5.18.0</version>
        <type>pom</type>
        <scope>import</scope>
        </dependency>
    </dependencies>
</dependencyManagement>
참고 항목
- 스프링 웹에 종속되지 않는 비웹 기능 관리 라이브러리가 있습니다. 차이점은 GitHub의 설명서를 참조하세요.
App Configuration 저장소에 연결
앱의
resources디렉터리로 이동하여 또는bootstrap.yaml파일을 엽니다bootstrap.properties. 파일이 없으면 새로 만듭니다. 파일에 다음 줄을 추가합니다.App Configuration 저장소에 인증하는 데 사용합니다
DefaultAzureCredential. 지침에 따라 자격 증명에 App Configuration 데이터 판독기 역할을 할당합니다. 애플리케이션을 실행하기 전에 권한이 전파될 수 있는 충분한 시간을 허용해야 합니다. AppConfigCredential.java 새 파일을 만들고 다음 줄을 추가합니다.속성 파일을 사용하는 경우 다음 코드를 사용합니다.
 spring.cloud.azure.appconfiguration.stores[0].endpoint= ${APP_CONFIGURATION_ENDPOINT}
 spring.cloud.azure.appconfiguration.stores[0].feature-flags.enabled=true
yaml 파일을 사용하는 경우 다음 코드를 사용합니다.
spring:
  cloud:
    azure:
      appconfiguration:
        stores[0]:
          feature-flags:
            enabled: 'true'
          connection-string: ${APP_CONFIGURATION_CONNECTION_STRING}
또한 관리 ID를 사용하지 않으려면 프로젝트에 다음 코드를 추가해야 합니다.
import org.springframework.stereotype.Component;

import com.azure.data.appconfiguration.ConfigurationClientBuilder;
import com.azure.identity.DefaultAzureCredentialBuilder;
import com.azure.spring.cloud.appconfiguration.config.ConfigurationClientCustomizer;

@Component
public class AppConfigCredential implements ConfigurationClientCustomizer {

    @Override
    public void customize(ConfigurationClientBuilder builder, String endpoint) {
        builder.credential(new DefaultAzureCredentialBuilder().build());
    }
}
디렉터리 아래에
resources/META-INF파일을 만들고spring.factories다음 줄을 추가하고 애플리케이션 이름 및 패키지로 업데이트com.example.MyApplication하여 구성 부트스트랩 구성을 추가합니다.org.springframework.cloud.bootstrap.BootstrapConfiguration=\ com.example.MyApplication환경 변수를 설정합니다.
APP_CONFIGURATION_ENDPOINT 환경 변수를 Azure Portal의 저장소 개요 아래에 있는 App Configuration 저장소의 엔드포인트로 설정합니다.
Windows 명령 프롬프트를 사용하는 경우 다음 명령을 실행하고, 명령 프롬프트를 다시 시작하여 변경 내용을 적용합니다.
setx APP_CONFIGURATION_ENDPOINT "endpoint-of-your-app-configuration-store"PowerShell을 사용하는 경우 다음 명령을 실행합니다.
$Env:APP_CONFIGURATION_ENDPOINT = "<endpoint-of-your-app-configuration-store>"macOS 또는 Linux를 사용하는 경우 다음 명령을 실행합니다.
export APP_CONFIGURATION_ENDPOINT='<endpoint-of-your-app-configuration-store>'명령 프롬프트를 다시 시작하여 변경 내용을 적용합니다. 환경 변수의 값을 출력하여 올바르게 설정되었는지 확인합니다.
앱의 패키지 디렉터리에 HelloController.java라는 새 Java 파일을 만듭니다.
package com.example.demo;

import org.springframework.boot.context.properties.ConfigurationProperties;
import org.springframework.stereotype.Controller;
import org.springframework.ui.Model;

import com.azure.spring.cloud.feature.management.FeatureManager;
import org.springframework.web.bind.annotation.GetMapping;


@Controller
@ConfigurationProperties("controller")
public class HelloController {

    private FeatureManager featureManager;

    public HelloController(FeatureManager featureManager) {
        this.featureManager = featureManager;
    }

    @GetMapping("/welcome")
    public String mainWithParam(Model model) {
        model.addAttribute("Beta", featureManager.isEnabledAsync("Beta").block());
        return "welcome";
    }
}
앱의 템플릿 디렉터리에 welcome.html이라는 새 HTML 파일을 만듭니다.
<!DOCTYPE html> <html lang="en" xmlns:th="http://www.thymeleaf.org"> <head> <meta charset="utf-8"> <meta name="viewport" content="width=device-width, initial-scale=1, shrink-to-fit=no"> <title>Feature Management with Spring Cloud Azure</title> <link rel="stylesheet" href="/css/main.css"> <link rel="stylesheet" href="https://stackpath.bootstrapcdn.com/bootstrap/4.3.1/css/bootstrap.min.css" integrity="sha384-ggOyR0iXCbMQv3Xipma34MD+dH/1fQ784/j6cY/iJTQUOhcWr7x9JvoRxT2MZw1T" crossorigin="anonymous"> <script src="https://code.jquery.com/jquery-3.6.0.min.js" integrity="sha256-/xUj+3OJU5yExlq6GSYGSHk7tPXikynS7ogEvDej/m4=" crossorigin="anonymous"></script> <script src="https://unpkg.com/@popperjs/core@2"></script> <script src="https://cdn.jsdelivr.net/npm/bootstrap@5.1.3/dist/js/bootstrap.bundle.min.js" integrity="sha384-ka7Sk0Gln4gmtz2MlQnikT1wXgYsOg+OMhuP+IlRH9sENBO0LRn5q+8nbTov4+1p" crossorigin="anonymous"></script> </head> <body> <header> <!-- Fixed navbar --> <nav class="navbar navbar-expand-md navbar-dark fixed-top bg-dark"> <a class="navbar-brand" href="#">TestFeatureFlags</a> <button class="navbar-toggler" aria-expanded="false" aria-controls="navbarCollapse" aria-label="Toggle navigation" type="button" data-target="#navbarCollapse" data-toggle="collapse"> <span class="navbar-toggler-icon"></span> </button> <div class="collapse navbar-collapse" id="navbarCollapse"> <ul class="navbar-nav mr-auto"> <li class="nav-item active"> <a class="nav-link" href="#">Home <span class="sr-only">(current)</span></a> </li> <li class="nav-item" th:if="${Beta}"> <a class="nav-link" href="#">Beta</a> </li> <li class="nav-item"> <a class="nav-link" href="#">Privacy</a> </li> </ul> </div> </nav> </header> <div class="container body-content"> <h1 class="mt-5">Welcome</h1> <p>Learn more about <a href="https://github.com/Azure/azure-sdk-for-java/tree/main/sdk/spring/spring-cloud-azure-feature-management/README.md">Feature Management with Spring Cloud Azure</a></p> </div> <footer class="footer"> <div class="container"> <span class="text-muted">© 2019 - Projects</span> </div> </footer> </body> </html>static아래에 CSS라는 새 폴더를 만들고 그 안에 main.css라는 새 CSS 파일을 만듭니다.html { position: relative; min-height: 100%; } body { margin-bottom: 60px; } .footer { position: absolute; bottom: 0; width: 100%; height: 60px; line-height: 60px; background-color: #f5f5f5; } body > .container { padding: 60px 15px 0; } .footer > .container { padding-right: 15px; padding-left: 15px; } code { font-size: 80%; }
로컬로 앱 빌드 및 실행
Maven을 사용하여 Spring Boot 애플리케이션을 빌드하고 실행합니다.
mvn clean package
mvn spring-boot:run
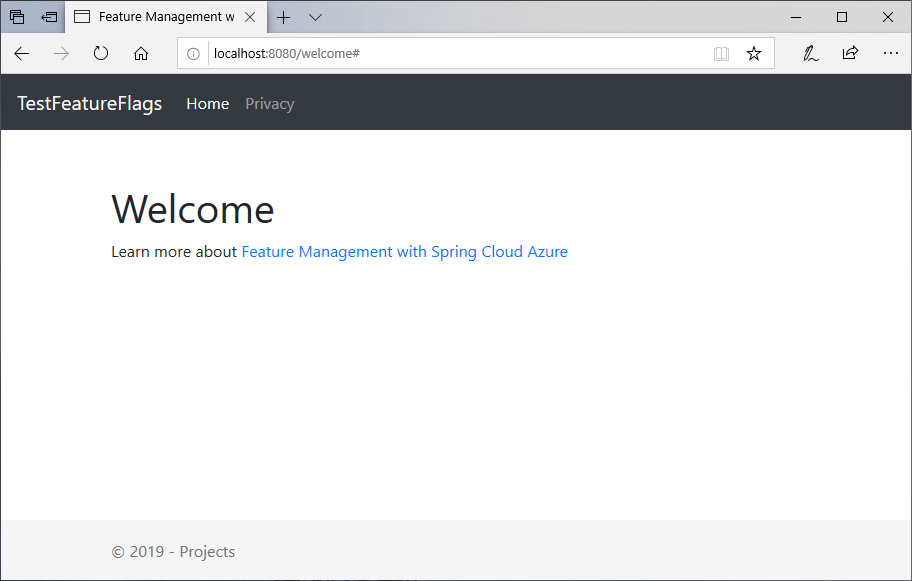
새 브라우저 창을 열고 URL(
http://localhost:8080/welcome)로 이동합니다.
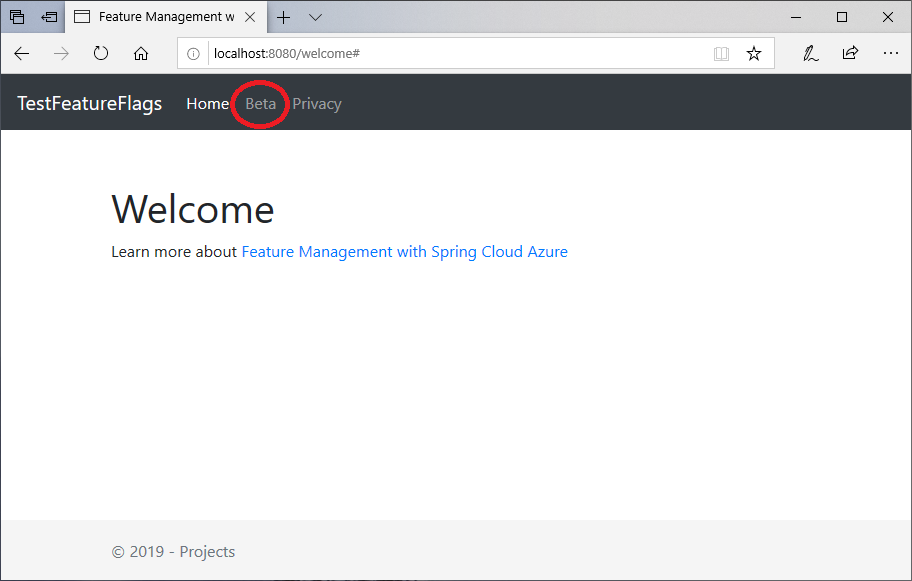
App Configuration 포털에서 기능 관리자를 선택하고, Beta 키의 상태를 다음과 같이 On으로 변경합니다.
키 State(상태) 베타 설정 새 구성 설정을 확인하려면 브라우저 페이지를 새로 고칩니다.

리소스 정리
이 문서에서 만든 리소스를 계속 사용하지 않으려면 여기서 만든 리소스 그룹을 삭제하여 요금이 부과되지 않도록 합니다.
Important
리소스 그룹을 삭제하면 다시 되돌릴 수 없습니다. 리소스 그룹 및 포함된 모든 리소스가 영구적으로 삭제됩니다. 잘못된 리소스 그룹 또는 리소스를 자동으로 삭제하지 않도록 합니다. 유지하려는 다른 리소스가 포함된 리소스 그룹 내에서 이 문서에 대한 리소스를 만든 경우 리소스 그룹을 삭제하는 대신 해당 창에서 각 리소스를 개별적으로 삭제합니다.
- Azure Portal에 로그인하고 리소스 그룹을 선택합니다.
- 이름으로 필터링 상자에서 리소스 그룹의 이름을 입력합니다.
- 결과 목록에서 리소스 그룹 이름을 선택하여 개요를 확인합니다.
- 리소스 그룹 삭제를 선택합니다.
- 리소스 그룹 삭제를 확인하는 메시지가 표시됩니다. 리소스 그룹의 이름을 입력하여 확인하고 삭제를 선택합니다.
잠시 후, 리소스 그룹 및 모든 해당 리소스가 삭제됩니다.
다음 단계
이 빠른 시작에서는 새 App Configuration 저장소를 만든 후 기능 관리 라이브러리를 통해 Spring Boot 웹앱에서 기능을 관리하는 데 사용했습니다.
- 라이브러리 참조 설명서
- 기능 관리에 대한 자세한 정보
- 기능 플래그 관리
- Spring Boot Core 앱에서 기능 플래그 사용