Windows Server 2008 R2 での手書き認識
Windows Server 2008 R2 では、サーバー側の手書き認識がサポートされています。 サーバー側認識を使用すると、サーバーは Web ページ上のペン入力からコンテンツを認識できます。 これは、ネットワーク上のユーザーがユーザー辞書を使用して解釈される用語を指定する場合に特に便利です。 たとえば、患者名をサーバー データベースに照会する医療アプリケーションがある場合は、手書きの Silverlight フォームから検索を実行するときに相互参照される別のデータベースにそれらの名前を追加できます。
Server-Side認識用にサーバーを設定する
サーバー側認識を設定するには、次の手順に従う必要があります。
- インクと手書きサービスをインストールする
- Web サーバー (IIS) とアプリケーション サーバーのサポートをインストールする
- デスクトップ エクスペリエンス ロールを有効にする
- タブレット PC 入力サービスを開始する
インクと手書きサービスをインストールする
Ink サービスと Handwriting サービスをインストールするには、サイド リンク バー トレイのサーバー マネージャー アイコンをクリックしてサーバー マネージャーを開きます。 [機能] メニューの [機能 の 追加] をクリックします。 [Ink and Handwriting Services チェック] ボックスを選択していることを確認します。 次の図は、[インクと手書きサービス] が選択された [機能の選択] ダイアログ ボックスを示しています。
![インクと手書きサービスのチェック ボックスが選択された [機能の選択] ダイアログ ボックス](images/setup-server-1-ink-and-handwriting.png)
インクと手書きサービスのチェック ボックスが選択された [機能の選択] ダイアログ ボックス
Web サーバー (IIS) とアプリケーション サーバーのインストール サポート
最初の手順と同様に、サーバー マネージャーを開きます。 次に、Web サーバー (IIS) とアプリケーション サーバーの役割を追加する必要があります。 [ ロール ] メニューの [ ロールの追加] をクリックします。 [役割の追加] ウィザードが表示されます。 [次へ] をクリックします。 [アプリケーション サーバーと Web サーバー (IIS)] が選択されていることを確認します。 次の図は、Web サーバー (IIS) とアプリケーション サーバーの役割が選択された [サーバーの役割の選択] ダイアログ ボックスを示しています。
![Web サーバー (iis) とアプリケーション サーバーの役割が選択された [サーバーの役割の選択] ダイアログ ボックス](images/setup-server-2-select-server-roles.png)
Web サーバー (iis) とアプリケーション サーバーの役割が選択された [サーバーの役割の選択] ダイアログ ボックス
[アプリケーション サーバー] を選択すると、ASP.NET フレームワークをインストールするように求められます。 [ 必要な機能の追加] ボタンを クリックします。 [ 次へ] をクリックすると、概要ダイアログ ボックスが表示されます。[ 次へ] をクリックします。 [ 役割サービスの選択 ] ダイアログ ボックスが使用できるようになりました。 [Web サーバー (IIS)] が選択されていることを確認します。 次の図は、Web サーバー (IIS) が有効になっている [ 役割サービスの選択 ] ダイアログ ボックスを示しています。
![Web サーバー (iis) が有効になっている [役割サービスの選択] ダイアログ ボックス](images/setup-server-3-select-role-services.png)
Web サーバー (iis) が有効になっている [役割サービスの選択] ダイアログ ボックス
[次へ] をクリックします。 [概要] ダイアログ ボックスが表示されます。もう一度 [ 次へ ] をクリックします。 Web サーバー (IIS) の役割のオプションを提供するページが表示されます。 [次へ] をクリックします。 次のページで、[ インストール ] ボタンがアクティブになります。 [ インストール ] をクリックすると、Web サーバー (IIS) とアプリケーション サーバーのサポートがインストールされます。
デスクトップ エクスペリエンス ロールを有効にする
デスクトップ エクスペリエンスを有効にするには、[スタート] をクリックし、[管理ツール] をクリックし、[サーバー マネージャー] をクリックします。 [ サービスの追加] を選択し、 デスクトップ エクスペリエンス サービスを選択します。 次の図は、[デスクトップ エクスペリエンス] 項目がインストールされている [ 機能の選択 ] ダイアログ ボックスを示しています。
![デスクトップ エクスペリエンス サービスが選択された [機能の選択] ダイアログ ボックス](images/setup-server-4-desktop-experience.png)
デスクトップ エクスペリエンス サービスが選択された [機能の選択] ダイアログ ボックス
[ 次へ ] をクリックして、デスクトップ エクスペリエンスをインストールします。
タブレット サービスを開始する
デスクトップ エクスペリエンス サービスをインストールすると、[ サービス ] メニューにタブレット PC 入力サービスが表示されます。 [サービス] メニューにアクセスするには、[スタート] をクリックし、[管理ツール] をクリックし、[サービス] をクリックします。 サービスを開始するには、[ タブレット PC 入力サービス ] を右クリックし、[ 開始] をクリックします。 次の図 は、タブレット PC 入力サービスが開始された [サービス] メニューを示しています。
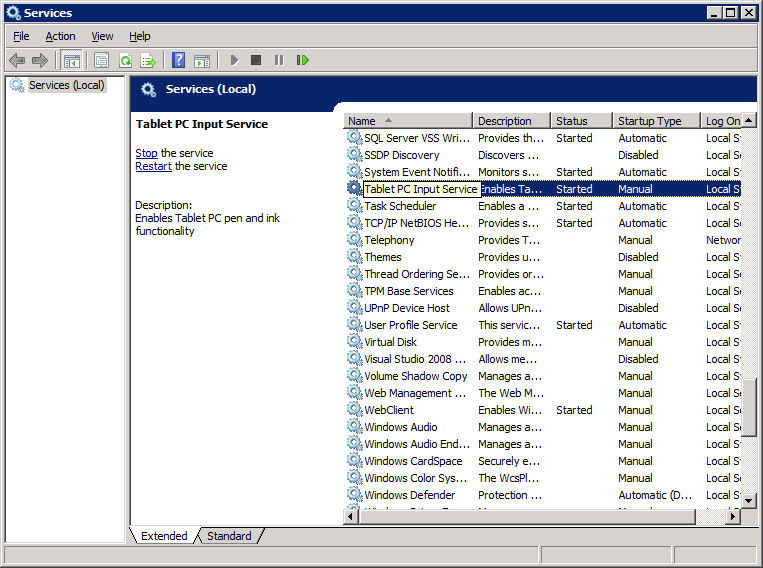
タブレット PC 入力サービスが開始されたサービス メニュー
Silverlight を使用したServer-Side認識の実行
このセクションでは、Silverlight を使用して手書き入力をキャプチャする Web アプリケーションを作成する方法について説明します。 Visual Studio 2008 で認識エンジンをプログラミングするには、次の手順に従います。
- Silverlight のサポートを追加するには、Visual Studio 2008 をインストールして更新します。
- Visual Studio 2008 で新しい Silverlight プロジェクトを作成します。
- 必要なサービス参照をプロジェクトに追加します。
- インク認識用の Silverlight WCF サービスを作成します。
- サービス参照をクライアント プロジェクトに追加します。
- InkCollector クラスを InkRecognition プロジェクトに追加します。
- クライアント構成からセキュリティで保護されたトランスポート ディレクティブを削除する
Visual Studio 2008 をインストールして更新して Silverlight のサポートを追加する
開始する前に、Windows Server 2008 R2 サーバーで次の手順を実行する必要があります。
- Visual Studio 2008 をインストールします。
- Microsoft Visual Studio 2008 Service Pack 1 をインストールします。
- Microsoft Silverlight 5 SDK をインストールします。
これらのアプリケーションと更新プログラムをインストールしたら、サーバー側認識 Web アプリケーションを作成する準備が整います。
Visual Studio 2008 で新しい Silverlight Web プロジェクトを作成する
[ ファイル ] メニューの [ 新しいプロジェクト] をクリックします。 Visual C# プロジェクトの一覧から Silverlight アプリケーション テンプレートを選択します。 プロジェクトに InkRecognition という名前を付け、[OK] をクリック します。 次の図は、選択され InkRecognition という名前の C# Silverlight プロジェクトを示しています。
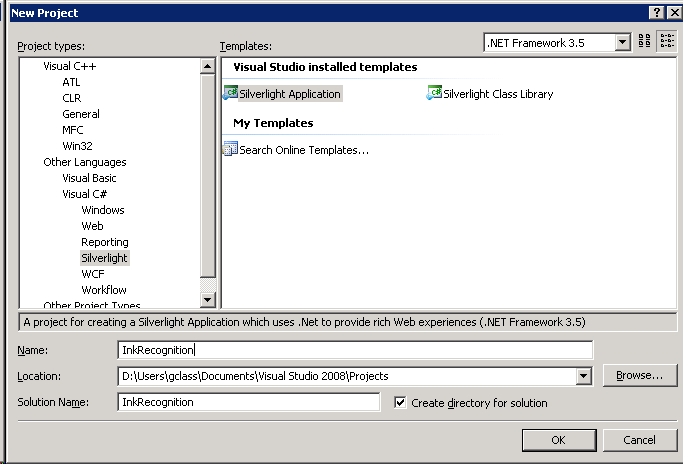
inkrecognition という名前の c# silverlight プロジェクトが選択されている
[OK] をクリックすると、Silverlight アプリケーションをプロジェクトに追加するように求めるダイアログ ボックスが表示されます。 [ Add a new ASP.NET Web project to the solution to host Silverlight]\(Silverlight をホストする新しい ASP.NET Web プロジェクトをソリューションに追加する \) を選択し、[OK] をクリック します。 次の図は、[OK] をクリックする前にサンプル プロジェクトを設定する方法を示 しています。
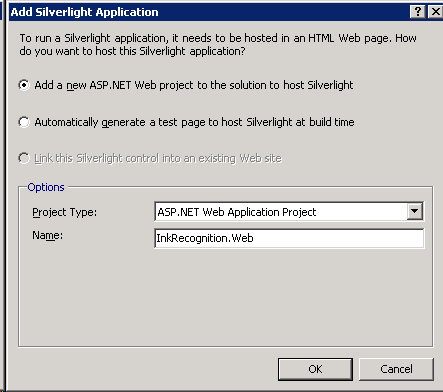
silverlight アプリケーションをプロジェクトに追加するためのプロンプトが表示されたダイアログ ボックス
必要なサービス参照をプロジェクトに追加する
これで、汎用の Silverlight クライアント プロジェクト (InkRecognition) と Web プロジェクト (InkRecognition.Web) がソリューションに設定されました。 プロジェクトが開き、Page.xaml と Default.aspx が開きます。 これらのウィンドウを閉じ、InkRecognition プロジェクトの references フォルダーを右クリックし、[ 参照の追加] を選択して、System.Runtime.Serialization および System.ServiceModel 参照を InkRecognition プロジェクトに追加します。 次の図は、必要な参照が選択されたダイアログ ボックスを示しています。
![system.runtime.serialization と system.servicemodel が選択された [参照の追加] ダイアログ ボックス](images/project-3a-add-references-to-inkreco.png)
system.runtime.serialization と system.servicemodel が選択された [参照の追加] ダイアログ ボックス
次に、System.ServiceModel および Microsoft.Ink 参照を InkRecognition.Web プロジェクトに追加する必要があります。 Microsoft.Ink 参照は既定では .NET 参照に表示されないため、Windows フォルダーでMicrosoft.Ink.dllを検索します。 DLL を見つけたら、プロジェクト参照にアセンブリを追加します。[ 参照 ] タブを選択し、Microsoft.Ink.dllを含むフォルダーに変更し、[Microsoft.Ink.dll] を選択して、[OK] をクリック します。 次の図は、すべての参照アセンブリが追加された Windows エクスプローラーのプロジェクトのソリューションを示しています。
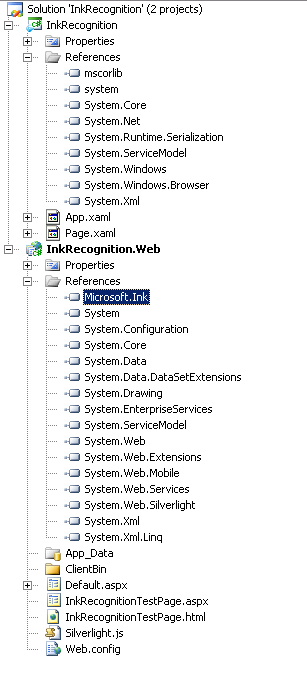
すべての参照アセンブリが追加された Windows エクスプローラーの inkrecognition プロジェクト
インク認識用の Silverlight WCF サービスを作成する
次に、プロジェクトにインク認識用の WCF サービスを追加します。 InkRecognition.Web プロジェクトを右クリックし、[ 追加] をクリックし、[ 新しい項目] をクリックします。 WCF Silverlight Service テンプレートを選択し、名前を InkRecogitionService に変更して、[ 追加] をクリックします。 次の図は、Silverlight WCF サービスが選択され、名前が付けられた [ 新しい項目の追加 ] ダイアログ ボックスを示しています。
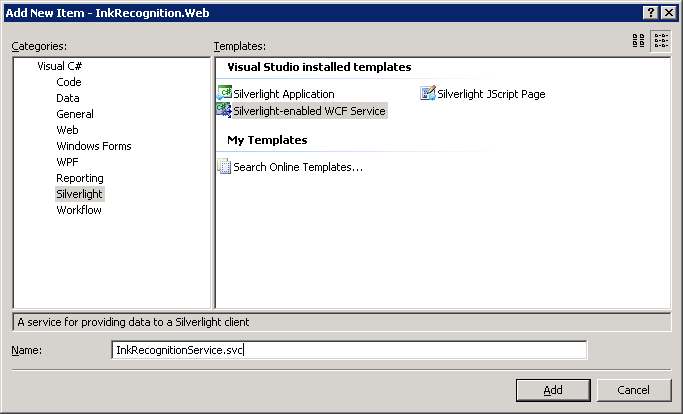
silverlight wcf サービスが選択され、名前が付いた新しい項目の追加ダイアログ ボックス
WCF Silverlight サービスを追加すると、サービス の分離コード InkRecognitionService.cs が開きます。 サービス コードを次のコードに置き換えます。
using System;
using System.Linq;
using System.Runtime.Serialization;
using System.ServiceModel;
using System.ServiceModel.Activation;
using System.Collections.Generic;
using System.Text;
using Microsoft.Ink;

namespace InkRecognition.Web
{
    [ServiceContract(Namespace = "")]
    [AspNetCompatibilityRequirements(RequirementsMode = AspNetCompatibilityRequirementsMode.Allowed)]
    public class InkRecognitionService
    {
        [OperationContract]
        public string[] Recognize(int[][] packets)
        {
            // Deserialize ink.
            Ink ink = new Ink();
            Tablet tablet = new Tablets().DefaultTablet;
            TabletPropertyDescriptionCollection desc = new TabletPropertyDescriptionCollection();
            desc.Add(new TabletPropertyDescription(PacketProperty.X, tablet.GetPropertyMetrics(PacketProperty.X)));
            desc.Add(new TabletPropertyDescription(PacketProperty.Y, tablet.GetPropertyMetrics(PacketProperty.Y)));
            int numOfStrokes = packets.GetUpperBound(0) + 1;
            for (int i = 0; i < numOfStrokes; i++)
            {
                ink.CreateStroke(packets[i], desc);
            }

            // Recognize ink.
            RecognitionStatus recoStatus;
            RecognizerContext recoContext = new RecognizerContext();
            recoContext.RecognitionFlags = RecognitionModes.LineMode | RecognitionModes.TopInkBreaksOnly;
            recoContext.Strokes = ink.Strokes;
            RecognitionResult recoResult = recoContext.Recognize(out recoStatus);
            RecognitionAlternates alternates = recoResult.GetAlternatesFromSelection();
            string[] results = new string[alternates.Count];
            for (int i = 0; i < alternates.Count; i++)
            {
                results[i] = alternates[i].ToString();
            }

            // Send results to client.
            return results;
        }
    }
}
クライアント プロジェクトにサービス参照を追加する
InkRecognition 用の Silverlight WCF サービスが用意されたので、クライアント アプリケーションからサービスを使用します。 InkRecognition プロジェクトを右クリックし、[ サービス参照の追加] を選択します。 表示される [ サービス参照の追加 ] ダイアログ ボックスで、[ 検出 ] を選択して、現在のソリューションからサービスを検出します。 InkRecognitionService が [サービス] ウィンドウに表示されます。 [サービス] ウィンドウで InkRecognitionService をダブルクリックし、名前空間を InkRecognitionServiceReference に変更し、[OK] をクリック します。 次の図は、InkRecognitionService が選択され、名前空間が変更された [ サービス参照の追加] ダイアログ ボックスを示しています。
![inkrecognitionservice が選択され、名前空間が変更された [サービス参照の追加] ダイアログ ボックス](images/project-5-discover-service-reference.png)
inkrecognitionservice が選択され、名前空間が変更された [サービス参照の追加] ダイアログ ボックス
InkCollector クラスを InkRecognition プロジェクトに追加する
InkRecognition プロジェクトを右クリックし、[ 追加] をクリックし、[ 新しい項目] をクリックします。 [Visual C#] メニューの [C# クラス] を選択します。 InkCollector クラスに名前を付けます。 次の図は、C# クラスが選択され、名前が付けられたダイアログ ボックスを示しています。
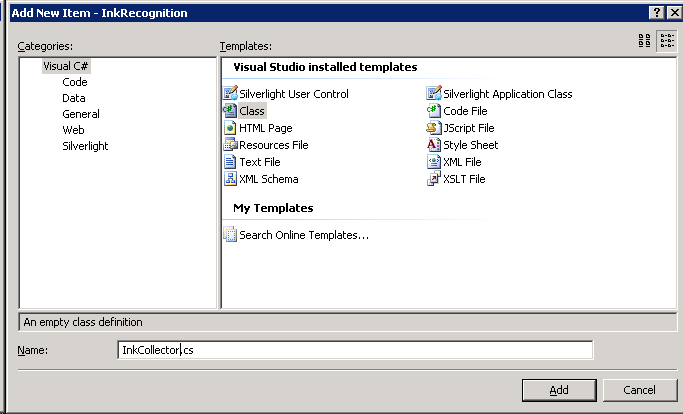
c# クラスが選択され、名前が付いた新しい項目の追加ダイアログ ボックス
InkCollector クラスを追加すると、クラス定義が開きます。 Ink Collector のコードを次のコードに置き換えます。
using System;
using System.Net;
using System.Windows;
using System.Windows.Controls;
using System.Windows.Documents;
using System.Windows.Ink;
using System.Windows.Input;
using System.Windows.Media;
using System.Windows.Media.Animation;
using System.Windows.Shapes;

namespace InkRecognition
{
    public class InkCollector : IDisposable
    {
        public InkCollector(InkPresenter presenter)
        {
            _presenter = presenter;
            _presenter.Cursor = Cursors.Stylus;
            _presenter.MouseLeftButtonDown += new MouseButtonEventHandler(_presenter_MouseLeftButtonDown);
            _presenter.MouseMove += new MouseEventHandler(_presenter_MouseMove);
            _presenter.MouseLeftButtonUp += new MouseButtonEventHandler(_presenter_MouseLeftButtonUp);
        }

        void _presenter_MouseLeftButtonDown(object sender, MouseButtonEventArgs e)
        {
            _presenter.CaptureMouse();
            if (!e.StylusDevice.Inverted)
            {
                _presenter.Cursor = Cursors.Stylus;
                _stroke = new Stroke(e.StylusDevice.GetStylusPoints(_presenter));
                _stroke.DrawingAttributes = _drawingAttributes;
                _presenter.Strokes.Add(_stroke);
            }
            else
            {
                _presenter.Cursor = Cursors.Eraser;
                _erasePoints = e.StylusDevice.GetStylusPoints(_presenter);
            }
        }

        void _presenter_MouseMove(object sender, MouseEventArgs e)
        {
            if (!e.StylusDevice.Inverted)
            {
                _presenter.Cursor = Cursors.Stylus;
            }
            else
            {
                _presenter.Cursor = Cursors.Eraser;
            }
            if (_stroke != null)
            {
                _stroke.StylusPoints.Add(e.StylusDevice.GetStylusPoints(_presenter));
            }
            else if (_erasePoints != null)
            {
                _erasePoints.Add(e.StylusDevice.GetStylusPoints(_presenter));
                StrokeCollection hitStrokes = _presenter.Strokes.HitTest(_erasePoints);
                if (hitStrokes.Count > 0)
                {
                    foreach (Stroke hitStroke in hitStrokes)
                    {
                        _presenter.Strokes.Remove(hitStroke);
                    }
                }
            }
        }

        void _presenter_MouseLeftButtonUp(object sender, MouseButtonEventArgs e)
        {
            _presenter.ReleaseMouseCapture();
            if (_stroke != null)
            {
                _stroke.StylusPoints.Add(e.StylusDevice.GetStylusPoints(_presenter));
            }
            _stroke = null;
            _erasePoints = null;
        }

        public DrawingAttributes DefaultDrawingAttributes
        {
            get { return _drawingAttributes; }
            set { _drawingAttributes = value; }
        }

        public void Dispose()
        {
            _presenter.MouseLeftButtonDown -= new MouseButtonEventHandler(_presenter_MouseLeftButtonDown);
            _presenter.MouseMove -= new MouseEventHandler(_presenter_MouseMove);
            _presenter.MouseLeftButtonUp -= new MouseButtonEventHandler(_presenter_MouseLeftButtonUp);
            _presenter = null;
        }

        private InkPresenter _presenter = null;
        private Stroke _stroke = null;
        private StylusPointCollection _erasePoints = null;
        private DrawingAttributes _drawingAttributes = new DrawingAttributes();
    }
}
既定のページの XAML を更新し、手書き認識用の分離コードを追加する
インクを収集するクラスが作成されたので、page.xaml の XAML を次の XAML で更新する必要があります。 次のコードは、入力領域に黄色のグラデーション、InkCanvas コントロール、および認識をトリガーするボタンを追加します。
<UserControl x:Class="InkRecognition.Page"
    xmlns="http://schemas.microsoft.com/winfx/2006/xaml/presentation"
    xmlns:x="http://schemas.microsoft.com/winfx/2006/xaml">
    <Grid x:Name="LayoutRoot" Background="White">
        <Grid.RowDefinitions>
            <RowDefinition Height="Auto"/>
            <RowDefinition Height="Auto"/>
        </Grid.RowDefinitions>
        <Border Margin="5" Grid.Row="0" BorderThickness="4" BorderBrush="Black" CornerRadius="5" Height="200">
            <Grid>
                <InkPresenter x:Name="inkCanvas">
                    <InkPresenter.Background>
                        <LinearGradientBrush StartPoint="0.5,0" EndPoint="0.5,1">
                            <GradientStop Offset="0" Color="Yellow"/>
                            <GradientStop Offset="1" Color="LightYellow"/>
                        </LinearGradientBrush>
                    </InkPresenter.Background>
                </InkPresenter>
                <Button Grid.Row="0" HorizontalAlignment="Right" VerticalAlignment="Bottom" Margin="10" Content="Recognize" Click="RecoButton_Click"/>
            </Grid>
        </Border>
        <Grid Grid.Row="1">
            <Grid.ColumnDefinitions>
                <ColumnDefinition Width="Auto"/>
                <ColumnDefinition Width="*"/>
            </Grid.ColumnDefinitions>
            <TextBlock Grid.Column="0" FontSize="28" Text="Result: "/>
            <ComboBox x:Name="results" Grid.Column="1" FontSize="28"/>
        </Grid>
    </Grid>
</UserControl>
分離コード ページ Page.xaml.cs を、 Recognize ボタンのイベント ハンドラーを追加する次のコードに置き換えます。
using System;
using System.Collections.Generic;
using System.Collections.ObjectModel;
using System.Linq;
using System.Net;
using System.Windows;
using System.Windows.Controls;
using System.Windows.Ink;
using System.Windows.Input;
using System.Windows.Media;
using System.Windows.Media.Animation;
using System.Windows.Shapes;
using InkRecognition.InkRecognitionServiceReference;

namespace InkRecognition
{
    public partial class Page : UserControl
    {
        public Page()
        {
            InitializeComponent();
            inkCol = new InkCollector(inkCanvas);
            recoClient = new InkRecognitionServiceClient();
            recoClient.RecognizeCompleted += new EventHandler<RecognizeCompletedEventArgs>(recoClient_RecognizeCompleted);
        }

        private void RecoButton_Click(object sender, RoutedEventArgs e)
        {
            // Serialize the ink into an array on ints.
            ObservableCollection<ObservableCollection<int>> packets = new ObservableCollection<ObservableCollection<int>>();
            double pixelToHimetricMultiplier = 2540d / 96d;

            foreach (Stroke stroke in inkCanvas.Strokes)
            {
                packets.Add(new ObservableCollection<int>());
                int index = inkCanvas.Strokes.IndexOf(stroke);
                for (int i = 0; i < stroke.StylusPoints.Count; i += 2)
                {
                    packets[index].Add(Convert.ToInt32(stroke.StylusPoints[i].X * pixelToHimetricMultiplier));
                    packets[index].Add(Convert.ToInt32(stroke.StylusPoints[i].Y * pixelToHimetricMultiplier));
                }
            }

            // Call the Web service.
            recoClient.RecognizeAsync(packets);
        }

        void recoClient_RecognizeCompleted(object sender, RecognizeCompletedEventArgs e)
        {
            // We have received results from the server, now display them.
            results.ItemsSource = e.Result;
            UpdateLayout();
            results.SelectedIndex = 0;
            inkCanvas.Strokes.Clear();
        }

        private InkRecognitionServiceClient recoClient = null;
        private InkCollector inkCol = null;
    }
}
クライアント構成からセキュリティで保護されたトランスポート ディレクティブを削除する
WCF サービスを使用する前に、Silverlight 2.0 WCF サービスではセキュリティで保護されたトランスポートが現在サポートされていないため、セキュリティで保護されたトランスポート オプションをすべてサービス構成から削除する必要があります。 InkRecognition プロジェクトから、ServiceReferences.ClientConfig のセキュリティ設定を更新します。 セキュリティ XML を から変更する
          <security mode="None">
            <transport>
              <extendedProtectionPolicy policyEnforcement="WhenSupported" />
            </transport>
          </security>
to
<security mode="None"/>
これで、アプリケーションが実行されます。 次の図は、認識ボックスに何らかの手書きを入力して、アプリケーションが awebpage 内でどのように見えるかを示しています。
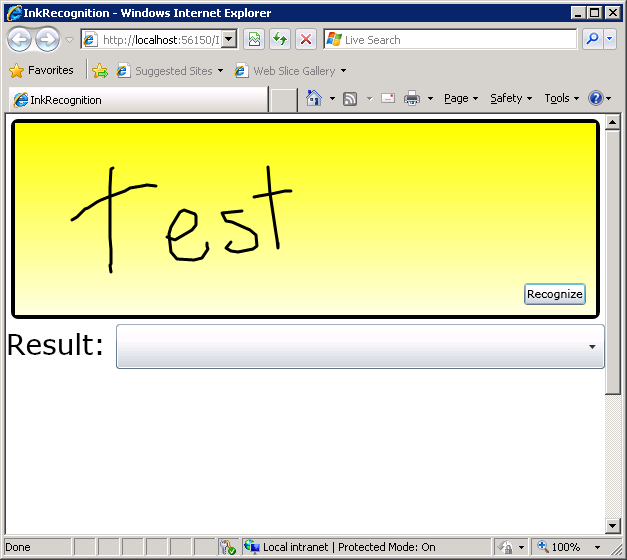
認識ボックスに手書き入力された awebpage 内のアプリケーション
次の図は、[ 結果 ] ドロップダウン リストで認識されたテキストを示しています。
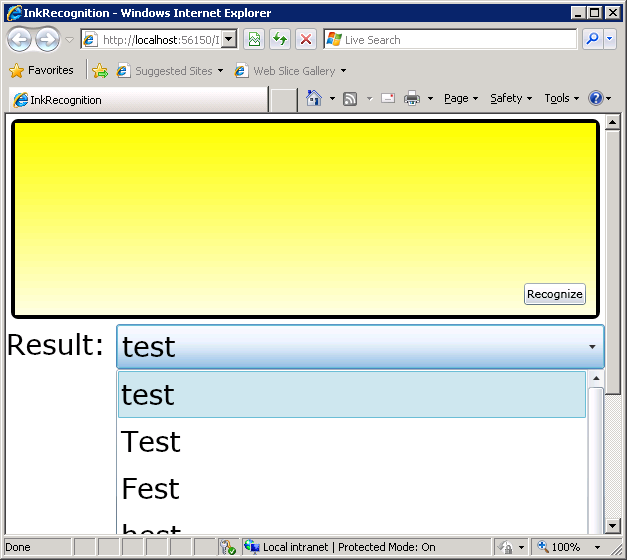
結果ドロップダウン リストに認識されたテキストを含む awebpage 内のアプリケーション