グラフィックス コンテナー
グラフィックスの状態 (クリッピング領域、変換、品質設定) は、Graphics オブジェクトに格納されます。 Windows GDI+ を使用すると、コンテナーを使用して、Graphics オブジェクトの状態の一部を一時的に置換または拡張できます。 Graphics オブジェクトの Graphics::BeginContainer メソッドを呼び出してコンテナーを起動し、Graphics::EndContainer メソッドを呼び出してコンテナーを終了します。 Graphics::BeginContainer と Graphics::EndContainerの間で、Graphics オブジェクトに加えた状態の変更はコンテナーに属し、Graphics オブジェクトの既存の状態は上書きされません。
次の例では、Graphics オブジェクト内にコンテナーを作成します。 Graphics オブジェクトのワールド変換は右に 200 単位、コンテナーのワールド変換は 100 単位下の変換です。
myGraphics.TranslateTransform(200.0f, 0.0f);

myGraphicsContainer = myGraphics.BeginContainer();
   myGraphics.TranslateTransform(0.0f, 100.0f);
   myGraphics.DrawRectangle(&myPen, 0, 0, 50, 50);
myGraphics.EndContainer(myGraphicsContainer);

myGraphics.DrawRectangle(&myPen, 0, 0, 50, 50);
前の例では、Graphics::BeginContainer と Graphics::EndContainer の呼び出しの間にステートメント myGraphics.DrawRectangle(&myPen, 0, 0, 50, 50)、Graphics::EndContainerの呼び出し後に行われた同じステートメントとは異なる四角形が生成されることに注意してください。 水平方向の翻訳のみが、コンテナーの外部で行われた DrawRectangle 呼び出しに適用されます。 両方の変換 (200 単位の水平方向の平行移動と 100 単位の垂直方向の平行移動) は、コンテナー内で行われた Graphics::D rawRectangle 呼び出しに適用されます。 次の図は、2 つの四角形を示しています。
2 つの四角形が青いペンで描画されたウィンドウのスクリーン ショット 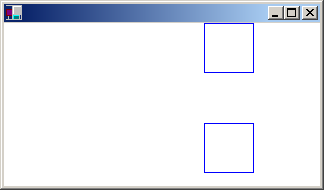 の上に配置されます。
コンテナーはコンテナー内で入れ子にすることができます。 次の例では、Graphics オブジェクト内にコンテナーを作成し、最初のコンテナー内に別のコンテナーを作成します。 Graphics オブジェクトのワールド変換は、x 方向に 100 単位、y 方向に 80 単位の平行移動です。 最初のコンテナーのワールド変換は 30 度回転です。 2 番目のコンテナーのワールド変換は、x 方向の 2 倍のスケーリングです。 Graphics::D rawEllipse メソッドの呼び出しは、2 番目のコンテナー内で行われます。
myGraphics.TranslateTransform(100.0f, 80.0f, MatrixOrderAppend);

container1 = myGraphics.BeginContainer();
   myGraphics.RotateTransform(30.0f, MatrixOrderAppend);

   container2 = myGraphics.BeginContainer();
      myGraphics.ScaleTransform(2.0f, 1.0f);
      myGraphics.DrawEllipse(&myPen, -30, -20, 60, 40);
   myGraphics.EndContainer(container2);

myGraphics.EndContainer(container1);
次の図は、楕円を示しています。

3 つの変換はすべて、2 番目の (最も内側の) コンテナーで行われた Graphics::D rawEllipse 呼び出しに適用されることに注意してください。 また、変換の順序 (最初のスケール、次に回転、次に平行移動) にも注意してください。 最も内側の変換が最初に適用され、最も外側の変換が最後に適用されます。
Graphics オブジェクトのプロパティは、コンテナー内で設定できます (Graphics::BeginContainer と Graphics::EndContainerの呼び出しの間)。 たとえば、クリッピング領域はコンテナー内で設定できます。 コンテナー内で実行されるすべての描画は、そのコンテナーのクリッピング領域に制限され、外側のコンテナーのクリッピング領域と、Graphics オブジェクト自体のクリッピング領域にも制限されます。
これまでに説明したプロパティ (ワールド変換とクリッピング領域) は、入れ子になったコンテナーによって結合されます。 その他のプロパティは、入れ子になったコンテナーに一時的に置き換えられます。 たとえば、スムージング モードをコンテナー内で SmoothingModeAntiAlias に設定した場合、そのコンテナー内で呼び出された描画メソッドはアンチエイリアス スムージング モードを使用しますが、Graphics::EndContainer の後に呼び出された描画メソッドは、Graphics::BeginContainerへの呼び出しの前に配置されていたスムージング モードを使用します。
Graphics オブジェクトとコンテナーのワールド変換を組み合わせる別の例として、目を描画し、一連の顔のさまざまな場所に配置するとします。 次の使用例は、座標系の原点を中心に目を描画します。
void DrawEye(Graphics* pGraphics)
{
   GraphicsContainer eyeContainer;

   eyeContainer = pGraphics->BeginContainer();

      Pen myBlackPen(Color(255, 0, 0, 0));
      SolidBrush myGreenBrush(Color(255, 0, 128, 0));
      SolidBrush myBlackBrush(Color(255, 0, 0, 0));

      GraphicsPath myTopPath;
      myTopPath.AddEllipse(-30, -50, 60, 60);

      GraphicsPath myBottomPath;
      myBottomPath.AddEllipse(-30, -10, 60, 60);

      Region myTopRegion(&myTopPath);
      Region myBottomRegion(&myBottomPath);

      // Draw the outline of the eye.
      // The outline of the eye consists of two ellipses.
      // The top ellipse is clipped by the bottom ellipse, and
      // the bottom ellipse is clipped by the top ellipse.
      pGraphics->SetClip(&myTopRegion);
      pGraphics->DrawPath(&myBlackPen, &myBottomPath);
      pGraphics->SetClip(&myBottomRegion);
      pGraphics->DrawPath(&myBlackPen, &myTopPath);

      // Fill the iris.
      // The iris is clipped by the bottom ellipse.
      pGraphics->FillEllipse(&myGreenBrush, -10, -15, 20, 22);

      // Fill the pupil.
      pGraphics->FillEllipse(&myBlackBrush, -3, -7, 6, 9);

   pGraphics->EndContainer(eyeContainer);
}
次の図は、目と座標軸を示しています。

前の例で定義した DrawEye 関数は、Graphics オブジェクトのアドレスを受け取り、その Graphics オブジェクト内にコンテナーをすぐに作成します。 このコンテナーは、DrawEye 関数の実行中に行われたプロパティ設定から DrawEye 関数を呼び出すコードを分離します。 たとえば、DrawEye 関数のコードは、Graphics オブジェクトのクリッピング領域を設定しますが、DrawEye が呼び出し元ルーチンにコントロールを返すと、クリッピング領域は DrawEye の呼び出し前と同じになります。
次の例では、3 つの楕円 (顔) を描画し、それぞれが内側に目を持っています。
// Draw an ellipse with center at (100, 100).
myGraphics.TranslateTransform(100.0f, 100.0f);
myGraphics.DrawEllipse(&myBlackPen, -40, -60, 80, 120);

// Draw the eye at the center of the ellipse.
DrawEye(&myGraphics);

// Draw an ellipse with center at 200, 100.
myGraphics.TranslateTransform(100.0f, 0.0f, MatrixOrderAppend);
myGraphics.DrawEllipse(&myBlackPen, -40, -60, 80, 120);

// Rotate the eye 40 degrees, and draw it 30 units above
// the center of the ellipse.
myGraphicsContainer = myGraphics.BeginContainer();
   myGraphics.RotateTransform(-40.0f);
   myGraphics.TranslateTransform(0.0f, -30.0f, MatrixOrderAppend);
   DrawEye(&myGraphics);
myGraphics.EndContainer(myGraphicsContainer);

// Draw a ellipse with center at (300.0f, 100.0f).
myGraphics.TranslateTransform(100.0f, 0.0f, MatrixOrderAppend);
myGraphics.DrawEllipse(&myBlackPen, -40, -60, 80, 120);

// Stretch and rotate the eye, and draw it at the
// center of the ellipse.
myGraphicsContainer = myGraphics.BeginContainer();
   myGraphics.ScaleTransform(2.0f, 1.5f);
   myGraphics.RotateTransform(45.0f, MatrixOrderAppend);
   DrawEye(&myGraphics);
myGraphics.EndContainer(myGraphicsContainer);
次の図は、3 つの省略記号を示しています。
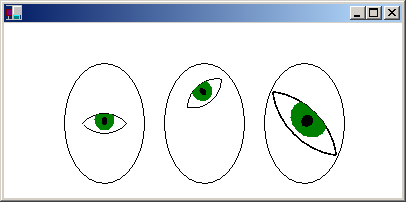
前の例では、すべての楕円が呼び出し DrawEllipse(&myBlackPen, -40, -60, 80, 120)で描画され、座標系の原点を中心に楕円が描画されます。 省略記号は、Graphics オブジェクトのワールド変換を設定することで、クライアント領域の左上隅から移動します。 このステートメントでは、最初の楕円の中心が (100, 100) になります。 このステートメントにより、2 番目の楕円の中心は、最初の楕円の中心の右側に 100 単位になります。 同様に、3 番目の楕円の中心は、2 番目の楕円の中心の右側に 100 単位です。
前の例のコンテナーは、特定の楕円の中心を基準にして目を変換するために使用されます。 最初の目は、変換なしで楕円の中心に描画されるため、DrawEye 呼び出しはコンテナー内にありません。 2 番目の目は 40 度回転し、楕円の中心の上に 30 単位描画されるため、DrawEye 関数と変換を設定するメソッドがコンテナー内で呼び出されます。 3 番目の目は、楕円の中心に引き伸ばされて回転し、描画されます。 2 番目の目と同様に、DrawEye 関数と変換を設定するメソッドはコンテナー内で呼び出されます。