四角形領域のツールヒントを作成する方法
次の例では、ウィンドウのクライアント領域全体に標準のヒント コントロールを作成する方法を示します。
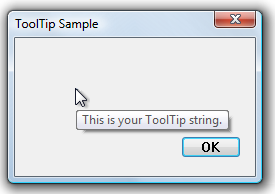
次の図は、マウス ポインターがダイアログ ボックスのクライアント ウィンドウ内にあるときに表示されるヒントを示しています。 ダイアログ ボックスのハンドルが、前の例で示した関数に渡されました。

知っておくべきこと
テクノロジ
前提条件
- C/C++
- Windows ユーザー インターフェイス プログラミング
手順
四角形領域のヒントを作成する
次の例では、ウィンドウのクライアント領域全体に標準のヒント コントロールを作成する方法を示します。
void CreateToolTipForRect(HWND hwndParent)
{
    // Create a tooltip.
    HWND hwndTT = CreateWindowEx(WS_EX_TOPMOST, TOOLTIPS_CLASS, NULL,
                                 WS_POPUP | TTS_NOPREFIX | TTS_ALWAYSTIP,
                                 CW_USEDEFAULT, CW_USEDEFAULT, CW_USEDEFAULT, CW_USEDEFAULT,
                                 hwndParent, NULL, g_hInst,NULL);

    SetWindowPos(hwndTT, HWND_TOPMOST, 0, 0, 0, 0,
                 SWP_NOMOVE | SWP_NOSIZE | SWP_NOACTIVATE);

    // Set up "tool" information. In this case, the "tool" is the entire parent window.

    TOOLINFO ti = { 0 };
    ti.cbSize   = sizeof(TOOLINFO);
    ti.uFlags   = TTF_SUBCLASS;
    ti.hwnd     = hwndParent;
    ti.hinst    = g_hInst;
    ti.lpszText = TEXT("This is your tooltip string.");

    GetClientRect (hwndParent, &ti.rect);

    // Associate the tooltip with the "tool" window.
    SendMessage(hwndTT, TTM_ADDTOOL, 0, (LPARAM) (LPTOOLINFO) &ti);
}
関連トピック