Windows 情報保護 (WIP) 開発者ガイド
対応アプリは、企業データと個人データを区別し、管理者によって定義された Windows 情報保護 (WIP) ポリシーに基づいて保護する対象を認識します。
このガイドでは、ビルド方法について説明します。 完了すると、ポリシー管理者はアプリを信頼して組織のデータを使用できるようになります。 また、従業員からも、組織のモバイル デバイス管理 (MDM) から登録を解除した場合や、完全に組織を去ることになった場合でも、デバイス上の個人データをそのまま残す方法が望まれています。
注 このガイドは、UWP アプリの対応に役立ちます。 C++ Windows デスクトップ アプリを対応させる場合は、「 Windows 情報保護 (WIP) 開発者ガイド (C++)を参照してください。
WIP と対応アプリの詳細については、 Windows 情報保護 (WIP)を参照してください。
完全なサンプル こちらにあります。
各タスクを実行する準備ができたら、始めましょう。
まず、必要なものを集める
次のものが必要です。
Windows 10 バージョン 1607 以降を実行するテスト仮想マシン (VM)。 このテスト VM に対してアプリをデバッグします。
Windows 10 バージョン 1607 以降を実行する開発用コンピューター。 Visual Studio がインストールされている場合は、これがテスト VM である可能性があります。
使用する開発環境を設定する
次のことを行います。
テスト VM に WIP Setup Developer Assistant をインストールする
このツールを使用して、テスト VM に Windows Information Protection ポリシーを設定します。
ツールのダウンロード: WIP Setup Developer Assistant。
保護ポリシーの作成
WIP セットアップ開発者アシスタントの各セクションに情報を追加して、ポリシーを定義します。 設定の横にあるヘルプ アイコンを選択して、その使用方法の詳細を確認します。
このツールの使用方法に関する一般的なガイダンスについては、アプリダウンロードページの「バージョンノート」セクションを参照してください。
Visual Studio プロジェクトをセットアップする
開発用コンピューターで、プロジェクトを開きます。
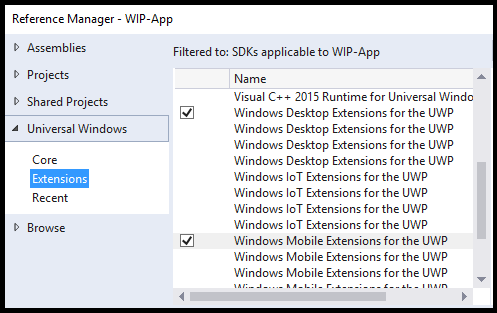
ユニバーサル Windows プラットフォーム (UWP) のデスクトップおよびモバイル拡張機能への参照を追加します。
この機能をパッケージ マニフェスト ファイルに追加します。
<rescap:Capability Name="enterpriseDataPolicy"/>省略可能な読み取り: "rescap" プレフィックスは、 Restricted Capability を意味します。 特別な機能と制限付き機能を参照してください。
この名前空間をパッケージ マニフェスト ファイルに追加します。
xmlns:rescap="http://schemas.microsoft.com/appx/manifest/foundation/windows10/restrictedcapabilities"パッケージ マニフェスト ファイルの
<ignorableNamespaces>要素に名前空間プレフィックスを追加します。<IgnorableNamespaces="uap mp rescap">これにより、制限付き機能をサポートしていないバージョンの Windows オペレーティング システムでアプリが実行されている場合、Windows は
enterpriseDataPolicy機能を無視します。
リモートデバッグをセットアップする
テスト VM に Visual Studio Remote Tools をインストールするのは、VM 以外のコンピューターでアプリを開発している場合のみです。 次に、開発用コンピューターでリモート デバッガーを起動し、アプリがテスト VM で実行されているかどうかを確認します。
「 リモート PC の手順を参照してください。
これらの名前空間をコード ファイルに追加する
これらの using ステートメントをコード ファイルの先頭に追加します (このガイドのスニペットでは、それらを使用します)。
using System;
using System.Collections.Generic;
using System.Linq;
using System.Text;
using System.Threading.Tasks;
using Windows.Security.EnterpriseData;
using Windows.Web.Http;
using Windows.Storage.Streams;
using Windows.ApplicationModel.DataTransfer;
using Windows.UI.Xaml.Controls;
using Windows.UI.Xaml;
using Windows.ApplicationModel.Activation;
using Windows.Web.Http.Filters;
using Windows.Storage;
using Windows.Data.Xml.Dom;
using Windows.Foundation.Metadata;
using Windows.Web.Http.Headers;
アプリで WIP API を使用するかどうかを決定する
アプリを実行するオペレーティング システムが WIP をサポートし、デバイスで WIP が有効になっていることを確認します。
bool use_WIP_APIs = false;

if ((ApiInformation.IsApiContractPresent
    ("Windows.Security.EnterpriseData.EnterpriseDataContract", 3)
    && ProtectionPolicyManager.IsProtectionEnabled))
{
    use_WIP_APIs = true;
}
else
{
    use_WIP_APIs = false;
}
オペレーティング システムが WIP をサポートしていない場合、またはデバイスで WIP が有効になっていない場合は、WIP API を呼び出さないでください。
エンタープライズ データの読み取り
共有コントラクトから受け入れる保護されたファイル、ネットワーク エンドポイント、クリップボード データ、データを読み取るために、アプリはアクセスを要求する必要があります。
Windows Information Protection は、アプリが保護ポリシーの許可リストにある場合に、アプリにアクセス許可を付与します。
このセクションの内容:
データをファイルから読み取る
手順 1: ファイル ハンドルを取得する
    Windows.Storage.StorageFolder storageFolder =
        Windows.Storage.ApplicationData.Current.LocalFolder;

    Windows.Storage.StorageFile file =
        await storageFolder.GetFileAsync(fileName);
手順 2: アプリでファイルを開くことができるかどうかを判断する
FileProtectionManager.GetProtectionInfoAsync を呼び出して、アプリでファイルを開くことができるかどうかを確認します。
FileProtectionInfo protectionInfo = await FileProtectionManager.GetProtectionInfoAsync(file);

if ((protectionInfo.Status != FileProtectionStatus.Protected &&
    protectionInfo.Status != FileProtectionStatus.Unprotected))
{
    return false;
}
else if (protectionInfo.Status == FileProtectionStatus.Revoked)
{
    // Code goes here to handle this situation. Perhaps, show UI
    // saying that the user's data has been revoked.
}
FileProtectionStatus Protected の値は、ファイルが保護され、アプリがポリシーの許可リストに含まれているためにアプリで開くことができることを意味します。
FileProtectionStatus UnProtected の値は、ファイルが保護されていないことを意味し、アプリがポリシーの許可リストにない場合でも、アプリでファイルを開くことができます。
API
FileProtectionManager.GetProtectionInfoAsync
FileProtectionInfo
FileProtectionStatus
ProtectionPolicyManager.IsIdentityManaged
手順 3: ストリームまたはバッファーにファイルを読み取る
ファイルをストリームに読み込む
var stream = await file.OpenAsync(Windows.Storage.FileAccessMode.ReadWrite);
ファイルをバッファーに読み込む
var buffer = await Windows.Storage.FileIO.ReadBufferAsync(file);
ネットワーク エンドポイントからデータを読み取る
エンタープライズ エンドポイントから読み取る保護されたスレッド コンテキストを作成します。
手順 1: ネットワーク エンドポイントの ID を取得する
Uri resourceURI = new Uri("http://contoso.com/stockData.xml");

Windows.Networking.HostName hostName =
    new Windows.Networking.HostName(resourceURI.Host);

string identity = await ProtectionPolicyManager.
    GetPrimaryManagedIdentityForNetworkEndpointAsync(hostName);
エンドポイントがポリシーによって管理されていない場合は、空の文字列が返されます。
API
ProtectionPolicyManager.GetPrimaryManagedIdentityForNetworkEndpointAsync
手順 2: 保護されたスレッド コンテキストを作成する
エンドポイントがポリシーによって管理されている場合は、保護されたスレッド コンテキストを作成します。 これにより、同じスレッドで行ったネットワーク接続が ID にタグ付けされます。
また、そのポリシーによって管理されているエンタープライズ ネットワーク リソースにアクセスすることもできます。
if (!string.IsNullOrEmpty(identity))
{
    using (ThreadNetworkContext threadNetworkContext =
            ProtectionPolicyManager.CreateCurrentThreadNetworkContext(identity))
    {
        return await GetDataFromNetworkRedirectHelperMethod(resourceURI);
    }
}
else
{
    return await GetDataFromNetworkRedirectHelperMethod(resourceURI);
}
次の使用例は、ソケット呼び出しを using ブロックで囲みます。 これを行わない場合は、リソースを取得した後にスレッド コンテキストを閉じてください。 「 ThreadNetworkContext.Close を参照してください。
保護されたスレッド上に個人用ファイルを作成しないでください。これらのファイルは自動的に暗号化されるためです。
ProtectionPolicyManager.CreateCurrentThreadNetworkContext メソッドは、エンドポイントがポリシーによって管理されているかどうかに関係なく、ThreadNetworkContext オブジェクトを返します。 アプリが個人リソースとエンタープライズ リソースの両方を処理する場合は、すべての ID に対して ProtectionPolicyManager.CreateCurrentThreadNetworkContext を呼び出します。 リソースを取得したら、ThreadNetworkContext を破棄して、現在のスレッドから ID タグをクリアします。
API
ProtectionPolicyManager.GetForCurrentView
ProtectionPolicyManager.Identity
ProtectionPolicyManager.CreateCurrentThreadNetworkContext
手順 3: リソースをバッファーに読み込む
private static async Task<IBuffer> GetDataFromNetworkHelperMethod(Uri resourceURI)
{
    HttpClient client;

    client = new HttpClient();

    try { return await client.GetBufferAsync(resourceURI); }

    catch (Exception) { return null; }
}
(省略可能)保護されたスレッド コンテキストを作成する代わりにヘッダー トークンを使用する
public static async Task<IBuffer> GetDataFromNetworkbyUsingHeader(Uri resourceURI)
{
    HttpClient client;

    Windows.Networking.HostName hostName =
        new Windows.Networking.HostName(resourceURI.Host);

    string identity = await ProtectionPolicyManager.
        GetPrimaryManagedIdentityForNetworkEndpointAsync(hostName);

    if (!string.IsNullOrEmpty(identity))
    {
        client = new HttpClient();

        HttpRequestHeaderCollection headerCollection = client.DefaultRequestHeaders;

        headerCollection.Add("X-MS-Windows-HttpClient-EnterpriseId", identity);

        return await GetDataFromNetworkbyUsingHeaderHelperMethod(client, resourceURI);
    }
    else
    {
        client = new HttpClient();
        return await GetDataFromNetworkbyUsingHeaderHelperMethod(client, resourceURI);
    }

}

private static async Task<IBuffer> GetDataFromNetworkbyUsingHeaderHelperMethod(HttpClient client, Uri resourceURI)
{

    try { return await client.GetBufferAsync(resourceURI); }

    catch (Exception) { return null; }
}
ページ リダイレクトの処理
Web サーバーによって、より新しいバージョンのリソースにトラフィックがリダイレクトされることがあります。
これを処理するには、要求の応答状態の値が OK になるまで要求を行います。
その後、その応答の URI を使用して、エンドポイントの ID を取得します。 これを行う 1 つの方法を次に示します。
private static async Task<IBuffer> GetDataFromNetworkRedirectHelperMethod(Uri resourceURI)
{
    HttpClient client = null;

    HttpBaseProtocolFilter filter = new HttpBaseProtocolFilter();
    filter.AllowAutoRedirect = false;

    client = new HttpClient(filter);

    HttpResponseMessage response = null;

        HttpRequestMessage message = new HttpRequestMessage(HttpMethod.Get, resourceURI);
        response = await client.SendRequestAsync(message);

    if (response.StatusCode == HttpStatusCode.MultipleChoices ||
        response.StatusCode == HttpStatusCode.MovedPermanently ||
        response.StatusCode == HttpStatusCode.Found ||
        response.StatusCode == HttpStatusCode.SeeOther ||
        response.StatusCode == HttpStatusCode.NotModified ||
        response.StatusCode == HttpStatusCode.UseProxy ||
        response.StatusCode == HttpStatusCode.TemporaryRedirect ||
        response.StatusCode == HttpStatusCode.PermanentRedirect)
    {
        message = new HttpRequestMessage(HttpMethod.Get, message.RequestUri);
        response = await client.SendRequestAsync(message);

        try { return await response.Content.ReadAsBufferAsync(); }

        catch (Exception) { return null; }
    }
    else
    {
        try { return await response.Content.ReadAsBufferAsync(); }

        catch (Exception) { return null; }
    }
}
API
ProtectionPolicyManager.GetPrimaryManagedIdentityForNetworkEndpointAsync
ProtectionPolicyManager.CreateCurrentThreadNetworkContext
ProtectionPolicyManager.GetForCurrentView
ProtectionPolicyManager.Identity
クリップボードからデータを読み取る
クリップボードからデータを使用するアクセス許可を取得する
クリップボードからデータを取得するには、Windows にアクセス許可を求めます。 これを行うには、 DataPackageView.RequestAccessAsync を使用します。
public static async Task PasteText(TextBox textBox)
{
    DataPackageView dataPackageView = Clipboard.GetContent();

    if (dataPackageView.Contains(StandardDataFormats.Text))
    {
        ProtectionPolicyEvaluationResult result = await dataPackageView.RequestAccessAsync();

        if (result == ProtectionPolicyEvaluationResult..Allowed)
        {
            string contentsOfClipboard = await dataPackageView.GetTextAsync();
            textBox.Text = contentsOfClipboard;
        }
    }
}
クリップボード データを使用する機能を非表示または無効にする
現在のビューに、クリップボード上のデータを取得する権限があるかどうかを判断します。
そうでない場合は、ユーザーがクリップボードから情報を貼り付けたり、内容をプレビューしたりできるコントロールを無効または非表示にすることができます。
private bool IsClipboardAllowedAsync()
{
    ProtectionPolicyEvaluationResult protectionPolicyEvaluationResult = ProtectionPolicyEvaluationResult.Blocked;

    DataPackageView dataPackageView = Clipboard.GetContent();

    if (dataPackageView.Contains(StandardDataFormats.Text))

        protectionPolicyEvaluationResult =
            ProtectionPolicyManager.CheckAccess(dataPackageView.Properties.EnterpriseId,
                ProtectionPolicyManager.GetForCurrentView().Identity);

    return (protectionPolicyEvaluationResult == ProtectionPolicyEvaluationResult.Allowed |
        protectionPolicyEvaluationResult == ProtectionPolicyEvaluationResult.ConsentRequired);
}
API
ProtectionPolicyEvaluationResult
ProtectionPolicyManager.GetForCurrentView
ProtectionPolicyManager.Identity
同意ダイアログ ボックスでユーザーにメッセージが表示されないようにする
新しいドキュメントは、 個人 または enterpriseではありません。 これは新しいだけです。 ユーザーがエンタープライズ データを貼り付けると、Windows によってポリシーが適用され、同意ダイアログが表示されます。 このコードでは、この問題が発生しないようにします。 このタスクは、データの保護に役立つものではありません。 アプリがまったく新しい項目を作成する場合に、ユーザーが同意ダイアログ ボックスを受け取ないようにする方法について詳しく取り上めます。
private async void PasteText(bool isNewEmptyDocument)
{
    DataPackageView dataPackageView = Clipboard.GetContent();

    if (dataPackageView.Contains(StandardDataFormats.Text))
    {
        if (!string.IsNullOrEmpty(dataPackageView.Properties.EnterpriseId))
        {
            if (isNewEmptyDocument)
            {
                ProtectionPolicyManager.TryApplyProcessUIPolicy(dataPackageView.Properties.EnterpriseId);
                string contentsOfClipboard = contentsOfClipboard = await dataPackageView.GetTextAsync();
                // add this string to the new item or document here.

            }
            else
            {
                ProtectionPolicyEvaluationResult result = await dataPackageView.RequestAccessAsync();

                if (result == ProtectionPolicyEvaluationResult.Allowed)
                {
                    string contentsOfClipboard = contentsOfClipboard = await dataPackageView.GetTextAsync();
                    // add this string to the new item or document here.
                }
            }
        }
    }
}
API
DataPackageView.RequestAccessAsync
ProtectionPolicyEvaluationResult
ProtectionPolicyManager.TryApplyProcessUIPolicy
共有コントラクトからデータを読み取る
従業員が情報を共有するアプリを選択すると、そのコンテンツを含む新しい項目がアプリによって開きます。
前に説明したように、新しい項目は 個人 または enterpriseではありません。 これは新しいだけです。 コードがアイテムにエンタープライズ コンテンツを追加すると、Windows によってポリシーが適用され、ユーザーに同意ダイアログが表示されます。 このコードでは、この問題が発生しないようにします。
protected override async void OnShareTargetActivated(ShareTargetActivatedEventArgs args)
{
    bool isNewEmptyDocument = true;
    string identity = "corp.microsoft.com";

    ShareOperation shareOperation = args.ShareOperation;
    if (shareOperation.Data.Contains(StandardDataFormats.Text))
    {
        if (!string.IsNullOrEmpty(shareOperation.Data.Properties.EnterpriseId))
        {
            if (isNewEmptyDocument)
                // If this is a new and empty document, and we're allowed to access
                // the data, then we can avoid popping the consent dialog
                ProtectionPolicyManager.TryApplyProcessUIPolicy(shareOperation.Data.Properties.EnterpriseId);
            else
            {
                // In this case, we can't optimize the workflow, so we just
                // request consent from the user in this case.

                ProtectionPolicyEvaluationResult protectionPolicyEvaluationResult = await shareOperation.Data.RequestAccessAsync();

                if (protectionPolicyEvaluationResult == ProtectionPolicyEvaluationResult.Allowed)
                {
                    string text = await shareOperation.Data.GetTextAsync();

                    // Do something with that text.
                }
            }
        }
        else
        {
            // If the data has no enterprise identity, then we already have access.
            string text = await shareOperation.Data.GetTextAsync();

            // Do something with that text.
        }

    }

}
API
ProtectionPolicyManager.RequestAccessAsync
ProtectionPolicyEvaluationResult
ProtectionPolicyManager.TryApplyProcessUIPolicy
エンタープライズ データの保護
アプリから離れるエンタープライズ データを保護します。 データは、ページに表示したり、ファイルまたはネットワーク エンドポイントに保存したり、共有コントラクトを介して保存したりすると、アプリから離れる。
このセクションの内容:
- ページに表示されるデータを保護する
- バックグラウンド プロセスとしてファイルへのデータを保護する
- ファイルの一部を保護する
- ファイルの保護された部分を読み取る
- フォルダーへのデータの保護
- ネットワーク エンドポイントへのデータの保護
- 共有コントラクトを使用してアプリが共有するデータを保護する
- 別の場所にコピーするファイルを保護する
- デバイスの画面がロックされているときにエンタープライズ データを保護する
ページに表示されるデータを保護する
ページにデータを表示する場合は、データの種類 (個人または企業) を Windows に知らせます。 これを行うには、現在のアプリ ビュータグを付けるか、アプリ プロセス全体にタグを付けます。
ビューまたはプロセスにタグを付けると、Windows によってポリシーが適用されます。 これは、アプリが制御しないアクションによって発生するデータ リークを防ぐのに役立ちます。 たとえば、コンピューターでは、ユーザーは Ctrl + V キーを使用して、企業情報をビューからコピーし、その情報を別のアプリに貼り付けることができます。 Windows は、その問題から保護します。 Windows は、共有コントラクトの適用にも役立ちます。
現在のアプリ ビューにタグを付け
アプリに複数のビューがあり、一部のビューがエンタープライズ データを使用し、一部が個人データを使用する場合は、これを行います。
// tag as enterprise data. "identity" the string that contains the enterprise ID.
// You'd get that from a file, network endpoint, or clipboard data package.
ProtectionPolicyManager.GetForCurrentView().Identity = identity;

// tag as personal data.
ProtectionPolicyManager.GetForCurrentView().Identity = String.Empty;
API
ProtectionPolicyManager.GetForCurrentView
ProtectionPolicyManager.Identity
プロセスにタグを付けます
アプリ内のすべてのビューが 1 種類のデータ (個人または企業) でのみ動作する場合は、これを行います。
これにより、個別にタグ付けされたビューを管理する必要がなくなります。
// tag as enterprise data. "identity" the string that contains the enterprise ID.
// You'd get that from a file, network endpoint, or clipboard data package.
bool result =
            ProtectionPolicyManager.TryApplyProcessUIPolicy(identity);

// tag as personal data.
ProtectionPolicyManager.ClearProcessUIPolicy();
ファイルへのデータの保護
保護されたファイルを作成し、それに書き込みます。
手順 1: アプリでエンタープライズ ファイルを作成できるかどうかを判断する
ID 文字列がポリシーによって管理されていて、アプリがそのポリシーの許可リストにある場合、アプリはエンタープライズ ファイルを作成できます。
if (!ProtectionPolicyManager.IsIdentityManaged(identity)) return false;
手順 2: ファイルを作成し、ID に保護する
StorageFolder storageFolder = ApplicationData.Current.LocalFolder;
StorageFile storageFile = await storageFolder.CreateFileAsync("sample.txt",
    CreationCollisionOption.ReplaceExisting);

FileProtectionInfo fileProtectionInfo =
    await FileProtectionManager.ProtectAsync(storageFile, identity);
手順 3: そのストリームまたはバッファーをファイルに書き込む
ストリームを書き込む
    if (fileProtectionInfo.Status == FileProtectionStatus.Protected)
    {
        var stream = await storageFile.OpenAsync(FileAccessMode.ReadWrite);

        using (var outputStream = stream.GetOutputStreamAt(0))
        {
            using (var dataWriter = new DataWriter(outputStream))
            {
                dataWriter.WriteString(enterpriseData);
            }
        }

    }
バッファーを書き込む
     if (fileProtectionInfo.Status == FileProtectionStatus.Protected)
     {
         var buffer = Windows.Security.Cryptography.CryptographicBuffer.ConvertStringToBinary(
             enterpriseData, Windows.Security.Cryptography.BinaryStringEncoding.Utf8);

         await FileIO.WriteBufferAsync(storageFile, buffer);

      }
バックグラウンド プロセスとしてファイルへのデータを保護する
このコードは、デバイスの画面がロックされている間に実行できます。 管理者がセキュリティで保護された "ロック下のデータ保護" (DPL) ポリシーを構成した場合、Windows は、保護されたリソースにデバイス メモリからアクセスするために必要な暗号化キーを削除します。 これにより、デバイスが失われた場合のデータ リークを防ぐことができます。 この同じ機能により、ハンドルが閉じられると、保護されたファイルに関連付けられているキーも削除されます。
ファイルの作成時にファイル ハンドルを開いたままにする方法を使用する必要があります。
手順 1: エンタープライズ ファイルを作成できるかどうかを判断する
使用している ID がポリシーによって管理されていて、アプリがそのポリシーの許可リストにある場合は、エンタープライズ ファイルを作成できます。
if (!ProtectionPolicyManager.IsIdentityManaged(identity)) return false;
手順 2: ファイルを作成して ID に保護する
FileProtectionManager.CreateProtectedAndOpenAsync は、保護されたファイルを作成し、書き込み中にファイル ハンドルを開いたままにします。
StorageFolder storageFolder = ApplicationData.Current.LocalFolder;

ProtectedFileCreateResult protectedFileCreateResult =
    await FileProtectionManager.CreateProtectedAndOpenAsync(storageFolder,
        "sample.txt", identity, CreationCollisionOption.ReplaceExisting);
手順 3: ストリームまたはバッファーをファイルに書き込む
次の使用例は、ストリームをファイルに書き込みます。
if (protectedFileCreateResult.ProtectionInfo.Status == FileProtectionStatus.Protected)
{
    IOutputStream outputStream =
        protectedFileCreateResult.Stream.GetOutputStreamAt(0);

    using (DataWriter writer = new DataWriter(outputStream))
    {
        writer.WriteString(enterpriseData);
        await writer.StoreAsync();
        await writer.FlushAsync();
    }

    outputStream.Dispose();
}
else if (protectedFileCreateResult.ProtectionInfo.Status == FileProtectionStatus.AccessSuspended)
{
    // Perform any special processing for the access suspended case.
}
API
ProtectedFileCreateResult.ProtectionInfo
FileProtectionStatus
ProtectedFileCreateResult.Stream
ファイルの一部を保護する
ほとんどの場合、企業データと個人データを別々に保存することはよりクリーンですが、必要に応じて同じファイルに保存できます。 たとえば、Microsoft Outlook では、エンタープライズ メールと個人用メールを 1 つのアーカイブ ファイルに格納できます。
エンタープライズ データを暗号化しますが、ファイル全体は暗号化しません。 そうすることで、MDM から登録を解除した場合や、エンタープライズ データ アクセス権が取り消された場合でも、ユーザーは引き続きそのファイルを使用できます。 また、アプリは、ファイルをメモリに読み取り戻すときに保護するデータを認識できるように、暗号化するデータを追跡する必要があります。
手順 1: 暗号化されたストリームまたはバッファーにエンタープライズ データを追加する
string enterpriseDataString = "<employees><employee><name>Bill</name><social>xxx-xxx-xxxx</social></employee></employees>";

var enterpriseData= Windows.Security.Cryptography.CryptographicBuffer.ConvertStringToBinary(
        enterpriseDataString, Windows.Security.Cryptography.BinaryStringEncoding.Utf8);

BufferProtectUnprotectResult result =
   await DataProtectionManager.ProtectAsync(enterpriseData, identity);

enterpriseData= result.Buffer;
API
DataProtectionManager.ProtectAsync
BufferProtectUnprotectResult.buffer
手順 2: 暗号化されていないストリームまたはバッファーに個人データを追加する
string personalDataString = "<recipies><recipe><name>BillsCupCakes</name><cooktime>30</cooktime></recipe></recipies>";

var personalData = Windows.Security.Cryptography.CryptographicBuffer.ConvertStringToBinary(
    personalDataString, Windows.Security.Cryptography.BinaryStringEncoding.Utf8);
手順 3: ストリームまたはバッファーの両方をファイルに書き込む
StorageFolder storageFolder = ApplicationData.Current.LocalFolder;

StorageFile storageFile = await storageFolder.CreateFileAsync("data.xml",
    CreationCollisionOption.ReplaceExisting);

 // Write both buffers to the file and save the file.

var stream = await storageFile.OpenAsync(FileAccessMode.ReadWrite);

using (var outputStream = stream.GetOutputStreamAt(0))
{
    using (var dataWriter = new DataWriter(outputStream))
    {
        dataWriter.WriteBuffer(enterpriseData);
        dataWriter.WriteBuffer(personalData);

        await dataWriter.StoreAsync();
        await outputStream.FlushAsync();
    }
}
手順 4: ファイル内のエンタープライズ データの場所を追跡する
企業が所有するファイル内のデータを追跡するのはアプリの責任です。
その情報は、ファイルに関連付けられているプロパティ、データベース、またはファイル内のヘッダー テキストに格納できます。
この例では、その情報を別の XML ファイルに保存します。
StorageFile metaDataFile = await storageFolder.CreateFileAsync("metadata.xml",
   CreationCollisionOption.ReplaceExisting);

await Windows.Storage.FileIO.WriteTextAsync
    (metaDataFile, "<EnterpriseDataMarker start='0' end='" + enterpriseData.Length.ToString() +
    "'></EnterpriseDataMarker>");
ファイルの保護された部分を読み取る
そのファイルからエンタープライズ データを読み取る方法を次に示します。
手順 1: ファイル内のエンタープライズ データの位置を取得する
Windows.Storage.StorageFolder storageFolder =
    Windows.Storage.ApplicationData.Current.LocalFolder;

 Windows.Storage.StorageFile metaDataFile =
   await storageFolder.GetFileAsync("metadata.xml");

string metaData = await Windows.Storage.FileIO.ReadTextAsync(metaDataFile);

XmlDocument doc = new XmlDocument();

doc.LoadXml(metaData);

uint startPosition =
    Convert.ToUInt16((doc.FirstChild.Attributes.GetNamedItem("start")).InnerText);

uint endPosition =
    Convert.ToUInt16((doc.FirstChild.Attributes.GetNamedItem("end")).InnerText);
手順 2: データ ファイルを開き、保護されていないことを確認する
Windows.Storage.StorageFile dataFile =
    await storageFolder.GetFileAsync("data.xml");

FileProtectionInfo protectionInfo =
    await FileProtectionManager.GetProtectionInfoAsync(dataFile);

if (protectionInfo.Status == FileProtectionStatus.Protected)
    return false;
API
FileProtectionManager.GetProtectionInfoAsync
FileProtectionInfo
FileProtectionStatus
手順 3: ファイルからエンタープライズ データを読み取る
var stream = await dataFile.OpenAsync(Windows.Storage.FileAccessMode.ReadWrite);

stream.Seek(startPosition);

Windows.Storage.Streams.Buffer tempBuffer = new Windows.Storage.Streams.Buffer(50000);

IBuffer enterpriseData = await stream.ReadAsync(tempBuffer, endPosition, InputStreamOptions.None);
手順 4: エンタープライズ データを含むバッファーの暗号化を解除する
DataProtectionInfo dataProtectionInfo =
   await DataProtectionManager.GetProtectionInfoAsync(enterpriseData);

if (dataProtectionInfo.Status == DataProtectionStatus.Protected)
{
    BufferProtectUnprotectResult result = await DataProtectionManager.UnprotectAsync(enterpriseData);
    enterpriseData = result.Buffer;
}
else if (dataProtectionInfo.Status == DataProtectionStatus.Revoked)
{
    // Code goes here to handle this situation. Perhaps, show UI
    // saying that the user's data has been revoked.
}
API
DataProtectionInfo
DataProtectionManager.GetProtectionInfoAsync
フォルダーへのデータの保護
フォルダーを作成して保護することができます。 そうすることで、そのフォルダーに追加するすべてのアイテムが自動的に保護されます。
private async Task<bool> CreateANewFolderAndProtectItAsync(string folderName, string identity)
{
    if (!ProtectionPolicyManager.IsIdentityManaged(identity)) return false;

    StorageFolder storageFolder = ApplicationData.Current.LocalFolder;
    StorageFolder newStorageFolder =
        await storageFolder.CreateFolderAsync(folderName);

    FileProtectionInfo fileProtectionInfo =
        await FileProtectionManager.ProtectAsync(newStorageFolder, identity);

    if (fileProtectionInfo.Status != FileProtectionStatus.Protected)
    {
        // Protection failed.
        return false;
    }
    return true;
}
保護する前に、フォルダーが空であることを確認します。 アイテムが既に含まれているフォルダーを保護することはできません。
API
ProtectionPolicyManager.IsIdentityManaged
FileProtectionManager.ProtectAsync
FileProtectionInfo.Identity
FileProtectionInfo.Status
ネットワーク エンドポイントへのデータの保護
保護されたスレッド コンテキストを作成して、そのデータをエンタープライズ エンドポイントに送信します。
手順 1: ネットワーク エンドポイントの ID を取得する
Windows.Networking.HostName hostName =
    new Windows.Networking.HostName(resourceURI.Host);

string identity = await ProtectionPolicyManager.
    GetPrimaryManagedIdentityForNetworkEndpointAsync(hostName);
API
ProtectionPolicyManager.GetPrimaryManagedIdentityForNetworkEndpointAsync
手順 2: 保護されたスレッド コンテキストを作成し、ネットワーク エンドポイントにデータを送信する
HttpClient client = null;

if (!string.IsNullOrEmpty(m_EnterpriseId))
{
    ProtectionPolicyManager.GetForCurrentView().Identity = identity;

    using (ThreadNetworkContext threadNetworkContext =
            ProtectionPolicyManager.CreateCurrentThreadNetworkContext(identity))
    {
        client = new HttpClient();
        HttpRequestMessage message = new HttpRequestMessage(HttpMethod.Put, resourceURI);
        message.Content = new HttpStreamContent(dataToWrite);

        HttpResponseMessage response = await client.SendRequestAsync(message);

        if (response.StatusCode == HttpStatusCode.Ok)
            return true;
        else
            return false;
    }
}
else
{
    return false;
}
API
ProtectionPolicyManager.GetForCurrentView
ProtectionPolicyManager.Identity
ProtectionPolicyManager.CreateCurrentThreadNetworkContext
共有コントラクトを使用してアプリが共有するデータを保護する
ユーザーがアプリからコンテンツを共有する場合は、共有コントラクトを実装し、 DataTransferManager.DataRequested イベントを処理する必要があります。
イベント ハンドラーで、データ パッケージにエンタープライズ ID コンテキストを設定します。
private void OnShareSourceOperation(object sender, RoutedEventArgs e)
{
    // Register the current page as a share source (or you could do this earlier in your app).
    DataTransferManager.GetForCurrentView().DataRequested += OnDataRequested;
    DataTransferManager.ShowShareUI();
}

private void OnDataRequested(DataTransferManager sender, DataRequestedEventArgs args)
{
    if (!string.IsNullOrEmpty(this.shareSourceContent))
    {
        var protectionPolicyManager = ProtectionPolicyManager.GetForCurrentView();
        DataPackage requestData = args.Request.Data;
        requestData.Properties.Title = this.shareSourceTitle;
        requestData.Properties.EnterpriseId = protectionPolicyManager.Identity;
        requestData.SetText(this.shareSourceContent);
    }
}
API
ProtectionPolicyManager.GetForCurrentView
ProtectionPolicyManager.Identity
別の場所にコピーするファイルを保護する
private async void CopyProtectionFromOneFileToAnother
    (StorageFile sourceStorageFile, StorageFile targetStorageFile)
{
    bool copyResult = await
        FileProtectionManager.CopyProtectionAsync(sourceStorageFile, targetStorageFile);

    if (!copyResult)
    {
        // Copying failed. To diagnose, you could check the file's status.
        // (call FileProtectionManager.GetProtectionInfoAsync and
        // check FileProtectionInfo.Status).
    }
}
デバイスの画面がロックされているときにエンタープライズ データを保護する
デバイスがロックされているときに、メモリ内のすべての機密データを削除します。 ユーザーがデバイスのロックを解除すると、アプリはそのデータを安全に追加できます。
ProtectionPolicyManager.ProtectedAccessSuspending イベントを処理して、画面がロックされていることをアプリが認識できるようにします。 このイベントは、管理者がロック ポリシーの下でセキュリティで保護されたデータ保護を構成する場合にのみ発生します。 Windows は、デバイスにプロビジョニングされているデータ保護キーを一時的に削除します。 Windows では、これらのキーを削除して、デバイスがロックされていて、場合によっては所有者が所有していない間に、暗号化されたデータへの不正アクセスがないことを確認します。
ProtectionPolicyManager.ProtectedAccessResumed イベントを処理して、画面のロックが解除されたことをアプリが認識できるようにします。 このイベントは、管理者がロック ポリシーの下でセキュリティで保護されたデータ保護を構成しているかどうかに関係なく発生します。
画面がロックされているときにメモリ内の機密データを削除する
機密データを保護し、保護されたファイルでアプリが開いたファイル ストリームをすべて閉じて、システムが機密データをメモリにキャッシュしないようにします。
次の使用例は、テキスト ブロックから暗号化されたバッファーにコンテンツを保存し、そのテキスト ブロックからコンテンツを削除します。
private async void ProtectionPolicyManager_ProtectedAccessSuspending(object sender, ProtectedAccessSuspendingEventArgs e)
{
    Deferral deferral = e.GetDeferral();

    if (ProtectionPolicyManager.GetForCurrentView().Identity != String.Empty)
    {
        IBuffer documentBodyBuffer = CryptographicBuffer.ConvertStringToBinary
           (documentTextBlock.Text, BinaryStringEncoding.Utf8);

        BufferProtectUnprotectResult result = await DataProtectionManager.ProtectAsync
            (documentBodyBuffer, ProtectionPolicyManager.GetForCurrentView().Identity);

        if (result.ProtectionInfo.Status == DataProtectionStatus.Protected)
        {
            this.protectedDocumentBuffer = result.Buffer;
            documentTextBlock.Text = null;
        }
    }

    // Close any open streams that you are actively working with
    // to make sure that we have no unprotected content in memory.

    // Optionally, code goes here to use e.Deadline to determine whether we have more
    // than 15 seconds left before the suspension deadline. If we do then process any
    // messages queued up for sending while we are still able to access them.

    deferral.Complete();
}
API
ProtectionPolicyManager.ProtectedAccessSuspending
ProtectionPolicyManager.GetForCurrentView
ProtectionPolicyManager.Identity
DataProtectionManager.ProtectAsync
BufferProtectUnprotectResult.buffer
ProtectedAccessSuspendingEventArgs.GetDeferral
Deferral.Complete
デバイスのロックが解除されたときに機密データを追加する
ProtectionPolicyManager.ProtectedAccessResumed は、デバイスのロックが解除され、キーがデバイスで再び使用可能になったときに発生します。
ProtectedAccessResumedEventArgs.Identities は、管理者がロック ポリシーの下でセキュリティで保護されたデータ保護を構成していない場合、空のコレクションです。
この例では、前の例の逆の処理を行います。 バッファーの暗号化を解除し、そのバッファーからテキスト ボックスに情報を追加し、バッファーを破棄します。
private async void ProtectionPolicyManager_ProtectedAccessResumed(object sender, ProtectedAccessResumedEventArgs e)
{
    if (ProtectionPolicyManager.GetForCurrentView().Identity != String.Empty)
    {
        BufferProtectUnprotectResult result = await DataProtectionManager.UnprotectAsync
            (this.protectedDocumentBuffer);

        if (result.ProtectionInfo.Status == DataProtectionStatus.Unprotected)
        {
            // Restore the unprotected version.
            documentTextBlock.Text = CryptographicBuffer.ConvertBinaryToString
                (BinaryStringEncoding.Utf8, result.Buffer);
            this.protectedDocumentBuffer = null;
        }
    }

}
API
ProtectionPolicyManager.ProtectedAccessResumed
ProtectionPolicyManager.GetForCurrentView
ProtectionPolicyManager.Identity
DataProtectionManager.UnprotectAsync
BufferProtectUnprotectResult.Status
保護されたコンテンツが取り消されたときにエンタープライズ データを処理する
デバイスが MDM から登録されていない場合、またはポリシー管理者がエンタープライズ データへのアクセスを明示的に取り消すときにアプリに通知する場合は、 ProtectionPolicyManager_ProtectedContentRevoked イベントを処理します。
この例では、電子メール アプリのエンタープライズ メールボックス内のデータが取り消されたかどうかを判断します。
private string mailIdentity = "contoso.com";

void MailAppSetup()
{
    ProtectionPolicyManager.ProtectedContentRevoked += ProtectionPolicyManager_ProtectedContentRevoked;
    // Code goes here to set up mailbox for 'mailIdentity'.
}

private void ProtectionPolicyManager_ProtectedContentRevoked(object sender, ProtectedContentRevokedEventArgs e)
{
    if (!new System.Collections.Generic.List<string>(e.Identities).Contains
        (this.mailIdentity))
    {
        // This event is not for our identity.
        return;
    }

    // Code goes here to delete any metadata associated with 'mailIdentity'.
}