HoloLens (第 1 世代) と Azure 309: アプリケーションの分析情報
注:
Mixed Reality Academy のチュートリアルは、HoloLens (第 1 世代) と Mixed Realityイマーシブ ヘッドセットを念頭に置いて設計されました。 そのため、これらのデバイスの開発に関するガイダンスをまだ探している開発者には、これらのチュートリアルを配置しておくことが重要であると考えます。 これらのチュートリアルは、HoloLens 2に使用されている最新のツールセットや相互作用では更新されません。 これらは、サポートされているデバイスでの作業を継続するために維持されます。 今後、HoloLens 2向けに開発する方法を示す新しい一連のチュートリアルが掲載されます。 この通知は、投稿時にこれらのチュートリアルへのリンクで更新されます。

このコースでは、Azure アプリケーション Insights API を使用してユーザーの動作に関する分析を収集して、Application Insights 機能を Mixed Reality アプリケーションに追加する方法について説明します。
Application Insights は Microsoft サービスであり、開発者はアプリケーションから分析を収集し、使いやすいポータルから管理できます。 分析は、パフォーマンスから収集するカスタム情報まで、あらゆる場合があります。 詳細については、 Application Insights ページを参照してください。
このコースを完了すると、Mixed Reality イマーシブ ヘッドセット アプリケーションが用意され、次の操作を行うことができます。
- ユーザーがシーンを視線入力して移動できるようにします。
- シーン内オブジェクトへの視線入力と近接性を使用して、 Application Insights サービスへの分析の送信をトリガーします。
- また、アプリはサービスを呼び出し、過去 24 時間以内にユーザーが最もアプローチしたオブジェクトに関する情報を取得します。 そのオブジェクトは、その色を緑色に変更します。
このコースでは、Application Insights Service からUnity ベースのサンプル アプリケーションに結果を取得する方法について説明します。 これらの概念を、ビルドする可能性のあるカスタム アプリケーションに適用するのはユーザー次第です。
デバイスのサポート
| コース | HoloLens | イマーシブ ヘッドセット |
|---|---|---|
| MR と Azure 309: アプリケーションの分析情報 | ✔️ | ✔️ |
注:
このコースでは主に、Windows Mixed Realityイマーシブ (VR) ヘッドセットに焦点を当てていますが、このコースで学習した内容をMicrosoft HoloLensに適用することもできます。 コースに従うと、HoloLens をサポートするために採用する必要がある変更に関するメモが表示されます。 HoloLens を使用すると、音声キャプチャ中にエコーが発生することがあります。
前提条件
注:
このチュートリアルは、Unityと C# に関する基本的な経験を持つ開発者向けに設計されています。 また、このドキュメント内の前提条件と書面による指示は、執筆時点 (2018 年 7 月) にテストおよび検証された内容を表していることにも注意してください。 ツールの インストール に関する記事に記載されているように、最新のソフトウェアを自由に使用できますが、このコースの情報は、以下に示すソフトウェアよりも新しいソフトウェアで見つかるものと完全に一致するとは想定しないでください。
このコースでは、次のハードウェアとソフトウェアをお勧めします。
- イマーシブ (VR) ヘッドセット開発用のWindows Mixed Realityと互換性のある開発用 PC
- 開発者モードが有効になっているWindows 10 Fall Creators Update (またはそれ以降)
- 最新のWindows 10 SDK
- Unity 2017.4
- Visual Studio 2017
- 開発者モードが有効になっているWindows Mixed Realityイマーシブ (VR) ヘッドセットまたはMicrosoft HoloLens
- マイクが内蔵されたヘッドホンのセット (ヘッドセットにマイクとスピーカーが組み込まれていない場合)
- Azure セットアップと Application Insights データ取得のためのインターネット アクセス
始める前に
このプロジェクトをビルドする際の問題を回避するには、このチュートリアルのプロジェクトをルート フォルダーまたはほぼルート フォルダーに作成することを強くお勧めします (長いフォルダー パスがビルド時に問題を引き起こす可能性があります)。
警告
Application Insights に送信されるデータには時間がかかるため、忍耐強く対応してください。 サービスがデータを受信したかどうかをチェックする場合は、第 14 章をチェックして、ポータルを移動する方法を示します。
第 1 章 - Azure Portal
Application Insights を使用するには、Azure portalで Application Insights サービスを作成して構成する必要があります。
Azure Portal にサインインします。
注:
Azure アカウントがまだない場合は、アカウントを作成する必要があります。 教室やラボの状況でこのチュートリアルに従っている場合は、講師またはプロクターの 1 人に新しいアカウントの設定に関するヘルプを依頼してください。
ログインしたら、左上隅にある [ 新規 ] をクリックし、 Application Insights を検索し、[ Enter] をクリックします。
注:
新しいポータルでは、New という単語がリソースの作成に置き換えられた可能性があります。
![Azure Portal の [Insight] が [すべて] ペインで強調表示されているスクリーンショット。](images/azurelabs-lab309-01.png)
右側の新しいページには、Azure アプリケーション Insights サービスの説明が表示されます。 このページの左下にある [ 作成 ] ボタンを選択して、このサービスとの関連付けを作成します。
![Application Insights 画面のスクリーンショット。[作成] が強調表示されています。](images/azurelabs-lab309-02.png)
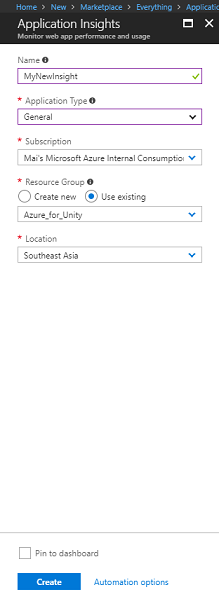
[作成] をクリックしたら、次の手順を実行します。
このサービス インスタンスの目的の 名前 を挿入します。
[アプリケーションの種類] で、[全般] を選択します。
適切なサブスクリプションを選択 します。
リソース グループを選択するか、新しい リソース グループ を作成します。 リソース グループを使用すると、Azure 資産のコレクションの監視、アクセスの制御、課金のプロビジョニングと管理を行うことができます。 1 つのプロジェクト (これらのコースなど) に関連付けられているすべての Azure サービスを共通リソース グループの下に保持することをお勧めします。
Azure リソース グループの詳細については、 リソース グループに関する記事を参照してください。
[場所] を選択します。
また、本サービスに適用される使用条件を理解していることも確認する必要があります。
[作成] を選択します。
[作成] をクリックすると、サービスが作成されるまで待つ必要があります。これには 1 分かかる場合があります。
Service インスタンスが作成されると、ポータルに通知が表示されます。

新しいサービス インスタンスを調べる通知を選択します。
![[デプロイに成功しました] ダイアログの [リソースに移動] が強調表示されているスクリーンショット。](images/azurelabs-lab309-05.png)
通知の [ リソースに移動 ] ボタンをクリックして、新しいサービス インスタンスを探索します。 新しい Application Insights Service インスタンスにアクセスします。
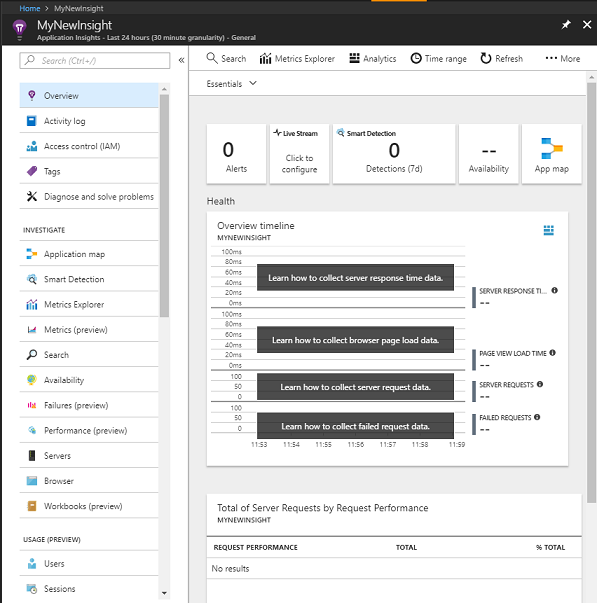
注:
この Web ページを開いたまま、簡単にアクセスできます。収集されたデータを確認するために頻繁にここに戻ってきます。
重要
Application Insights を実装するには、 インストルメンテーション キー、 アプリケーション ID、 API キーの 3 つの特定の値を使用する必要があります。 以下に、サービスからこれらの値を取得する方法を示します。 これらの値は、コードですぐに使用するため、空白の メモ帳 ページに必ず書き留めておいてください。
インストルメンテーション キーを見つけるには、サービス関数の一覧を下にスクロールし、[プロパティ] を選択する必要があります。表示されたタブにサービス キーが表示されます。
![サービス関数を示すスクリーンショット。[構成] セクションで [プロパティ] が強調表示され、メイン ウィンドウでインストルメンテーション キーが強調表示されています。](images/azurelabs-lab309-07.png)
[プロパティ] の下に、クリックする必要がある API Access があります。 右側のパネルには、アプリの アプリケーション ID が 表示されます。
![サービス関数を示すスクリーンショット。A P I Access が強調表示されています。[メイン] ウィンドウで [P I キーの作成] と [アプリケーション ID] が強調表示されています。](images/azurelabs-lab309-08.png)
[アプリケーション ID] パネルがまだ開いている状態で、[API キーの作成] をクリックすると、[API キーの作成] パネルが開きます。
![[A P I キーの作成] パネルを示すスクリーンショット。](images/azurelabs-lab309-09.png)
[ Create API key](API キーの作成 ) パネルを開き、説明を入力し、 3 つのボックスをオンにします。
[ キーの生成] をクリックします。 API キーが作成され、表示されます。
![新しいサービス キー情報を示す [A P I キーの作成] パネルのスクリーンショット。](images/azurelabs-lab309-10.png)
警告
これは、サービス キーが表示される唯一の時間であるため、今すぐコピーを作成してください。
第 2 章 - Unity プロジェクトを設定する
Mixed Reality を使用して開発するための一般的なセットアップを次に示します。そのため、他のプロジェクトに適したテンプレートです。
Unityを開き、[新規] をクリックします。
![[Unity プロジェクト] ウィンドウのスクリーンショット。プロジェクト情報は表示されません。](images/azurelabs-lab309-11.png)
これで、Unityプロジェクト名を指定し、MR_Azure_Application_Insightsを挿入する必要があります。 [テンプレート] が [3D] に設定されていることを確認します。 [場所] を適切な場所に設定します (ルート ディレクトリに近い方が適しています)。 次に、[ プロジェクトの作成] をクリックします。
![[新しいプロジェクトのUnity] ウィンドウのスクリーンショット。プロジェクト情報が表示されています。](images/azurelabs-lab309-12.png)
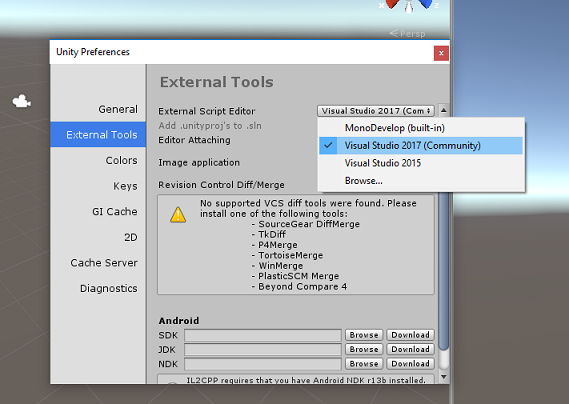
Unity開いている場合は、既定の [スクリプト] エディターが Visual Studio に設定されていることを確認する必要があります。 [>基本設定の編集] に移動し、新しいウィンドウから [外部ツール] に移動します。 [外部スクリプト] エディターを Visual Studio 2017 に変更します。 [基本設定] ウィンドウを閉じます。
次に、[ファイル>ビルド設定] に移動し、[プラットフォームの切り替え] ボタンをクリックしてプラットフォームをユニバーサル Windows プラットフォームに切り替えます。
![[ビルド設定] ウィンドウのスクリーンショット。[プラットフォーム] 選択リストが表示されています。ユニバーサル Windows プラットフォームが選択されています。](images/azurelabs-lab309-14.png)
[ファイル>ビルド設定] に移動し、次の点を確認します。
ターゲット デバイスが [任意のデバイス] に設定されている
Microsoft HoloLensの場合は、[ターゲット デバイス] を HoloLens に設定します。
ビルドの種類が D3D に設定されている
SDK が [最新インストール済み] に設定されている
ビルドと実行がローカル コンピューターに設定されている
シーンを保存し、ビルドに追加します。
これを行うには、[ 開いているシーンの追加] を選択します。 保存ウィンドウが表示されます。
![[ビルド設定] ウィンドウのスクリーンショット。[開いているシーンの追加] が選択されています。](images/azurelabs-lab309-15.png)
このために新しいフォルダーと将来のシーンを作成し、[ 新しいフォルダー ] ボタンをクリックして新しいフォルダーを作成し、 Scenes という名前を付けます。
![[シーンの保存] ウィンドウのスクリーンショット。[シーン] フォルダーが選択されています。](images/azurelabs-lab309-16.png)
新しく作成した Scenes フォルダーを開き、[ ファイル名: テキスト] フィールド に「ApplicationInsightsScene」と入力し、[ 保存] をクリックします。
![ファイル名が入力された [シーンの保存] ウィンドウのスクリーンショット。](images/azurelabs-lab309-17.png)
[ ビルド設定] の残りの設定は、現時点では既定値のままにする必要があります。
[ ビルド設定] ウィンドウで [ プレイヤー設定] を選択すると、 インスペクター が配置されている領域の関連パネルが開きます。
![[インスペクター] タブのスクリーンショット。プレイヤー設定が表示されています。](images/azurelabs-lab309-18.png)
このパネルでは、いくつかの設定を確認する必要があります。
[その他の設定] タブで、次 の手順を実行 します。
スクリプト ランタイムバージョンは試験的 (.NET 4.6 同等) である必要があります。これにより、エディターを再起動する必要がトリガーされます。
スクリプト バックエンドは .NET にする必要があります
API 互換性レベルは .NET 4.6 にする必要があります
![[その他の設定] の [構成] セクションの詳細を示す [インスペクター] タブのスクリーンショット。](images/azurelabs-lab309-19.png)
[発行設定] タブの [機能] で、次をチェックします。
InternetClient
![[機能] リストのスクリーンショット。インターネット クライアントがオンになっています。](images/azurelabs-lab309-20.png)
パネルの下の [XR 設定] ([発行設定] の下にあります) で、[Virtual Reality Supported] をオンにして、Windows Mixed Reality SDK が追加されていることを確認します。
![[X R 設定] セクションのスクリーンショット。Virtual Reality Supported がオンになっています。](images/azurelabs-lab309-21.png)
[ビルド設定] に戻り、C# プロジェクトUnity灰色表示されなくなりました。この横にあるチェック ボックスをオンにします。
[ビルド設定] ウィンドウを閉じます。
シーンとプロジェクト (FILE>SAVE SCENE/FILE>SAVE プロジェクト) を保存します。
第 3 章 - Unity パッケージをインポートする
重要
「このコースのコンポーネントを設定する」Unityをスキップし、そのままコードに進む場合は、この Azure-MR-309.unitypackage を自由にダウンロードして、カスタム パッケージとしてプロジェクトにインポートしてください。 これには、次の章の DLL も含まれます。 インポート後、 第 6 章から続行します。
重要
Unity内で Application Insights を使用するには、その DLL と Newtonsoft DLL をインポートする必要があります。 現在、Unityには、インポート後にプラグインを再構成する必要がある既知の問題があります。 バグが解決された後、これらの手順 (このセクションの 4 ~ 7) は不要になります。
Application Insights を独自のプロジェクトにインポートするには、 プラグインを含む '.unitypackage' をダウンロードしていることを確認します。 その後、次の操作を行います。
[Assets > Import Package]\(パッケージのインポート\) > [カスタム パッケージ] メニュー オプションを使用して、Unityに .unitypackage** を追加します。
ポップアップ表示される [Unity パッケージのインポート] ボックスで、[プラグイン] の下 (および含む) がすべて選択されていることを確認します。
![[Unity パッケージのインポート] ダイアログ ボックスのスクリーンショット。すべての項目がオンになっています。](images/azurelabs-lab309-22.png)
[ インポート ] ボタンをクリックして、項目をプロジェクトに追加します。
[プロジェクト] ビューの [プラグイン] の下にある [Insights] フォルダーに移動し、次のプラグインのみを選択します。
- Microsoft.ApplicationInsights
![[プロジェクト] パネルのスクリーンショット。Insights フォルダーが開いています。](images/azurelabs-lab309-23.png)
このプラグインを選択した状態で、[Any Platform]\(任意のプラットフォーム\) がオフになっていることを確認してから、WSAPlayer もオフになっていることを確認し、[適用] をクリックします。 これは、ファイルが正しく構成されていることを確認するためだけです。
![[インスペクター] パネルのスクリーンショット。[エディター] と [スタンドアロン] がオンになっています。](images/azurelabs-lab309-24.png)
注:
このようなプラグインをマークすると、Unity エディターでのみ使用されるように構成されます。 WSA フォルダーには別の DLL セットがあり、プロジェクトがUnityからエクスポートされた後に使用されます。
次に、Insights フォルダー内の WSA フォルダーを開く必要があります。 構成したのと同じファイルのコピーが表示されます。 このファイルを選択し、インスペクターで [Any Platform] がオフになっていることを確認し、WSAPlayerのみがオンになっていることを確認します。 [適用] をクリックします。
![[インスペクター] パネルのスクリーンショット。[W S A プレーヤー] がオンになっています。](images/azurelabs-lab309-25.png)
ここでは 手順 4 から 6 に従う必要がありますが、代わりに Newtonsoft プラグインの場合は必要です。 結果の外観については、次のスクリーンショットを参照してください。
![Newtonsoft フォルダーとプラグインの選択を設定した結果を示す [プロジェクト] パネルと [インスペクター] パネルの 4 つのビューのスクリーンショット。](images/azurelabs-lab309-25-5.png)
第 4 章 - カメラとユーザー コントロールを設定する
この章では、カメラとコントロールを設定して、ユーザーがシーン内を表示および移動できるようにします。
階層パネルの空の領域を右クリックし、[ 作成>Empty] をクリックします。
![[階層] パネルのスクリーンショット。[空の作成] が選択されています。](images/azurelabs-lab309-26.png)
新しい空の GameObject の名前を Camera Parent に変更します。
![[カメラの親] が選択されている [階層] パネルのスクリーンショット。[インスペクター] パネル](images/azurelabs-lab309-27.png)
階層パネルの空の領域を右クリックし、[ 3D オブジェクト]、[ 球体] の順にクリックします。
球体の名前を 右に変更します。
右手の変換スケールを 0.1、0.1、0.1 に設定する
![[階層] パネルと [インスペクター] パネルのスクリーンショット。[インスペクター] パネルの [変換] セクションが強調表示されています。](images/azurelabs-lab309-28.png)
球体コライダー コンポーネントの歯車をクリックし、[コンポーネントを削除] をクリックして、球体コライダー コンポーネントを右側から削除します。
![[インスペクター] パネルのスクリーンショット。歯車アイコンと [コンポーネントの削除] が [Sphere Collider] セクションで強調表示されています。](images/azurelabs-lab309-29.png)
階層パネルで、 Main Camera オブジェクトと Right Hand オブジェクト を Camera Parent オブジェクトにドラッグします。
![[メイン カメラ] が選択された [階層] パネルのスクリーンショット。[インスペクター] パネルに [メイン カメラ] がオンになっていると表示されます。](images/azurelabs-lab309-30.png)
メイン カメラと右手オブジェクトの両方の変換位置を 0、0、0 に設定します。
![[メイン カメラ] が選択されている [階層] パネルのスクリーンショット。[インスペクター] パネルで [変換] 設定が強調表示されています。](images/azurelabs-lab309-31.png)
![右側が選択されている [階層] パネルのスクリーンショット。[インスペクター] パネルで [変換] 設定が強調表示されています。](images/azurelabs-lab309-32.png)
第 5 章 - Unity シーンでオブジェクトを設定する
これで、ユーザーが操作できるシーンの基本的な図形をいくつか作成します。
階層パネルの空の領域を右クリックし、[3D オブジェクト] で [平面] を選択します。
平面 変換位置 を 0、-1、0 に設定します。
平面 変換スケール を 5、1、5 に設定します。
![[シーン]、[階層]、[インスペクター] パネルのスクリーンショット。[インスペクター] パネルの [変換] セクションが強調表示されています。](images/azurelabs-lab309-33.png)
他の図形を見やすくするために、 Plane オブジェクトで使用する基本的なマテリアルを作成します。 プロジェクト パネルに移動し、右クリックし、[作成]、[フォルダー] の順に移動して、新しいフォルダーを作成します。 マテリアルという名前を 付けます。
![[作成] と [フォルダー] が強調表示されている [プロジェクト] パネルのスクリーンショット。](images/azurelabs-lab309-34.png)
![[プロジェクト] パネルのスクリーンショット。[アセット] ウィンドウで [マテリアル] が強調表示されています。](images/azurelabs-lab309-35.png)
[マテリアル] フォルダーを開き、右クリックして [作成] をクリックし、[マテリアル] をクリックして新しいマテリアルを作成します。 ブルーという名前を付 けます。
![[作成] と [マテリアル] が強調表示されている [プロジェクト] パネルのスクリーンショット。](images/azurelabs-lab309-36.png)
![[プロジェクト] パネルのスクリーンショット。[マテリアル] ウィンドウで青が強調表示されています。](images/azurelabs-lab309-37.png)
新しい 青 い素材が選択されたら、 インスペクターを見て、 アルベドと一緒に長方形のウィンドウをクリックします。 青い色を選択します (下の 1 つの図は 16 進色: #3592FFFF)。 選択したら、閉じるボタンをクリックします。
![[インスペクター] パネルのスクリーンショット。[色] セクションが強調表示されています。](images/azurelabs-lab309-38.png)
新しいマテリアルをマテリアル フォルダーからシーン内の新しく作成した平面にドラッグします (または、階層内の Plane オブジェクトにドロップします)。
![[マテリアル] フォルダーの新しいマテリアルを示す [シーン] パネルのスクリーンショット。](images/azurelabs-lab309-39.png)
階層パネルの空の領域を右クリックし、[3D オブジェクト] の [カプセル] をクリックします。
- カプセルを選択した状態で、その変換位置を -10、1、0 に変更します。
階層パネルの空の領域を右クリックし、[3D オブジェクト] の [キューブ] をクリックします。
- [キューブ] が選択された状態で、その変換位置を 0、0、10 に変更します。
階層パネルの空の領域を右クリックし、[3D オブジェクト] の [Sphere] をクリックします。
- [球体] を選択した状態で、その変換位置を 10、0、0 に変更します。
![[シーン]、[階層]、[インスペクター] パネルのスクリーンショット。[階層] パネルで [カプセル] が選択されています。](images/azurelabs-lab309-40.png)
注:
これらの Position 値は 提案です。 オブジェクトの位置は自由に任意に設定できますが、オブジェクトの距離がカメラから遠すぎなければ、アプリケーションのユーザーにとっては簡単です。
アプリケーションを実行するときは、シーン内のオブジェクトを識別できる必要があります。これを実現するには、タグ付けする必要があります。 オブジェクトの 1 つを選択し、[ インスペクター] パネルで [ タグの追加]をクリックします。これにより、[ インスペクター] と [ タグ] & [レイヤー] パネルが 切り替わります。
![[タグの追加] オプションが強調表示されている [インスペクター] パネルのスクリーンショット。](images/azurelabs-lab309-41.png)
![[インスペクター] パネルのスクリーンショット。タグとレイヤーが強調表示されています。](images/azurelabs-lab309-42.png)
+(プラス) 記号をクリックし、タグ名を ObjectInScene として入力します。
![[タグ] と [レイヤー] が選択されている [インスペクター] パネルのスクリーンショット。[新しいタグ名] ダイアログが強調表示されています。](images/azurelabs-lab309-43.png)
警告
タグに別の名前を使用する場合は、シーン内でオブジェクトが検出され、検出されるように、この変更によって DataFromAnalytics、 ObjectTrigger、 および Gaze スクリプトも後で行われるようにする必要があります。
タグを作成したら、3 つのオブジェクトすべてにタグを適用する必要があります。 階層から Shift キーを押しながら、カプセル、キューブ、および Sphere オブジェクトをクリックし、インスペクターで[タグ] と共にドロップダウン メニューをクリックし、作成した ObjectInScene タグをクリックします。
![[インスペクター] パネルのスクリーンショット。矢印が [タグ] をポイントしています。[タグなし] メニューに [タグなし] チェック が表示され、ObjectInScene が選択されています。](images/azurelabs-lab309-44.png)
![[作成] と [フォルダー] が強調表示されている 2 つのメニューを示すスクリーンショット。](images/azurelabs-lab309-45.png)
第 6 章 - ApplicationInsightsTracker クラスを作成する
最初に作成する必要があるスクリプトは ApplicationInsightsTracker です。これは次の役割を担います。
Azure アプリケーション Insights に送信するユーザーの操作に基づいてイベントを作成する。
ユーザーの操作に応じて、適切なイベント名を作成します。
Application Insights Service インスタンスにイベントを送信する。
このクラスを作成するには:
[プロジェクト パネル]、[作成]、[フォルダー>右クリックします。 [スクリプト] フォルダーに名前 を付けます。
![[プロジェクト] パネルのスクリーンショット。[資産] ウィンドウで [スクリプト] フォルダー アイコンが強調表示されています。](images/azurelabs-lab309-46.png)
![[作成] と [C# スクリプト] のオプションが選択されているメニュー オプションを示すスクリーンショット。](images/azurelabs-lab309-47.png)
[スクリプト] フォルダーが作成されたら、ダブルクリックして開きます。 次に、そのフォルダー内で、[ 作成>C# スクリプト] を右クリックします。 スクリプトに ApplicationInsightsTracker という名前を付けます。
新しい ApplicationInsightsTracker スクリプトをダブルクリックして 、Visual Studio で開きます。
スクリプトの上部にある名前空間を次のように更新します。
    using Microsoft.ApplicationInsights;
    using Microsoft.ApplicationInsights.DataContracts;
    using Microsoft.ApplicationInsights.Extensibility;
    using UnityEngine;
クラス内に次の変数を挿入します。
    /// <summary>
    /// Allows this class to behavior like a singleton
    /// </summary>
    public static ApplicationInsightsTracker Instance;

    /// <summary>
    /// Insert your Instrumentation Key here
    /// </summary>
    internal string instrumentationKey = "Insert Instrumentation Key here";

    /// <summary>
    /// Insert your Application Id here
    /// </summary>
    internal string applicationId = "Insert Application Id here";

    /// <summary>
    /// Insert your API Key here
    /// </summary>
    internal string API_Key = "Insert API Key here";

    /// <summary>
    /// Represent the Analytic Custom Event object
    /// </summary>
    private TelemetryClient telemetryClient;

    /// <summary>
    /// Represent the Analytic object able to host gaze duration
    /// </summary>
    private MetricTelemetry metric;
注:
手順 9 以降の第 1 章で説明されているように、Azure Portal のサービス キーを使用して、instrumentationKey、applicationId、および API_Key の値を適切に設定します。
次に、クラスが初期化されたときに呼び出される Start() メソッドと Awake() メソッドを追加します。
    /// <summary>
    /// Sets this class instance as a singleton
    /// </summary>
    void Awake()
    {
        Instance = this;
    }

    /// <summary>
    /// Use this for initialization
    /// </summary>
    void Start()
    {
        // Instantiate telemetry and metric
        telemetryClient = new TelemetryClient();

        metric = new MetricTelemetry();

        // Assign the Instrumentation Key to the Event and Metric objects
        TelemetryConfiguration.Active.InstrumentationKey = instrumentationKey;

        telemetryClient.InstrumentationKey = instrumentationKey;
    }
アプリケーションによって登録されたイベントとメトリックの送信を担当するメソッドを追加します。
/// <summary> /// Submit the Event to Azure Analytics using the event trigger object /// </summary> public void RecordProximityEvent(string objectName) { telemetryClient.TrackEvent(CreateEventName(objectName)); } /// <summary> /// Uses the name of the object involved in the event to create /// and return an Event Name convention /// </summary> public string CreateEventName(string name) { string eventName = $"User near {name}"; return eventName; } /// <summary> /// Submit a Metric to Azure Analytics using the metric gazed object /// and the time count of the gaze /// </summary> public void RecordGazeMetrics(string objectName, int time) { // Output Console information about gaze. Debug.Log($"Finished gazing at {objectName}, which went for <b>{time}</b> second{(time != 1 ? "s" : "")}"); metric.Name = $"Gazed {objectName}"; metric.Value = time; telemetryClient.TrackMetric(metric); }Unityに戻る前に、変更を Visual Studio に保存してください。
第 7 章 - 視線入力スクリプトを作成する
次に作成するスクリプトは、 視線入力 スクリプトです。 このスクリプトは、メイン カメラから前方に投影されるレイキャストを作成して、ユーザーが見ているオブジェクトを検出する役割を担います。 この場合、 Raycast は、ユーザーが ObjectInScene タグを持つオブジェクトを見ているかどうかを識別し、ユーザーがそのオブジェクトを 視線入力 する時間をカウントする必要があります。
Scripts フォルダーをダブルクリックして開きます。
[スクリプト] フォルダー内を右クリックし、[作成>C# スクリプト] をクリックします。 スクリプトに Gaze という名前を付 けます。
スクリプトをダブルクリックして Visual Studio で開きます。
既存のコードを次のように置き換えます。
    using UnityEngine;

    public class Gaze : MonoBehaviour
    {
        /// <summary>
        /// Provides Singleton-like behavior to this class.
        /// </summary>
        public static Gaze Instance;

        /// <summary>
        /// Provides a reference to the object the user is currently looking at.
        /// </summary>
        public GameObject FocusedGameObject { get; private set; }

        /// <summary>
        /// Provides whether an object has been successfully hit by the raycast.
        /// </summary>
        public bool Hit { get; private set; }

        /// <summary>
        /// Provides a reference to compare whether the user is still looking at
        /// the same object (and has not looked away).
        /// </summary>
        private GameObject _oldFocusedObject = null;

        /// <summary>
        /// Max Ray Distance
        /// </summary>
        private float _gazeMaxDistance = 300;

        /// <summary>
        /// Max Ray Distance
        /// </summary>
        private float _gazeTimeCounter = 0;

        /// <summary>
        /// The cursor object will be created when the app is running,
        /// this will store its values.
        /// </summary>
        private GameObject _cursor;
    }
Awake() メソッドと Start() メソッドのコードを追加する必要があります。
    private void Awake()
    {
        // Set this class to behave similar to singleton
        Instance = this;
        _cursor = CreateCursor();
    }

    void Start()
    {
        FocusedGameObject = null;
    }

    /// <summary>
    /// Create a cursor object, to provide what the user
    /// is looking at.
    /// </summary>
    /// <returns></returns>
    private GameObject CreateCursor()
    {
        GameObject newCursor = GameObject.CreatePrimitive(PrimitiveType.Sphere);

        // Remove the collider, so it does not block raycast.
        Destroy(newCursor.GetComponent<SphereCollider>());

        newCursor.transform.localScale = new Vector3(0.1f, 0.1f, 0.1f);

        newCursor.GetComponent<MeshRenderer>().material.color =
        Color.HSVToRGB(0.0223f, 0.7922f, 1.000f);

        newCursor.SetActive(false);
        return newCursor;
    }
Gaze クラス内で、Update() メソッドに次のコードを追加して Raycast を投影し、ターゲット ヒットを検出します。
    /// <summary>
    /// Called every frame
    /// </summary>
    void Update()
    {
        // Set the old focused gameobject.
        _oldFocusedObject = FocusedGameObject;

        RaycastHit hitInfo;

        // Initialize Raycasting.
        Hit = Physics.Raycast(Camera.main.transform.position, Camera.main.transform.forward, out hitInfo, _gazeMaxDistance);

        // Check whether raycast has hit.
        if (Hit == true)
        {
            // Check whether the hit has a collider.
            if (hitInfo.collider != null)
            {
                // Set the focused object with what the user just looked at.
                FocusedGameObject = hitInfo.collider.gameObject;

                // Lerp the cursor to the hit point, which helps to stabilize the gaze.
                _cursor.transform.position = Vector3.Lerp(_cursor.transform.position, hitInfo.point, 0.6f);

                _cursor.SetActive(true);
            }
            else
            {
                // Object looked on is not valid, set focused gameobject to null.
                FocusedGameObject = null;

                _cursor.SetActive(false);
            }
        }
        else
        {
            // No object looked upon, set focused gameobject to null.
            FocusedGameObject = null;

            _cursor.SetActive(false);
        }

        // Check whether the previous focused object is this same object. If so, reset the focused object.
        if (FocusedGameObject != _oldFocusedObject)
        {
            ResetFocusedObject();
        }
        // If they are the same, but are null, reset the counter.
        else if (FocusedGameObject == null && _oldFocusedObject == null)
        {
            _gazeTimeCounter = 0;
        }
        // Count whilst the user continues looking at the same object.
        else
        {
            _gazeTimeCounter += Time.deltaTime;
        }
    }
ユーザーがオブジェクトを確認したときに Application Insights にデータを送信するには、ResetFocusedObject() メソッドを追加します。
/// <summary> /// Reset the old focused object, stop the gaze timer, and send data if it /// is greater than one. /// </summary> public void ResetFocusedObject() { // Ensure the old focused object is not null. if (_oldFocusedObject != null) { // Only looking for objects with the correct tag. if (_oldFocusedObject.CompareTag("ObjectInScene")) { // Turn the timer into an int, and ensure that more than zero time has passed. int gazeAsInt = (int)_gazeTimeCounter; if (gazeAsInt > 0) { //Record the object gazed and duration of gaze for Analytics ApplicationInsightsTracker.Instance.RecordGazeMetrics(_oldFocusedObject.name, gazeAsInt); } //Reset timer _gazeTimeCounter = 0; } } }これで、視線入力スクリプトが完了しました。 Unityに戻る前に、Visual Studio に変更を保存します。
第 8 章 - ObjectTrigger クラスを作成する
次に作成する必要があるスクリプトは ObjectTrigger です。これは次の役割を担います。
- メイン カメラへの衝突に必要なコンポーネントの追加。
- ObjectInScene としてタグ付けされたオブジェクトの近くにカメラがあるかどうかを検出します。
スクリプトを作成するには:
Scripts フォルダーをダブルクリックして開きます。
[スクリプト] フォルダー内を右クリックし、[作成>C# スクリプト] をクリックします。 スクリプトに ObjectTrigger という名前を付けます。
スクリプトをダブルクリックして Visual Studio で開きます。 既存のコードを次のように置き換えます。
using UnityEngine; public class ObjectTrigger : MonoBehaviour { private void Start() { // Add the Collider and Rigidbody components, // and set their respective settings. This allows for collision. gameObject.AddComponent<SphereCollider>().radius = 1.5f; gameObject.AddComponent<Rigidbody>().useGravity = false; } /// <summary> /// Triggered when an object with a collider enters this objects trigger collider. /// </summary> /// <param name="collision">Collided object</param> private void OnCollisionEnter(Collision collision) { CompareTriggerEvent(collision, true); } /// <summary> /// Triggered when an object with a collider exits this objects trigger collider. /// </summary> /// <param name="collision">Collided object</param> private void OnCollisionExit(Collision collision) { CompareTriggerEvent(collision, false); } /// <summary> /// Method for providing debug message, and sending event information to InsightsTracker. /// </summary> /// <param name="other">Collided object</param> /// <param name="enter">Enter = true, Exit = False</param> private void CompareTriggerEvent(Collision other, bool enter) { if (other.collider.CompareTag("ObjectInScene")) { string message = $"User is{(enter == true ? " " : " no longer ")}near <b>{other.gameObject.name}</b>"; if (enter == true) { ApplicationInsightsTracker.Instance.RecordProximityEvent(other.gameObject.name); } Debug.Log(message); } } }Unityに戻る前に、変更を Visual Studio に保存してください。
第 9 章 - DataFromAnalytics クラスを作成する
次に、 DataFromAnalytics スクリプトを作成する必要があります。このスクリプトは次の役割を担います。
- カメラによって最もアプローチされたオブジェクトに関する分析データをフェッチします。
- Azure アプリケーション Insights サービス インスタンスとの通信を許可するサービス キーを使用します。
- イベント数が最も多いシーン内のオブジェクトを並べ替えます。
- 最も近づくオブジェクトのマテリアルの色を 緑に変更します。
スクリプトを作成するには:
Scripts フォルダーをダブルクリックして開きます。
[スクリプト] フォルダー内を右クリックし、[作成>C# スクリプト] をクリックします。 スクリプトに DataFromAnalytics という名前を付けます。
スクリプトをダブルクリックして Visual Studio で開きます。
次の名前空間を挿入します。
    using Newtonsoft.Json;
    using System;
    using System.Collections;
    using System.Collections.Generic;
    using System.Linq;
    using UnityEngine;
    using UnityEngine.Networking;
スクリプト内に次を挿入します。
    /// <summary>
    /// Number of most recent events to be queried
    /// </summary>
    private int _quantityOfEventsQueried = 10;

    /// <summary>
    /// The timespan with which to query. Needs to be in hours.
    /// </summary>
    private int _timepspanAsHours = 24;

    /// <summary>
    /// A list of the objects in the scene
    /// </summary>
    private List<GameObject> _listOfGameObjectsInScene;

    /// <summary>
    /// Number of queries which have returned, after being sent.
    /// </summary>
    private int _queriesReturned = 0;

    /// <summary>
    /// List of GameObjects, as the Key, with their event count, as the Value.
    /// </summary>
    private List<KeyValuePair<GameObject, int>> _pairedObjectsWithEventCount = new List<KeyValuePair<GameObject, int>>();

    // Use this for initialization
    void Start()
    {
        // Find all objects in scene which have the ObjectInScene tag (as there may be other GameObjects in the scene which you do not want).
        _listOfGameObjectsInScene = GameObject.FindGameObjectsWithTag("ObjectInScene").ToList();

        FetchAnalytics();
    }
Start() メソッドの直後の DataFromAnalytics クラス内に、FetchAnalytics()という名前の次のメソッドを追加します。 このメソッドは、 GameObject とプレースホルダー イベントカウント番号を使用して、キー値ペアのリストを設定する役割を担います。 次に、 GetWebRequest() コルーチンを初期化します。 Application Insights への呼び出しのクエリ構造は、クエリ URL エンドポイントとしても、このメソッド内にあります。
    private void FetchAnalytics()
    {
        // Iterate through the objects in the list
        for (int i = 0; i < _listOfGameObjectsInScene.Count; i++)
        {
            // The current event number is not known, so set it to zero.
            int eventCount = 0;

            // Add new pair to list, as placeholder, until eventCount is known.
            _pairedObjectsWithEventCount.Add(new KeyValuePair<GameObject, int>(_listOfGameObjectsInScene[i], eventCount));

            // Set the renderer of the object to the default color, white
            _listOfGameObjectsInScene[i].GetComponent<Renderer>().material.color = Color.white;

            // Create the appropriate object name using Insights structure
            string objectName = _listOfGameObjectsInScene[i].name;

 		    // Build the queryUrl for this object.
 		    string queryUrl = Uri.EscapeUriString(string.Format(
                "https://api.applicationinsights.io/v1/apps/{0}/events/$all?timespan=PT{1}H&$search={2}&$select=customMetric/name&$top={3}&$count=true",
 			    ApplicationInsightsTracker.Instance.applicationId, _timepspanAsHours, "Gazed " + objectName, _quantityOfEventsQueried));


            // Send this object away within the WebRequest Coroutine, to determine it is event count.
            StartCoroutine("GetWebRequest", new KeyValuePair<string, int>(queryUrl, i));
        }
    }
FetchAnalytics() メソッドのすぐ下に、IEnumerator を返す GetWebRequest()というメソッドを追加します。 このメソッドは、特定の GameObject に対応するイベントが Application Insights 内で呼び出された回数を要求する役割を担います。 送信されたすべてのクエリが返されると、 DetermineWinner() メソッドが呼び出されます。
    /// <summary>
    /// Requests the data count for number of events, according to the
    /// input query URL.
    /// </summary>
    /// <param name="webQueryPair">Query URL and the list number count.</param>
    /// <returns></returns>
    private IEnumerator GetWebRequest(KeyValuePair<string, int> webQueryPair)
    {
        // Set the URL and count as their own variables (for readability).
        string url = webQueryPair.Key;
        int currentCount = webQueryPair.Value;

        using (UnityWebRequest unityWebRequest = UnityWebRequest.Get(url))
        {
            DownloadHandlerBuffer handlerBuffer = new DownloadHandlerBuffer();

            unityWebRequest.downloadHandler = handlerBuffer;

            unityWebRequest.SetRequestHeader("host", "api.applicationinsights.io");

            unityWebRequest.SetRequestHeader("x-api-key", ApplicationInsightsTracker.Instance.API_Key);

            yield return unityWebRequest.SendWebRequest();

            if (unityWebRequest.isNetworkError)
            {
                // Failure with web request.
                Debug.Log("<color=red>Error Sending:</color> " + unityWebRequest.error);
            }
            else
            {
                // This query has returned, so add to the current count.
                _queriesReturned++;

                // Initialize event count integer.
                int eventCount = 0;

                // Deserialize the response with the custom Analytics class.
                Analytics welcome = JsonConvert.DeserializeObject<Analytics>(unityWebRequest.downloadHandler.text);

                // Get and return the count for the Event
                if (int.TryParse(welcome.OdataCount, out eventCount) == false)
                {
                    // Parsing failed. Can sometimes mean that the Query URL was incorrect.
                    Debug.Log("<color=red>Failure to Parse Data Results. Check Query URL for issues.</color>");
                }
                else
                {
                    // Overwrite the current pair, with its actual values, now that the event count is known.
                    _pairedObjectsWithEventCount[currentCount] = new KeyValuePair<GameObject, int>(_pairedObjectsWithEventCount[currentCount].Key, eventCount);
                }

                // If all queries (compared with the number which was sent away) have
                // returned, then run the determine winner method.
                if (_queriesReturned == _pairedObjectsWithEventCount.Count)
                {
                    DetermineWinner();
                }
            }
        }
    }
次のメソッドは DetermineWinner()で、 GameObject と Int のペアの一覧を、最も大きいイベント数に従って並べ替えます。 次に、 その GameObject の素材の色を 緑色 に変更します (最大カウントのフィードバックとして)。 これにより、分析結果を含むメッセージが表示されます。
    /// <summary>
    /// Call to determine the keyValue pair, within the objects list,
    /// with the highest event count.
    /// </summary>
    private void DetermineWinner()
    {
        // Sort the values within the list of pairs.
        _pairedObjectsWithEventCount.Sort((x, y) => y.Value.CompareTo(x.Value));

        // Change its colour to green
        _pairedObjectsWithEventCount.First().Key.GetComponent<Renderer>().material.color = Color.green;

        // Provide the winner, and other results, within the console window.
        string message = $"<b>Analytics Results:</b>\n " +
            $"<i>{_pairedObjectsWithEventCount.First().Key.name}</i> has the highest event count, " +
            $"with <i>{_pairedObjectsWithEventCount.First().Value.ToString()}</i>.\nFollowed by: ";

        for (int i = 1; i < _pairedObjectsWithEventCount.Count; i++)
        {
            message += $"{_pairedObjectsWithEventCount[i].Key.name}, " +
                $"with {_pairedObjectsWithEventCount[i].Value.ToString()} events.\n";
        }

        Debug.Log(message);
    }
Application Insights から受け取った JSON オブジェクトの逆シリアル化に使用されるクラス構造を追加します。 これらのクラスを、クラス定義の外部にある DataFromAnalytics クラス ファイルの一番下に追加します。
/// <summary> /// These classes represent the structure of the JSON response from Azure Insight /// </summary> [Serializable] public class Analytics { [JsonProperty("@odata.context")] public string OdataContext { get; set; } [JsonProperty("@odata.count")] public string OdataCount { get; set; } [JsonProperty("value")] public Value[] Value { get; set; } } [Serializable] public class Value { [JsonProperty("customMetric")] public CustomMetric CustomMetric { get; set; } } [Serializable] public class CustomMetric { [JsonProperty("name")] public string Name { get; set; } }Unityに戻る前に、変更を Visual Studio に保存してください。
第 10 章 - Movement クラスを作成する
移動スクリプトは、作成する必要がある次のスクリプトです。 次の責任を負います。
- カメラが見ている方向に従ってメイン カメラを移動します。
- シーン オブジェクトに他のすべてのスクリプトを追加する。
スクリプトを作成するには:
Scripts フォルダーをダブルクリックして開きます。
[スクリプト] フォルダー内を右クリックし、[作成>C# スクリプト] をクリックします。 スクリプトに 「Movement」という名前を付けます。
スクリプトをダブルクリックして Visual Studio で開きます。
既存のコードを次のように置き換えます。
    using UnityEngine;
    using UnityEngine.XR.WSA.Input;

    public class Movement : MonoBehaviour
    {
        /// <summary>
        /// The rendered object representing the right controller.
        /// </summary>
        public GameObject Controller;

        /// <summary>
        /// The movement speed of the user.
        /// </summary>
        public float UserSpeed;

        /// <summary>
        /// Provides whether source updates have been registered.
        /// </summary>
        private bool _isAttached = false;

        /// <summary>
        /// The chosen controller hand to use.
        /// </summary>
        private InteractionSourceHandedness _handness = InteractionSourceHandedness.Right;

        /// <summary>
        /// Used to calculate and proposes movement translation.
        /// </summary>
        private Vector3 _playerMovementTranslation;

        private void Start()
        {
            // You are now adding components dynamically
            // to ensure they are existing on the correct object

            // Add all camera related scripts to the camera.
            Camera.main.gameObject.AddComponent<Gaze>();
            Camera.main.gameObject.AddComponent<ObjectTrigger>();

            // Add all other scripts to this object.
            gameObject.AddComponent<ApplicationInsightsTracker>();
            gameObject.AddComponent<DataFromAnalytics>();
        }

        // Update is called once per frame
        void Update()
        {

        }
    }
Movement クラス内の空の Update() メソッドの下に、ユーザーがハンド コントローラーを使用して仮想空間内を移動できるようにする次のメソッドを挿入します。
    /// <summary>
    /// Used for tracking the current position and rotation of the controller.
    /// </summary>
    private void UpdateControllerState()
    {
#if UNITY_WSA && UNITY_2017_2_OR_NEWER
        // Check for current connected controllers, only if WSA.
        string message = string.Empty;

        if (InteractionManager.GetCurrentReading().Length > 0)
        {
            foreach (var sourceState in InteractionManager.GetCurrentReading())
            {
                if (sourceState.source.kind == InteractionSourceKind.Controller && sourceState.source.handedness == _handness)
                {
                    // If a controller source is found, which matches the selected handness,
                    // check whether interaction source updated events have been registered.
                    if (_isAttached == false)
                    {
                        // Register events, as not yet registered.
                        message = "<color=green>Source Found: Registering Controller Source Events</color>";
                        _isAttached = true;

                        InteractionManager.InteractionSourceUpdated += InteractionManager_InteractionSourceUpdated;
                    }

                    // Update the position and rotation information for the controller.
                    Vector3 newPosition;
                    if (sourceState.sourcePose.TryGetPosition(out newPosition, InteractionSourceNode.Pointer) && ValidPosition(newPosition))
                    {
                        Controller.transform.localPosition = newPosition;
                    }

                    Quaternion newRotation;

                    if (sourceState.sourcePose.TryGetRotation(out newRotation, InteractionSourceNode.Pointer) && ValidRotation(newRotation))
                    {
                        Controller.transform.localRotation = newRotation;
                    }
                }
            }
        }
        else
        {
            // Controller source not detected.
            message = "<color=blue>Trying to detect controller source</color>";

            if (_isAttached == true)
            {
                // A source was previously connected, however, has been lost. Disconnected
                // all registered events.

                _isAttached = false;

                InteractionManager.InteractionSourceUpdated -= InteractionManager_InteractionSourceUpdated;

                message = "<color=red>Source Lost: Detaching Controller Source Events</color>";
            }
        }

        if(message != string.Empty)
        {
            Debug.Log(message);
        }
#endif
    }
/// <summary> /// This registered event is triggered when a source state has been updated. /// </summary> /// <param name="obj"></param> private void InteractionManager_InteractionSourceUpdated(InteractionSourceUpdatedEventArgs obj) { if (obj.state.source.handedness == _handness) { if(obj.state.thumbstickPosition.magnitude > 0.2f) { float thumbstickY = obj.state.thumbstickPosition.y; // Vertical Input. if (thumbstickY > 0.3f || thumbstickY < -0.3f) { _playerMovementTranslation = Camera.main.transform.forward; _playerMovementTranslation.y = 0; transform.Translate(_playerMovementTranslation * UserSpeed * Time.deltaTime * thumbstickY, Space.World); } } } }/// <summary> /// Check that controller position is valid. /// </summary> /// <param name="inputVector3">The Vector3 to check</param> /// <returns>The position is valid</returns> private bool ValidPosition(Vector3 inputVector3) { return !float.IsNaN(inputVector3.x) && !float.IsNaN(inputVector3.y) && !float.IsNaN(inputVector3.z) && !float.IsInfinity(inputVector3.x) && !float.IsInfinity(inputVector3.y) && !float.IsInfinity(inputVector3.z); } /// <summary> /// Check that controller rotation is valid. /// </summary> /// <param name="inputQuaternion">The Quaternion to check</param> /// <returns>The rotation is valid</returns> private bool ValidRotation(Quaternion inputQuaternion) { return !float.IsNaN(inputQuaternion.x) && !float.IsNaN(inputQuaternion.y) && !float.IsNaN(inputQuaternion.z) && !float.IsNaN(inputQuaternion.w) && !float.IsInfinity(inputQuaternion.x) && !float.IsInfinity(inputQuaternion.y) && !float.IsInfinity(inputQuaternion.z) && !float.IsInfinity(inputQuaternion.w); }最後に、 Update() メソッド内にメソッド呼び出しを追加します。
// Update is called once per frame void Update() { UpdateControllerState(); }Unityに戻る前に、変更を Visual Studio に保存してください。
第 11 章 - スクリプト参照の設定
この章では、 移動 スクリプトを カメラ親 に配置し、その参照ターゲットを設定する必要があります。 その後、そのスクリプトは、必要な場所に他のスクリプトを配置します。
プロジェクト パネルの Scripts フォルダーから、階層パネルにある Camera Parent オブジェクトに Movement スクリプトをドラッグします。
![[プロジェクト] パネルと [階層] パネルのスクリーンショット。移動が強調表示されています。](images/azurelabs-lab309-48.png)
[カメラの親] をクリックします。 階層パネルで、右側のオブジェクトを階層パネルからインスペクター パネルの参照ターゲットコントローラーにドラッグします。 次の図に示すように、[ ユーザー速度 ] を 5 に設定します。
![[階層] パネルと [インスペクター] パネルを示すスクリーンショット。線は、両方のパネルで右手を接続します。](images/azurelabs-lab309-49.png)
第 12 章 - Unity プロジェクトをビルドする
このプロジェクトのUnityセクションに必要なものはすべて完了したので、Unityからビルドします。
[ビルド設定] ([ファイル] >[ビルド設定]) に移動します。
[ ビルド設定] ウィンドウで、[ ビルド] をクリックします。
![ビルド中のシーンを示す [ビルド設定] ウィンドウのスクリーンショット。](images/azurelabs-lab309-50.png)
エクスプローラー ウィンドウが表示され、ビルドの場所を確認するメッセージが表示されます。 (左上隅の [新しいフォルダー] をクリックして) 新しいフォルダー を作成し、ビルドという名前 を付けます。
![[ビルド] フォルダーが強調表示されているエクスプローラーのスクリーンショット。](images/azurelabs-lab309-51.png)
新しい ビルド フォルダーを開き、(新しいフォルダーをもう一度使用して) 別の フォルダー を作成し、MR_Azure_Application_Insightsという名前を 付けます。

MR_Azure_Application_Insights フォルダーを選択した状態で、[フォルダーの選択] をクリックします。 プロジェクトのビルドには 1 分ほどかかります。
ビルド後、新しいプロジェクトの場所を示すエクスプローラーが表示されます。
第 13 章 - MR_Azure_Application_Insights アプリをコンピューターにデプロイする
ローカル コンピューターに MR_Azure_Application_Insights アプリをデプロイするには:
Visual Studio でMR_Azure_Application_Insights アプリのソリューション ファイルを開きます。
ソリューション プラットフォームで、x86、ローカル コンピューターを選択します。
[ソリューション構成] で [デバッグ] を選択します。
![メニュー バーの [デバッグ] を示す Visual Studio ソリューション構成画面のスクリーンショット。](images/azurelabs-lab309-53.png)
[ ビルド] メニュー に移動し、[ ソリューションのデプロイ ] をクリックして、アプリケーションをコンピューターにサイドロードします。
アプリがインストールされているアプリの一覧に表示され、起動する準備が整いました。
Mixed Reality アプリケーションを起動します。
シーン内を移動し、オブジェクトに近づいて見ると、 Azure Insight Service で十分なイベント データが収集されると、最も近づいたオブジェクトが緑色に設定されます。
重要
イベントとメトリックがサービスによって収集されるまでの平均待機時間は約 15 分ですが、場合によっては最大 1 時間かかる場合があります。
第 14 章 - Application Insights サービス ポータル
シーン内を移動して複数のオブジェクトを監視すると、 Application Insights Service ポータルで収集されたデータを確認できます。
Application Insights Service ポータルに戻るします。
[メトリックエクスプローラー] を選択します。
![オプションの一覧を示す MyNewInsight パネルのスクリーンショット。メトリック エクスプローラーは、[調査] セクションに一覧表示されます。](images/azurelabs-lab309-54.png)
アプリケーションに関連する イベントとメトリック を表すグラフを含むタブで開きます。 上記のように、データがグラフに表示されるまでに少し時間がかかる場合があります (最大 1 時間)。
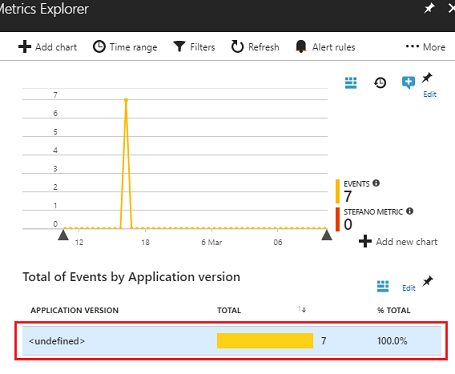
[アプリケーション のバージョン別のイベントの合計] で [イベント] バーを選択すると、イベントの詳細な内訳と名前が表示されます。
![カスタム イベント フィルターの結果を示す [検索] パネルのスクリーンショット。](images/azurelabs-lab309-56.png)
Application Insights Service アプリケーションが完成しました
これで、Application Insights Service を利用してアプリ内のユーザーのアクティビティを監視する Mixed Reality アプリが構築されました。
ボーナス演習
演習 1
ObjectInScene オブジェクトを手動で作成するのではなく、スポーンを試み、スクリプト内の平面上に座標を設定します。 このようにして、Azure で最も人気のあるオブジェクトは何か (視線入力または近接の結果から) 尋ね、それらのオブジェクトの 追加 の 1 つを生成できます。
演習 2
Application Insights の結果を時間別に並べ替えて、最も関連性の高いデータを取得し、その時間の機密データをアプリケーションに実装します。