Web API を呼び出す Web API (On-Behalf-Of シナリオ)
ユーザーの代わりに別の Web API を呼び出す Web API を構築する方法について説明します。
この記事を読む前に、ADFS の概念と認証コードの付与フローについて理解しておく必要があります
概要
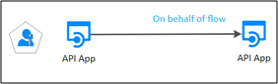
次の図に示されていないクライアント (Web アプリ) は、保護された Web API を呼び出し、その "Authorization" Http ヘッダーに JWT ベアラー トークンを提供します。
保護された Web API はトークンを検証し、MSAL AcquireTokenOnBehalfOf メソッドを使用して (AD FS から) 別のトークンを要求し、それ自体がユーザーに代わって 2 つ目の Web API (ダウンストリーム Web API という名前) を呼び出すのを可能にしています。
保護された Web API は、このトークンを使用してダウン ストリーム API を呼び出します。 AcquireTokenSilentlater を呼び出して、他のダウンストリーム API のトークンを要求することもできます (ただし、引き続き同じユーザーに代わって)。 AcquireTokenSilent は、必要に応じてトークンを更新します。
AD FS で認証シナリオの代わりに を構成する方法を理解するために、ここで使用できるサンプルを使用して、アプリの登録とコード構成の手順を説明しましょう。
前提条件
- GitHub クライアント ツール
- AD FS 2019 以降が構成および実行されている
- Visual Studio 2013 以降
AD FS でのアプリの登録
このセクションでは、ネイティブ アプリをパブリック クライアントとして登録し、Web API を AD FS で証明書利用者 (RP) としてクライアントに登録する方法について説明します
[AD FS の管理] で、 [アプリケーション グループ] を右クリックし、 [アプリケーション グループの追加] を選択します。
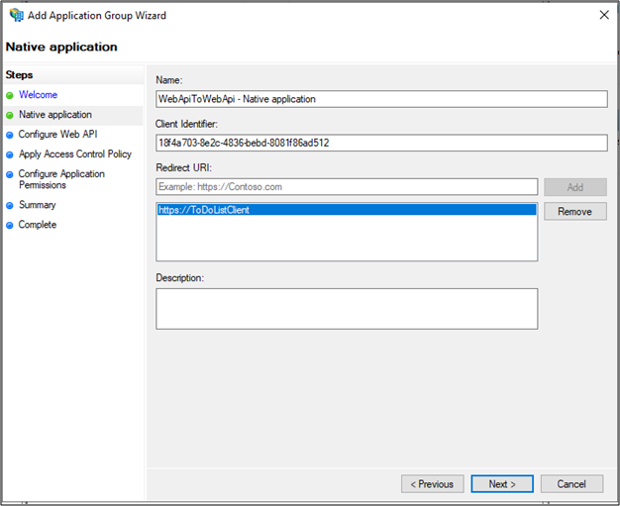
アプリケーション グループ ウィザードで、[名前] に「NativeAppToWebApi」と入力し、[クライアント/サーバー アプリケーション] で [Web API にアクセスするネイティブ アプリケーション] テンプレートを選択します。 [次へ] をクリックします。
![Web API テンプレートにアクセスするネイティブ アプリケーションが強調表示されているアプリケーション グループの追加ウィザードの [ようこそ] ページのスクリーンショット。](media/adfs-msal-web-api-web-api/webapi2.png)
[クライアント識別子] の値をコピーします。 これは、後でアプリケーションの App.config ファイル内の ClientId の値として使用されます。 [リダイレクト URI] に次を入力します: https://ToDoListClient. [追加] をクリックします。 [次へ] をクリックします。
[Web API の構成] 画面で、[識別子] に次のように入力します: https://localhost:44321/. [追加] をクリックします。 [次へ] をクリックします。 この値は、後でアプリのファイル App.config および Web.config で使用されます。
![正しい識別子が表示されている、アプリケーション グループの追加ウィザードの [Web API の構成] ページのスクリーンショット。](media/adfs-msal-web-api-web-api/webapi4.png)
[アクセス制御ポリシーの適用] 画面で、[すべてのユーザーを許可] を選んで、[次へ] をクリックします。
![[すべてのユーザーを許可] オプションが強調表示されている、アプリケーション グループの追加ウィザードの [アクセス制御ポリシーの選択] ページのスクリーンショット。](media/adfs-msal-web-api-web-api/webapi5.png)
アプリケーションのアクセス許可の構成 画面で、openid を選択し、user_impersonation。 [次へ] をクリックします。
![openid が選択されている、アプリケーション グループの追加ウィザードの [アプリケーションのアクセス許可の構成] ページのスクリーンショット。](media/adfs-msal-web-api-web-api/webapi6.png)
[概要] 画面で、[次へ] をクリックします。
[完了] 画面で、[閉じる] をクリックします。
[AD FS の管理] で、[アプリケーション グループ] をクリックし、[NativeAppToWebApi] アプリグループを選択します。 右クリックし、[プロパティ] を選択します。
![WebApiToWebApi グループが強調され、ドロップダウン リストに [プロパティ] オプションが表示されている、[AD FS 管理] ダイアログ ボックスのスクリーンショット。](media/adfs-msal-web-api-web-api/webapi7.png)
[WebApiToWebApi] プロパティ画面で、[アプリケーションの 追加] をクリックします。
![WebApiToWebApi - Web API アプリケーションが示されている [WebApiToWebApi プロパティ] ダイアログ ボックスのスクリーンショット。](media/adfs-msal-web-api-web-api/webapi8.png)
[スタンドアロン アプリケーション] で、[サーバー アプリケーション ] を選択します。
![[サーバー アプリケーション] オプションが強調表示されている、WebApiToWebApi に新しいアプリケーションを追加するウィザードの [ようこそ] ページのスクリーンショット。](media/adfs-msal-web-api-web-api/webapi9.png)
[サーバー アプリケーション] 画面で、https://localhost:44321/クライアント 識別子と を追加します。
![正しいクライアント識別子とリダイレクト URI が表示されている、WebApiToWebApi に新しいアプリケーションを追加するウィザードの [サーバー アプリケーション] ページのスクリーンショット。](media/adfs-msal-web-api-web-api/webapi10.png)
[アプリケーション資格情報の構成] 画面で、[共有シークレット の生成] を選択します。 後で使用するためにシークレットをコピーします。
![[共有シークレットを生成する] オプションが選択され、生成された共有シークレットが強調表示されている、WebApiToWebApi に新しいアプリケーションを追加するウィザードの [アプリケーションの資格情報の構成] アプリケーション ページのスクリーンショット。](media/adfs-msal-web-api-web-api/webapi11.png)
[概要] 画面で、[次へ] をクリックします。
[完了] 画面で、[閉じる] をクリックします。
[AD FS の管理] で、[アプリケーション グループ] をクリックし、[NativeAppToWebApi] アプリグループを選択します。 右クリックし、[プロパティ] を選択します。
![WebApiToWebApi グループが強調され、ドロップダウン リストに [プロパティ] オプションが表示されている、[AD FS 管理] ダイアログ ボックスの 2 つめのスクリーンショット。](media/adfs-msal-web-api-web-api/webapi12.png)
[WebApiToWebApi] プロパティ画面で、[アプリケーションの 追加] をクリックします。
![WebApiToWebApi - Web API アプリケーションが示されている [WebApiToWebApi プロパティ] ダイアログ ボックスの 2 つめのスクリーンショット。](media/adfs-msal-web-api-web-api/webapi13.png)
[スタンドアロン アプリケーション] で、[ Web API] を選択します。
![[Web API] オプションが強調表示されている、WebApiToWebApi に新しいアプリケーションを追加するウィザードの [ようこそ] ページのスクリーンショット。](media/adfs-msal-web-api-web-api/webapi14.png)
[Web API の構成] で、識別子 として を追加 https://localhost:44300。
![正しいリダイレクト URI が表示されている、WebApiToWebApi に新しいアプリケーションを追加するウィザードの [Web API の構成] ページのスクリーンショット。](media/adfs-msal-web-api-web-api/webapi15.png)
[アクセス制御ポリシーの適用] 画面で、[すべてのユーザーを許可] を選択し、[次へ] をクリックします。
![[すべてのユーザーを許可] オプションが強調表示されている、WebApiToWebApi に新しいアプリケーションを追加するウィザードの [アクセス制御ポリシーの選択] ページのスクリーンショット。](media/adfs-msal-web-api-web-api/webapi16.png)
[アプリケーションのアクセス許可の構成] 画面で、[次へ] を クリックします。
![[次へ] オプションが強調表示されている、WebApiToWebApi に新しいアプリケーションを追加するウィザードの [アプリケーションのアクセス許可の構成] ページのスクリーンショット。](media/adfs-msal-web-api-web-api/webapi17.png)
[概要] 画面で、[次へ] をクリックします。
[完了] 画面で、[閉じる] をクリックします。
[WebApiToWebApi – Web API 2 のプロパティ] 画面で [OK] をクリックします
[WebApiToWebApi のプロパティ] 画面で、[ WebApiToWebApi – Web API ] を選択し、[編集 ] をクリックします。
![WebApiToWebApi - Web API アプリケーションが強調表示されている [WebApiToWebApi プロパティ] ダイアログ ボックスのスクリーンショット。](media/adfs-msal-web-api-web-api/webapi18.png)
[NativeAppToWebApi – Web API のプロパティ] 画面で、[発行変換規則] タブを選択し、[規則の追加] をクリックします。
![[発行変換規則] タブが表示されている [WebApiToWebApi - Web API プロパティ] ダイアログ ボックスのスクリーンショット。](media/adfs-msal-web-api-web-api/webapi19.png)
変換要求規則の追加ウィザードで、ドロップダウンから [カスタム規則を使用して要求を送信] を選択して、[次へ] をクリックします。
![[カスタム規則を使用して要求を送信選択] オプションが選択されている、変換要求規則の追加ウィザードの [規則テンプレートの選択] ページのスクリーンショット。](media/adfs-msal-web-api-web-api/webapi20.png)
[要求規則名] フィールドに「PassAllClaims」と入力し、x:[] => issue(claim=x); [カスタム規則: フィールド] に要求規則を入力し、[ 完了] をクリックします。
![上記の構成を示す変換要求規則の追加ウィザードの [規則の構成] ページのスクリーンショット。](media/adfs-msal-web-api-web-api/webapi21.png)
[WebApiToWebApi – Web API 2 のプロパティ] 画面で [OK] をクリックします
[WebApiToWebApi プロパティ] 画面で、[WebApiToWebApi – Web API 2] を選択し、[編集...]をクリックします
![WebApiToWebApi-Web API 2 アプリケーションが強調表示されいる、[WebApiToWebApi プロパティ]ダイアログボックスのスクリーンショット。](media/adfs-msal-web-api-web-api/webapi22.png)
[NativeAppToWebApi – Web API 2のプロパティ] 画面で、[発行変換規則] タブを選択し、[規則の追加] をクリックします。
変換要求規則の追加ウィザードで、ドロップダウンから [カスタム規則を使用して要求を送信] を選択し、[次へ]をクリックします。
![[カスタム規則を使用して要求を送信] オプションの選択が表示されている、変換要求規則の追加ウィザードの [規則テンプレートの選択] ページの 2 つめのスクリーンショット。](media/adfs-msal-web-api-web-api/webapi23.png)
[要求規則名] フィールドに「PassAllClaims」と入力し、x:[] => issue(claim=x); [カスタム規則: フィールド] に要求規則を入力し、[ 完了] をクリックします。
![上記の構成を示す変換要求規則の追加ウィザードの [規則の構成] ページの 2 つめスクリーンショット。](media/adfs-msal-web-api-web-api/webapi24.png)
[WebApiToWebApi – Web API 2 のプロパティ] 画面で [OK] をクリックし、[WebApiToWebApi のプロパティ] 画面をクリックします。
コード構成
このセクションでは、別の Web API を呼び出すように Web API を構成する方法について説明します
こちらからサンプルをダウンロードする
Visual Studio を使用してサンプルを開く
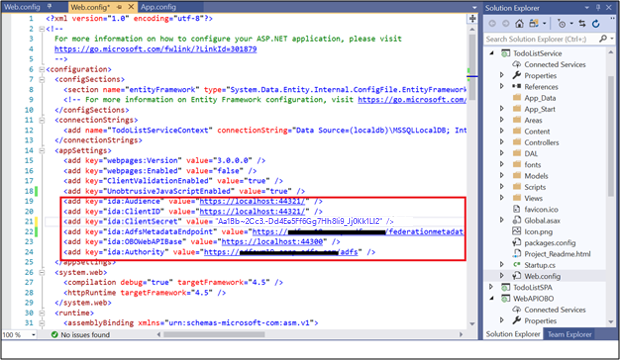
App.config ファイルを開きます。 次の変更を行います:
ida:Authority - https://[AD FS hostname]/adfs/ を入力します
ida:ClientId - 上記の AD FS セクションの [アプリの登録] の #3 からの[クライアント識別子] 値を入力します。
ida:RedirectUri - 上記の AD FS セクションの [アプリの登録] の #3 からの [リダイレクト URI]値を入力します。
todo:TodoListResourceId – 上記の AD FS セクションの [アプリの登録] の #4 からの [識別子] 値を入力します
ida: todo:TodoListBaseAddress – 上記の AD FS セクションの [アプリの登録] の #4 からの [識別子] 値を入力します。

ToDoListService Web.configファイルを開きます。 次の変更を行います:
ida:Audience – 上記の AD FS セクションの [アプリの登録] の #12 からの [識別子] 値を入力します
ida:ClientId - 上記の AD FS セクションの [アプリの登録] の #12 からの [クライアント識別子]値を入力します。
Ida: ClientSecret - #13 からコピーした共有シークレットを、上記の「アプリの登録」セクションAD FS入力します。
ida:RedirectUri - 上記の AD FS セクションの [アプリの登録] の #12 からの [リダイレクト URI] 値を入力します。
ida: AdfsMetadataEndpoint - https://[your AD FS hostname]/federationmetadata/2007-06/federationmetadata.xml
ida:Audience – 上記の AD FS セクションの [アプリの登録] の #19 からの [識別子] 値を入力します。
ida:Authority - https://[AD FS hostname]/adfs/ を入力します
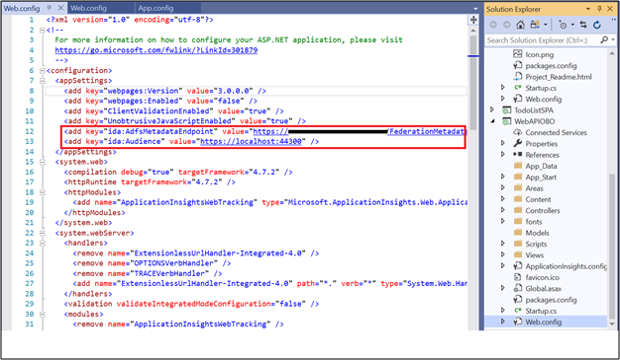
WebAPIOBO Web.configファイルを開きます。 次の変更を行います:
ida: AdfsMetadataEndpoint - https://[your AD FS hostname]/federationmetadata/2007-06/federationmetadata.xml
ida:Audience – 上記の AD FS セクションの [アプリの登録] の #12 からの [識別子] 値を入力します
サンプルをテストする
このセクションでは、上で構成したサンプルをテストする方法を示します。
コードの変更が行われたら、ソリューションをリビルドします
Visual Studio 上で、ソリューションを右クリックし、[スタートアップ プロジェクトの設定] を選択します…
![[スタートアップ プロジェクトの設定] オプションが強調表示されている、ソリューションを右クリックしたときに表示される一覧のスクリーンショット。](media/adfs-msal-web-api-web-api/webapi28.png)
[プロパティ] ページで、各プロジェクトに対して [アクション] が [開始] に設定されていることを確認します。
![[マルチ スタートアップ プロジェクト] オプションが選択され、すべてのプロジェクトのアクションが [開始] に設定されている、ソリューションのプロパティ ページ ダイアログ ボックスのスクリーンショット。](media/adfs-msal-web-api-web-api/webapi29.png)
Visual Studio の上部で、緑色の矢印をクリックします。
![[開始] オプションが強調表示されている Visual Studio UI のスクリーンショット。](media/adfs-msal-web-api-web-api/webapi30.png)
ネイティブ アプリのメイン画面で、[サインイン] をクリックします。
![[To Do リスト クライアント] ダイアログ ボックスのスクリーンショット。](media/adfs-msal-web-api-web-api/webapi31.png)
ネイティブ アプリ画面が表示されていない場合は、プロジェクト リポジトリが保存されているシステム上で *msalcache.bin ファイルを検索して削除します。
AD FS サインイン ページにリダイレクトされます。 要求に従ってサインインしてください。
![[サインイン] ページのスクリーンショット。](media/adfs-msal-web-api-web-api/webapi32.png)
サインインしたら、[Create a To Do] 項目に「Web Api to Web Api Call in the」というテキストを入力します。 [項目の追加] をクリックします。 これにより、Web API (To Do List Service) が呼び出され、Web API 2 (WebAPIOBO) が呼び出され、キャッシュに項目が追加されます。
![[To Do 項目] セクションに新しい作業項目が設定されている、[To Do リスト クライアント] ダイアログ ボックスのスクリーンショット。](media/adfs-msal-web-api-web-api/webapi33.png)