チュートリアル: Visual Studio でシンプルな C# コンソール アプリを作成する (パート 1/2)
このチュートリアルでは、Visual Studio を使用して、C# のコンソール アプリを作成および実行し、Visual Studio の統合開発環境 (IDE) の機能をいくつか確認します。 このチュートリアルは、2 部構成のチュートリアル シリーズのパート 1 です。
このチュートリアルでは、次のタスクを実行します。
- Visual Studio のプロジェクトを作成します。
- C# のコンソール アプリを作成します。
- アプリをデバッグします。
- お使いのアプリを閉じます。
- 自分の完成したコードを検査します。
パート 2 では、このアプリを拡張してプロジェクトを追加し、デバッグのコツを学習し、サードパーティー製パッケージを参照します。
[前提条件]
Visual Studio をインストールする必要があります。
Visual Studio をまだインストールしていない場合は、Visual Studio のダウンロード ページに移動し、無料試用版をインストールしてください。
プロジェクトを作成する
まず C# アプリケーション プロジェクトを作成します。 このプロジェクト タイプには、必要なテンプレート ファイルがすべて用意されています。
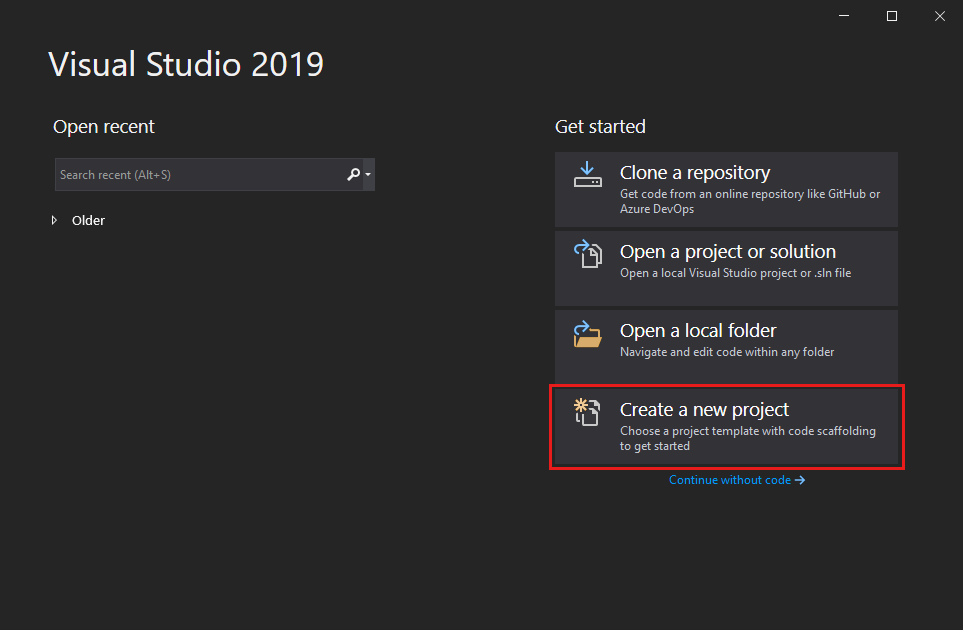
Visual Studio を開き、[開始] ウィンドウで [新しいプロジェクトの作成] を選択します。
** [新しいプロジェクトの作成]** ウィンドウで、言語の一覧から** [C#]** を選択します。 次に、プラットフォームの一覧から** [Windows]** を選択し、プロジェクトの種類の一覧から** [コンソール]** を選択します。言語、プラットフォーム、およびプロジェクトの種類のフィルターを適用してから、 [コンソール アプリケーション] テンプレートを選択して、 [次へ] を選択します。
注意
コンソール アプリケーション テンプレートが表示されない場合は、 [さらにツールと機能をインストールする] を選択します。

Visual Studio インストーラーで、[.NET Core クロスプラットフォームの開発] ワークロードを選択します。

Visual Studio インストーラーで、 [変更] を選択します。 作業内容を保存するよう求められることがあります。 [続行] を選択してワークロードをインストールします。
この「プロジェクトを作成する」プロシージャの手順 2 に戻ります。
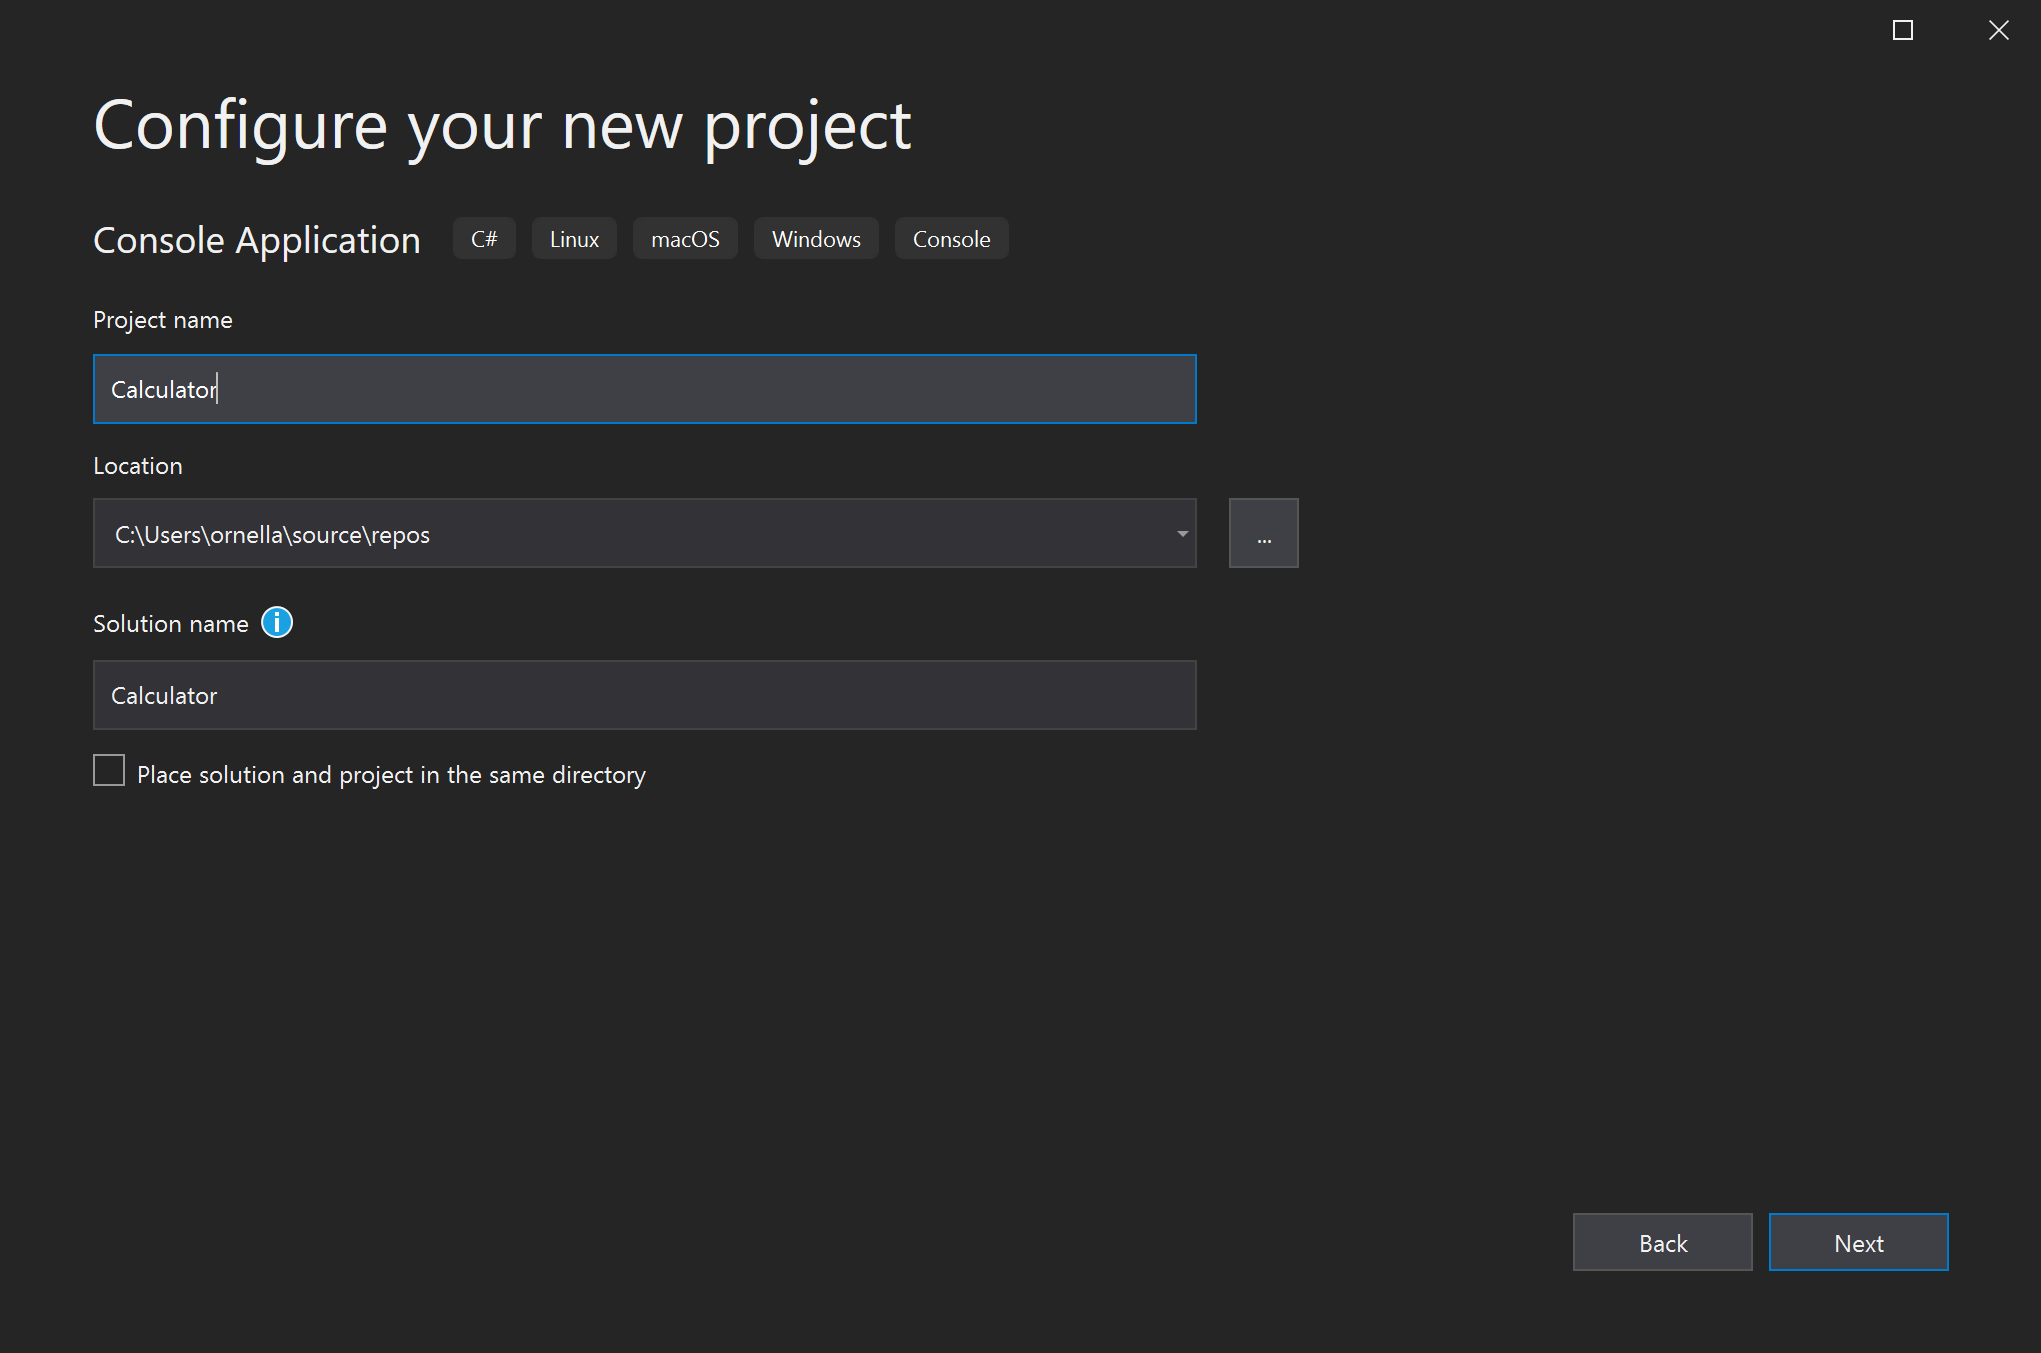
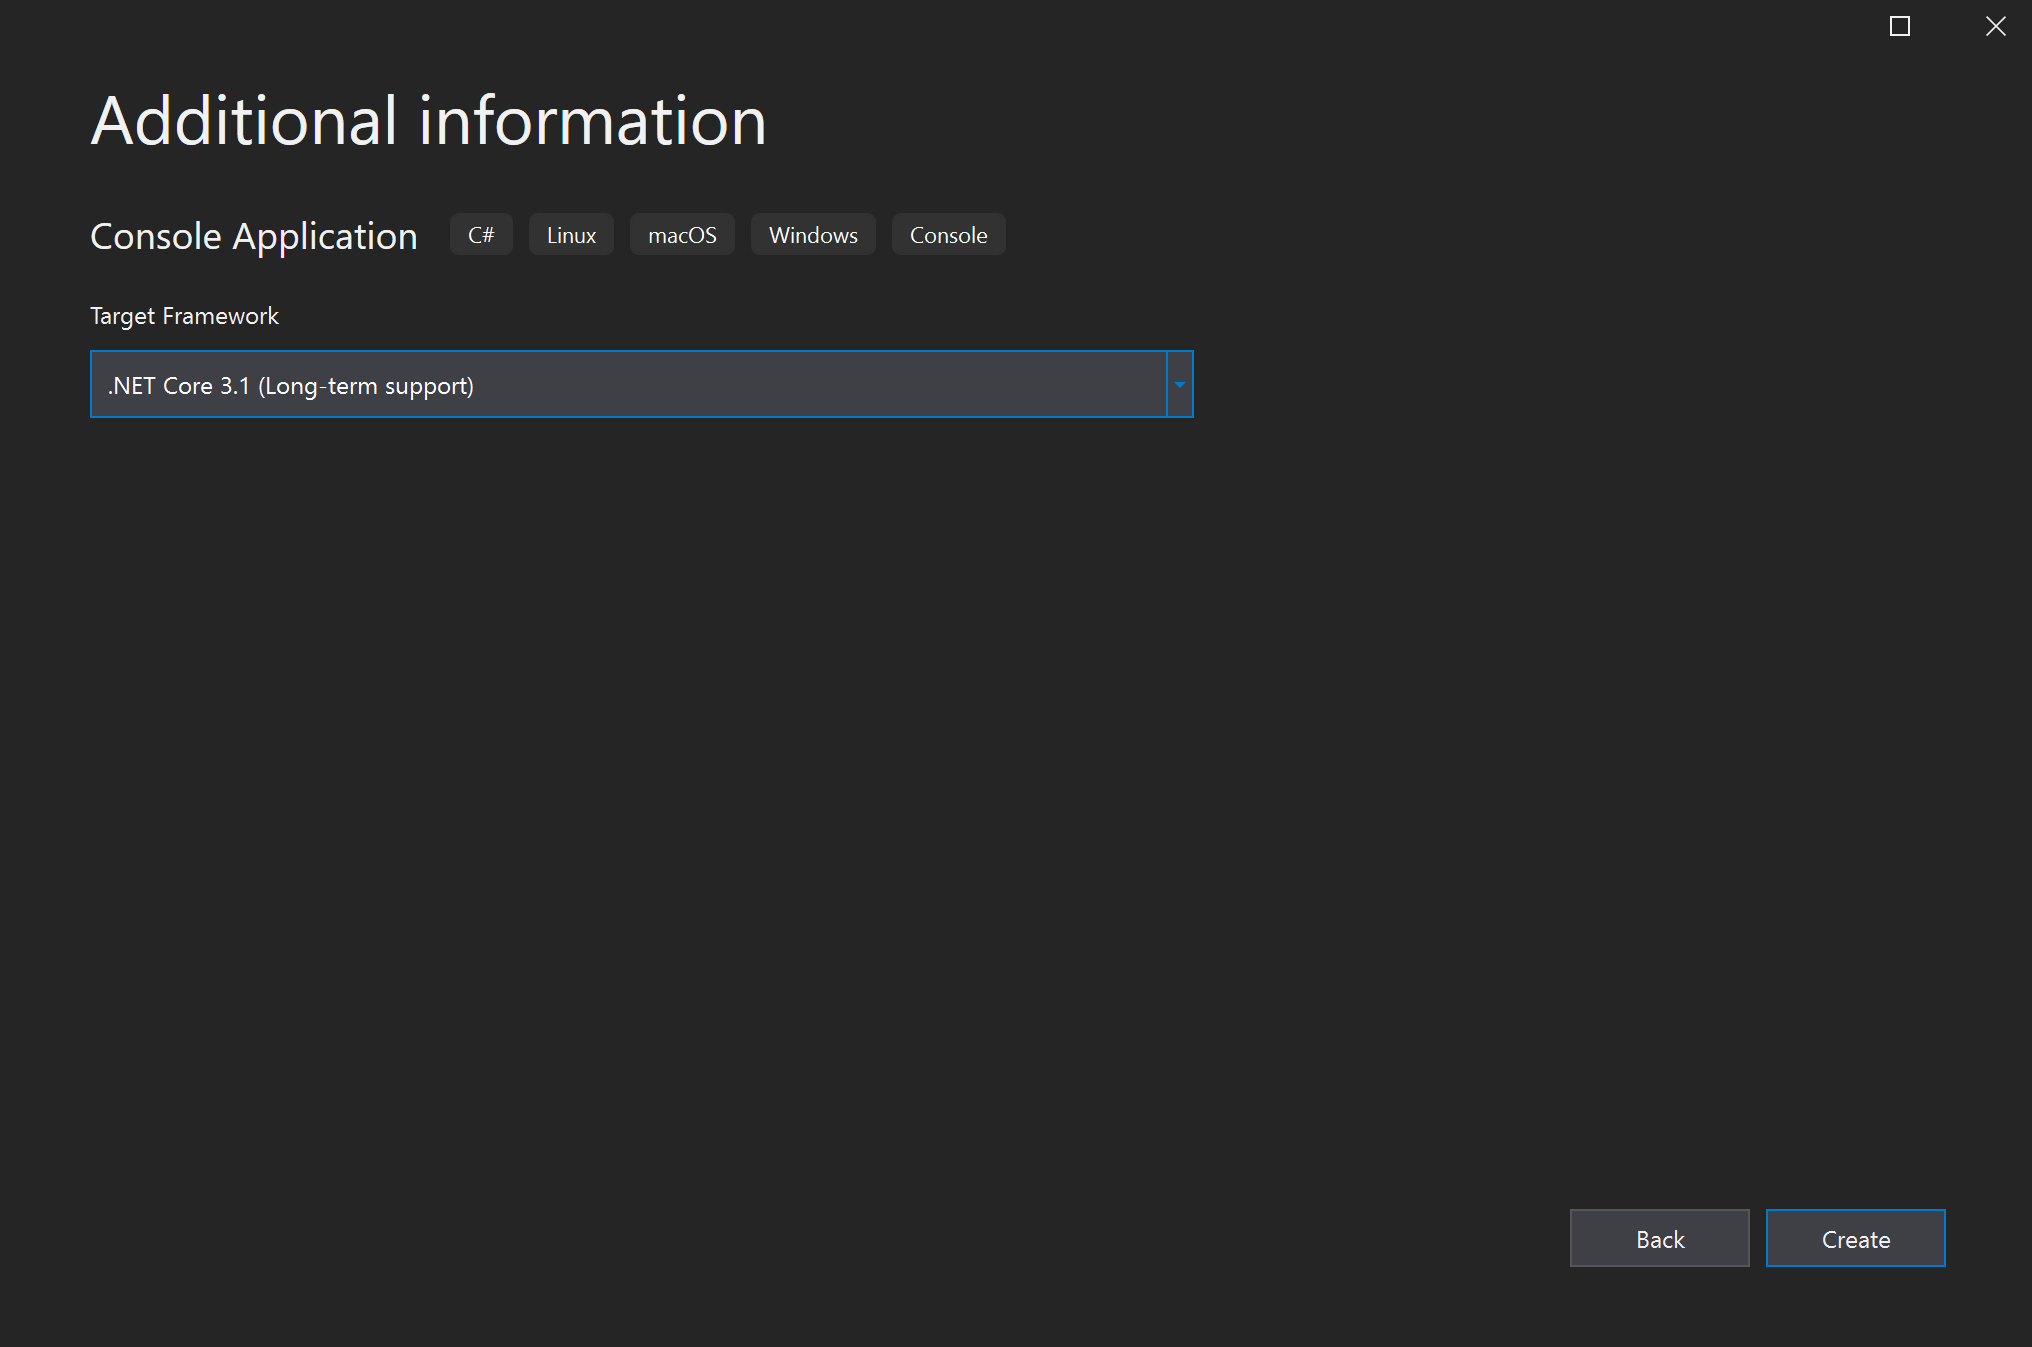
** [新しいプロジェクトの構成]** ウィンドウの** [プロジェクト名]** ボックスに「* 電卓* 」とタイプまたは入力します。 次に、 [次へ] を選択します。[追加情報] ウィンドウで、 "ターゲット フレームワーク" フィールドに .NET Core 3.1 が表示されていることを確認します。 そのうえで [Create](作成) を選択します。
Visual Studio によってその新しいプロジェクトが開かれます。プロジェクトには既定で "Hello World" コードが含まれます。 エディターに表示するには、[ソリューション エクスプローラー] ウィンドウ (通常は Visual Studio の右側にあります) で、コード ファイル Program.cs を選択します。
既定の "Hello World" コードによって WriteLine メソッドが呼び出され、コンソール ウィンドウにリテラル文字列 "Hello World!" が表示されます。 F5 キーを押すと、既定のプログラムをデバッグ モードで実行できます。 デバッガーでアプリケーションを実行すると、コンソール ウィンドウが開いたままになります。 任意のキーを押して、コンソール ウィンドウを閉じます。
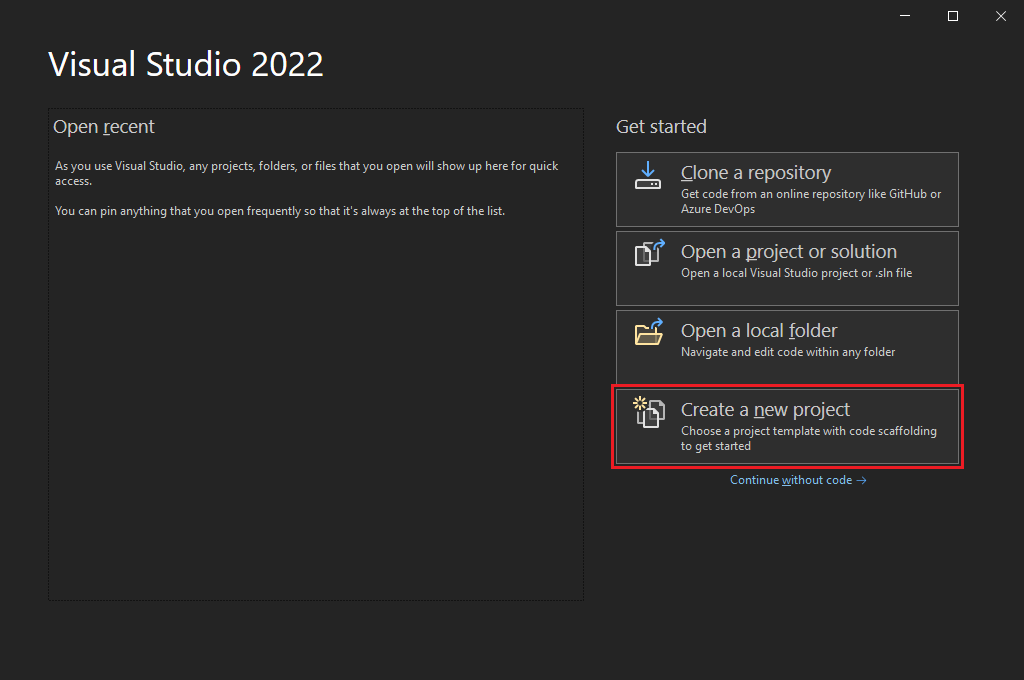
Visual Studio を開き、[開始] ウィンドウで [新しいプロジェクトの作成] を選択します。
[新しいプロジェクトの作成] ウィンドウで [すべての言語] を選択し、ドロップダウン リストから [C#] を選択します。 [すべてのプラットフォーム] リストから [Windows] を選択し、 [すべてのプロジェクトの種類] リストから [コンソール] を選択します。
言語、プラットフォーム、およびプロジェクト タイプのフィルターを適用してから、 [コンソール アプリケーション] テンプレートを選択して、 [次へ] を選択します。
注意
[コンソール アプリケーション] テンプレートが表示されない場合は、 [さらにツールと機能をインストールする] を選択します。

Visual Studio インストーラーで、[.NET デスクトップ開発] ワークロードを選択します。

Visual Studio インストーラーで、 [変更] を選択します。 作業内容を保存するよう求められることがあります。 [続行] を選択してワークロードをインストールします。
この「プロジェクトを作成する」プロシージャの手順 2 に戻ります。
[新しいプロジェクトの構成] ウィンドウの [プロジェクト名] ボックスに「電卓」とタイプまたは入力し、 [次へ] を選択します。
[追加情報] ウィンドウで、[ターゲット フレームワーク] フィールドの [.NET 8.0] を選択します。 そのうえで [Create](作成) を選択します。
Visual Studio によってその新しいプロジェクトが開かれます。プロジェクトには既定で "Hello World" コードが含まれます。 エディターに表示するには、[ソリューション エクスプローラー] ウィンドウ (通常は Visual Studio の右側にあります) で、コード ファイル Program.cs を選択します。
1 つのコード ステートメントによって WriteLine メソッドが呼び出され、コンソール ウィンドウにリテラル文字列 "Hello World!" が表示されます。 F5 キーを押すと、既定のプログラムをデバッグ モードで実行できます。 デバッガーでアプリケーションを実行すると、コンソール ウィンドウが開いたままになります。 任意のキーを押して、コンソール ウィンドウを閉じます。
注意
.NET 6 以降、コンソール テンプレートを使用した新しいプロジェクトからは、以前のバージョンとは異なるコードが生成されます。 詳細については、「新しい C# テンプレートで、最上位レベルのステートメントが生成される」ページを参照してください。
アプリを作成する
このセクションでは、次のタスクを実行します。
- C# での基本的な整数計算を見ていきます。
- 基本的な電卓アプリを作成するコードを追加します。
- アプリをデバッグし、エラーを見つけて修正します。
- コードを修正してさらに効率的にします。
整数の演算の確認
C# での基本的な整数演算から始めます。
コード エディターで、既定の "Hello World" のコードを削除します。
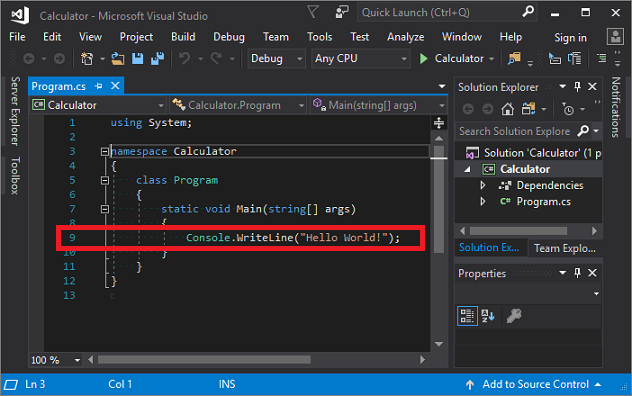
具体的には、
`Console.WriteLine("Hello World!");` と記述された行を削除します。その場所に、次のコードを入力します。
    int a = 42;
    int b = 119;
    int c = a + b;
    Console.WriteLine(c);
    Console.ReadKey();
コードを入力すると、Visual Studio の IntelliSense 機能によって、入力のオートコンプリート オプションが提供されることに注目してください。
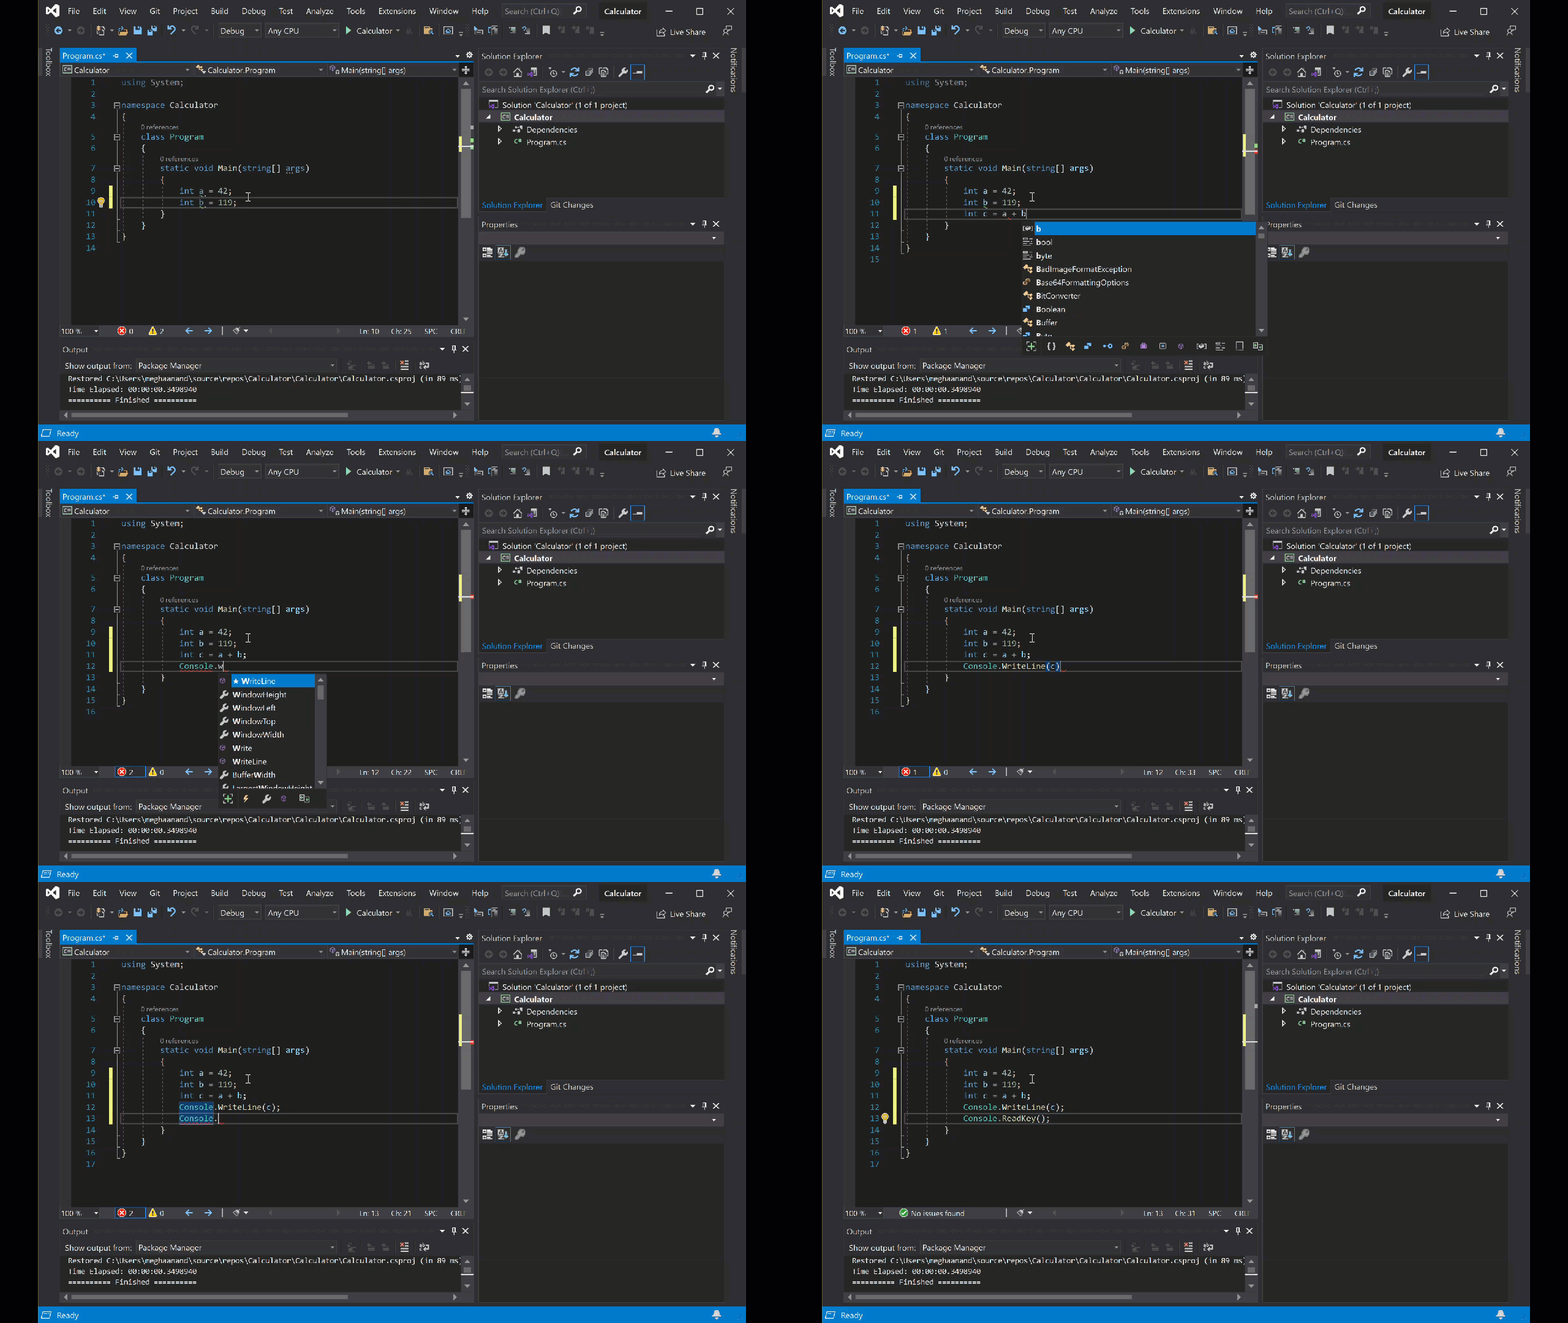
[Calculator] の横にある緑色の [開始] ボタンを選択して、プログラムをビルドして実行します。または、F5 キーを押します。

コンソール ウィンドウが開き、42 + 119 の合計 (
** 161** ) が表示されます。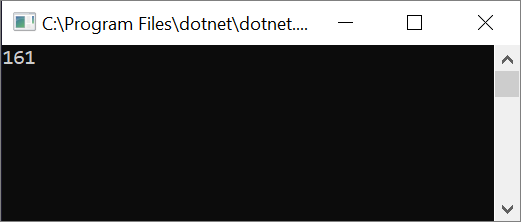
** (省略可能)** 演算子を変更することで、結果を変えることができます。 たとえば、`int c = a + b;` コード行の`+` 演算子を減算用の`-` 、乗算用の`*` 、または除算用の`/` に変更することができます。 次に、プログラムを実行すると、結果も変更されます。コンソール ウィンドウを閉じます。
ソリューション エクスプローラーの右ペインにある Program.cs を選択して、コード エディターにファイルを表示します。
コード エディターで、
Console.WriteLine("Hello World!");という既定の "Hello World" のコードを置き換えます。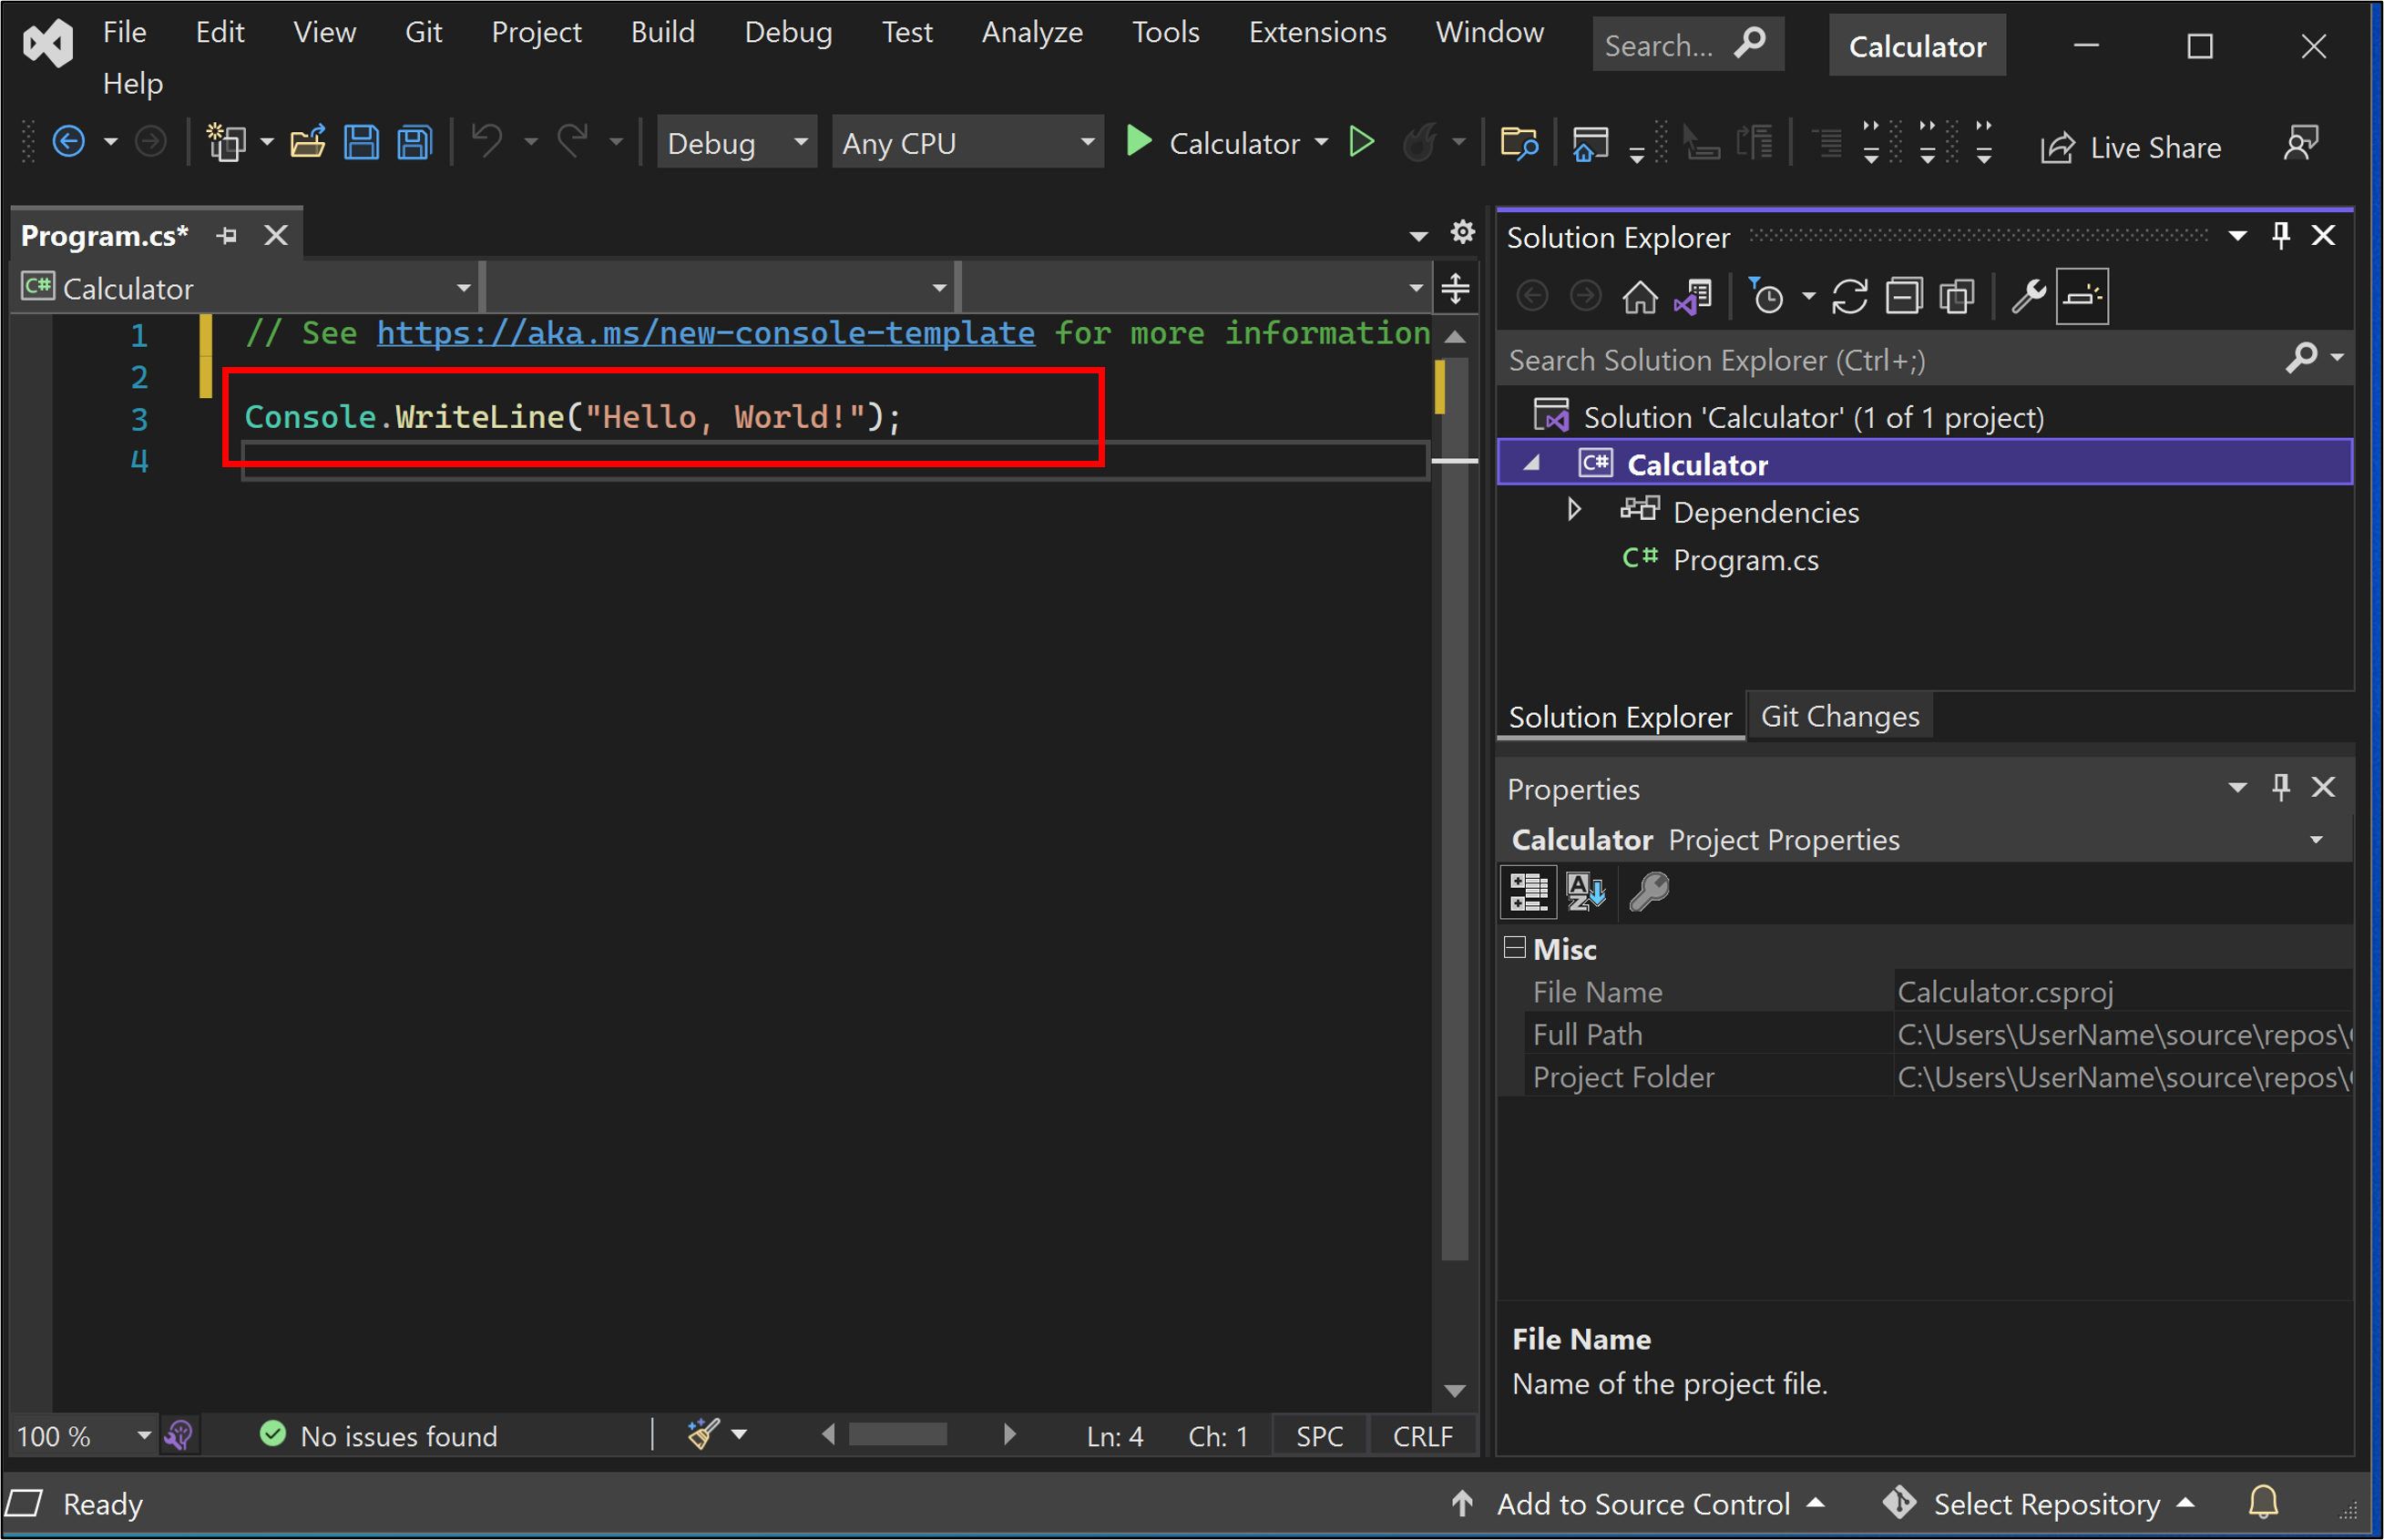
この行を次のコードに置き換えます。
    int a = 42;
    int b = 119;
    int c = a + b;
    Console.WriteLine(c);
    Console.ReadKey();
コードを入力すると、Visual Studio の IntelliSense 機能によって、入力のオートコンプリート オプションが提供されます。

アプリをビルドして実行するには、F5 キーを押すか、上部のツール バーの名前 [電卓] の横にある緑色の矢印を選択します。

コンソール ウィンドウが開き、42 + 119 の合計 (161) が表示されます。

コンソール ウィンドウを閉じます。
必要に応じて、演算子を変更して結果を変えることができます。 たとえば、
`int c = a + b;` コード行の`+` 演算子を減算用の`-` 、乗算用の`*` 、または除算用の`/` に変更することができます。 アプリを実行すると、それに応じて結果が変わります。
電卓を作成するコードを追加する
次に、より複雑な一連の電卓コードをプロジェクトに追加してみましょう。
コード エディターで Program.cs のすべてのコードを次の新しいコードに置き換えます。
    using System;

    namespace Calculator
    {
        class Program
        {
            static void Main(string[] args)
            {
                // Declare variables and then initialize to zero.
                int num1 = 0; int num2 = 0;

                // Display title as the C# console calculator app.
                Console.WriteLine("Console Calculator in C#\r");
                Console.WriteLine("------------------------\n");

                // Ask the user to type the first number.
                Console.WriteLine("Type a number, and then press Enter");
                num1 = Convert.ToInt32(Console.ReadLine());

                // Ask the user to type the second number.
                Console.WriteLine("Type another number, and then press Enter");
                num2 = Convert.ToInt32(Console.ReadLine());

                // Ask the user to choose an option.
                Console.WriteLine("Choose an option from the following list:");
                Console.WriteLine("\ta - Add");
                Console.WriteLine("\ts - Subtract");
                Console.WriteLine("\tm - Multiply");
                Console.WriteLine("\td - Divide");
                Console.Write("Your option? ");

                // Use a switch statement to do the math.
                switch (Console.ReadLine())
                {
                    case "a":
                        Console.WriteLine($"Your result: {num1} + {num2} = " + (num1 + num2));
                        break;
                    case "s":
                        Console.WriteLine($"Your result: {num1} - {num2} = " + (num1 - num2));
                        break;
                    case "m":
                        Console.WriteLine($"Your result: {num1} * {num2} = " + (num1 * num2));
                        break;
                    case "d":
                        Console.WriteLine($"Your result: {num1} / {num2} = " + (num1 / num2));
                        break;
                }
                // Wait for the user to respond before closing.
                Console.Write("Press any key to close the Calculator console app...");
                Console.ReadKey();
            }
        }
    }
[電卓] ボタンを選択するか、F5 キーを押してアプリを実行します。
コンソール ウィンドウが開きます。
コンソール ウィンドウで、プロンプトに従って数値 42 と 119 を加算します。
アプリは次のスクリーンショットのようになります。
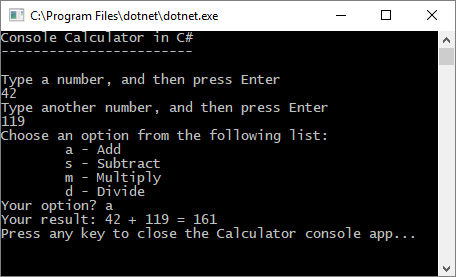
コード エディターで Program.cs のすべてのコードを次の新しいコードに置き換えます。
    // Declare variables and then initialize to zero.
    int num1 = 0; int num2 = 0;

    // Display title as the C# console calculator app.
    Console.WriteLine("Console Calculator in C#\r");
    Console.WriteLine("------------------------\n");

    // Ask the user to type the first number.
    Console.WriteLine("Type a number, and then press Enter");
    num1 = Convert.ToInt32(Console.ReadLine());

    // Ask the user to type the second number.
    Console.WriteLine("Type another number, and then press Enter");
    num2 = Convert.ToInt32(Console.ReadLine());

    // Ask the user to choose an option.
    Console.WriteLine("Choose an option from the following list:");
    Console.WriteLine("\ta - Add");
    Console.WriteLine("\ts - Subtract");
    Console.WriteLine("\tm - Multiply");
    Console.WriteLine("\td - Divide");
    Console.Write("Your option? ");

    // Use a switch statement to do the math.
    switch (Console.ReadLine())
    {
        case "a":
            Console.WriteLine($"Your result: {num1} + {num2} = " + (num1 + num2));
            break;
        case "s":
            Console.WriteLine($"Your result: {num1} - {num2} = " + (num1 - num2));
            break;
        case "m":
            Console.WriteLine($"Your result: {num1} * {num2} = " + (num1 * num2));
            break;
        case "d":
            Console.WriteLine($"Your result: {num1} / {num2} = " + (num1 / num2));
            break;
    }
    // Wait for the user to respond before closing.
    Console.Write("Press any key to close the Calculator console app...");
    Console.ReadKey();
[電卓] ボタンを選択するか、F5 キーを押してアプリを実行します。
コンソール ウィンドウが開きます。
コンソール ウィンドウで、プロンプトに従って数値 42 と 119 を加算します。
アプリは次のスクリーンショットのようになります。

小数の機能を追加する
次はコードを手を加えて機能を追加しましょう。
現在の電卓アプリは、整数を受け取って返すだけの機能です。 たとえば、アプリを実行して数値 42 を数値 119 で割ると、結果は 0 になりますが、これは正確ではありません。
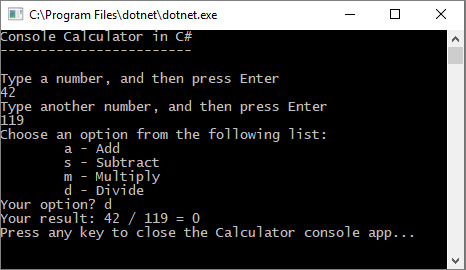
小数を処理して精度が向上するようにコードを修正します。
Visual Studio エディターの Program.cs から Ctrl+H キーを押し、[検索と置換] コントロールを開きます。
コントロールに「int」と入力し、 [置換] フィールドに「float」と入力します。
コントロールの [大文字と小文字を区別] と [単語単位] のアイコンを選択するか、Alt+C キーと Alt+W キーを押します。
[すべて置換] アイコンを選択するか、Alt+A キーを押して検索と置換を実行します。
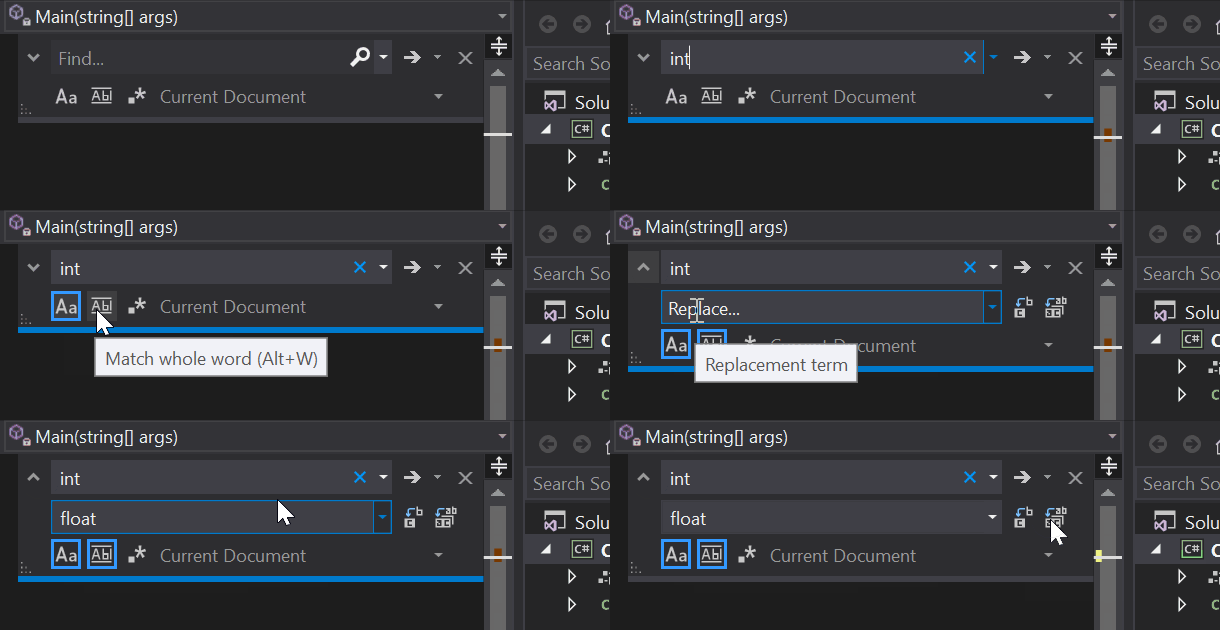
電卓アプリをもう一度実行し、数値 42 を数値 119 で割ります。
アプリから 0 ではなく小数が返されるようになりました。
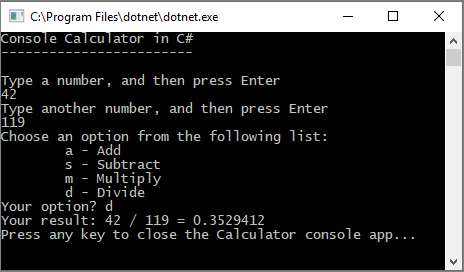
これでアプリで小数の結果を生成できるようになりました。 もう少しコードに手を加えて、小数も計算できるようにしましょう。
[検索と置換] コントロールを使用して
float変数の各インスタンスをdoubleに変更し、Convert.ToInt32メソッドの各インスタンスをConvert.ToDoubleに変更します。電卓アプリを実行し、数値 42.5 を数値 119.75 で割ります。
アプリが小数値を受け取り、結果として長い小数値が返されるようになりました。
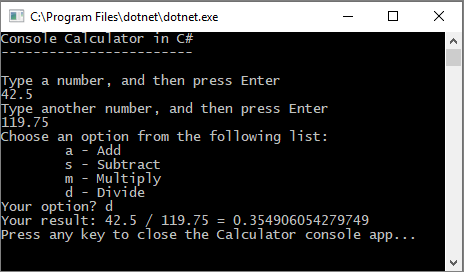
「コードを修正する」セクションでは、結果の小数点以下の桁数を減らします。
アプリをデバッグする
基本的な電卓アプリを改善しましたが、ユーザーの入力エラーなどの例外はまだ処理していません。 たとえば、ユーザーが 0 で除算しようとしたり、予期しない文字を入力したりすると、アプリの動作が停止する、エラーが返される、または予期しない数値以外の結果が返されることがあります。
一般的なユーザー入力エラーをいくつか見てみましょう。発生した場合はデバッガーで探し、コードで修正します。
ヒント
デバッガーとそのしくみの詳細については、「最初に Visual Studio デバッガーを見る」を参照してください。
"0 除算" エラーを修正する
数値を 0 で除算しようとすると、コンソール アプリがフリーズし、コード エディターに問題が表示されることがあります。
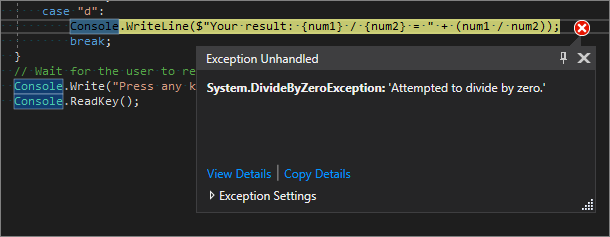
Note
場合によっては、アプリがフリーズせず、デバッガーに 0 除算エラーが表示されないことがあります。 代わりに、無限大記号など、予期しない数値以外の結果がアプリから返されることがあります。 この場合でも、次のコード修正を利用できます。
このエラーを処理するようにコードを変更してみましょう。 Program.cs で、case "d": のコードを次のコードに置き換えます。
            // Ask the user to enter a non-zero divisor until they do so.
                while (num2 == 0)
                {
                    Console.WriteLine("Enter a non-zero divisor: ");
                    num2 = Convert.ToInt32(Console.ReadLine());
                }
                Console.WriteLine($"Your result: {num1} / {num2} = " + (num1 / num2));
                break;
        }
コードを置き換えると、switch ステートメントを含むセクションは次のスクリーンショットのようになります。
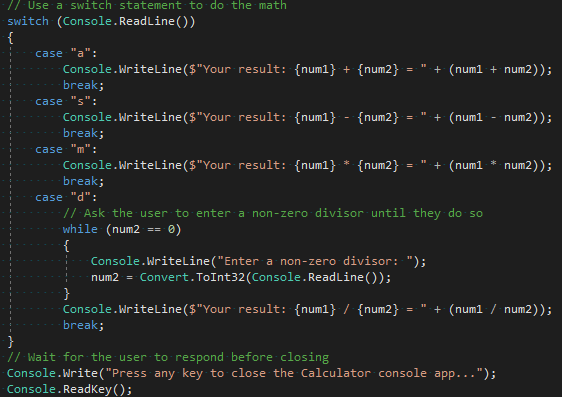
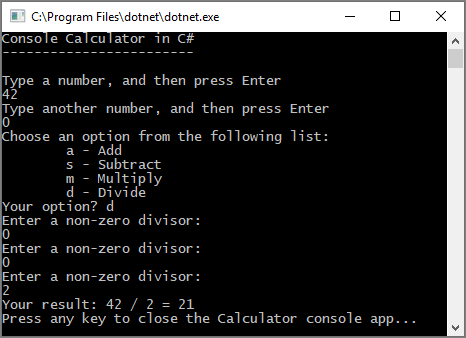
これで、任意の数値を 0 で割ると、アプリから別の数値が要求され、0 以外の数値を入力するまで要求が続けられます。
"書式" エラーを修正する
アプリで数字が想定されているときにアルファベットを入力すると、アプリはフリーズします。 Visual Studio のコード エディターに問題が表示されます。

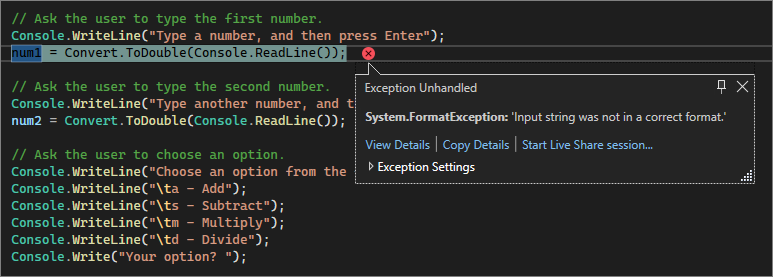
この例外を防ぐには、先ほど入力したコードをリファクターします。
コードを修正する
program クラスに依存してすべてのコードを処理するのではなく、アプリを 2 つのクラス Calculator と Program に分割することができます。
Calculator クラスにより、計算作業の大部分が処理され、Program クラスにより、ユーザー インターフェイスとエラー処理作業が処理されます。
それでは、始めましょう。
Program.cs のすべてを削除して、次の新しい
Calculatorクラスを追加します。class Calculator { public static double DoOperation(double num1, double num2, string op) { double result = double.NaN; // Default value is "not-a-number" if an operation, such as division, could result in an error. // Use a switch statement to do the math. switch (op) { case "a": result = num1 + num2; break; case "s": result = num1 - num2; break; case "m": result = num1 * num2; break; case "d": // Ask the user to enter a non-zero divisor. if (num2 != 0) { result = num1 / num2; } break; // Return text for an incorrect option entry. default: break; } return result; } }さらに、次のように、新しい
Programクラスを追加します。class Program { static void Main(string[] args) { bool endApp = false; // Display title as the C# console calculator app. Console.WriteLine("Console Calculator in C#\r"); Console.WriteLine("------------------------\n"); while (!endApp) { // Declare variables and set to empty. string numInput1 = ""; string numInput2 = ""; double result = 0; // Ask the user to type the first number. Console.Write("Type a number, and then press Enter: "); numInput1 = Console.ReadLine(); double cleanNum1 = 0; while (!double.TryParse(numInput1, out cleanNum1)) { Console.Write("This is not valid input. Please enter an integer value: "); numInput1 = Console.ReadLine(); } // Ask the user to type the second number. Console.Write("Type another number, and then press Enter: "); numInput2 = Console.ReadLine(); double cleanNum2 = 0; while (!double.TryParse(numInput2, out cleanNum2)) { Console.Write("This is not valid input. Please enter an integer value: "); numInput2 = Console.ReadLine(); } // Ask the user to choose an operator. Console.WriteLine("Choose an operator from the following list:"); Console.WriteLine("\ta - Add"); Console.WriteLine("\ts - Subtract"); Console.WriteLine("\tm - Multiply"); Console.WriteLine("\td - Divide"); Console.Write("Your option? "); string op = Console.ReadLine(); try { result = Calculator.DoOperation(cleanNum1, cleanNum2, op); if (double.IsNaN(result)) { Console.WriteLine("This operation will result in a mathematical error.\n"); } else Console.WriteLine("Your result: {0:0.##}\n", result); } catch (Exception e) { Console.WriteLine("Oh no! An exception occurred trying to do the math.\n - Details: " + e.Message); } Console.WriteLine("------------------------\n"); // Wait for the user to respond before closing. Console.Write("Press 'n' and Enter to close the app, or press any other key and Enter to continue: "); if (Console.ReadLine() == "n") endApp = true; Console.WriteLine("\n"); // Friendly linespacing. } return; } }[電卓] ボタンを選択するか、F5 キーを押してアプリを実行します。
画面の指示に従って、値
** 42** を値** 119** で割ります。 結果は次のスクリーンショットのようになります。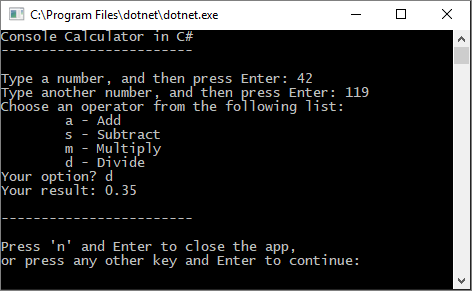

これで、コンソール アプリを閉じるまで、さらに計算を実行できるようになりました。 また、結果の小数点以下の桁数も少なくなりました。 また、間違った文字を入力した場合には、適切なエラー応答が表示されます。
アプリを閉じる
まだ行っていない場合は、電卓アプリを閉じます。
Visual Studio の
** [出力]** ウィンドウを閉じます。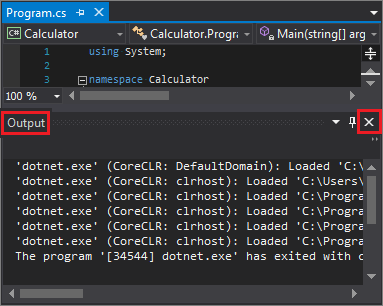
Visual Studio で
** Ctrl** + ** S** キーを押してアプリを保存します。
Git ソース管理を追加する
これでアプリを作成できたので、それを Git リポジトリに追加したいと思うかもしれません。 Visual Studio では、IDE から直接使用できる Git ツールで、その作業を簡単に行うことができます。
ヒント
Git は最も広く使用されている最新のバージョン コントロール システムであるため、プロフェッショナルな開発者にも、コードの作成を学習している方にも、Git は非常に便利です。 Git を初めてお使いになる場合は、https://git-scm.com/ の Web サイトから開始することをお勧めします。 そこには、チート シート、人気のオンライン ブック、Git の基本についてのビデオがあります。
コードを Git に関連付けるには、まず、コードを配置する新しい Git リポジトリを作成します。
Visual Studio の右下隅にあるステータス バーで、 [ソース管理に追加] を選択し、 [Git] を選択します。

[Git リポジトリの作成] ダイアログ ボックスで、GitHub にサインインします。
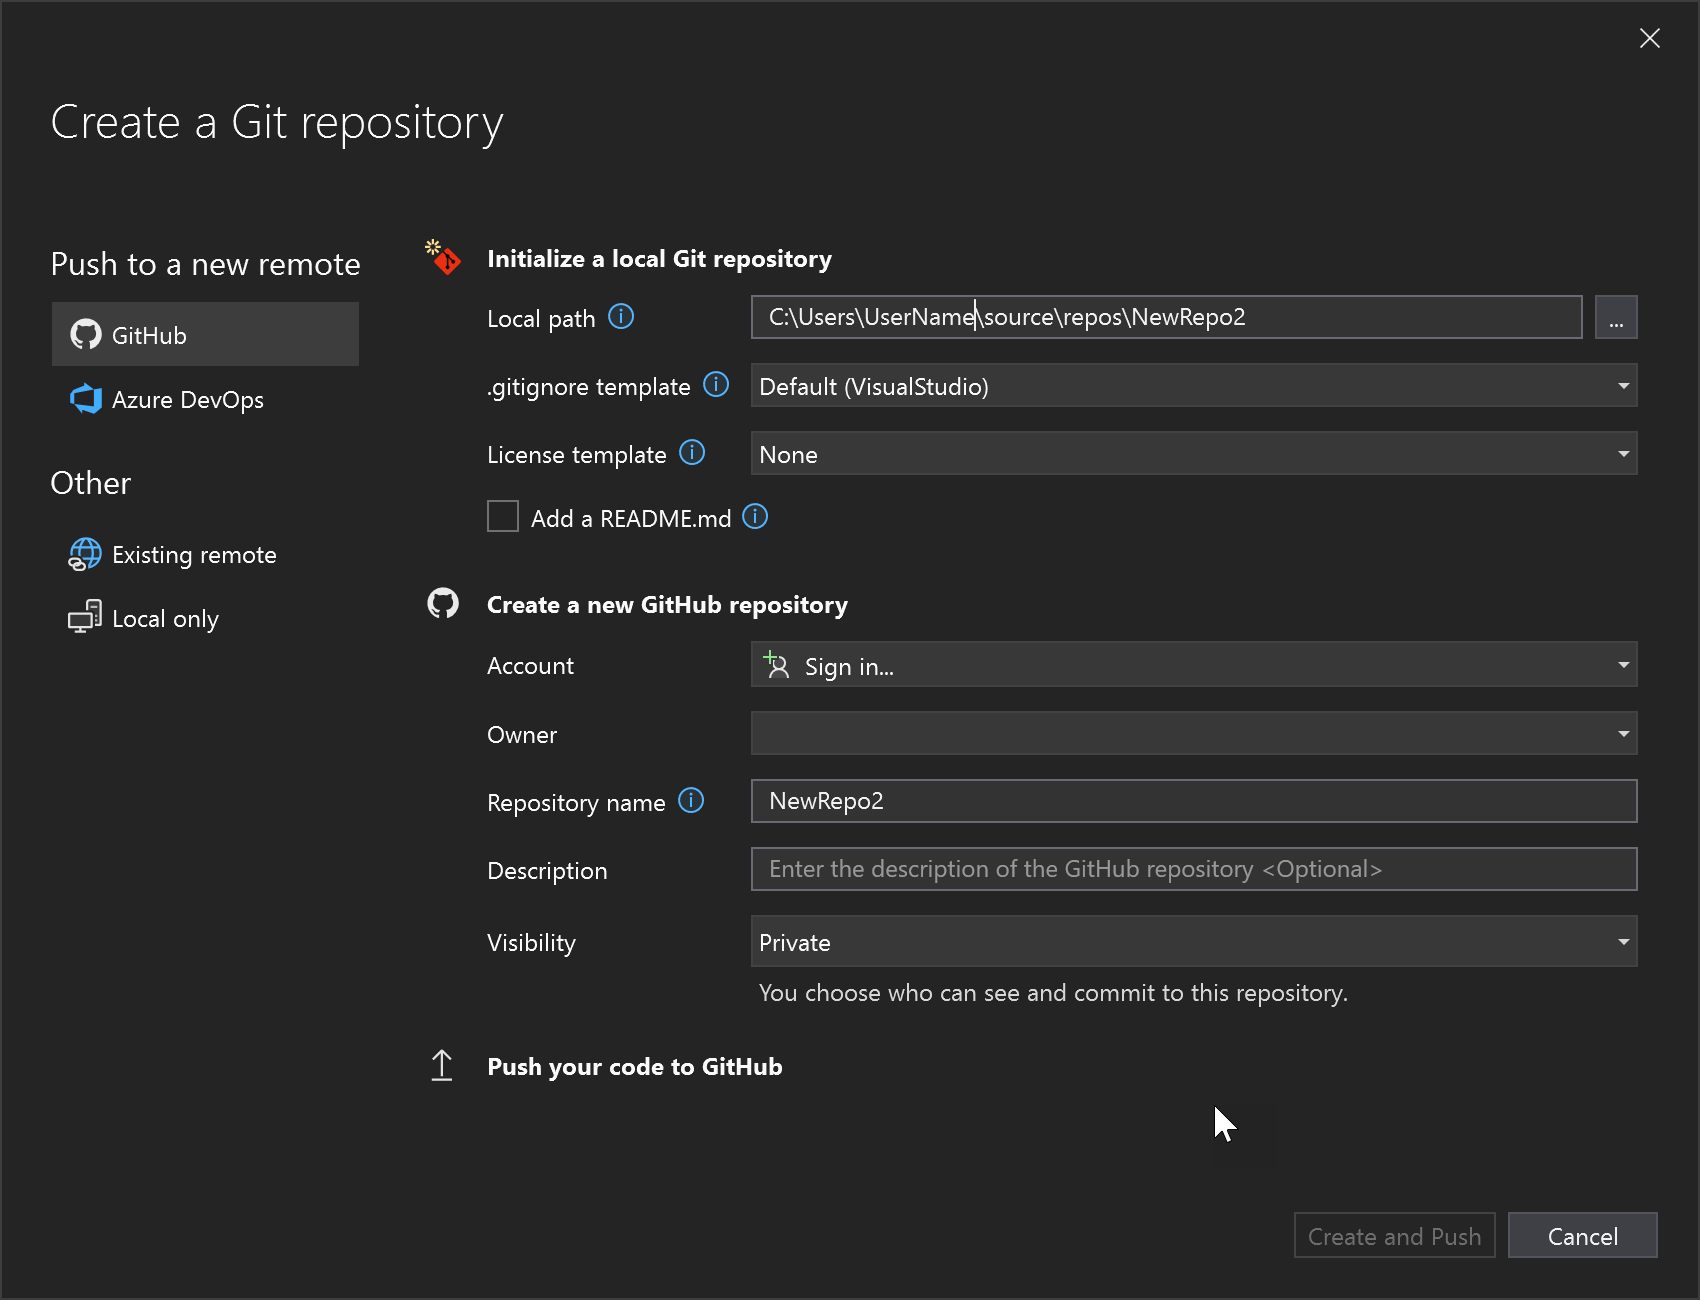
リポジトリ名は、フォルダーの場所に基づいて自動的に設定されます。 既定では、新しいリポジトリはプライベートになります。つまり、アクセスできるのは自分だけです。
ヒント
リポジトリがパブリックかプライベートかに関係なく、コードのバックアップをリモートの GitHub に安全に保存しておくことをお勧めします。 チームで作業していない場合でも、リモート リポジトリを使用すると、コードをご自分のすべてのコンピューターから利用できるようになります。
[作成とプッシュ] を選択します。
リポジトリを作成すると、ステータス バーに状態の詳細が表示されます。

矢印の付いた最初のアイコンには、現在のブランチにある出力/入力方向のコミットの数が表示されます。 このアイコンを使用して、入力方向のコミットをプルしたり、出力方向のコミットをプッシュしたりすることができます。 また、これらのコミットを最初に表示することもできます。 これを行うには、アイコンを選択し、 [View Outgoing/Incoming](出力/入力の表示) を選択します。
鉛筆の 2 番目のアイコンは、コードに対する確定されていない変更の数を示しています。 このアイコンを選択すると、 [Git 変更] ウィンドウにこれらの変更が表示されます。
ご自分のアプリで Git を使用する方法の詳細については、「Visual Studio のバージョン コントロールに関するドキュメント」を参照してください。
確認: コードの完成
このチュートリアルでは、電卓アプリに多くの変更を加えました。 アプリでは、コンピューティング リソースがより効率的に処理され、ほとんどのユーザーの入力エラーが処理されるようになっています。
次に完全なコードをまとめて示します。
class Calculator
{
public static double DoOperation(double num1, double num2, string op)
{
double result = double.NaN; // Default value is "not-a-number" which we use if an operation, such as division, could result in an error.
// Use a switch statement to do the math.
switch (op)
{
case "a":
result = num1 + num2;
break;
case "s":
result = num1 - num2;
break;
case "m":
result = num1 * num2;
break;
case "d":
// Ask the user to enter a non-zero divisor.
if (num2 != 0)
{
result = num1 / num2;
}
break;
// Return text for an incorrect option entry.
default:
break;
}
return result;
}
}
class Program
{
    static void Main(string[] args)
    {
        bool endApp = false;
        // Display title as the C# console calculator app.
        Console.WriteLine("Console Calculator in C#\r");
        Console.WriteLine("------------------------\n");

        while (!endApp)
        {
            // Declare variables and set to empty.
            string numInput1 = "";
            string numInput2 = "";
            double result = 0;

            // Ask the user to type the first number.
            Console.Write("Type a number, and then press Enter: ");
            numInput1 = Console.ReadLine();

            double cleanNum1 = 0;
            while (!double.TryParse(numInput1, out cleanNum1))
            {
                Console.Write("This is not valid input. Please enter an integer value: ");
                numInput1 = Console.ReadLine();
            }

            // Ask the user to type the second number.
            Console.Write("Type another number, and then press Enter: ");
            numInput2 = Console.ReadLine();

            double cleanNum2 = 0;
            while (!double.TryParse(numInput2, out cleanNum2))
            {
                Console.Write("This is not valid input. Please enter an integer value: ");
                numInput2 = Console.ReadLine();
            }

            // Ask the user to choose an operator.
            Console.WriteLine("Choose an operator from the following list:");
            Console.WriteLine("\ta - Add");
            Console.WriteLine("\ts - Subtract");
            Console.WriteLine("\tm - Multiply");
            Console.WriteLine("\td - Divide");
            Console.Write("Your option? ");

            string op = Console.ReadLine();

            try
            {
                result = Calculator.DoOperation(cleanNum1, cleanNum2, op);
                if (double.IsNaN(result))
                {
                    Console.WriteLine("This operation will result in a mathematical error.\n");
                }
                else Console.WriteLine("Your result: {0:0.##}\n", result);
            }
            catch (Exception e)
            {
                Console.WriteLine("Oh no! An exception occurred trying to do the math.\n - Details: " + e.Message);
            }

            Console.WriteLine("------------------------\n");

            // Wait for the user to respond before closing.
            Console.Write("Press 'n' and Enter to close the app, or press any other key and Enter to continue: ");
            if (Console.ReadLine() == "n") endApp = true;

            Console.WriteLine("\n"); // Friendly linespacing.
        }
        return;
    }
}
次の手順
このチュートリアルの第 2 部、
