演習 - パイプラインにプレビュー ステージを追加する
パイプラインにさらなるステージを追加して、Azure 環境にどのような変更が加えられるかを確認できるようにします。
このプロセスでは、次のことを行います。
- パイプライン YAML ファイルを更新して、新しいプレビュー ステージを追加する。
- Azure Pipelines に環境を追加する。
- 承認が必要になるように環境を構成する。
- パイプライン YAML ファイルを更新して、デプロイ ステージで環境を使用します。
- what-if 結果を表示し、パイプラインの実行を承認する。
パイプライン定義を更新してプレビュー ステージを追加する
ここでは、what-if 操作を実行するパイプラインに新しいステージを追加します。
Visual Studio Code で、deploy フォルダー内の azure-pipelines.yml ファイルを開きます。
検証とデプロイのステージの間に、次に示すプレビュー ステージの定義を追加します。
- stage: Preview
  jobs:
  - job: PreviewAzureChanges
    displayName: Preview Azure changes
    steps:
      - task: AzureCLI@2
        name: RunWhatIf
        displayName: Run what-if
        inputs:
          azureSubscription: $(ServiceConnectionName)
          scriptType: 'bash'
          scriptLocation: 'inlineScript'
          inlineScript: |
            az deployment group what-if \
              --resource-group $(ResourceGroupName) \
              --template-file deploy/main.bicep \
              --parameters environmentType=$(EnvironmentType)
ファイルに加えた変更を保存します。
環境を追加する
ブラウザーで、[Pipelines]>[環境] に移動します。
![[Pipelines] メニューを示す Azure DevOps インターフェイスのスクリーンショット。[環境] 項目が強調表示されています。](media/7-environments.png)
[環境の作成] を選択します。
![[環境] ページを示す Azure DevOps インターフェイスのスクリーンショット。環境を作成するためのボタンが強調表示されています。](media/7-environments-new.png)
環境名として Website と入力します。
説明は空白のままにします。 [リソース] には [なし] を選択します。
Note
Azure Pipelines では、環境を使用してデプロイ機能を有効にします。 これらの機能の一部は、Kubernetes または仮想マシンにデプロイする場合にのみ適用されます。 このモジュールでは、これらの機能を使用しないので、無視してかまいません。
[作成] を選択します
![Azure DevOps の新しい環境用のページのスクリーンショット。詳細情報の入力が完了し、[作成] ボタンが強調表示されています。](media/7-environments-new-details.png)
承認チェックを環境に追加する
画面の左上にある [承認とチェック] タブを選択します。
![Web サイト環境を示す Azure DevOps インターフェイスのスクリーンショット。[承認とチェック] タブが強調表示されています。](media/7-add-check.png)
[Approvals] を選択します。
![チェックを追加するページを示す Azure DevOps インターフェイスのスクリーンショット。[承認] 項目が強調表示されています。](media/7-add-check-approval.png)
[承認者] テキスト ボックスに自分の名前を入力し、自分自身を選択します。
[詳細設定] の横にある矢印ボタンを選択します。
既定では、承認者は自分がトリガーした実行を承認することができます。 このパイプラインを操作するユーザーは他にいないため、このチェックボックスはオンのままにしておきます。
[作成] を選択します
![承認チェックの追加のためのページを示す Azure DevOps インターフェイスのスクリーンショット。詳細情報の入力が完了し、[作成] ボタンが強調表示されています。](media/7-add-check-approval-details.png)
環境と承認を必要とするようにパイプライン定義を更新する
ここでは、既に作成した Web サイト環境に対して実行するようにデプロイ ステージを構成します。 標準ジョブではなくデプロイ ジョブを実行するようにデプロイ ステージを変換し、その環境にデプロイするように構成します。
Visual Studio Code で、azure-pipelines.yml ファイルのデプロイ ステージ定義を次のコードに置き換えます。
- stage: Deploy
  jobs:
  - deployment: DeployWebsite
    displayName: Deploy website
    environment: Website
    strategy:
      runOnce:
        deploy:
          steps:
            - checkout: self

            - task: AzureResourceManagerTemplateDeployment@3
              name: DeployBicepFile
              displayName: Deploy Bicep file
              inputs:
                connectedServiceName: $(ServiceConnectionName)
                deploymentName: $(Build.BuildNumber)
                location: $(deploymentDefaultLocation)
                resourceGroupName: $(ResourceGroupName)
                csmFile: deploy/main.bicep
                overrideParameters: >
                  -environmentType $(EnvironmentType)
新しい
checkoutステップを定義したことに注目してください。 通常のジョブとは異なり、デプロイ ジョブは Git リポジトリからファイルをチェックアウト (ダウンロード) するように構成する必要があります。 このステップを実行しないと、デプロイ ジョブで Bicep ファイルを読み取ることができません。 代わりに "パイプライン アーティファクト" を使用して、パイプライン ステージ間でファイルを送信することもできます。 アーティファクトに関する詳細情報へのリンクを「まとめ」に示します。ファイルを保存します。
パイプライン定義を確認してコミットする
azure-pipelines.yml ファイルが次のコードのようになっていることを確認します。
trigger:
  batch: true
  branches:
    include:
    - main

pool:
  vmImage: ubuntu-latest

variables:
  - name: deploymentDefaultLocation
    value: westus3

stages:

- stage: Lint
  jobs:
  - job: LintCode
    displayName: Lint code
    steps:
      - script: |
          az bicep build --file deploy/main.bicep
        name: LintBicepCode
        displayName: Run Bicep linter

- stage: Validate
  jobs:
  - job: ValidateBicepCode
    displayName: Validate Bicep code
    steps:
      - task: AzureResourceManagerTemplateDeployment@3
        name: RunPreflightValidation
        displayName: Run preflight validation
        inputs:
          connectedServiceName: $(ServiceConnectionName)
          location: $(deploymentDefaultLocation)
          deploymentMode: Validation
          resourceGroupName: $(ResourceGroupName)
          csmFile: deploy/main.bicep
          overrideParameters: >
            -environmentType $(EnvironmentType)

- stage: Preview
  jobs:
  - job: PreviewAzureChanges
    displayName: Preview Azure changes
    steps:
      - task: AzureCLI@2
        name: RunWhatIf
        displayName: Run what-if
        inputs:
          azureSubscription: $(ServiceConnectionName)
          scriptType: 'bash'
          scriptLocation: 'inlineScript'
          inlineScript: |
            az deployment group what-if \
              --resource-group $(ResourceGroupName) \
              --template-file deploy/main.bicep \
              --parameters environmentType=$(EnvironmentType)

- stage: Deploy
  jobs:
  - deployment: DeployWebsite
    displayName: Deploy website
    environment: Website
    strategy:
      runOnce:
        deploy:
          steps:
            - checkout: self

            - task: AzureResourceManagerTemplateDeployment@3
              name: DeployBicepFile
              displayName: Deploy Bicep file
              inputs:
                connectedServiceName: $(ServiceConnectionName)
                deploymentName: $(Build.BuildNumber)
                location: $(deploymentDefaultLocation)
                resourceGroupName: $(ResourceGroupName)
                csmFile: deploy/main.bicep
                overrideParameters: >
                  -environmentType $(EnvironmentType)
そうでない場合は、この例と一致するように更新してから保存してください。
Visual Studio Code ターミナルで次のコマンドを実行し、変更をコミットして Git リポジトリにプッシュします。
git add .
git commit -m "Add preview stage"
git push
パイプラインを実行して what-if 出力を確認する
ブラウザーでパイプラインに移動します。
パイプラインの最新の実行を選択します。
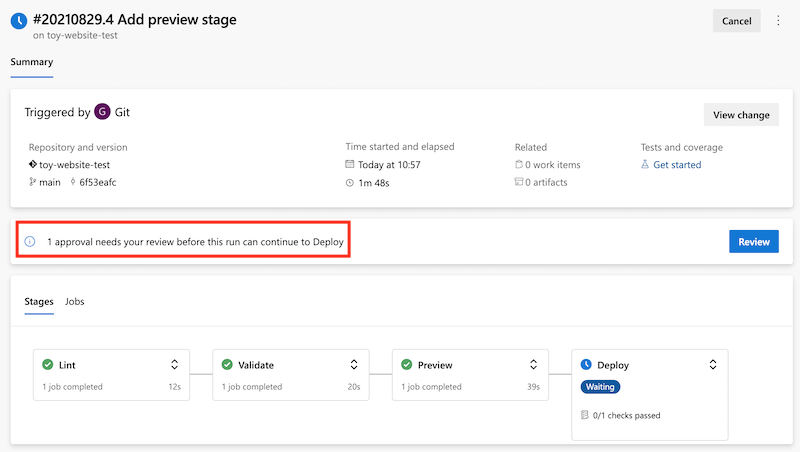
パイプラインでリント、検証、プレビューの各ステージが完了するまで待ちます。 Azure Pipelines によってページが最新の状態で自動的に更新されますが、ページを随時更新することをお勧めします。
リソースへのアクセス許可を付与するように求められたら、[表示] を選択し、[許可] を選択します。
Azure Pipelines に、承認を求めるメッセージが表示されます。 また、パイプラインで承認が必要であることを知らせる電子メールも届きます。

パイプラインの継続を承認する前に、what-if の結果を確認し、期待どおりであることを確かめます。
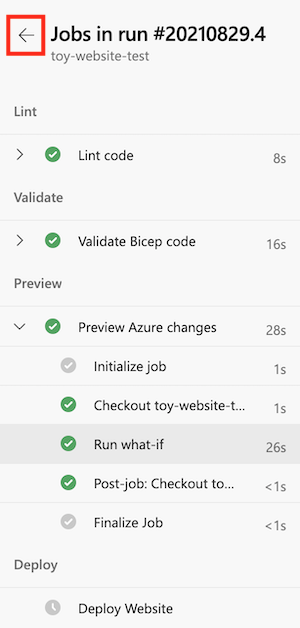
[プレビュー] ステージを選択します。
[Run what-if](what-if の実行) ステップを選択し、what-if コマンドで報告される変更点を確認します。
パイプライン ログに次のコードのような what-if の結果が示されることに注目してください。
Resource and property changes are indicated with these symbols:
  + Create
  ~ Modify
  = Nochange

The deployment will update the following scope:

Scope: /subscriptions/f0750bbe-ea75-4ae5-b24d-a92ca601da2c/resourceGroups/ToyWebsiteTest

  ~ Microsoft.Web/sites/toy-website-nbfnedv766snk [2021-01-15]
    + properties.siteConfig.localMySqlEnabled:   false
    + properties.siteConfig.netFrameworkVersion: "v4.6"

  = Microsoft.Insights/components/toywebsite [2020-02-02]
  = Microsoft.Storage/storageAccounts/mystoragenbfnedv766snk [2021-04-01]
  = Microsoft.Web/serverfarms/toy-website [2021-01-15]

Resource changes: 1 to modify, 3 no change.
what-if 操作によって、Web サイト リソースへの変更が検出されました。 ただし、検出された変更はノイズです。 リソースに対する実際の変更を表すものではありません。 時間の経過と共に、Azure チームによってノイズは軽減されます。 それまで、この 2 つの特定のプロパティについては、検出された変更を無視できます。
また、what-if 出力に
microsoft.alertsmanagement/smartDetectorAlertRules/Failure Anomalies - toywebsiteというリソースの種類の項目が表示される場合があります。 このリソースは、Application Insights によって自動的に作成されます。 リソースに変更が加えられないことが what-if コマンドで検出されます。
パイプラインの実行を承認する
左矢印を選択して、パイプラインの実行の詳細に戻ります。

[承認] パネルで [確認] ボタンを選択します。
[コメント] ボックスに「Reviewed what-if results」 (what-if の結果を確認済み) と入力します。
[承認] を選択します。
![パイプライン承認ページを示す Azure DevOps インターフェイスのスクリーンショット。[承認] ボタンが強調表示されています。](media/7-pipeline-run-approve.png)
デプロイが成功したことを確認する
パイプラインの実行を承認すると、デプロイ ステージの実行が開始されることがわかります。
ステージが終了するまで待ちます。
パイプラインの実行が正常に終了することに注目してください。