演習 - イメージ カルーセルを表示する SPFx イメージ カード ACE を作成する
この演習では、選択した Mars ローバーのカメラの 1 つによって撮影された画像を示すイメージ カード テンプレートを使用して、SharePoint Framework (SPFx) アダプティブ カード拡張機能 (ACE) を作成します。
前提条件
Viva Connections用の ACE を開発するには、テナントに Microsoft 365 テナント、SharePoint Online、Viva Connectionsを設定する必要があります。 テナントを準備するには、次のリソースを使用します。
ワークステーションに必要な開発者ツールもインストールする必要があります。
重要
ほとんどの場合、次のツールの最新バージョンをインストールすることをお勧めします。 ここに記載されているバージョンのリストは、このモジュールが発行され、最後にテストしたときに使用されたものです。
- Node.js - v16.*
- Gulp-cli - v2.3.*
- Yeoman - v4.3.*
- SharePoint 用 Yeoman ジェネレーター - v1.17.1
- Visual Studio Code
SPFx プロジェクトを作成する
コマンド プロンプトを開き、SPFx プロジェクトを作成するフォルダーに移動します。 その後、次のコマンドを実行して SharePoint Yeoman ジェネレーターを起動します。
yo @microsoft/sharepoint
表示されるプロンプトを完了するには、次のコマンドを使用します。
- ソリューション名は何ですか?: AceImageViewer
- 作成するクライアント側コンポーネントの種類:アダプティブ カード拡張機能
- どのテンプレートを使用しますか?: イメージ カード テンプレート
- アダプティブ カード拡張機能の名前は何ですか?: AceImageViewer
プロジェクト フォルダーを作成した後、 ジェネレーターは npm インストールを実行して、すべての依存関係パッケージを自動的にインストールします。 npm がすべての依存関係のダウンロードを完了したら、 Visual Studio Code でプロジェクトを開きます。
ACE コンポーネントにパブリック プロパティを追加する
この演習で作成する ACE コンポーネントは、 NASA OpenAPI エンドポイントのいずれかを使用して、Mars ローバーによって撮影されたイメージを取得して表示します。
API を呼び出すには、次の 3 つの値を設定する必要があります。
- API キー
- の写真を取得するマーズローバー
- の画像を取得するために、火星の太陽の日である Mars sol
これらはすべて、ACE コンポーネントのパブリックおよび構成可能なプロパティになります。
注:
NASA Open API では、デモ API キーの使用、または無料の API キーの作成がサポートされています。 この演習では、デモ キーを使用していることを前提としています。
デモ キーには、1 時間と 1 日の IP アドレスあたりの要求の最大数などの制限があります。 デモ API キーの制限を超えた場合は、メール アドレスにリンクされたキーを作成できます。 詳細については、 NASA Open API サイトを参照してください。
まず、ACE コンポーネントにプロパティを追加します。
ファイル ./src/adaptiveCardExtensions/aceImageViewer/AceImageViewerAdaptiveCardExtension.ts で ACE クラスを見つけて、VS Code で開きます。
IAceImageViewerAdaptiveCardExtensionPropsインターフェイスを見つけて、次のプロパティが含まれるよう更新します。export interface IAceImageViewerAdaptiveCardExtensionProps { title: string; nasa_api_key: string; nasa_rover: string; mars_sol: number; }
次に、プロパティをプロパティ ウィンドウに追加します。
ファイル ./src/adaptiveCardExtensions/aceImageViewer/AceImageViewerPropertyPane.ts で クラスを見つけて、VS Code で開きます。
PropertyPaneTextFieldメソッドをインポートするimportステートメントを見つけます。 このimportステートメントに、PropertyPaneDropdownメソッドに一覧を追加します。import { IPropertyPaneConfiguration, PropertyPaneTextField, PropertyPaneDropdown // << add } from '@microsoft/sp-property-pane';既存の
getPropertyPaneConfiguration()メソッドを更新して、選択したローバーを指定する 1 つのパラメーターを受け入れます。public getPropertyPaneConfiguration(selectedRover: string = 'curiosity'): IPropertyPaneConfiguration { .. }getPropertyPaneConfiguration()メソッドで返されるオブジェクト内のgroupFieldsの配列に次のフィールドを追加します。PropertyPaneTextField('nasa_api_key', { label: 'NASA API key' }), PropertyPaneDropdown('nasa_rover', { label: 'NASA Mars rover', options: [ { index: 0, key: 'curiosity', text: 'Curiosity' }, { index: 1, key: 'opportunity', text: 'Opportunity' }, { index: 2, key: 'spirit', text: 'Spirit' } ], selectedKey: selectedRover }), PropertyPaneTextField('mars_sol', { label: 'Display photos from Mars day (Sol)' })
プロパティ ウィンドウに小さな機能強化を追加してみましょう。Mars rover のドロップダウン セレクターは、既定で現在選択されているローバーに設定されます。
getPropertyPaneConfiguration() メソッドのシグネチャは、それを設定するために使用できる入力パラメーターを受け取ります。
AceImageViewerAdaptiveCardExtensionクラスに戻るし、getPropertyPaneConfiguration()メソッドを見つけます。 既存のreturnステートメントを次のように置き換えます。return this._deferredPropertyPane?.getPropertyPaneConfiguration(this.properties.nasa_rover);
最後に、ACE コンポーネントがページに追加されたときに、 プロパティの既定値を設定します。
ファイル ./src/adaptiveCardExtensions/aceImageViewer/AceImageViewerAdaptiveCardExtension.manifest.json で ACE クラスを見つけて、VS Code で開きます。
preconfiguredEntries.propertiesオブジェクトのプロパティの既存の一覧に次のプロパティを追加します。"nasa_api_key": "DEMO_KEY", "nasa_rover": "curiosity", "nasa_sol": 1000
NASA REST API サービス ヘルパーを追加する
NASA REST OpenAPI からのすべての読み取りを処理するサービスをプロジェクトに追加しましょう。
プロジェクトに新しいファイル ./src/adaptiveCardExtensions/aceImageViewer/nasa.service.ts を作成し、次のコードを追加します。
import { AdaptiveCardExtensionContext } from '@microsoft/sp-adaptive-card-extension-base';
import { HttpClient } from '@microsoft/sp-http';

export interface IMarsRoverCamera {
  id: number;
  name: string;
  rover_id: number;
  full_name: string;
}

export interface IMarsRoverVehicle {
  id: number;
  name: string;
  landing_date: Date;
  launch_date: Date;
  status: string;
}

export interface IMarsRoverPhoto {
  id: number;
  sol: number;
  camera: IMarsRoverCamera;
  rover: IMarsRoverVehicle;
  img_src: string;
  earth_date: Date;
}

export const fetchRoverPhotos = async (
  spContext: AdaptiveCardExtensionContext,
  apiKey: string,
  rover: string,
  mars_sol: number): Promise<IMarsRoverPhoto[]> => {
  const results: { photos: IMarsRoverPhoto[] } = await (
    await spContext.httpClient.get(
      `https://api.nasa.gov/mars-photos/api/v1/rovers/${rover}/photos?sol=${mars_sol}&page=1&api_key=${apiKey}`,
      HttpClient.configurations.v1
    )
  ).json();

  return Promise.resolve(results.photos);
}
ACE コンポーネントの状態を更新する
パブリック プロパティとヘルパー サービスが作成された状態で、コンポーネント内のデータを表示するために使用されるコンポーネントの状態を更新しましょう。
ファイル ./src/adaptiveCardExtensions/aceImageViewer/AceImageViewerAdaptiveCardExtension.ts で ACE クラスを見つけて、VS Code で開きます。
次の
importステートメントを、既存のimportステートメントの後に追加します:import { isEmpty } from '@microsoft/sp-lodash-subset' import { fetchRoverPhotos, IMarsRoverPhoto } from './nasa.service';IAceImageViewerAdaptiveCardExtensionStateインターフェイスを見つけて、次のプロパティが含まれるよう更新します。export interface IAceImageViewerAdaptiveCardExtensionState { currentIndex: number; roverPhotos: IMarsRoverPhoto[]; }次に、
AceImageViewerAdaptiveCardExtensionクラスのonInit()メソッドを更新して、これらの 2 つのプロパティを空の値に初期化します。this.state = { currentIndex: 0, roverPhotos: [] };onInit()で、最小プロパティが設定されている場合に NASA API からイメージを取得する次のコードを追加します。 これは、既存のreturn Promise.resolve();if (!isEmpty(this.properties.nasa_api_key) && !isEmpty(this.properties.nasa_rover) && !isEmpty(this.properties.mars_sol)){ this.setState({ roverPhotos: await fetchRoverPhotos( this.context, this.properties.nasa_api_key, this.properties.nasa_rover, this.properties.mars_sol) }); }最後のステートメントでは
awaitキーワード (keyword) を使用するため、onInit()メソッドの宣言にasyncキーワード (keyword)を追加する必要があります。public async onInit(): Promise<void> {
もう 1 つのシナリオを処理してみましょう。ユーザーがプロパティ ウィンドウで選択した nasa_rover または mars_sol を変更した場合は、状態の画像を更新します。 これを行うには、 AceImageViewerAdaptiveCardExtension クラスに次のコードを追加します。 プロパティ ウィンドウでプロパティが変更されると、次のように実行されます。
protected onPropertyPaneFieldChanged(propertyPath: string, oldValue: any, newValue: any): void {
  if (propertyPath === 'nasa_rover' && newValue !== oldValue) {
    (async () => {
      this.setState({ roverPhotos: await fetchRoverPhotos(
        this.context,
        this.properties.nasa_api_key,
        newValue,
        this.properties.mars_sol)
      });
    })
  }

  if (propertyPath === 'mars_sol' && newValue !== oldValue) {
    (async () => {
      this.setState({ roverPhotos: await fetchRoverPhotos(
        this.context,
        this.properties.nasa_api_key,
        this.properties.nasa_rover,
        newValue)
      });
    })
  }
}
CardView を更新する
コンポーネントが REST API から写真を取得し、それらを状態に格納したら、レンダリングを更新して写真を表示できます。 まず、CardView を更新します。
VS Code で ./src/adaptiveCardExtensions/aceImageViewer/cardView/CardView.ts ファイルを見つけて開きます。
@microsoft/sp-adaptive-card-extension-baseパッケージからインポートされたIActionArgumentsインターフェイスへの参照を追加します。import { BaseImageCardView, IImageCardParameters, IExternalLinkCardAction, IQuickViewCardAction, ICardButton, IActionArguments // << add } from '@microsoft/sp-adaptive-card-extension-base';次に、CardView に表示されるボタンを更新します。 CardView は、0 個、1 つ、または 2 つのボタンを返すことができます。 写真のコレクションの先頭または最後に表示されていない場合は、前のボタンと次のボタンの 2 つのボタンを表示する必要があります。 これを追加するには、
cardButtons()アクセサー メソッドの内容を次のコードに置き換えます。const cardButtons: ICardButton[] = []; if (this.state.currentIndex !== 0) { cardButtons.push(<ICardButton>{ title: '<', id: '-1', action: { type: 'Submit', parameters: {} } }); } if (this.state.currentIndex !== (this.state.roverPhotos.length - 1)) { cardButtons.push(<ICardButton>{ title: '>', id: '1', action: { type: 'Submit', parameters: {} } }); } return (cardButtons.length === 0) ? undefined : (cardButtons.length === 1) ? [cardButtons[0]] : [cardButtons[0], cardButtons[1]];次に、
data()アクセサー メソッドの内容を次のコードに置き換えます。 これにより、ローバーまたは Mars sol が指定されていない場合、いくつかの命令を含む Mars の既定の画像が返されます。 それ以外の場合は、現在のイメージが表示されます。if (!this.properties.nasa_rover || !this.properties.mars_sol) { return { primaryText: `Select Mars rover and sol to display photos...`, imageUrl: 'https://upload.wikimedia.org/wikipedia/commons/thumb/0/0e/Tharsis_and_Valles_Marineris_-_Mars_Orbiter_Mission_%2830055660701%29.png/240px-Tharsis_and_Valles_Marineris_-_Mars_Orbiter_Mission_%2830055660701%29.png', imageAltText: `Select Mars rover and sol to display photos...`, title: this.properties.title } } else { const rover = `${this.properties.nasa_rover.substring(0, 1).toUpperCase()}${this.properties.nasa_rover.substring(1)}`; const roverImage = this.state.roverPhotos[this.state.currentIndex]; if (roverImage) { return { primaryText: `Photos from the Mars rover ${rover} on sol ${this.properties.mars_sol}`, imageUrl: roverImage.img_src, imageAltText: `Image ${roverImage.id} taken on ${roverImage.earth_date} from ${rover}'s ${roverImage.camera.full_name} camera.`, title: this.properties.title }; } else { return { primaryText: `Please refresh the page to reload the rover photos`, imageUrl: '', imageAltText: '', title: this.properties.title } } }次に、
onCardSelection()アクセサー メソッドの内容を次のコードに置き換えます。 これにより、カードが選択されたときにすぐに更新される QuickView が開きます。return { type: 'QuickView', parameters: { view: QUICK_VIEW_REGISTRY_ID } };次に、
CardViewクラスに次のコードを追加して、onAction()メソッドを実装します。 これは、CardView の実装で送信アクションが発生するたびに実行されます。cardButtons()メソッドでリコール、ボタンのidプロパティを正または負の数に設定して、画像の配列内を移動します。public onAction(action: IActionArguments): void { if (action.type !== 'Submit') { return; } let currentIndex = this.state.currentIndex; this.setState({ currentIndex: currentIndex + Number(action.id) }); }最後に、
stringsオブジェクトへの次の参照をコメントアウトまたは削除します。import * as strings from 'AceImageViewerAdaptiveCardExtensionStrings';
クイック ビューを更新する
ACE コンポーネントをテストする前の最後の手順は、QuickView を更新することです。 このシナリオでは、QuickView に現在の写真の詳細が表示されます。
VS Code で ./src/adaptiveCardExtensions/aceImageViewer/quickView/QuickView.ts ファイルを見つけて開きます。
既存のインポートに次の
importステートメントを追加します。import { IMarsRoverPhoto } from '../nasa.service';既存の
IQuickViewDataインターフェイスを削除します。QuickViewクラス内のIQuickViewDataへの残りの参照をすべてIMarsRoverPhotoに置き換えます。data()アクセサー メソッドの内容を次のように置き換えます。return this.state.roverPhotos[this.state.currentIndex];最後に、
stringsオブジェクトへの次の参照をコメントアウトまたは削除します。import * as strings from 'AceImageViewerAdaptiveCardExtensionStrings';
次に、アダプティブ カード テンプレートを更新します。
VS Code で ./src/adaptiveCardExtensions/aceImageViewer/quickView/template/QuickViewTemplate.json ファイルを見つけて開きます。
テンプレートの内容を次のコードに置き換えます。
{
  "$schema": "http://adaptivecards.io/schemas/adaptive-card.json",
  "version": "1.5",
  "type": "AdaptiveCard",
  "body": [
    {
      "type": "Image",
      "url": "${img_src}"
    },
    {
      "type": "TextBlock",
      "text": "${rover.name} rover image #${id}",
      "horizontalAlignment": "Center"
    },
    {
      "type": "TextBlock",
      "text": "Photo Details",
      "spacing": "Medium",
      "separator": true,
      "size": "Large",
      "weight": "Bolder"
    },
    {
      "type": "FactSet",
      "facts": [
        {
          "title": "Rover:",
          "value": "${rover.name}"
        },
        {
          "title": "Camera:",
          "value": "${camera.full_name}"
        },
        {
          "title": "Date taken:",
          "value": "${earth_date} (sol ${sol})"
        }
      ]
    }
  ]
}
動的 ACE をテストする
ACE をテストして、イメージ ブラウザーを確認しましょう。
コンソールで、次のステートメントを実行します。
gulp serve --nobrowser
ブラウザーで、ACE をテストするサイトの SharePoint ホストワークベンチに移動します。 たとえば、サイトの URL が https://contoso.sharepoint.com/sites/MSLearningTeamされている場合、ホストされているワークベンチの URL は https://contoso.sharepoint.com/sites/MSLearningTeam/_layouts/15/workbench.aspx。
+ アイコンを選択し、ツールボックスから AceImageViewer を選択します。
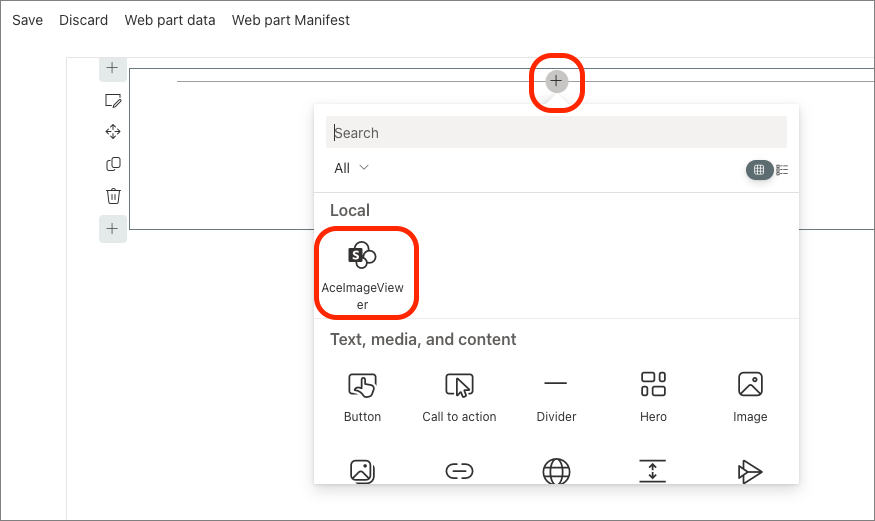
コンポーネントの既定のエクスペリエンスでは、Mars のイメージが使用されていることに注意してください。 これは、Mars sol セットがないためです。
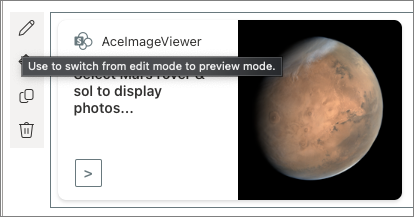
SPFx Web パーツと同様に、ACE コンポーネントの上にマウス ポインターを置き、鉛筆アイコンを選択してプロパティ ウィンドウを開くことができます。
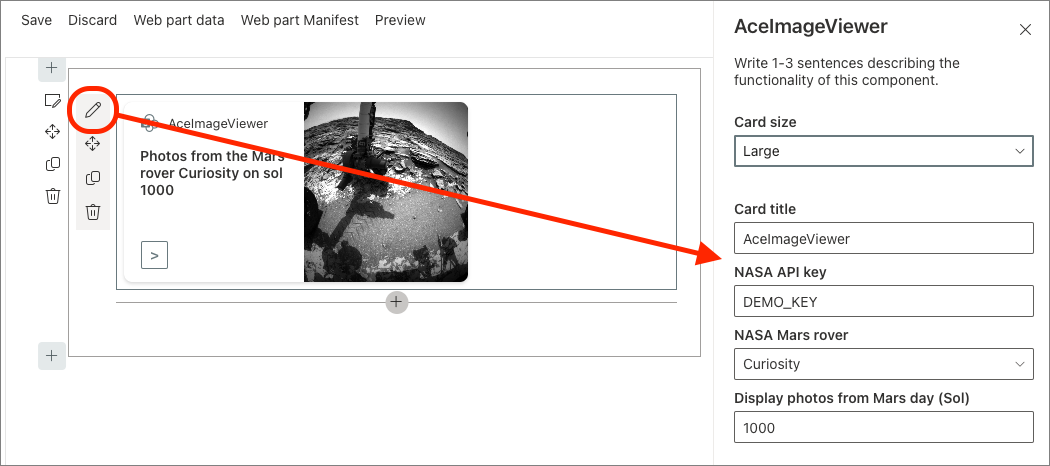
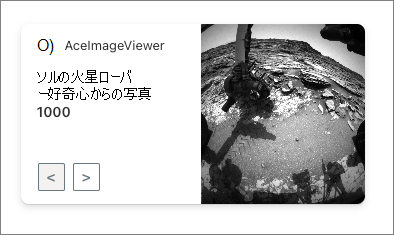
Mars sol を 1000 に設定し、右上隅の [X ] を選択してプロパティ ウィンドウを閉じ、ページの右上隅にある [プレビュー ] リンクを選択してページを表示モードにします。
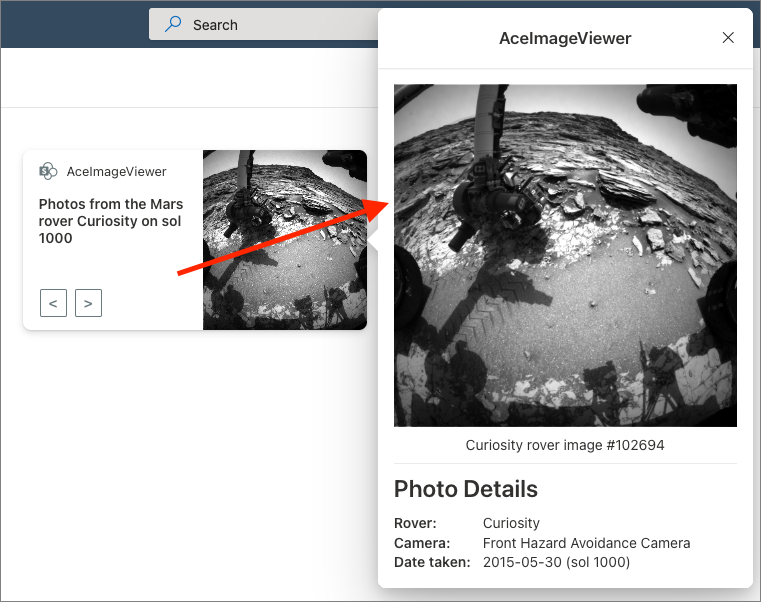
CardView で指定されたボタンを使用して、画像をスクロールします。 イメージのトリミングされたバージョンがイメージ カードの CardView に表示されます
マウスを使用して、カード上の任意の場所を選択します。どちらのボタンも選択しません。 クイックビューには、撮影されたタイミングに関する詳細を含む、トリミングされていない写真が表示されます。
この演習では、選択した Mars ローバーのカメラの 1 つによって撮影された画像を表示するイメージ カード テンプレートを使用して、SharePoint Framework (SPFx) アダプティブ カード拡張機能 (ACE) を作成しました。