コンテナー内のファイルの作成、更新、削除
この演習では、SharePoint Embedded Container にファイルを格納するように既存のプロジェクトを更新します。
Microsoft Graph 型宣言をプロジェクトに追加する
新しい React コンポーネントを作成する前に、まずプロジェクトを更新します。
この演習では、Microsoft Graph によって提供される型を使用します。 それらを含む npm パッケージをインストールしていないため、最初にインストールする必要があります。
コマンド ラインから、プロジェクトのルート フォルダーから次のコマンドを実行します。
npm install @microsoft/microsoft-graph-types -DE
React Containers コンポーネントを更新してファイルを表示する
前の演習を思い出して、選択したコンテナーの内容を表示するために使用されるコンテナー コンポーネントにプレースホルダーを残しました。
コンポーネントは作成 Files していませんが、まずコンポーネントを更新して、プレースホルダーを Containers 作成するコンポーネントに Files 置き換えます。
./src/components/containers.tsx ファイルを見つけて開きます。
次の import ステートメントを、ファイルの先頭にある既存のインポートの一覧に追加します。
import { Files } from "./files";
次に、ファイルの末尾付近にある次のプレースホルダー コードを見つけます。...
{selectedContainer && (`[[TOOD]] container "${selectedContainer.displayName}" contents go here`)}
… を次のコードに置き換えます。
{selectedContainer && (<Files container={selectedContainer} />)}
Files React コンポーネントを作成する
まず、コンテナーの内容を表示および管理する新しい React コンポーネントを作成します。
新しいファイル ./src/components/files.tsx を作成し、次のコードを追加します。 これは、すべてのインポートとコンポーネントのスケルトンを含む定型コンポーネントです。
import React, {
  useState,
  useEffect,
  useRef
} from 'react';
import { Providers } from "@microsoft/mgt-element";
import {
  AddRegular, ArrowUploadRegular,
  FolderRegular, DocumentRegular,
  SaveRegular, DeleteRegular,
} from '@fluentui/react-icons';
import {
  Button, Link, Label, Spinner,
  Input, InputProps, InputOnChangeData,
  Dialog, DialogActions, DialogContent, DialogBody, DialogSurface, DialogTitle, DialogTrigger,
  DataGrid, DataGridProps,
  DataGridHeader, DataGridHeaderCell,
  DataGridBody, DataGridRow,
  DataGridCell,
  TableColumnDefinition, createTableColumn,
  TableRowId,
  TableCellLayout,
  OnSelectionChangeData,
  SelectionItemId,
  Toolbar, ToolbarButton,
  makeStyles
} from "@fluentui/react-components";
import {
  DriveItem
} from "@microsoft/microsoft-graph-types-beta";
import { IContainer } from "./../common/IContainer";
require('isomorphic-fetch');

interface IFilesProps {
  container: IContainer;
}

interface IDriveItemExtended extends DriveItem {
  isFolder: boolean;
  modifiedByName: string;
  iconElement: JSX.Element;
  downloadUrl: string;
}

export const Files = (props: IFilesProps) => {

  // BOOKMARK 1 - constants & hooks

  // BOOKMARK 2 - handlers go here

  // BOOKMARK 3 - component rendering return (
  return
  (
    <div>
    </div>
  );
}

export default Files;
注:
コンポーネント内の // BOOKMARK # コメントに注目してください。 これらは、正しい場所にコードを追加していることを確認します。
選択したコンテナーの内容の一覧を表示する
最初に対処する必要があるのは、選択したコンテナーの内容を表示することです。 これを行うには、Fluent UI React ライブラリの DataGrid コンポーネントを使用します。
コメントの後に、 ステートメント内の <div> 要素内に次の return() マークアップを // BOOKMARK 3 追加します。
<DataGrid
  items={driveItems}
  columns={columns}
  getRowId={(item) => item.id}
  resizableColumns
  columnSizingOptions={columnSizingOptions}
  >
  <DataGridHeader>
    <DataGridRow>
      {({ renderHeaderCell }) => (
        <DataGridHeaderCell>{renderHeaderCell()}</DataGridHeaderCell>
      )}
    </DataGridRow>
  </DataGridHeader>
  <DataGridBody<IDriveItemExtended>>
    {({ item, rowId }) => (
      <DataGridRow<IDriveItemExtended> key={rowId}>
        {({ renderCell, columnId }) => (
          <DataGridCell>
            {renderCell(item)}
          </DataGridCell>
        )}
      </DataGridRow>
    )}
  </DataGridBody>
</DataGrid>
には DataGrid 、設定する必要があるコレクション、設定、メソッドへの参照がいくつか含まれています。 ビジュアルから始めて、データを取得します。
内の DataGrid 列は、設定したプロパティに従ってサイズを変更できます。 新しい定数 を作成し、 columnSizingOptionsコメントの直前にコードを // BOOKMARK 3 追加します。
const columnSizingOptions = {
  driveItemName: {
    minWidth: 150,
    defaultWidth: 250,
    idealWidth: 200
  },
  lastModifiedTimestamp: {
    minWidth: 150,
    defaultWidth: 150
  },
  lastModifiedBy: {
    minWidth: 150,
    defaultWidth: 150
  },
  actions: {
    minWidth: 250,
    defaultWidth: 250
  }
};
次に、 内のすべての列の構造とレンダリング設定を定義します DataGrid。 これを行うには、新しいコレクションを作成し、 columns作成する直前に columnSizingOptions 追加します。
const columns: TableColumnDefinition<IDriveItemExtended>[] = [
  createTableColumn({
    columnId: 'driveItemName',
    renderHeaderCell: () => {
      return 'Name'
    },
    renderCell: (driveItem) => {
      return (
        <TableCellLayout media={driveItem.iconElement}>
          <Link href={driveItem!.webUrl!} target='_blank'>{driveItem.name}</Link>
        </TableCellLayout>
      )
    }
  }),
  createTableColumn({
    columnId: 'lastModifiedTimestamp',
    renderHeaderCell: () => {
      return 'Last Modified'
    },
    renderCell: (driveItem) => {
      return (
        <TableCellLayout>
          {driveItem.lastModifiedDateTime}
        </TableCellLayout>
      )
    }
  }),
  createTableColumn({
    columnId: 'lastModifiedBy',
    renderHeaderCell: () => {
      return 'Last Modified By'
    },
    renderCell: (driveItem) => {
      return (
        <TableCellLayout>
          {driveItem.modifiedByName}
        </TableCellLayout>
      )
    }
  }),
  createTableColumn({
    columnId: 'actions',
    renderHeaderCell: () => {
      return 'Actions'
    },
    renderCell: (driveItem) => {
      return (
        <>
          <Button aria-label="Download"
            disabled={!selectedRows.has(driveItem.id as string)}
            icon={<SaveRegular />}>Download</Button>
          <Button aria-label="Delete"
            icon={<DeleteRegular />}>Delete</Button>
        </>
      )
    }
  }),
];
このコードでは、ユーティリティ メソッド createTableColumn() を使用して各列に ID を指定し、テーブル内のヘッダーセルと本文セルのレンダリング方法を指定します。
を DataGrid 構成したら、次の定数を追加して、既存のコードで使用されているプロパティを使用して React アプリの状態を管理します。
// BOOKMARK 1 のコメントの直前に次のコードを追加します。
const [driveItems, setDriveItems] = useState<IDriveItemExtended[]>([]);
const [selectedRows, setSelectedRows] = useState<Set<SelectionItemId>>(new Set<TableRowId>([1]));
次に、コンテナーからデータをフェッチして表示するハンドラーをいくつか追加しましょう。
次のハンドラーと React フックを追加して、選択したコンテナーの内容を取得します。 フックは useEffect 、コンポーネントが初めてレンダリングされたときと、コンポーネントの <Files />入力プロパティが変更されたときに実行されます。
// BOOKMARK 2 のコメントの直前に次のコードを追加します。
useEffect(() => {
  (async () => {
    loadItems();
  })();
}, [props]);

const loadItems = async (itemId?: string) => {
  try {
    const graphClient = Providers.globalProvider.graph.client;
    const driveId = props.container.id;
    const driveItemId = itemId || 'root';

    // get Container items at current level
    const graphResponse = await graphClient.api(`/drives/${driveId}/items/${driveItemId}/children`).get();
    const containerItems: DriveItem[] = graphResponse.value as DriveItem[]
    const items: IDriveItemExtended[] = [];
    containerItems.forEach((driveItem: DriveItem) => {
      items.push({
        ...driveItem,
        isFolder: (driveItem.folder) ? true : false,
        modifiedByName: (driveItem.lastModifiedBy?.user?.displayName) ? driveItem.lastModifiedBy!.user!.displayName : 'unknown',
        iconElement: (driveItem.folder) ? <FolderRegular /> : <DocumentRegular />,
        downloadUrl: (driveItem as any)['@microsoft.graph.downloadUrl']
      });
    });
    setDriveItems(items);
  } catch (error: any) {
    console.error(`Failed to load items: ${error.message}`);
  }
};
関数は loadItems 、Microsoft Graph クライアントを使用して、現在のフォルダー内のすべてのファイルの一覧を root 取得します。既定では、 フォルダーがまだ選択されていない場合は です。
その後、Microsoft Graph から返された の DriveItems コレクションを受け取り、後でコードを簡略化するためにさらにいくつかのプロパティを追加します。 メソッドの最後に、コンポーネントの再レンダリングを setDriveitems() トリガーする状態アクセサー メソッドを呼び出します。 は driveItems 、テーブルに情報が表示される理由を説明する プロパティに DataGrid.items 設定されます。
コンテナーの内容を一覧表示するレンダリングをテストする
次に、クライアント側の React アプリをテストして、コンポーネントに <Files /> 選択したコンテナーの内容が表示されていることを確認します。
プロジェクトのルート フォルダーのコマンド ラインから、次のコマンドを実行します。
npm run start
ブラウザーが読み込まれたら、使用しているのと同じ 職場および学校 アカウントを使用してサインインします。
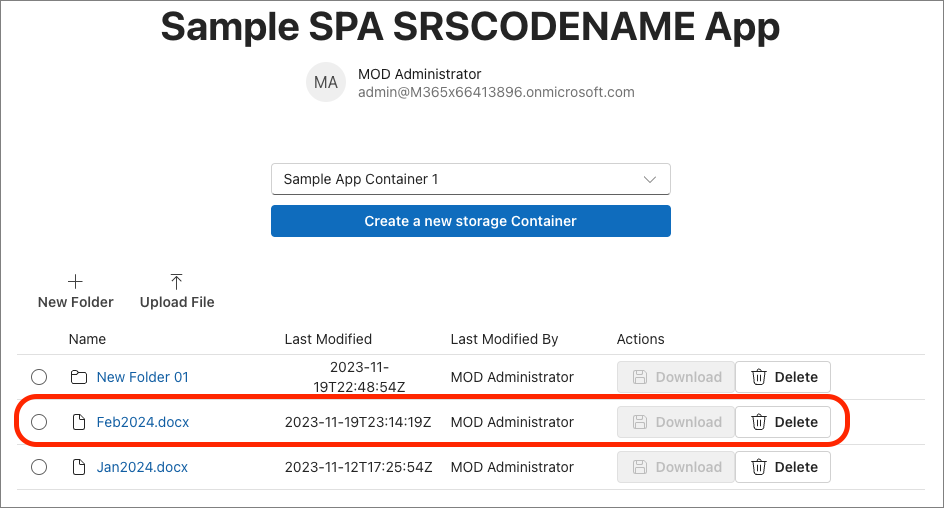
サインイン後、既存のコンテナーを選択します。 そのコンテナーに既にコンテンツが含まれる場合は、次のように表示されます。
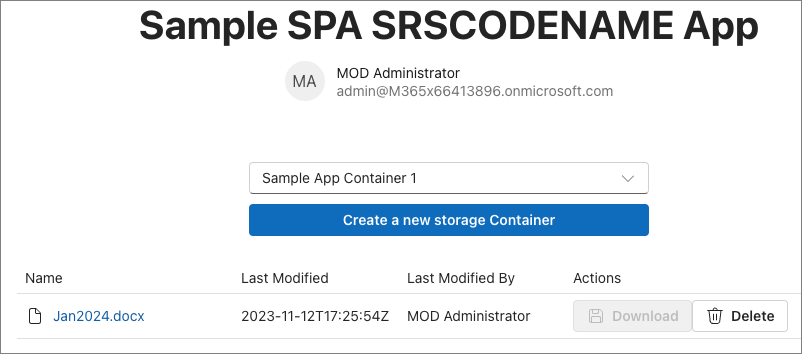
ファイルを選択すると、この場合は Word 文書が開き、新しいタブが開き、アイテムの URL が読み込まれます。 この例では、Word online でファイルを開きます。
ファイルのダウンロードのサポートを追加する
コンテンツ表示機能が完了したら、ファイルのダウンロードをサポートするようにコンポーネントを更新しましょう。
まず、コメントの直前に次のコードを // BOOKMARK 1 追加します。
const downloadLinkRef = useRef<HTMLAnchorElement>(null);
次に、 内の DataGrid 項目が選択されていることを確認してから、ダウンロードできるようにします。 それ以外の場合、[ ダウンロード ] ボタンは現在の状態で無効になります。
DataGridで、1 つの項目選択モード (selectionMode) をサポートするように設定する 3 つのプロパティを追加し、選択されている項目 (selectedItems)、および選択が変更されたときに実行する処理 (onSelectionChange) を追跡します。
<DataGrid
  ...
  selectionMode='single'
  selectedItems={selectedRows}
  onSelectionChange={onSelectionChange}>
次に、コメントの直前に次のハンドラーを // BOOKMARK 2 追加します。
const onSelectionChange: DataGridProps["onSelectionChange"] = (event: React.MouseEvent | React.KeyboardEvent, data: OnSelectionChangeData): void => {
  setSelectedRows(data.selectedItems);
}
リスト内の項目が選択されると、[ ダウンロード ] ボタンが無効になりなくなりました。
![項目が選択されている場合に有効な [ダウンロード] ボタンのスクリーンショット。](../../m365-developer/sharepoint-embedded-create-app/media/07-enabled-download-button.png)
ダウンロード オプションでは、非表示のハイパーリンクが使用されます。このハイパーリンクは、最初にプログラムによって選択した項目のダウンロード リンクを設定してから、プログラムによって次の操作を行います。
- ハイパーリンクの URL をアイテムのダウンロード URL に設定します。
- ハイパーリンクを選択します。
これにより、ユーザーのダウンロードがトリガーされます。
メソッドの開始 <div> 直後に、次のマークアップを return() 追加します。
<a ref={downloadLinkRef} href="" target="_blank" style={{ display: 'none' }} />
ここで、前に追加した既存 columns の定数を見つけて、 を createTableColumn 参照する を columnId: 'actions'見つけます。 プロパティに renderCell 、 を onClick 呼び出すハンドラーを追加します onDownloadItemClick。 完了すると、ボタンは次のようになります。
<Button aria-label="Download"
        disabled={!selectedRows.has(driveItem.id as string)}
        icon={<SaveRegular />}
        onClick={() => onDownloadItemClick(driveItem.downloadUrl)}>Download</Button>
最後に、前に追加した既存 onSelectionChange のイベント ハンドラーの直後に次のハンドラーを追加します。 これにより、前述の 2 つのプログラムによる手順が処理されます。
const onDownloadItemClick = (downloadUrl: string) => {
  const link = downloadLinkRef.current;
  link!.href = downloadUrl;
  link!.click();
}
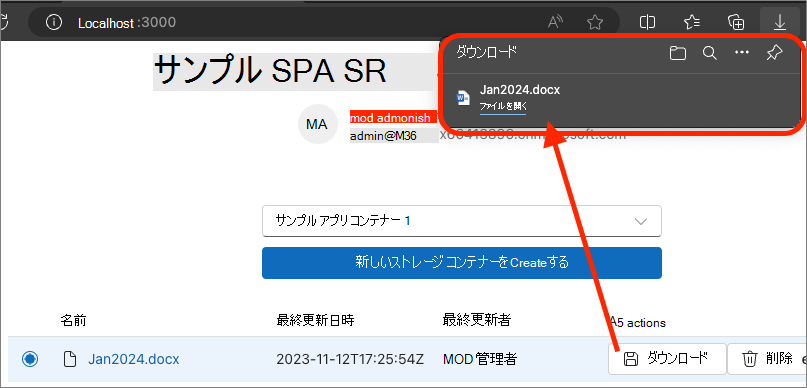
変更を保存し、ブラウザーを更新し、[ ダウンロード ] リンクを選択して、ファイルがダウンロードされるのを確認します。
コンテナーにフォルダーを作成する機能を追加する
フォルダーの作成と表示にサポートを <Files /> 追加して、コンポーネントのビルドを続けましょう。
まず、コメントの直前に次のコードを // BOOKMARK 1 追加します。 これにより、使用する必要な React 状態値が追加されます。
const [folderId, setFolderId] = useState<string>('root');
const [folderName, setFolderName] = useState<string>('');
const [creatingFolder, setCreatingFolder] = useState<boolean>(false);
const [newFolderDialogOpen, setNewFolderDialogOpen] = useState(false);
新しいフォルダーを作成するには、ツール バーでボタンを選択すると、ユーザーにダイアログが表示されます。
メソッド内で return() 、 の直前に <DataGrid>、次のコードを追加してダイアログを実装します。
<Toolbar>
  <ToolbarButton vertical icon={<AddRegular />} onClick={() => setNewFolderDialogOpen(true)}>New Folder</ToolbarButton>
</Toolbar>

<Dialog open={newFolderDialogOpen}>
  <DialogSurface>
    <DialogBody>
      <DialogTitle>Create New Folder</DialogTitle>
      <DialogContent className={styles.dialogContent}>
        <Label htmlFor={folderName}>Folder name:</Label>
        <Input id={folderName} className={styles.dialogInputControl} autoFocus required
          value={folderName} onChange={onHandleFolderNameChange}></Input>
        {creatingFolder &&
          <Spinner size='medium' label='Creating folder...' labelPosition='after' />
        }
      </DialogContent>
      <DialogActions>
        <DialogTrigger disableButtonEnhancement>
          <Button appearance="secondary" onClick={() => setNewFolderDialogOpen(false)} disabled={creatingFolder}>Cancel</Button>
        </DialogTrigger>
        <Button appearance="primary"
          onClick={onFolderCreateClick}
          disabled={creatingFolder || (folderName === '')}>Create Folder</Button>
      </DialogActions>
    </DialogBody>
  </DialogSurface>
</Dialog>
ダイアログでは、まだ追加していないカスタム スタイルが使用されます。 これを行うには、最初にコンポーネントの宣言の直前に次のコードを Files 追加します。
const useStyles = makeStyles({
  dialogInputControl: {
    width: '400px',
  },
  dialogContent: {
    display: 'flex',
    flexDirection: 'column',
    rowGap: '10px',
    marginBottom: '25px'
  }
});
次に、コンポーネントの メソッドの直前に return() 次のコードを追加します。
const styles = useStyles();
UI が設定されたので、いくつかのハンドラーを追加する必要があります。 コメントの直前に次のハンドラーを // BOOKMARK 2 追加します。 ダイアログを開き、新しいフォルダーの名前の値を保存し、ダイアログでボタンを選択するとどうなるかを処理します。
const onFolderCreateClick = async () => {
  setCreatingFolder(true);

  const currentFolderId = folderId;
  const graphClient = Providers.globalProvider.graph.client;
  const endpoint = `/drives/${props.container.id}/items/${currentFolderId}/children`;
  const data = {
    "name": folderName,
    "folder": {},
    "@microsoft.graph.conflictBehavior": "rename"
  };
  await graphClient.api(endpoint).post(data);

  await loadItems(currentFolderId);

  setCreatingFolder(false);
  setNewFolderDialogOpen(false);
};

const onHandleFolderNameChange: InputProps["onChange"] = (event: React.ChangeEvent<HTMLInputElement>, data: InputOnChangeData): void => {
  setFolderName(data?.value);
};
変更を保存し、ブラウザーを更新し、コンテナーの内容の上にある [新しいフォルダー] ボタンを選択します。
![[新しいフォルダー] ボタンを示すスクリーンショット。](../../m365-developer/sharepoint-embedded-create-app/media/07-new-folder-button.png)
[ 新しいフォルダー ] ボタンを選択し、名前を入力し、ダイアログで [フォルダーの作成 ] ボタンを選択します。
![[新しいフォルダーの作成] ダイアログのスクリーンショット。](../../m365-developer/sharepoint-embedded-create-app/media/07-new-folder-dialog.png)
フォルダーが作成されると、そのフォルダーがコンテンツ テーブルに一覧表示されます。
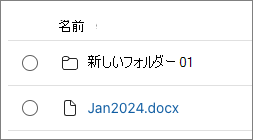
コンポーネントにもう 1 つの変更を加える必要があります。 現在、フォルダーを選択すると、アプリを除外する新しいタブで URL が起動されます。 それは私たちが望むものではありません.... フォルダーにドリルインする必要があります。
前に追加した既存columnsの定数を見つけて、 を参照columnId: 'driveItemName'する をcreateTableColumn見つけることで、これを修正しましょう。 プロパティで renderCell 、既存 <Link /> のコンポーネントを次のコードに置き換えます。 これにより、レンダリングされている現在のアイテムがフォルダーまたはファイルかどうかに基づいて、2 つのリンクが生成されます。
{(!driveItem.isFolder)
  ? <Link href={driveItem!.webUrl!} target='_blank'>{driveItem.name}</Link>
  : <Link onClick={() => {
    loadItems(driveItem.id);
    setFolderId(driveItem.id as string)
  }}>{driveItem.name}</Link>
}
フォルダーを選択すると、アプリにフォルダーの内容が表示されます。
ファイルまたはフォルダーを削除する機能を追加する
次の手順では、コンテナーからフォルダーまたはファイルを削除する機能を追加します。
これを行うには、まず、コメントの前に次のコードを既存の呼び出しの useState() 一覧に // BOOKMARK 1 追加します
const [deleteDialogOpen, setDeleteDialogOpen] = useState(false);
次に、ユーザーが [削除 ] ボタンを選択したときに確認として機能するダイアログを追加します。 メソッド内の既存 <Dialog> のコンポーネントの直後に、次のコードを return() 追加します。
<Dialog open={deleteDialogOpen} modalType='modal' onOpenChange={() => setSelectedRows(new Set<TableRowId>([0]))}>
  <DialogSurface>
    <DialogBody>
      <DialogTitle>Delete Item</DialogTitle>
      <DialogContent>
        <p>Are you sure you want to delete this item?</p>
      </DialogContent>
      <DialogActions>
        <DialogTrigger>
          <Button
            appearance='secondary'
            onClick={() => setDeleteDialogOpen(false)}>Cancel</Button>
        </DialogTrigger>
        <Button
          appearance='primary'
          onClick={onDeleteItemClick}>Delete</Button>
      </DialogActions>
    </DialogBody>
  </DialogSurface>
</Dialog>
[削除] ボタンを更新して、選択したときに何かを行います。 前に追加した既存 columns の定数を見つけて、 を createTableColumn 参照する を columnId: 'actions'見つけます。 プロパティに renderCell 、 を onClick 呼び出すハンドラーを追加します onDeleteDialogOpen。 完了すると、ボタンは次のようになります。
<Button aria-label="Delete"
        icon={<DeleteRegular />}
        onClick={() => setDeleteDialogOpen(true)}>Delete</Button>
最後に、コメントの直前に次のコードを // BOOKMARK 2 追加して、現在選択されている項目の削除を処理します。
const onDeleteItemClick = async () => {
  const graphClient = Providers.globalProvider.graph.client;
  const endpoint = `/drives/${props.container.id}/items/${selectedRows.entries().next().value[0]}`;
  await graphClient.api(endpoint).delete();
  await loadItems(folderId || 'root');
  setDeleteDialogOpen(false);
}
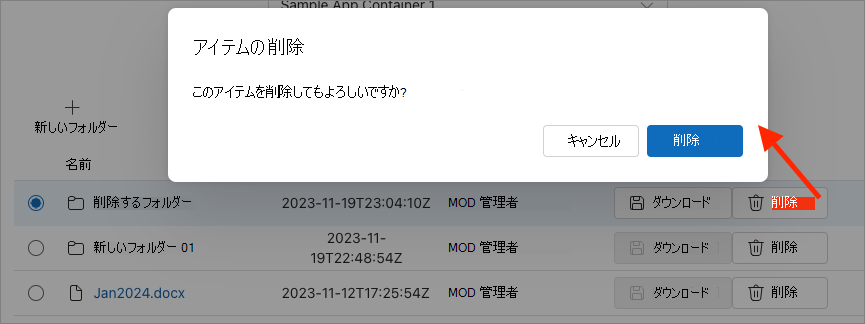
変更内容を保存し、ブラウザーを更新します。 コレクション内の既存のフォルダーまたはファイルの 1 つにある [ 削除 ] ボタンを選択します。 確認ダイアログが表示され、ダイアログで [削除 ] ボタンを選択すると、コンテナーのコンテンツ テーブルが更新され、アイテムが削除されたことを示します。
コンテナーにファイルをアップロードする機能を追加する
最後の手順では、コンテナーまたはコンテナー内のフォルダーにファイルをアップロードする機能を追加します。
まず、コメントの直前に次のコードを // BOOKMARK 1 追加します。
const uploadFileRef = useRef<HTMLInputElement>(null);
次に、非表示 <Input> のコントロールを使用して同様の手法を繰り返してファイルをアップロードします。 コンポーネントのメソッドの開始 <div> 直後に次の return() コードを追加します。
<input ref={uploadFileRef} type="file" onChange={onUploadFileSelected} style={{ display: 'none' }} />
ツール バーにボタンを追加して、ファイルの選択ダイアログをトリガーします。 これを行うには、新しいフォルダーを追加する既存のツール バー ボタンの直後に次のコードを追加します。
<ToolbarButton vertical icon={<ArrowUploadRegular />} onClick={onUploadFileClick}>Upload File</ToolbarButton>
最後に、コメントの直前に次のコードを追加して、 // BOOKMARK 2 2 つのイベント ハンドラーを追加します。
onUploadFileClick[ファイルのアップロード] ツール バー ボタンを選択するとハンドラーがトリガーされ、ユーザーがファイルをonUploadFileSelected選択するとハンドラーがトリガーされます。
const onUploadFileClick = () => {
  if (uploadFileRef.current) {
    uploadFileRef.current.click();
  }
};

const onUploadFileSelected = async (event: React.ChangeEvent<HTMLInputElement>) => {
  const file = event.target.files![0];
  const fileReader = new FileReader();
  fileReader.readAsArrayBuffer(file);
  fileReader.addEventListener('loadend', async (event: any) => {
    const graphClient = Providers.globalProvider.graph.client;
    const endpoint = `/drives/${props.container.id}/items/${folderId || 'root'}:/${file.name}:/content`;
    graphClient.api(endpoint).putStream(fileReader.result)
      .then(async (response) => {
        await loadItems(folderId || 'root');
      })
      .catch((error) => {
        console.error(`Failed to upload file ${file.name}: ${error.message}`);
      });
  });
  fileReader.addEventListener('error', (event: any) => {
    console.error(`Error on reading file: ${event.message}`);
  });
};
ファイルを保存し、ブラウザーを更新し、[ ファイルのアップロード ] ボタンを選択して、変更をテストします。
![[ファイルのアップロード] ボタンのスクリーンショット。](../../m365-developer/sharepoint-embedded-create-app/media/07-upload-file.png)
ファイルを選択すると、アプリによってファイルがアップロードされ、コンテナーの内容のテーブルが更新されます。
概要
この演習では、SharePoint Embedded Container にファイルを格納および管理するために、既存のプロジェクトを更新しました。