演習 - 環境を設定する
重要
この演習を行うには、独自の Azure サブスクリプションが必要です。また、料金が発生することがあります。 Azure サブスクリプションをお持ちでない場合は、開始する前に無料アカウントを作成してください。
おもちゃ会社の Web サイトのワークフローで作業を開始する前に、環境を構成する必要があります。 このユニットでは、このモジュールの残りの部分を完了するために Azure と GitHub 環境が設定されていることを確認します。
これらの目的を達成するには、次の作業を行います。
- このモジュール向けに GitHub リポジトリを設定します。
- プロジェクトのリポジトリをコンピューターにクローンする。
- Microsoft Entra ID で 2 つのワークロード ID を作成します。
- Azure で 2 つのリソース グループを作成します。
- GitHub でシークレットと環境を作成します。
GitHub リポジトリを取得する
ここで、このモジュールの残りの部分を完了するために GitHub リポジトリが設定されていることを確認します。 テンプレート リポジトリに基づいて新しいリポジトリを作成することによって、設定します。 テンプレート リポジトリには、このモジュールを開始するために必要なファイルが含まれています。
このラーニング パスのモジュールは、段階的に進めるラーニング パスの一部となっています。 各モジュールには、学習のための、関連する GitHub テンプレート リポジトリがあります。
ヒント
ラーニング パスで前のモジュールを完了した場合でも、これらの手順に従って新しいリポジトリを作成し、必ず新しい名前を付けてください。
テンプレート リポジトリから開始する
GitHub リポジトリを設定するテンプレートを実行します。
GitHub サイトで、次の手順を実行して、テンプレートからリポジトリを作成します。
[このテンプレートを使用]>[新しいリポジトリの作成] の順に選択します。
![強調表示されている [このテンプレートを使用] ボタンのあるテンプレート リポジトリが示されている GitHub インターフェイスのスクリーンショット。](media/4-template.png)
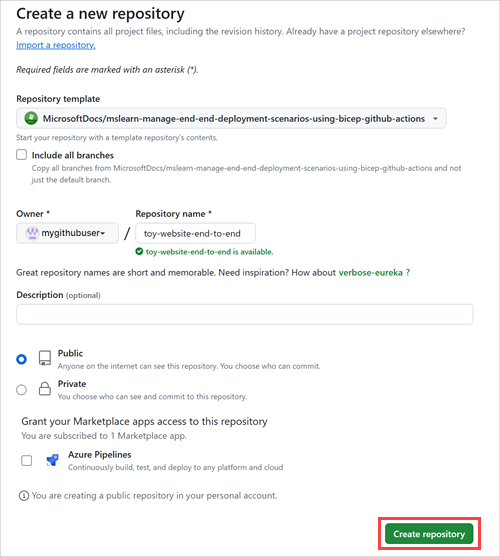
[所有者] ドロップダウン リストから GitHub ユーザー名を選択します。
新しいプロジェクトに、toy-website-end-to-end などのリポジトリ名を入力します。
[Public](パブリック) オプションを選択します
独自のリポジトリを作成するときに、プライベートにしたい場合もあります。 このモジュールでは、パブリック リポジトリと GitHub Enterprise アカウントでのみ動作する、いくつかの GitHub 機能を使用して作業します。
[Create repository] (リポジトリの作成) を選択します。
重要
このモジュールの最後の演習には、重要なクリーンアップ ステップが含まれています。 クリーンアップ手順は、このモジュールを完了しなかった場合でも必ず行ってください。
リポジトリの複製
これで、独自のアカウントでテンプレート リポジトリのコピーが作成されました。 このリポジトリをローカルにクローンすると、作業を開始できるようになります。
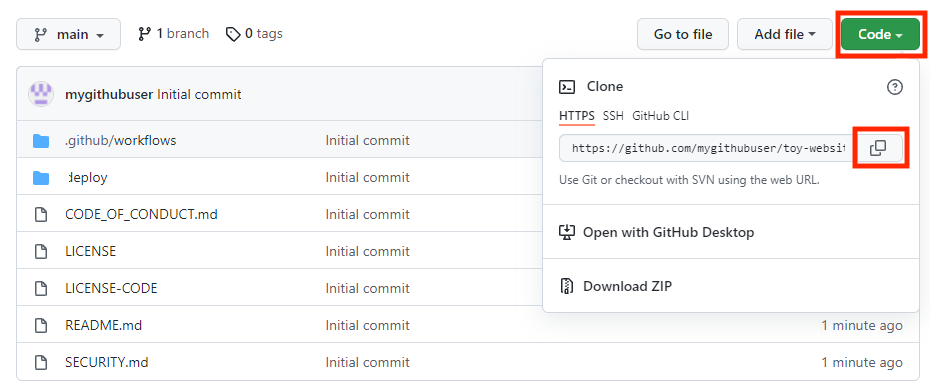
[コード] を選択して、コピー アイコンを選択します。
Visual Studio Code を開きます。
[ターミナル]>[新しいターミナル] を選択して、Visual Studio Code ターミナル ウィンドウを開きます。 このウィンドウは通常、画面の下部に表示されます。
ターミナルで、ローカル コンピューター上の GitHub リポジトリをクローンするディレクトリに移動します。 たとえば、toy-website-environments フォルダーにリポジトリをクローンするには、次のコマンドを実行します。
cd toy-website-end-to-endgit cloneを入力し、先ほどコピーした URL を貼り付けます。 コマンドは、次のようになります。git clone https://github.com/mygithubuser/toy-website-end-to-end.gitVisual Studio Code ターミナルで次のコマンドを実行して、リポジトリ フォルダー内の Visual Studio Code を再度開きます。
code -r toy-website-end-to-end
Azure へのサインイン
Azure でリソース グループを使用するには、Visual Studio Code ターミナルから Azure アカウントにサインインします。 Azure CLI ツールがインストールされていることを確認してください。
[ターミナル] メニューで、[新しいターミナル] を選択します。 通常、ターミナル ウィンドウは画面の下半分に表示されます。
ターミナル ウィンドウの右側に示されているように、通常、既定のシェルは pwsh です。

[起動プロファイル] ドロップダウン リストを選択し、[Azure Cloud Shell (Bash)] を選択します。
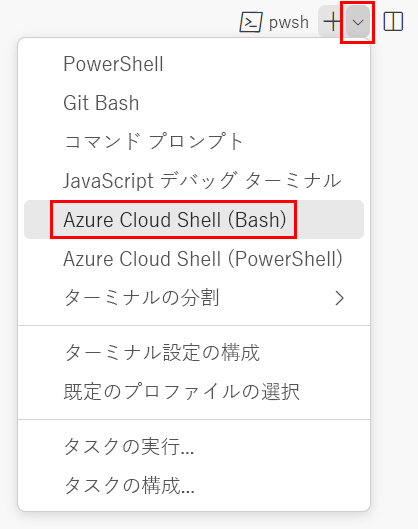
新しいシェルが開きます。
Azure CLI を使用して Azure にサインインする
Visual Studio Code のターミナルで次のコマンドを実行して、Azure にサインインします。
az login開いたブラウザーで、Azure アカウントにサインインします。
Azure でリソース グループを使用するには、Visual Studio Code ターミナルから Azure アカウントにサインインします。 Azure PowerShell がインストールされていることを確認します。
[ターミナル] メニューで、[新しいターミナル] を選択します。 通常、ターミナル ウィンドウは画面の下半分に表示されます。
ターミナル ウィンドウの右側に示されているように、通常、既定のシェルは pwsh です。

[起動プロファイル] ドロップダウン リストを選択し、[Azure Cloud Shell (PowerShell)] を選択します。
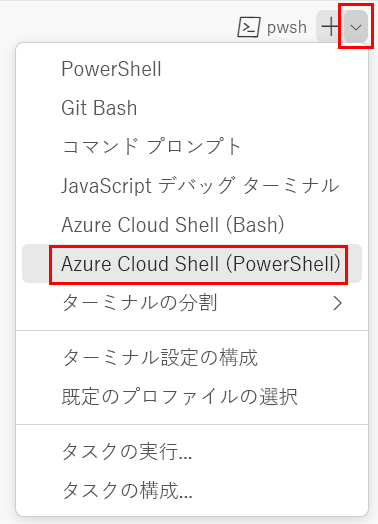
新しいシェルが開きます。
Azure PowerShell を使用して Azure にサインインする
Visual Studio Code のターミナルで次のコマンドを実行して、Azure にサインインします。
Connect-AzAccount開いたブラウザーで、Azure アカウントにサインインします。
2 つのワークロード ID を作成する
次に、Microsoft Entra ID で 2 つのワークロード ID を作成します。1 つはテスト環境用、もう 1 つは運用環境用です。
次のコードを実行して、GitHub ユーザー名とリポジトリ名の変数を定義します。
mygithubuserは必ず、この演習で前にメモした GitHub ユーザー名に置き換えてください。 また、正しい GitHub リポジトリ名を指定するようにしてください。githubOrganizationName='mygithubuser' githubRepositoryName='toy-website-end-to-end'テスト環境へのデプロイのワークロード ID を作成します。 ワークロード ID には 2 つのフェデレーション資格情報が必要です。1 つは、ワークフローが "検証" ジョブを実行するときに使用されます。このジョブは GitHub 環境に関連付けられていないためです。 2 つ目は、ワークフローが "デプロイ" ジョブを実行するときに使用されます。これは、"テスト" GitHub 環境に対して実行されます。
testApplicationRegistrationDetails=$(az ad app create --display-name 'toy-website-end-to-end-test')
testApplicationRegistrationObjectId=$(echo $testApplicationRegistrationDetails | jq -r '.id')
testApplicationRegistrationAppId=$(echo $testApplicationRegistrationDetails | jq -r '.appId')

az ad app federated-credential create \
   --id $testApplicationRegistrationObjectId \
   --parameters "{\"name\":\"toy-website-end-to-end-test\",\"issuer\":\"https://token.actions.githubusercontent.com\",\"subject\":\"repo:${githubOrganizationName}/${githubRepositoryName}:environment:Test\",\"audiences\":[\"api://AzureADTokenExchange\"]}"

az ad app federated-credential create \
   --id $testApplicationRegistrationObjectId \
   --parameters "{\"name\":\"toy-website-end-to-end-test-branch\",\"issuer\":\"https://token.actions.githubusercontent.com\",\"subject\":\"repo:${githubOrganizationName}/${githubRepositoryName}:ref:refs/heads/main\",\"audiences\":[\"api://AzureADTokenExchange\"]}"
次のコードを実行して、運用環境用として、同様のワークロード ID とフェデレーション資格情報を作成します。
productionApplicationRegistrationDetails=$(az ad app create --display-name 'toy-website-end-to-end-production')
productionApplicationRegistrationObjectId=$(echo $productionApplicationRegistrationDetails | jq -r '.id')
productionApplicationRegistrationAppId=$(echo $productionApplicationRegistrationDetails | jq -r '.appId')

az ad app federated-credential create \
   --id $productionApplicationRegistrationObjectId \
   --parameters "{\"name\":\"toy-website-end-to-end-production\",\"issuer\":\"https://token.actions.githubusercontent.com\",\"subject\":\"repo:${githubOrganizationName}/${githubRepositoryName}:environment:Production\",\"audiences\":[\"api://AzureADTokenExchange\"]}"

az ad app federated-credential create \
   --id $productionApplicationRegistrationObjectId \
   --parameters "{\"name\":\"toy-website-end-to-end-production-branch\",\"issuer\":\"https://token.actions.githubusercontent.com\",\"subject\":\"repo:${githubOrganizationName}/${githubRepositoryName}:ref:refs/heads/main\",\"audiences\":[\"api://AzureADTokenExchange\"]}"
次のコードを実行して、GitHub ユーザー名とリポジトリ名の変数を定義します。
mygithubuserは必ず、この演習で前にメモした GitHub ユーザー名に置き換えてください。 また、正しい GitHub リポジトリ名を指定するようにしてください。$githubOrganizationName = 'mygithubuser' $githubRepositoryName = 'toy-website-end-to-end'次のコードを実行して、テスト環境用として、ワークロード ID を作成し、GitHub リポジトリに関連付けます。
$testApplicationRegistration = New-AzADApplication -DisplayName 'toy-website-end-to-end-test'
New-AzADAppFederatedCredential `
   -Name 'toy-website-end-to-end-test' `
   -ApplicationObjectId $testApplicationRegistration.Id `
   -Issuer 'https://token.actions.githubusercontent.com' `
   -Audience 'api://AzureADTokenExchange' `
   -Subject "repo:$($githubOrganizationName)/$($githubRepositoryName):environment:Test"
New-AzADAppFederatedCredential `
   -Name 'toy-website-end-to-end-test-branch' `
   -ApplicationObjectId $testApplicationRegistration.Id `
   -Issuer 'https://token.actions.githubusercontent.com' `
   -Audience 'api://AzureADTokenExchange' `
   -Subject "repo:$($githubOrganizationName)/$($githubRepositoryName):ref:refs/heads/main"
次のコードを実行して、運用環境用として、同様のプロセスを実行します。
$productionApplicationRegistration = New-AzADApplication -DisplayName 'toy-website-end-to-end-production'
New-AzADAppFederatedCredential `
   -Name 'toy-website-end-to-end-production' `
   -ApplicationObjectId $productionApplicationRegistration.Id `
   -Issuer 'https://token.actions.githubusercontent.com' `
   -Audience 'api://AzureADTokenExchange' `
   -Subject "repo:$($githubOrganizationName)/$($githubRepositoryName):environment:Production"
New-AzADAppFederatedCredential `
   -Name 'toy-website-end-to-end-production-branch' `
   -ApplicationObjectId $productionApplicationRegistration.Id `
   -Issuer 'https://token.actions.githubusercontent.com' `
   -Audience 'api://AzureADTokenExchange' `
   -Subject "repo:$($githubOrganizationName)/$($githubRepositoryName):ref:refs/heads/main"
Azure で 2 つのリソース グループを作成し、ワークロード ID にアクセス権を付与する
次に、各環境用のリソース グループを作成します。 また、このプロセスでは、それぞれのワークロード ID にリソース グループの "共同作成者" ロールを付与し、ワークフローでリソース グループにデプロイできるようにします。
テスト環境のリソース グループを作成し、ワークロード ID にそれへのアクセス権を付与するには、Visual Studio Code ターミナルで次の Azure CLI コマンドを実行します。
testResourceGroupResourceId=$(az group create --name ToyWebsiteTest --location westus3 --query id --output tsv)

az ad sp create --id $testApplicationRegistrationObjectId
az role assignment create \
   --assignee $testApplicationRegistrationAppId \
   --role Contributor \
   --scope $testResourceGroupResourceId
同様のプロセスを実行して、運用環境のリソース グループを作成します。
productionResourceGroupResourceId=$(az group create --name ToyWebsiteProduction --location westus3 --query id --output tsv)

az ad sp create --id $productionApplicationRegistrationObjectId
az role assignment create \
   --assignee $productionApplicationRegistrationAppId \
   --role Contributor \
   --scope $productionResourceGroupResourceId
テスト環境のリソース グループを作成し、ワークロード ID にそれへのアクセス権を付与するには、Visual Studio Code ターミナルで次の Azure PowerShell コマンドを実行します。
$testResourceGroup = New-AzResourceGroup -Name ToyWebsiteTest -Location westus3

New-AzADServicePrincipal -AppId $($testApplicationRegistration.AppId)
New-AzRoleAssignment `
   -ApplicationId $($testApplicationRegistration.AppId) `
   -RoleDefinitionName Contributor `
   -Scope $($testResourceGroup.ResourceId)
同様のプロセスを実行して、運用環境のリソース グループを作成します。
$productionResourceGroup = New-AzResourceGroup -Name ToyWebsiteProduction -Location westus3

New-AzADServicePrincipal -AppId $($productionApplicationRegistration.AppId)
New-AzRoleAssignment `
   -ApplicationId $($productionApplicationRegistration.AppId) `
   -RoleDefinitionName Contributor `
   -Scope $($productionResourceGroup.ResourceId)
GitHub シークレットを準備する
次のコードを実行して、GitHub シークレットとして作成する必要がある値を出力します。
echo "AZURE_CLIENT_ID_TEST: $testApplicationRegistrationAppId"
echo "AZURE_CLIENT_ID_PRODUCTION: $productionApplicationRegistrationAppId"
echo "AZURE_TENANT_ID: $(az account show --query tenantId --output tsv)"
echo "AZURE_SUBSCRIPTION_ID: $(az account show --query id --output tsv)"
$azureContext = Get-AzContext
Write-Host "AZURE_CLIENT_ID_TEST: $($testApplicationRegistration.AppId)"
Write-Host "AZURE_CLIENT_ID_PRODUCTION: $($productionApplicationRegistration.AppId)"
Write-Host "AZURE_TENANT_ID: $($azureContext.Tenant.Id)"
Write-Host "AZURE_SUBSCRIPTION_ID: $($azureContext.Subscription.Id)"
GitHub シークレットを作成する
2 つのワークロード ID と、それらのデプロイ先にできるリソース グループを作成しました。 次に、GitHub Actions でシークレットを作成します。
ブラウザーで GitHub リポジトリに移動します。
[設定]>[シークレットと変数]>[アクション] の順に選択します。
[New repository secret](新しいリポジトリ シークレット) を選択します。
![GitHub インターフェイスの [Secrets]\(シークレット\) ページのスクリーンショット。[Create repository secret]\(リポジトリ シークレットの作成\) ボタンが強調表示されています。](../includes/media/github-create-repository-secret.png)
シークレットに AZURE_CLIENT_ID_TEST という名前を付けます。
[値] フィールドに、ターミナル出力の最初の行の GUID を貼り付けます。 値には、
AZURE_CLIENT_ID_TEST、コロン、スペースを含めないでください。[Add secret](シークレットの追加) を選択します。
![[New Secret]\(新しいシークレット\) ページが表示されている GitHub インターフェイスのスクリーンショット。名前と値が入力され、[Add Secret]\(シークレットの追加\) ボタンが強調表示されています。](../includes/media/github-create-repository-secret-details-test-environment.png)
このプロセスを繰り返して AZURE_CLIENT_ID_PRODUCTION、AZURE_TENANT_ID、AZURE_SUBSCRIPTION_ID のシークレットを作成します。値は、ターミナル出力の対応するフィールドからコピーします。
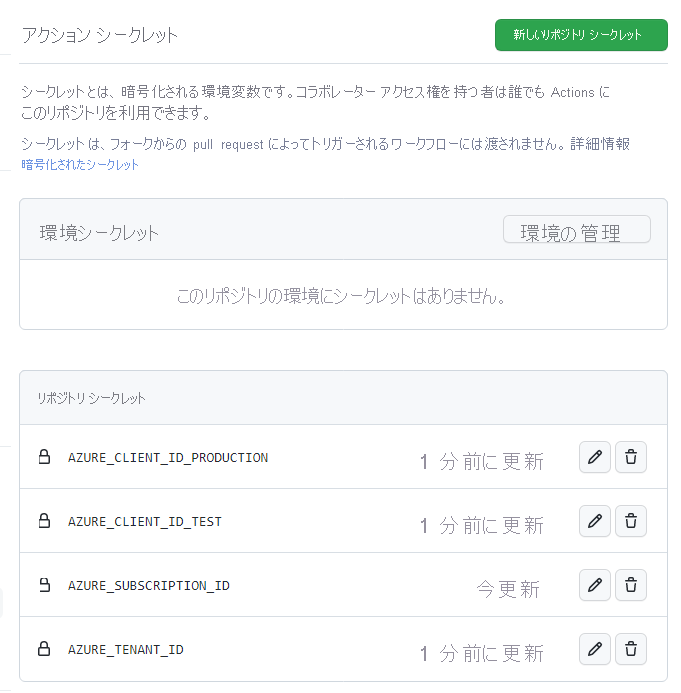
シークレットの一覧に、現在 4 つのシークレットがすべて表示されていることを確認します。
GitHub で環境を作成する
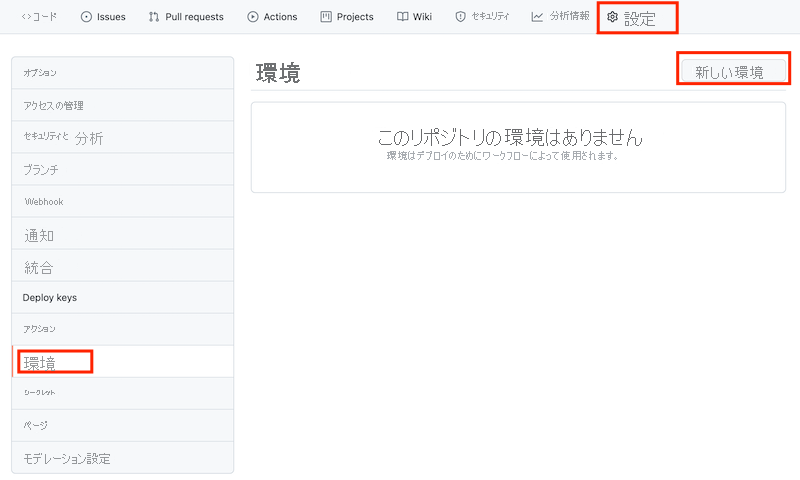
ブラウザーで、[設定]>[環境] と移動します。
[New environment] (新しい環境) を選択します。
環境名として「Test」と入力します。
![Test という名前の新しい環境の GitHub ページのスクリーンショット。[環境の構成] ボタンが含まれています。](media/4-environments-new-details-test.png)
[環境の構成] を選択します。
[環境] を選択して、環境の一覧に戻ります。
![Test という名前の新しい環境の GitHub ページのスクリーンショット。[環境] リンクが含まれています。](media/4-environments-new-configure-test.png)
手順を繰り返して、Production という名前の環境を作成します。
Note
このラーニング パスの前のモジュールでは、保護ルールを運用環境に追加しました。 このモジュールでは、わかりやすくするために、保護ルールをスキップします。 ただし必要であれば、保護ルールは自分で追加できます。