演習: ストレージ アカウントとデータベースをシード処理する
Web サイトのアプリケーションをビルドして Bicep ファイルで定義されている Azure App Service アプリにデプロイするようにパイプラインを更新しました。 ただし、データベースがまだ動作していないため、スモーク テスト ステージが失敗しています。 このユニットでは、Azure SQL の新しい論理サーバーとデータベースをデプロイし、データベースのスキーマをビルドしてデプロイするようにパイプラインを構成します。 また、チームが Web サイトを試すことができるように、パイプラインを更新してテスト環境用のサンプル製品データをいくつか追加します。
このプロセスで、次のタスクを実行します。
- BLOB コンテナーを Azure ストレージ アカウントに追加します。
- Azure SQL の論理サーバーとデータベースを追加します。
- データベース プロジェクトを DACPAC ファイルにビルドするようにビルド ステージを更新します。
- Azure SQL の論理サーバーとデータベースの変数グループに新しい変数を追加します。
- 新しい変数をパラメーター値として使用するようにデプロイ ステージを更新します。
- DACPAC ファイルをデプロイするための新しいパイプライン ステップを追加します。
- パイプラインを実行し、Web サイトを表示します。
ストレージ コンテナーを追加する
Bicep ファイルには既にストレージ アカウントが定義されていますが、BLOB コンテナーは定義されていません。 ここで、BLOB コンテナーを Bicep ファイルに追加します。 また、アプリケーションの構成設定を使用して、アプリケーションに対してストレージ アカウントと BLOB コンテナーの名前を指定します。 そうすることで、アプリはどのストレージ アカウントにアクセスするかを把握できます。
Visual Studio Code で、deploy フォルダーの main.bicep ファイルを開きます。
リソース名を定義する変数の下 (27 行目の近く) に、BLOB ストレージ コンテナーの名前の新しい変数定義を追加します。
var storageAccountImagesBlobContainerName = 'toyimages'storageAccountリソースを更新して BLOB コンテナーを定義します。resource storageAccount 'Microsoft.Storage/storageAccounts@2022-09-01' = { name: storageAccountName location: location kind: 'StorageV2' sku: environmentConfigurationMap[environmentType].storageAccount.sku resource blobService 'blobServices' = { name: 'default' resource storageAccountImagesBlobContainer 'containers' = { name: storageAccountImagesBlobContainerName properties: { publicAccess: 'Blob' } } } }アプリの
appSettingsプロパティを更新し、ストレージ アカウント名、BLOB エンドポイント、および BLOB コンテナー名の 3 つの新しいアプリケーション設定を追加します。resource appServiceApp 'Microsoft.Web/sites@2022-03-01' = { name: appServiceAppName location: location properties: { serverFarmId: appServicePlan.id httpsOnly: true siteConfig: { appSettings: [ { name: 'APPINSIGHTS_INSTRUMENTATIONKEY' value: applicationInsights.properties.InstrumentationKey } { name: 'APPLICATIONINSIGHTS_CONNECTION_STRING' value: applicationInsights.properties.ConnectionString } { name: 'ReviewApiUrl' value: reviewApiUrl } { name: 'ReviewApiKey' value: reviewApiKey } { name: 'StorageAccountName' value: storageAccount.name } { name: 'StorageAccountBlobEndpoint' value: storageAccount.properties.primaryEndpoints.blob } { name: 'StorageAccountImagesContainerName' value: storageAccount::blobService::storageAccountImagesBlobContainer.name } ] } } }ファイルの最後に、ストレージ アカウントと BLOB コンテナーの名前を公開するための新しい出力を追加します。
output storageAccountName string = storageAccount.name
output storageAccountImagesBlobContainerName string = storageAccount::blobService::storageAccountImagesBlobContainer.name
ファイルに加えた変更を保存します。
変更を Git リポジトリにコミットしますが、まだプッシュしないでください。 Visual Studio Code ターミナルで、次のコマンドを実行します。
git add .
git commit -m "Add storage container"
Azure SQL の論理サーバーとデータベースを追加します。
現時点では、Bicep ファイルは Azure SQL の論理サーバーもデータベースもデプロイしません。 このセクションでは、これらのリソースを Bicep ファイルに追加します。
main.bicep ファイルで、
reviewApiKeyパラメーターの下に 2 つの新しいパラメーターを追加します。@description('The administrator login username for the SQL server.') param sqlServerAdministratorLogin string @secure() @description('The administrator login password for the SQL server.') param sqlServerAdministratorLoginPassword stringリソース名を定義する変数の下に、Azure SQL の論理サーバーとデータベースの名前を定義するための新しい変数を追加します。
var sqlServerName = 'toy-website-${resourceNameSuffix}'
var sqlDatabaseName = 'Toys'
今追加した変数の下に、アプリケーションがデータベースにアクセスするための接続文字列を作成する新しい変数を定義します。
// Define the connection string to access Azure SQL.
var sqlDatabaseConnectionString = 'Server=tcp:${sqlServer.properties.fullyQualifiedDomainName},1433;Initial Catalog=${sqlDatabase.name};Persist Security Info=False;User ID=${sqlServerAdministratorLogin};Password=${sqlServerAdministratorLoginPassword};MultipleActiveResultSets=False;Encrypt=True;TrustServerCertificate=False;Connection Timeout=30;'
注意
わかりやすくするために、アプリケーションでは管理者のログインとパスワードを使用してデータベースにアクセスします。 ただし、これは運用ソリューションには適していません。 App Service マネージド ID を使用してデータベースにアクセスし、アプリケーションが必要とする最小限のアクセス許可をマネージ ID に付与することをお勧めします。 詳細へのリンクについては、「まとめ」ページを参照してください。
ファイルの最後の近くにある出力の上に、Azure SQL の論理サーバーとデータベースのリソースを追加します。
resource sqlServer 'Microsoft.Sql/servers@2022-05-01-preview' = { name: sqlServerName location: location properties: { administratorLogin: sqlServerAdministratorLogin administratorLoginPassword: sqlServerAdministratorLoginPassword } } resource sqlServerFirewallRule 'Microsoft.Sql/servers/firewallRules@2022-05-01-preview' = { parent: sqlServer name: 'AllowAllWindowsAzureIps' properties: { endIpAddress: '0.0.0.0' startIpAddress: '0.0.0.0' } } resource sqlDatabase 'Microsoft.Sql/servers/databases@2022-05-01-preview' = { parent: sqlServer name: sqlDatabaseName location: location sku: environmentConfigurationMap[environmentType].sqlDatabase.sku }environmentConfigurationMap変数を更新することで、データベースに使用するsku値を環境ごとに定義します。var environmentConfigurationMap = { Production: { appServicePlan: { sku: { name: 'S1' capacity: 1 } } storageAccount: { sku: { name: 'Standard_LRS' } } sqlDatabase: { sku: { name: 'Standard' tier: 'Standard' } } } Test: { appServicePlan: { sku: { name: 'F1' } } storageAccount: { sku: { name: 'Standard_GRS' } } sqlDatabase: { sku: { name: 'Standard' tier: 'Standard' } } } }データベース接続文字列用の別のアプリ設定を App Service アプリに追加します。
resource appServiceApp 'Microsoft.Web/sites@2022-03-01' = {
  name: appServiceAppName
  location: location
  properties: {
    serverFarmId: appServicePlan.id
    httpsOnly: true
    siteConfig: {
      appSettings: [
        {
          name: 'APPINSIGHTS_INSTRUMENTATIONKEY'
          value: applicationInsights.properties.InstrumentationKey
        }
        {
          name: 'APPLICATIONINSIGHTS_CONNECTION_STRING'
          value: applicationInsights.properties.ConnectionString
        }
        {
          name: 'ReviewApiUrl'
          value: reviewApiUrl
        }
        {
          name: 'ReviewApiKey'
          value: reviewApiKey
        }
        {
          name: 'StorageAccountName'
          value: storageAccount.name
        }
        {
          name: 'StorageAccountBlobEndpoint'
          value: storageAccount.properties.primaryEndpoints.blob
        }
        {
          name: 'StorageAccountImagesContainerName'
          value: storageAccount::blobService::storageAccountImagesBlobContainer.name
        }
        {
          name: 'SqlDatabaseConnectionString'
          value: sqlDatabaseConnectionString
        }
      ]
    }
  }
}
ファイルの末尾に、Azure SQL 論理サーバーのホスト名とデータベースの名前を公開するための出力を追加します。
output appServiceAppName string = appServiceApp.name
output appServiceAppHostName string = appServiceApp.properties.defaultHostName
output storageAccountName string = storageAccount.name
output storageAccountImagesBlobContainerName string = storageAccount::blobService::storageAccountImagesBlobContainer.name
output sqlServerFullyQualifiedDomainName string = sqlServer.properties.fullyQualifiedDomainName
output sqlDatabaseName string = sqlDatabase.name
ファイルに加えた変更を保存します。
データベース プロジェクトの新しいビルド ステップを追加する
Web サイト開発者は、Web サイト データベース テーブルをデプロイおよび構成するための Visual Studio データベース プロジェクトを準備済みです。 ここで、データベース プロジェクトを DACPAC ファイルにビルドしてパイプライン成果物として発行するようにパイプラインのビルド ステージを更新します。
deploy/pipeline-templates フォルダーの build.yml ファイルを開きます。
Visual Studio データベース プロジェクトをビルドするには、生成された DACPAC ファイルをステージング フォルダーにコピーし、それをパイプライン成果物として発行します。次のステップを追加します。
jobs:
- job: Build
  displayName: Build application and database
  pool:
    vmImage: windows-latest

  steps:

  # Build, copy, and publish the website.
  - task: DotNetCoreCLI@2
    displayName: Build publishable website
    inputs:
      command: 'publish'
      publishWebProjects: true

  - task: CopyFiles@2
    displayName: Copy publishable website
    inputs:
      sourceFolder: '$(Build.SourcesDirectory)/src/ToyCompany/ToyCompany.Website/bin'
      contents: '**/publish.zip'
      targetFolder: '$(Build.ArtifactStagingDirectory)/website'
      flattenFolders: true

  - task: PublishBuildArtifacts@1
    displayName: Publish website as pipeline artifact
    inputs:
      pathToPublish: '$(Build.ArtifactStagingDirectory)/website'
      artifactName: 'website'

  # Build, copy, and publish the DACPAC file.
  - task: VSBuild@1
    displayName: Build Visual Studio solution
    inputs:
      solution: '$(Build.SourcesDirectory)/src/ToyCompany/ToyCompany.Database/ToyCompany.Database.sqlproj'

  - task: CopyFiles@2
    displayName: Copy DACPAC
    inputs:
      sourceFolder: '$(Build.SourcesDirectory)/src/ToyCompany/ToyCompany.Database/bin'
      contents: '**/*.dacpac'
      targetFolder: '$(Build.ArtifactStagingDirectory)/database'
      flattenFolders: true

  - task: PublishBuildArtifacts@1
    displayName: Publish DACPAC as pipeline artifact
    inputs:
      pathToPublish: '$(Build.ArtifactStagingDirectory)/database'
      artifactName: 'database'
ファイルに加えた変更を保存します。
変数グループに値を追加する
ブラウザーで、[Pipelines]>[ライブラリ] に移動します。
ToyWebsiteProduction 変数グループを選択します。

次の変数を変数グループに追加します。
Name 値 SqlServerAdministratorLogin ToyCompanyAdmin SqlServerAdministratorLoginPassword SecurePassword!111 SqlServerAdministratorLoginPassword 変数の横にある南京錠アイコンを選択します。 この機能では、Azure Pipelines に変数の値を安全に処理するように指示します。

変数グループを保存します。
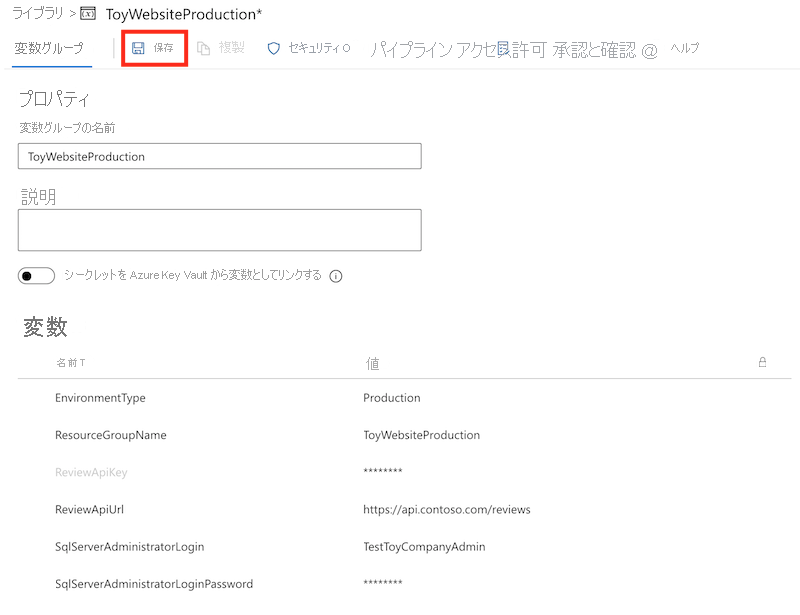
このプロセスを繰り返して、次の変数を ToyWebsiteTest 変数グループに追加します。
Name 値 SqlServerAdministratorLogin TestToyCompanyAdmin SqlServerAdministratorLoginPassword SecurePassword!999 SqlServerAdministratorLoginPassword 変数の横にある南京錠アイコンを選択してから変数グループを保存することを忘れないでください。
検証ステージとプレビュー ステージにパラメーター値を追加する
sqlServerAdministratorLogin と sqlServerAdministratorLoginPassword の 2 つの新しい必須パラメーターが Bicep ファイルに追加されました。 ここで、検証ステージとプレビュー ステージの両方とも、変数グループのこれらのパラメーター値を伝達します。
Visual Studio Code で、deploy/pipeline-templates フォルダーの deploy.yml ファイルを開きます。
新しいパラメーターを追加して "検証" ステージの RunPreflightValidation ステップを更新します。
- task: AzureResourceManagerTemplateDeployment@3
  name: RunPreflightValidation
  displayName: Run preflight validation
  inputs:
    connectedServiceName: ToyWebsite${{parameters.environmentType}}
    location: ${{parameters.deploymentDefaultLocation}}
    deploymentMode: Validation
    resourceGroupName: $(ResourceGroupName)
    csmFile: deploy/main.bicep
    overrideParameters: >
      -environmentType $(EnvironmentType)
      -reviewApiUrl $(ReviewApiUrl)
      -reviewApiKey $(ReviewApiKey)
      -sqlServerAdministratorLogin $(SqlServerAdministratorLogin)
      -sqlServerAdministratorLoginPassword $(SqlServerAdministratorLoginPassword)
新しいパラメーターを追加して "プレビュー" ステージの RunWhatIf ステップを更新します。
inlineScript: |
  az deployment group what-if \
    --resource-group $(ResourceGroupName) \
    --template-file deploy/main.bicep \
    --parameters environmentType=$(EnvironmentType) \
                 reviewApiUrl=$(ReviewApiUrl) \
                 reviewApiKey=$(ReviewApiKey) \
                 sqlServerAdministratorLogin=$(SqlServerAdministratorLogin) \
                 sqlServerAdministratorLoginPassword=$(SqlServerAdministratorLoginPassword)
重要
reviewApiKeyパラメーター値を設定する行の末尾と次の行に円記号 (\) を追加してください。\文字は、同じ Azure CLI コマンドに含まれる行がさらに存在することを示します。
デプロイ ステージにパラメーター値を追加する
新しいパラメーターを追加して "デプロイ" ステージの DeployBicepFile ステップを更新します。
- task: AzureResourceManagerTemplateDeployment@3
  name: DeployBicepFile
  displayName: Deploy Bicep file
  inputs:
    connectedServiceName: ToyWebsite${{parameters.environmentType}}
    deploymentName: $(Build.BuildNumber)
    location: ${{parameters.deploymentDefaultLocation}}
    resourceGroupName: $(ResourceGroupName)
    csmFile: deploy/main.bicep
    overrideParameters: >
      -environmentType $(EnvironmentType)
      -reviewApiUrl $(ReviewApiUrl)
      -reviewApiKey $(ReviewApiKey)
      -sqlServerAdministratorLogin $(SqlServerAdministratorLogin)
      -sqlServerAdministratorLoginPassword $(SqlServerAdministratorLoginPassword)
    deploymentOutputs: deploymentOutputs
ストレージ アカウントと Azure SQL リソース用に少し前に追加した Bicep 出力の値を含むパイプライン変数を作成します。
- bash: |
    echo "##vso[task.setvariable variable=appServiceAppName]$(echo $DEPLOYMENT_OUTPUTS | jq -r '.appServiceAppName.value')"
    echo "##vso[task.setvariable variable=appServiceAppHostName;isOutput=true]$(echo $DEPLOYMENT_OUTPUTS | jq -r '.appServiceAppHostName.value')"
    echo "##vso[task.setvariable variable=storageAccountName]$(echo $DEPLOYMENT_OUTPUTS | jq -r '.storageAccountName.value')"
    echo "##vso[task.setvariable variable=storageAccountImagesBlobContainerName]$(echo $DEPLOYMENT_OUTPUTS | jq -r '.storageAccountImagesBlobContainerName.value')"
    echo "##vso[task.setvariable variable=sqlServerFullyQualifiedDomainName]$(echo $DEPLOYMENT_OUTPUTS | jq -r '.sqlServerFullyQualifiedDomainName.value')"
    echo "##vso[task.setvariable variable=sqlDatabaseName]$(echo $DEPLOYMENT_OUTPUTS | jq -r '.sqlDatabaseName.value')"
  name: SaveDeploymentOutputs
  displayName: Save deployment outputs into variables
  env:
    DEPLOYMENT_OUTPUTS: $(deploymentOutputs)
データベース デプロイ ステップを追加する
このセクションでは、Web サイトのデータベース コンポーネントをデプロイするために必要なステップを定義します。 まず、パイプラインによって既にビルドされている DACPAC ファイルをデプロイするためのステップを追加します。 次に、データベースとストレージ アカウントにサンプル データを追加します。ただし、非運用環境でのみ使用されます。
デプロイ ステージの DeployWebsiteApp ステップの下に、DACPAC ファイルをデプロイするための新しいステップを追加します。
- task: SqlAzureDacpacDeployment@1
  name: DeploySqlDatabaseDacpac
  displayName: Deploy DACPAC to database
  inputs:
    ConnectedServiceNameARM: ToyWebsite${{parameters.environmentType}}
    authenticationType: 'server'
    serverName: $(sqlServerFullyQualifiedDomainName)
    databaseName: $(sqlDatabaseName)
    sqlUsername: $(SqlServerAdministratorLogin)
    sqlPassword: $(SqlServerAdministratorLoginPassword)
    deployType: 'DacpacTask'
    deploymentAction: 'Publish'
    dacpacFile: '$(Pipeline.Workspace)/database/ToyCompany.Database.dacpac'
今追加したステップの下に、サンプル データを使用してデータベースをシード処理するためのステップを定義します。
- ${{ if ne(parameters.environmentType, 'Production') }}:
  - task: SqlAzureDacpacDeployment@1
    name: AddTestDataToDatabase
    displayName: Add test data to database
    inputs:
      ConnectedServiceNameARM: ToyWebsite${{parameters.environmentType}}
      authenticationType: 'server'
      serverName: $(sqlServerFullyQualifiedDomainName)
      databaseName: $(sqlDatabaseName)
      sqlUsername: $(SqlServerAdministratorLogin)
      sqlPassword: $(SqlServerAdministratorLoginPassword)
      deployType: 'sqlTask'
      sqlFile: 'deploy/sample-data/Toys.sql'
このステップには、非運用環境でのみ実行されるように条件が適用されていることに注目してください。
さきほど追加したステップの下の、なおかつ条件のスコープ内で、Azure CLI を使用して玩具のいくつかのサンプル画像を BLOB コンテナーにアップロードするためのステップを追加します。
- task: AzureCLI@2
  name: UploadSampleImages
  displayName: Upload sample images
  inputs:
    azureSubscription: ToyWebsite${{parameters.environmentType}}
    scriptType: 'bash'
    scriptLocation: 'inlineScript'
    inlineScript: |
      az storage blob upload-batch \
        --account-name $(storageAccountName) \
        --destination $(storageAccountImagesBlobContainerName) \
        --source 'deploy/sample-data/toyimages'
ファイルを確認して変更をコミットする
main.bicep ファイルが次のようになっていることを確認します。
@description('The location into which your Azure resources should be deployed.')
param location string = resourceGroup().location

@description('Select the type of environment you want to provision. Allowed values are Production and Test.')
@allowed([
  'Production'
  'Test'
])
param environmentType string

@description('A unique suffix to add to resource names that need to be globally unique.')
@maxLength(13)
param resourceNameSuffix string = uniqueString(resourceGroup().id)

@description('The URL to the product review API.')
param reviewApiUrl string

@secure()
@description('The API key to use when accessing the product review API.')
param reviewApiKey string

@description('The administrator login username for the SQL server.')
param sqlServerAdministratorLogin string

@secure()
@description('The administrator login password for the SQL server.')
param sqlServerAdministratorLoginPassword string

// Define the names for resources.
var appServiceAppName = 'toy-website-${resourceNameSuffix}'
var appServicePlanName = 'toy-website'
var logAnalyticsWorkspaceName = 'workspace-${resourceNameSuffix}'
var applicationInsightsName = 'toywebsite'
var storageAccountName = 'mystorage${resourceNameSuffix}'
var storageAccountImagesBlobContainerName = 'toyimages'
var sqlServerName = 'toy-website-${resourceNameSuffix}'
var sqlDatabaseName = 'Toys'

// Define the connection string to access Azure SQL.
var sqlDatabaseConnectionString = 'Server=tcp:${sqlServer.properties.fullyQualifiedDomainName},1433;Initial Catalog=${sqlDatabase.name};Persist Security Info=False;User ID=${sqlServerAdministratorLogin};Password=${sqlServerAdministratorLoginPassword};MultipleActiveResultSets=False;Encrypt=True;TrustServerCertificate=False;Connection Timeout=30;'

// Define the SKUs for each component based on the environment type.
var environmentConfigurationMap = {
  Production: {
    appServicePlan: {
      sku: {
        name: 'S1'
        capacity: 1
      }
    }
    storageAccount: {
      sku: {
        name: 'Standard_LRS'
      }
    }
    sqlDatabase: {
      sku: {
        name: 'Standard'
        tier: 'Standard'
      }
    }
  }
  Test: {
    appServicePlan: {
      sku: {
        name: 'F1'
      }
    }
    storageAccount: {
      sku: {
        name: 'Standard_GRS'
      }
    }
    sqlDatabase: {
      sku: {
        name: 'Standard'
        tier: 'Standard'
      }
    }
  }
}

resource appServicePlan 'Microsoft.Web/serverfarms@2022-03-01' = {
  name: appServicePlanName
  location: location
  sku: environmentConfigurationMap[environmentType].appServicePlan.sku
}

resource appServiceApp 'Microsoft.Web/sites@2022-03-01' = {
  name: appServiceAppName
  location: location
  properties: {
    serverFarmId: appServicePlan.id
    httpsOnly: true
    siteConfig: {
      appSettings: [
        {
          name: 'APPINSIGHTS_INSTRUMENTATIONKEY'
          value: applicationInsights.properties.InstrumentationKey
        }
        {
          name: 'APPLICATIONINSIGHTS_CONNECTION_STRING'
          value: applicationInsights.properties.ConnectionString
        }
        {
          name: 'ReviewApiUrl'
          value: reviewApiUrl
        }
        {
          name: 'ReviewApiKey'
          value: reviewApiKey
        }
        {
          name: 'StorageAccountName'
          value: storageAccount.name
        }
        {
          name: 'StorageAccountBlobEndpoint'
          value: storageAccount.properties.primaryEndpoints.blob
        }
        {
          name: 'StorageAccountImagesContainerName'
          value: storageAccount::blobService::storageAccountImagesBlobContainer.name
        }
        {
          name: 'SqlDatabaseConnectionString'
          value: sqlDatabaseConnectionString
        }
      ]
    }
  }
}

resource logAnalyticsWorkspace 'Microsoft.OperationalInsights/workspaces@2022-10-01' = {
  name: logAnalyticsWorkspaceName
  location: location
}

resource applicationInsights 'Microsoft.Insights/components@2020-02-02' = {
  name: applicationInsightsName
  location: location
  kind: 'web'
  properties: {
    Application_Type: 'web'
    Request_Source: 'rest'
    Flow_Type: 'Bluefield'
    WorkspaceResourceId: logAnalyticsWorkspace.id
  }
}

resource storageAccount 'Microsoft.Storage/storageAccounts@2022-09-01' = {
  name: storageAccountName
  location: location
  kind: 'StorageV2'
  sku: environmentConfigurationMap[environmentType].storageAccount.sku

  resource blobService 'blobServices' = {
    name: 'default'

    resource storageAccountImagesBlobContainer 'containers' = {
      name: storageAccountImagesBlobContainerName

      properties: {
        publicAccess: 'Blob'
      }
    }
  }
}

resource sqlServer 'Microsoft.Sql/servers@2022-05-01-preview' = {
  name: sqlServerName
  location: location
  properties: {
    administratorLogin: sqlServerAdministratorLogin
    administratorLoginPassword: sqlServerAdministratorLoginPassword
  }
}

resource sqlServerFirewallRule 'Microsoft.Sql/servers/firewallRules@2022-05-01-preview' = {
  parent: sqlServer
  name: 'AllowAllWindowsAzureIps'
  properties: {
    endIpAddress: '0.0.0.0'
    startIpAddress: '0.0.0.0'
  }
}

resource sqlDatabase 'Microsoft.Sql/servers/databases@2022-05-01-preview' = {
  parent: sqlServer
  name: sqlDatabaseName
  location: location
  sku: environmentConfigurationMap[environmentType].sqlDatabase.sku
}

output appServiceAppName string = appServiceApp.name
output appServiceAppHostName string = appServiceApp.properties.defaultHostName
output storageAccountName string = storageAccount.name
output storageAccountImagesBlobContainerName string = storageAccount::blobService::storageAccountImagesBlobContainer.name
output sqlServerFullyQualifiedDomainName string = sqlServer.properties.fullyQualifiedDomainName
output sqlDatabaseName string = sqlDatabase.name
このようになっていない場合は、ファイルの内容と合うように更新してください。
deploy.yml ファイルが次のようになっていることを確認します。
parameters:
- name: environmentType
  type: string
- name: deploymentDefaultLocation
  type: string
  default: westus3

stages:

- ${{ if ne(parameters.environmentType, 'Production') }}:
  - stage: Validate_${{parameters.environmentType}}
    displayName: Validate (${{parameters.environmentType}} Environment)
    jobs:
    - job: ValidateBicepCode
      displayName: Validate Bicep code
      variables:
      - group: ToyWebsite${{parameters.environmentType}}
      steps:
        - task: AzureResourceManagerTemplateDeployment@3
          name: RunPreflightValidation
          displayName: Run preflight validation
          inputs:
            connectedServiceName: ToyWebsite${{parameters.environmentType}}
            location: ${{parameters.deploymentDefaultLocation}}
            deploymentMode: Validation
            resourceGroupName: $(ResourceGroupName)
            csmFile: deploy/main.bicep
            overrideParameters: >
              -environmentType $(EnvironmentType)
              -reviewApiUrl $(ReviewApiUrl)
              -reviewApiKey $(ReviewApiKey)
              -sqlServerAdministratorLogin $(SqlServerAdministratorLogin)
              -sqlServerAdministratorLoginPassword $(SqlServerAdministratorLoginPassword)

- ${{ if eq(parameters.environmentType, 'Production') }}:
  - stage: Preview_${{parameters.environmentType}}
    displayName: Preview (${{parameters.environmentType}} Environment)
    jobs:
    - job: PreviewAzureChanges
      displayName: Preview Azure changes
      variables:
      - group: ToyWebsite${{parameters.environmentType}}
      steps:
        - task: AzureCLI@2
          name: RunWhatIf
          displayName: Run what-if
          inputs:
            azureSubscription: ToyWebsite${{parameters.environmentType}}
            scriptType: 'bash'
            scriptLocation: 'inlineScript'
            inlineScript: |
              az deployment group what-if \
                --resource-group $(ResourceGroupName) \
                --template-file deploy/main.bicep \
                --parameters environmentType=$(EnvironmentType) \
                             reviewApiUrl=$(ReviewApiUrl) \
                             reviewApiKey=$(ReviewApiKey) \
                             sqlServerAdministratorLogin=$(SqlServerAdministratorLogin) \
                             sqlServerAdministratorLoginPassword=$(SqlServerAdministratorLoginPassword)

- stage: Deploy_${{parameters.environmentType}}
  displayName: Deploy (${{parameters.environmentType}} Environment)
  jobs:
  - deployment: DeployWebsite
    displayName: Deploy website
    pool:
      vmImage: windows-latest
    variables:
    - group: ToyWebsite${{parameters.environmentType}}
    environment: ${{parameters.environmentType}}
    strategy:
      runOnce:
        deploy:
          steps:
            - checkout: self

            - task: AzureResourceManagerTemplateDeployment@3
              name: DeployBicepFile
              displayName: Deploy Bicep file
              inputs:
                connectedServiceName: ToyWebsite${{parameters.environmentType}}
                deploymentName: $(Build.BuildNumber)
                location: ${{parameters.deploymentDefaultLocation}}
                resourceGroupName: $(ResourceGroupName)
                csmFile: deploy/main.bicep
                overrideParameters: >
                  -environmentType $(EnvironmentType)
                  -reviewApiUrl $(ReviewApiUrl)
                  -reviewApiKey $(ReviewApiKey)
                  -sqlServerAdministratorLogin $(SqlServerAdministratorLogin)
                  -sqlServerAdministratorLoginPassword $(SqlServerAdministratorLoginPassword)
                deploymentOutputs: deploymentOutputs

            - bash: |
                echo "##vso[task.setvariable variable=appServiceAppName]$(echo $DEPLOYMENT_OUTPUTS | jq -r '.appServiceAppName.value')"
                echo "##vso[task.setvariable variable=appServiceAppHostName;isOutput=true]$(echo $DEPLOYMENT_OUTPUTS | jq -r '.appServiceAppHostName.value')"
                echo "##vso[task.setvariable variable=storageAccountName]$(echo $DEPLOYMENT_OUTPUTS | jq -r '.storageAccountName.value')"
                echo "##vso[task.setvariable variable=storageAccountImagesBlobContainerName]$(echo $DEPLOYMENT_OUTPUTS | jq -r '.storageAccountImagesBlobContainerName.value')"
                echo "##vso[task.setvariable variable=sqlServerFullyQualifiedDomainName]$(echo $DEPLOYMENT_OUTPUTS | jq -r '.sqlServerFullyQualifiedDomainName.value')"
                echo "##vso[task.setvariable variable=sqlDatabaseName]$(echo $DEPLOYMENT_OUTPUTS | jq -r '.sqlDatabaseName.value')"
              name: SaveDeploymentOutputs
              displayName: Save deployment outputs into variables
              env:
                DEPLOYMENT_OUTPUTS: $(deploymentOutputs)

            - task: AzureRmWebAppDeployment@4
              name: DeployWebsiteApp
              displayName: Deploy website
              inputs:
                appType: webApp
                ConnectionType: AzureRM
                azureSubscription: ToyWebsite${{parameters.environmentType}}
                ResourceGroupName: $(ResourceGroupName)
                WebAppName: $(appServiceAppName)
                Package: '$(Pipeline.Workspace)/website/publish.zip'

            - task: SqlAzureDacpacDeployment@1
              name: DeploySqlDatabaseDacpac
              displayName: Deploy DACPAC to database
              inputs:
                ConnectedServiceNameARM: ToyWebsite${{parameters.environmentType}}
                authenticationType: 'server'
                serverName: $(sqlServerFullyQualifiedDomainName)
                databaseName: $(sqlDatabaseName)
                sqlUsername: $(SqlServerAdministratorLogin)
                sqlPassword: $(SqlServerAdministratorLoginPassword)
                deployType: 'DacpacTask'
                deploymentAction: 'Publish'
                dacpacFile: '$(Pipeline.Workspace)/database/ToyCompany.Database.dacpac'

            - ${{ if ne(parameters.environmentType, 'Production') }}:
              - task: SqlAzureDacpacDeployment@1
                name: AddTestDataToDatabase
                displayName: Add test data to database
                inputs:
                  ConnectedServiceNameARM: ToyWebsite${{parameters.environmentType}}
                  authenticationType: 'server'
                  serverName: $(sqlServerFullyQualifiedDomainName)
                  databaseName: $(sqlDatabaseName)
                  sqlUsername: $(SqlServerAdministratorLogin)
                  sqlPassword: $(SqlServerAdministratorLoginPassword)
                  deployType: 'sqlTask'
                  sqlFile: 'deploy/sample-data/Toys.sql'

              - task: AzureCLI@2
                name: UploadSampleImages
                displayName: Upload sample images
                inputs:
                  azureSubscription: ToyWebsite${{parameters.environmentType}}
                  scriptType: 'bash'
                  scriptLocation: 'inlineScript'
                  inlineScript: |
                    az storage blob upload-batch \
                      --account-name $(storageAccountName) \
                      --destination $(storageAccountImagesBlobContainerName) \
                      --source 'deploy/sample-data/toyimages'

- stage: SmokeTest_${{parameters.environmentType}}
  displayName: Smoke Test (${{parameters.environmentType}} Environment)
  jobs:
  - job: SmokeTest
    displayName: Smoke test
    variables:
      appServiceAppHostName: $[ stageDependencies.Deploy_${{parameters.environmentType}}.DeployWebsite.outputs['DeployWebsite.SaveDeploymentOutputs.appServiceAppHostName'] ]
    steps:
      - task: PowerShell@2
        name: RunSmokeTests
        displayName: Run smoke tests
        inputs:
          targetType: inline
          script: |
            $container = New-PesterContainer `
              -Path 'deploy/Website.Tests.ps1' `
              -Data @{ HostName = '$(appServiceAppHostName)' }
            Invoke-Pester `
              -Container $container `
              -CI

      - task: PublishTestResults@2
        name: PublishTestResults
        displayName: Publish test results
        condition: always()
        inputs:
          testResultsFormat: NUnit
          testResultsFiles: 'testResults.xml'
このようになっていない場合は、ファイルの内容と合うように更新してください。
ファイルに加えた変更を保存します。
変更を Git リポジトリにコミットしてプッシュします。 Visual Studio Code ターミナルで、次のコマンドを実行します。
git add .
git commit -m "Add SQL database"
git push
パイプラインを実行する
ブラウザーで、[Pipelines] に移動します。
パイプラインの最新の実行を選択します。
テスト環境のすべてのステージが正常に完了するまで待ちます。 スモーク テストも成功するようになったことに注意してください。
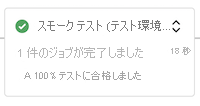
プレビュー (運用環境) ステージの前でパイプラインが再び一時停止するのを待ちます。パイプラインは今度は別の変数グループに対するアクセス許可を必要とするためです。
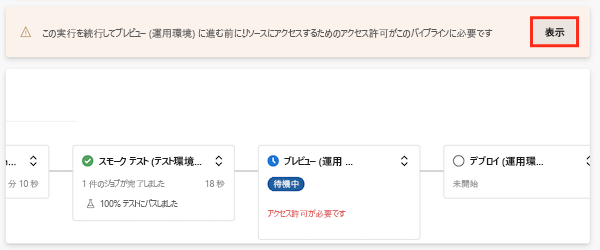
[表示] を選択し、[許可]>[許可] を選択します。
プレビュー (運用環境) ステージが正常に完了します。
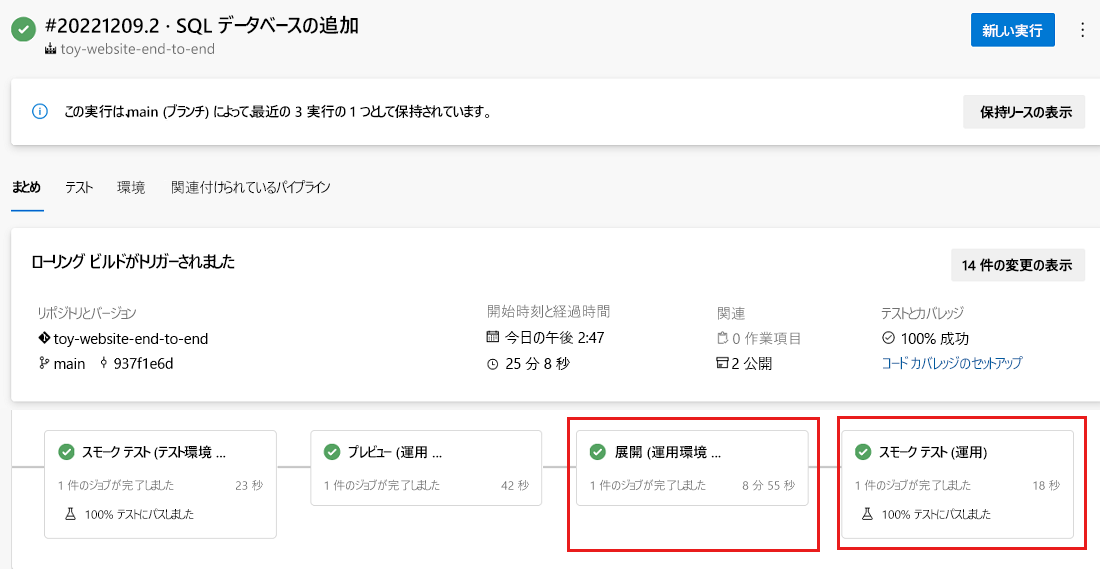
最終的なステージが完了したら、パイプラインを監視します。
デプロイ (運用環境) ステージが正常に完了し、スモーク テスト (運用環境) ステージも正常に完了します。
Web サイトを表示する
[デプロイ (テスト環境)] ステージを選択してパイプライン ログを開きます。
[Web サイトのデプロイ] ステップを選択します。
Ctrl キー (macOS の場合は⌘) を押したまま App Service アプリの URL を選択して新しいブラウザー タブで開きます。
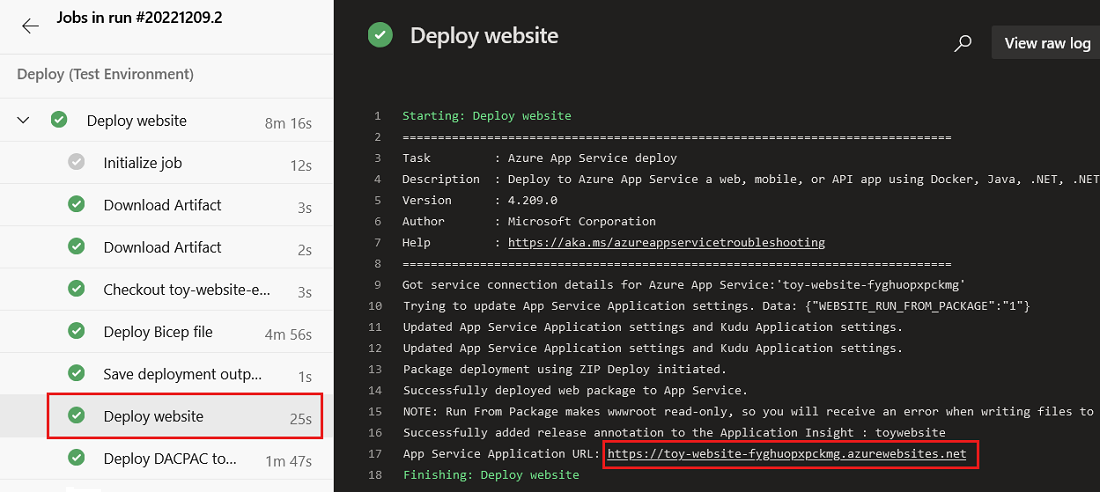
[Toys] を選択します。

テスト環境ではサンプル データが表示されることに注意してください。
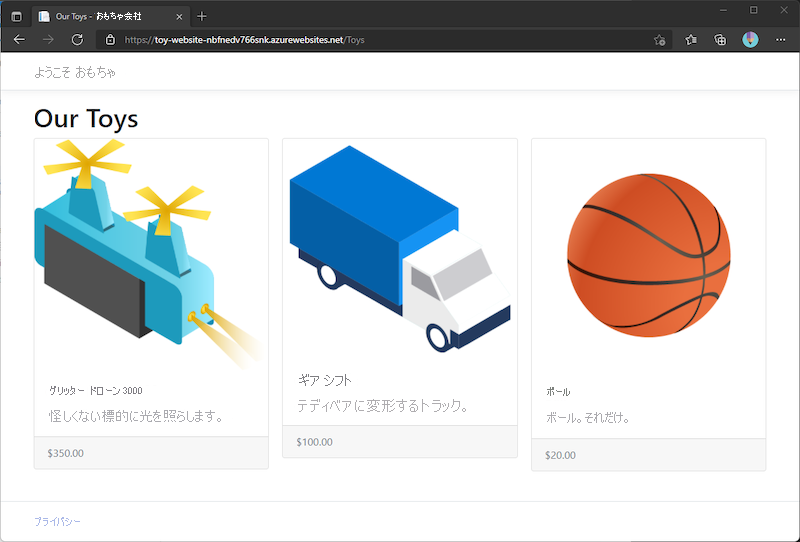
デプロイ (運用環境) ステージのアプリに対して上記のプロセスを繰り返します。
運用環境ではサンプル データが表示されないことに注意してください。

リソースをクリーンアップする
これで演習が完了したので、課金されないようにリソースを削除してください。
Visual Studio Code ターミナルで、次のコマンドを実行します。
az group delete --resource-group ToyWebsiteTest --yes --no-wait
az group delete --resource-group ToyWebsiteProduction --yes --no-wait
バックグラウンドでリソース グループが削除されます。
Remove-AzResourceGroup -Name ToyWebsiteTest -Force
Remove-AzResourceGroup -Name ToyWebsiteProduction -Force