演習 - Web アプリケーションをデプロイする
あなたの玩具会社で、Web サイト開発チームが最新バージョンの Web サイトを Git リポジトリにコミットしました。 これで、Web サイトをビルドして Azure App Service にデプロイするようにパイプラインを更新する準備が整いました。
このプロセスでは、次のタスクを行います。
- ビルド ジョブ用の新しいパイプライン テンプレートを追加します。
- ビルド ジョブを含めるようにパイプラインを更新します。
- 新しいスモーク テストを追加します。
- アプリケーションをデプロイするようにデプロイ ステージを更新します。
- パイプラインを実行します。
ビルド ジョブ用のパイプライン テンプレートを追加する
Web サイト アプリケーションをビルドするために必要なステップを含む新しいジョブ定義を追加します。
Visual Studio Code を開きます。
deploy/pipeline-templates フォルダーに、build.yml という名前の新しいファイルを作成します。
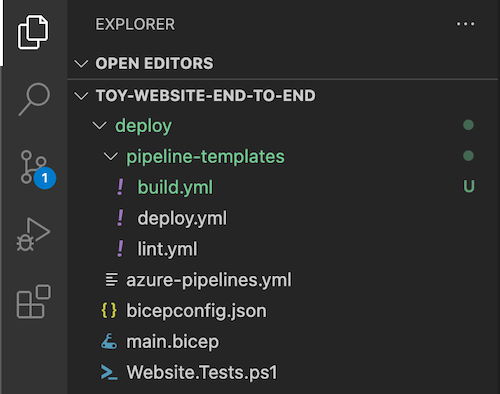
次の内容を build.yml パイプライン テンプレート ファイルに追加します。
jobs:
- job: Build
  displayName: Build application and database
  pool:
    vmImage: windows-latest

  steps:

  # Build, copy, and publish the website.
  - task: DotNetCoreCLI@2
    displayName: Build publishable website
    inputs:
      command: 'publish'
      publishWebProjects: true

  - task: CopyFiles@2
    displayName: Copy publishable website
    inputs:
      sourceFolder: '$(Build.SourcesDirectory)/src/ToyCompany/ToyCompany.Website/bin'
      contents: '**/publish.zip'
      targetFolder: '$(Build.ArtifactStagingDirectory)/website'
      flattenFolders: true

  - task: PublishBuildArtifacts@1
    displayName: Publish website as pipeline artifact
    inputs:
      pathToPublish: '$(Build.ArtifactStagingDirectory)/website'
      artifactName: 'website'
このジョブは、ビルド ステップを実行して、Web サイト アプリケーションのソース コードを、Azure で実行できるコンパイル済みファイルにします。 その後、ジョブはコンパイル済み成果物を一時ステージング フォルダーにコピーし、パイプライン成果物として発行します。
ファイルに加えた変更を保存します。
最初のパイプライン ステージの名前を変更し、ビルド ジョブを追加する
deploy フォルダーの azure-pipelines.yml ファイルを開きます。
リント ステージを変更します。 名前を Build に変更し、作成した build.yml パイプライン テンプレートを使用するビルド ジョブを追加します。
trigger:
  batch: true
  branches:
    include:
    - main

pool:
  vmImage: ubuntu-latest

stages:

- stage: Build
  jobs:
  # Build the Visual Studio solution.
  - template: pipeline-templates/build.yml

  # Lint the Bicep file.
  - template: pipeline-templates/lint.yml

# Deploy to the test environment.
- template: pipeline-templates/deploy.yml
  parameters:
    environmentType: Test

# Deploy to the production environment.
- template: pipeline-templates/deploy.yml
  parameters:
    environmentType: Production
ファイルに加えた変更を保存します。
スモーク テスト ファイルを更新する
Web サイト開発者が Web サイトに正常性エンドポイントを追加しました。 このエンドポイントは、Web サイトがオンラインであり、データベースにアクセスできることを確認します。 ここで、デプロイ パイプラインから正常性チェックを呼び出す新しいスモーク テストを追加します。
deploy フォルダーの Website.Tests.ps1 ファイルを開きます。
正常性チェックを呼び出す新しいテスト ケースを追加します。 このテスト ケースは、応答コードが成功を示す 200 ではない場合に失敗します。
param(
  [Parameter(Mandatory)]
  [ValidateNotNullOrEmpty()]
  [string] $HostName
)

Describe 'Toy Website' {

    It 'Serves pages over HTTPS' {
      $request = [System.Net.WebRequest]::Create("https://$HostName/")
      $request.AllowAutoRedirect = $false
      $request.GetResponse().StatusCode |
        Should -Be 200 -Because "the website requires HTTPS"
    }

    It 'Does not serves pages over HTTP' {
      $request = [System.Net.WebRequest]::Create("http://$HostName/")
      $request.AllowAutoRedirect = $false
      $request.GetResponse().StatusCode |
        Should -BeGreaterOrEqual 300 -Because "HTTP is not secure"
    }

    It 'Returns a success code from the health check endpoint' {
      $response = Invoke-WebRequest -Uri "https://$HostName/health" -SkipHttpErrorCheck
      Write-Host $response.Content
      $response.StatusCode |
        Should -Be 200 -Because "the website and configuration should be healthy"
    }

}
ファイルに加えた変更を保存します。
出力を Bicep ファイルに追加する
Web サイトを Azure App Service に発行するデプロイ手順を追加する必要がありますが、発行手順には App Service アプリの名前が必要です。 ここで、アプリ名を Bicep ファイルからの出力として公開します。
deploy フォルダーの main.bicep ファイルを開きます。
ファイルの内容の末尾に、出力として App Service アプリの名前を追加します。
output appServiceAppName string = appServiceApp.name
output appServiceAppHostName string = appServiceApp.properties.defaultHostName
ファイルに加えた変更を保存します。
デプロイ ステージを更新する
deploy/pipeline-templates フォルダーの deploy.yml ファイルを開きます。
''デプロイ'' ステージのデプロイ ジョブの定義 (59 行目の近く) で、Windows によってホストされるエージェント プールを使用するようにジョブを構成します。
- stage: Deploy_${{parameters.environmentType}}
  displayName: Deploy (${{parameters.environmentType}} Environment)
  jobs:
  - deployment: DeployWebsite
    displayName: Deploy website
    pool:
      vmImage: windows-latest
    variables:
    - group: ToyWebsite${{parameters.environmentType}}
    environment: ${{parameters.environmentType}}
    strategy:
データベースを操作するために後で追加するパイプライン手順のうちのいくつかは、Windows オペレーティング システムの実行を必要とします。 パイプライン内のジョブごとに異なるエージェント プールを使用できるので、他のジョブは Ubuntu Linux パイプライン エージェント プールを使い続けます。
Deploy ジョブの SaveDeploymentOutputs ステップで、Bicep デプロイの出力からのアプリ名の値を使用して新しいパイプライン変数を追加します。
- bash: | echo "##vso[task.setvariable variable=appServiceAppName]$(echo $DEPLOYMENT_OUTPUTS | jq -r '.appServiceAppName.value')" echo "##vso[task.setvariable variable=appServiceAppHostName;isOutput=true]$(echo $DEPLOYMENT_OUTPUTS | jq -r '.appServiceAppHostName.value')" name: SaveDeploymentOutputs displayName: Save deployment outputs into variables env: DEPLOYMENT_OUTPUTS: $(deploymentOutputs)appServiceAppHostName変数にはisOutput=trueプロパティが適用されています。この変数はスモーク テスト ステージで使用されるためです。appServiceAppName変数が設定され、パイプラインの同じステージとジョブで使用されます。 そのため、isOutput=true設定は必要ありません。Deploy ジョブの内容の最後に、アプリを Azure App Service にデプロイするための新しいステップを追加します。
steps:
  - checkout: self

  - task: AzureResourceManagerTemplateDeployment@3
    name: DeployBicepFile
    displayName: Deploy Bicep file
    inputs:
      connectedServiceName: ToyWebsite${{parameters.environmentType}}
      deploymentName: $(Build.BuildNumber)
      location: ${{parameters.deploymentDefaultLocation}}
      resourceGroupName: $(ResourceGroupName)
      csmFile: deploy/main.bicep
      overrideParameters: >
        -environmentType $(EnvironmentType)
        -reviewApiUrl $(ReviewApiUrl)
        -reviewApiKey $(ReviewApiKey)
      deploymentOutputs: deploymentOutputs

  - bash: |
      echo "##vso[task.setvariable variable=appServiceAppName]$(echo $DEPLOYMENT_OUTPUTS | jq -r '.appServiceAppName.value')"
      echo "##vso[task.setvariable variable=appServiceAppHostName;isOutput=true]$(echo $DEPLOYMENT_OUTPUTS | jq -r '.appServiceAppHostName.value')"
    name: SaveDeploymentOutputs
    displayName: Save deployment outputs into variables
    env:
      DEPLOYMENT_OUTPUTS: $(deploymentOutputs)

  - task: AzureRmWebAppDeployment@4
    name: DeployWebsiteApp
    displayName: Deploy website
    inputs:
      appType: webApp
      ConnectionType: AzureRM
      azureSubscription: ToyWebsite${{parameters.environmentType}}
      ResourceGroupName: $(ResourceGroupName)
      WebAppName: $(appServiceAppName)
      Package: '$(Pipeline.Workspace)/website/publish.zip'
Note
新しいデプロイ ステップが
DeployBicepFileステップと同じレベルでインデントされるように、YAML ファイルのインデントに注意してください。 不明な場合は、次の手順の例から deploy.yml ファイルの内容全体をコピーしてください。パイプライン定義で成果物を明示的にダウンロードしなかったことに注意してください。 デプロイ ジョブを使用するので、Azure Pipelines は自動的に成果物をダウンロードします。
deploy.yml ファイルの内容を確認し、変更をコミットする
deploy.yml ファイルが、次の例のようになっていることを確認します。
parameters:
- name: environmentType
  type: string
- name: deploymentDefaultLocation
  type: string
  default: westus3

stages:

- ${{ if ne(parameters.environmentType, 'Production') }}:
  - stage: Validate_${{parameters.environmentType}}
    displayName: Validate (${{parameters.environmentType}} Environment)
    jobs:
    - job: ValidateBicepCode
      displayName: Validate Bicep code
      variables:
      - group: ToyWebsite${{parameters.environmentType}}
      steps:
        - task: AzureResourceManagerTemplateDeployment@3
          name: RunPreflightValidation
          displayName: Run preflight validation
          inputs:
            connectedServiceName: ToyWebsite${{parameters.environmentType}}
            location: ${{parameters.deploymentDefaultLocation}}
            deploymentMode: Validation
            resourceGroupName: $(ResourceGroupName)
            csmFile: deploy/main.bicep
            overrideParameters: >
              -environmentType $(EnvironmentType)
              -reviewApiUrl $(ReviewApiUrl)
              -reviewApiKey $(ReviewApiKey)

- ${{ if eq(parameters.environmentType, 'Production') }}:
  - stage: Preview_${{parameters.environmentType}}
    displayName: Preview (${{parameters.environmentType}} Environment)
    jobs:
    - job: PreviewAzureChanges
      displayName: Preview Azure changes
      variables:
      - group: ToyWebsite${{parameters.environmentType}}
      steps:
        - task: AzureCLI@2
          name: RunWhatIf
          displayName: Run what-if
          inputs:
            azureSubscription: ToyWebsite${{parameters.environmentType}}
            scriptType: 'bash'
            scriptLocation: 'inlineScript'
            inlineScript: |
              az deployment group what-if \
                --resource-group $(ResourceGroupName) \
                --template-file deploy/main.bicep \
                --parameters environmentType=$(EnvironmentType) \
                             reviewApiUrl=$(ReviewApiUrl) \
                             reviewApiKey=$(ReviewApiKey)

- stage: Deploy_${{parameters.environmentType}}
  displayName: Deploy (${{parameters.environmentType}} Environment)
  jobs:
  - deployment: DeployWebsite
    displayName: Deploy website
    pool:
      vmImage: windows-latest
    variables:
    - group: ToyWebsite${{parameters.environmentType}}
    environment: ${{parameters.environmentType}}
    strategy:
      runOnce:
        deploy:
          steps:
            - checkout: self

            - task: AzureResourceManagerTemplateDeployment@3
              name: DeployBicepFile
              displayName: Deploy Bicep file
              inputs:
                connectedServiceName: ToyWebsite${{parameters.environmentType}}
                deploymentName: $(Build.BuildNumber)
                location: ${{parameters.deploymentDefaultLocation}}
                resourceGroupName: $(ResourceGroupName)
                csmFile: deploy/main.bicep
                overrideParameters: >
                  -environmentType $(EnvironmentType)
                  -reviewApiUrl $(ReviewApiUrl)
                  -reviewApiKey $(ReviewApiKey)
                deploymentOutputs: deploymentOutputs

            - bash: |
                echo "##vso[task.setvariable variable=appServiceAppName]$(echo $DEPLOYMENT_OUTPUTS | jq -r '.appServiceAppName.value')"
                echo "##vso[task.setvariable variable=appServiceAppHostName;isOutput=true]$(echo $DEPLOYMENT_OUTPUTS | jq -r '.appServiceAppHostName.value')"
              name: SaveDeploymentOutputs
              displayName: Save deployment outputs into variables
              env:
                DEPLOYMENT_OUTPUTS: $(deploymentOutputs)

            - task: AzureRmWebAppDeployment@4
              name: DeployWebsiteApp
              displayName: Deploy website
              inputs:
                appType: webApp
                ConnectionType: AzureRM
                azureSubscription: ToyWebsite${{parameters.environmentType}}
                ResourceGroupName: $(ResourceGroupName)
                WebAppName: $(appServiceAppName)
                Package: '$(Pipeline.Workspace)/website/publish.zip'

- stage: SmokeTest_${{parameters.environmentType}}
  displayName: Smoke Test (${{parameters.environmentType}} Environment)
  jobs:
  - job: SmokeTest
    displayName: Smoke test
    variables:
      appServiceAppHostName: $[ stageDependencies.Deploy_${{parameters.environmentType}}.DeployWebsite.outputs['DeployWebsite.SaveDeploymentOutputs.appServiceAppHostName'] ]
    steps:
      - task: PowerShell@2
        name: RunSmokeTests
        displayName: Run smoke tests
        inputs:
          targetType: inline
          script: |
            $container = New-PesterContainer `
              -Path 'deploy/Website.Tests.ps1' `
              -Data @{ HostName = '$(appServiceAppHostName)' }
            Invoke-Pester `
              -Container $container `
              -CI

      - task: PublishTestResults@2
        name: PublishTestResults
        displayName: Publish test results
        condition: always()
        inputs:
          testResultsFormat: NUnit
          testResultsFiles: 'testResults.xml'
ファイルに加えた変更を保存します。
Visual Studio Code ターミナルで次のコマンドを実行して、変更を Git リポジトリにコミットしてプッシュします。
git add .
git commit -m "Build and deploy website application"
git push
パイプラインを実行する
ブラウザーで、[Pipelines] に移動します。
パイプラインの最新の実行を選択します。

ビルド ステージが正常に完了するまで待ちます。
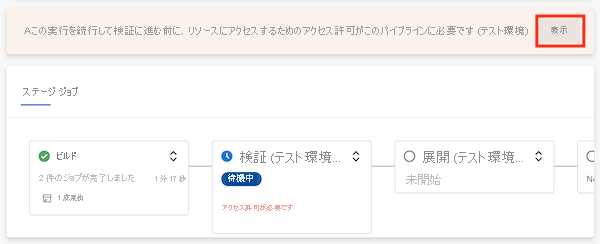
パイプラインは ''検証 (テスト環境)'' ステージを実行する前に一時停止します。パイプラインには、ステージで参照される変数グループを使用するためのアクセス許可が必要であるためです。 このプロジェクトでパイプラインを実行するのは初めてなので、変数グループに対するパイプラインのアクセスを承認する必要があります。 パイプラインを再度実行するときは、同じ変数グループへのアクセスを承認する必要はありません。
[表示] を選びます。
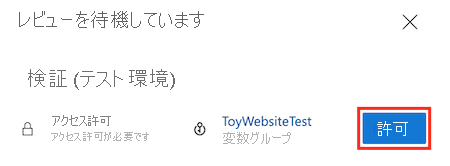
[許可] を選択します。
[許可] を選択します。
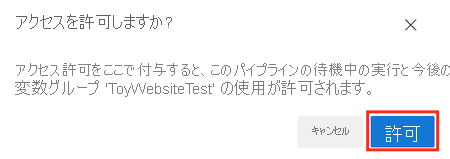
検証 (テスト環境) ステージが正常に完了します。
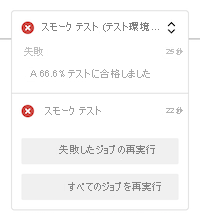
パイプラインが続行され、''デプロイ (テスト環境)'' ステージが正常に終了します。 その後、パイプラインでは ''スモーク テスト (テスト環境)'' ステージが実行されますが、スモーク テスト ステージは失敗します。
[スモーク テスト (テスト環境)] ステージを選択してパイプライン ログを開きます。
[スモーク テストの実行] ステップを選択して、パイプライン ログの関連セクションを表示します。
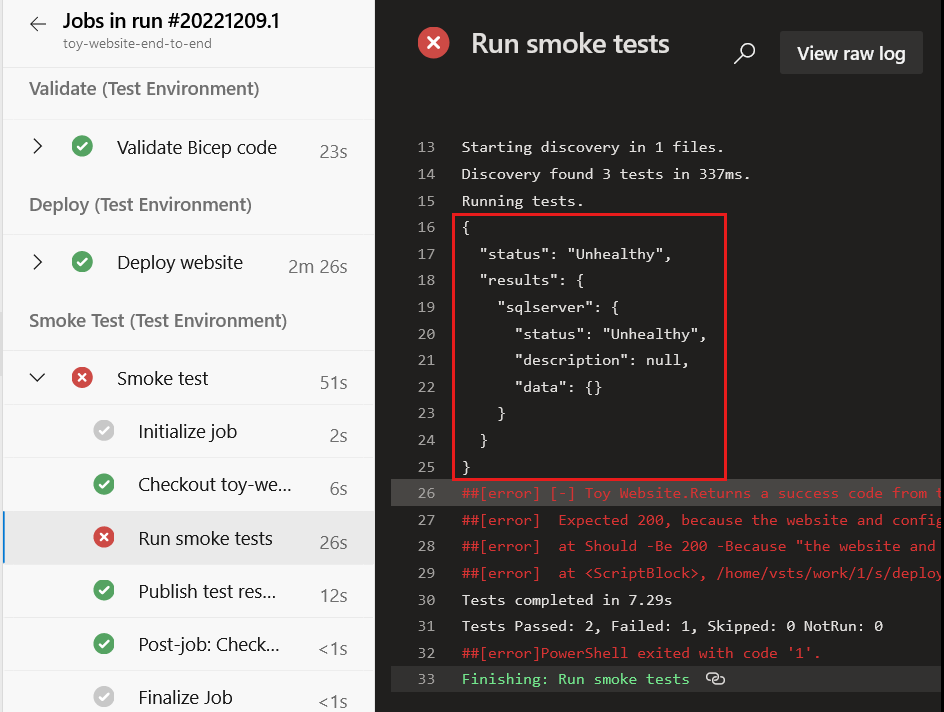
パイプライン ログには正常性チェックの応答が含まれていることに注意してください。 応答は、Azure SQL Database とのアプリケーションの通信に問題があることを示しています。 データベースのデプロイも構成もまだ完了していません。このため、Web サイトからアクセスできません。 次の演習では、この構成の問題を修正します。