単一の SQL データベースについて調べる
単一の Azure SQL データベースをデプロイするいくつかの方法を見ていきます。
ポータルを使用してデプロイする
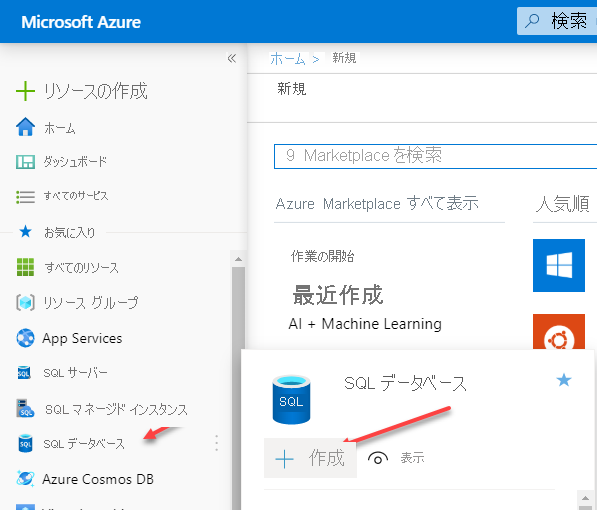
Azure portal を通じて単一データベースを作成するプロセスは単純です。 ポータルの左側のナビゲーション メニューで [SQL データベース] を選択します。 それによりスライド表示されるダイアログで、[作成] をクリックします。

下の画像のブレードでは、サブスクリプションがあらかじめ自動で入力されていることがわかります。 次の情報を指定する必要があります。
- リソース グループ - 使用したい既存のリソース グループがある場合は、ドロップダウン リストからそれを選択できます。 この Azure SQL データベース用に新しいリソース グループを作成したい場合は、[新規作成] オプションをクリックできます。
- データベース名 - データベース名を指定する必要があります。
- サーバー - 各データベースは論理サーバー上に配置される必要があります。 適切なリージョンに既存のものが既にある場合は、それを使用することを選択できます。 そうしない場合は、[新規作成] をクリックし、プロンプトに従って、データベースをホストする新しい論理サーバーを作成できます。
- SQL エラスティック プールを使用しますか? - エラスティック プールを使用するかどうかを決定します。
- コンピューティング + ストレージ - 必要とされる適切なコンピューティング リソースを決定します。 これは、別の設定が選択されていない既定では、Gen5、2 仮想コア、32 GB になります。 代替構成オプションを表示するには、[データベースの構成] をクリックします。
![Azure portal の [SQL データベースの作成] ブレード](../../wwl-data-ai/deploy-paas-solutions-with-azure-sql/media/module-22-plan-implement-final-14.png)
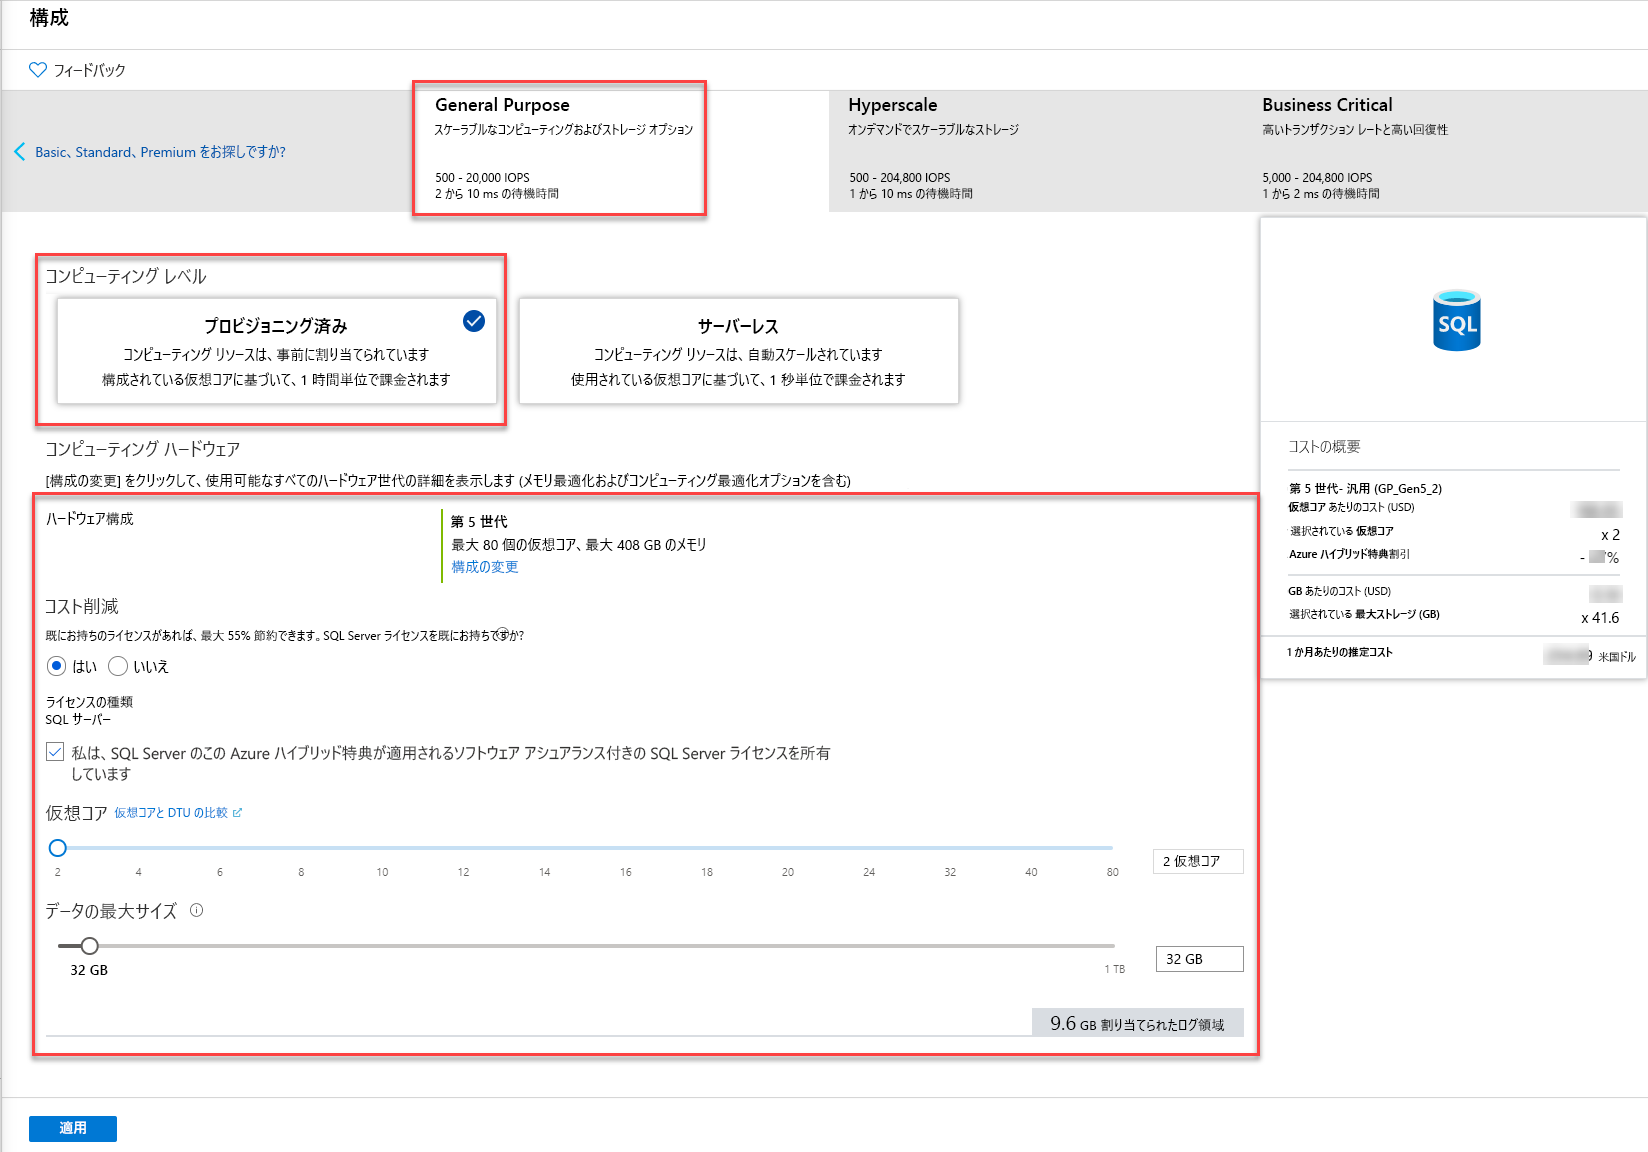
下の画像は、データベース オプションを構成できるポータル ブレードを示しています。 ここでは、サービス レベルが [汎用]、コンピューティング レベルが [Provisioned](プロビジョニング済み) であることがわかります。 [Provisioned](プロビジョニング済み) が示すのは、コンピューティング リソースが事前に割り当てられていて、構成済みの仮想コア数に基づいて時間単位で課金されるということです。 もう一方のオプションは [サーバーレス] です。これについては前に説明しました。 サーバーレスは、使用される仮想コアの数に基づいて、秒単位で課金されます。

PowerShell または CLI を使用して Azure SQL データベースをデプロイする
データベースは、Azure PowerShell または Azure CLI を使用してデプロイすることもできます。 下の画像は、新しいリソース グループを作成し、SqlAdmin という管理者を定義して、新しいサーバー、データベース、ファイアウォール規則を作成する PowerShell サンプルを示しています。
# Connect-AzAccount

# The SubscriptionId in which to create these objects
$SubscriptionId = ''

# Set the resource group name and location for your server
$resourceGroupName = "myResourceGroup-$(Get-Random)"
$location = "westus2"

# Set an admin login and password for your server
$adminSqlLogin = "SqlAdmin"
$password = "ChangeYourAdminPassword1"

# Set server name - the logical server name has to be unique in the system
$serverName = "server-$(Get-Random)"

# The sample database name
$databaseName = "mySampleDatabase"

# The ip address range that you want to allow to access your server
$startIp = "0.0.0.0"
$endIp = "0.0.0.0"

# Set subscription
Set-AzContext -SubscriptionId $subscriptionId

# Create a resource group
$resourceGroup = New-AzResourceGroup -Name $resourceGroupName -Location $location

# Create a server with a system wide unique server name
$server = New-AzSqlServer -ResourceGroupName $resourceGroupName `
 -ServerName $serverName `
 -Location $location `
 -SqlAdministratorCredentials $(New-Object -TypeName System.Management.Automation.PSCredential -ArgumentList $adminSqlLogin, $(ConvertTo-SecureString -String $password -AsPlainText -Force))

# Create a server firewall rule that allows access from the specified IP range

$serverFirewallRule = New-AzSqlServerFirewallRule -ResourceGroupName $resourceGroupName `
 -ServerName $serverName `
 -FirewallRuleName "AllowedIPs" -StartIpAddress $startIp -EndIpAddress $endIp

# Create a blank database with an S0 performance level

$database = New-AzSqlDatabase -ResourceGroupName $resourceGroupName `
 -ServerName $serverName `
 -DatabaseName $databaseName `
 -RequestedServiceObjectiveName "S0" `
 -SampleName "AdventureWorksLT"
次のように、Azure SQL データベースをデプロイするために Azure CLI を使用することもできます。
#!/bin/bash

# set execution context (if necessary)
az account set --subscription <replace with your subscription name or id>

# Set the resource group name and location for your server
resourceGroupName=myResourceGroup-$RANDOM
location=westus2

# Set an admin login and password for your database
adminlogin=ServerAdmin
password=`openssl rand -base64 16`

# password=<EnterYourComplexPasswordHere1>

# The logical server name has to be unique in all of Azure
servername=server-$RANDOM

# The ip address range that you want to allow to access your DB
startip=0.0.0.0
endip=0.0.0.0

# Create a resource group
az group create \
 --name $resourceGroupName \
 --location $location

# Create a logical server in the resource group
az sql server create \
 --name $servername \
 --resource-group $resourceGroupName \
 --location $location \
 --admin-user $adminlogin \
 --admin-password $password

# Configure a firewall rule for the server

az sql server firewall-rule create \
 --resource-group $resourceGroupName \
 --server $servername \
 -n AllowYourIp \
 --start-ip-address $startip \
 --end-ip-address $endip

# Create a database in the server
az sql db create \
 --resource-group $resourceGroupName \
 --server $servername
 --name mySampleDatabase \
 --sample-name AdventureWorksLT \
 --edition GeneralPurpose \
 --family Gen4 \
 --capacity 1 \

# Echo random password
echo $password
Azure Resource Manager テンプレートを使用して Azure SQL データベースをデプロイする
前に述べたとおり、リソースをデプロイする別の方法は Azure Resource Manager テンプレートの使用です。 Resource Manager テンプレートを使用すると、リソースを最も細かく制御できます。Microsoft は "Azure クイックスタート テンプレート" という GitHub リポジトリを提供しています。ここには、お客様のデプロイで参照できる Azure Resource Manager テンプレートがホストされています。 GitHub ベースのテンプレートをデプロイする PowerShell サンプルを次に示します。
#Define Variables for parameters to pass to template
$projectName = Read-Host -Prompt "Enter a project name"
$location = Read-Host -Prompt "Enter an Azure location (i.e. centralus)"
$adminUser = Read-Host -Prompt "Enter the SQL server administrator username"
$adminPassword = Read-Host -Prompt "Enter the SQl server administrator password" -AsSecureString
$resourceGroupName = "${projectName}rg"

#Create Resource Group and Deploy Template to Resource Group
New-AzResourceGroup -Name $resourceGroupName -Location $location

New-AzResourceGroupDeployment -ResourceGroupName $resourceGroupName `
 -TemplateUri "https://raw.githubusercontent.com/Azure/azure-quickstart-templates/master/101-sql-logical-server/azuredeploy.json" `
 -administratorLogin $adminUser -administratorLoginPassword $adminPassword

Read-Host -Prompt "Press [ENTER] to continue ..."